Table of Contents
Advertisement
Quick Links
Advertisement
Table of Contents

Related Manuals for Boly Media SG520 Series


Summary of Contents for Boly Media SG520 Series
- Page 1 Infrared Digital Scouting Camera User Manual SG520 Series...
-
Page 2: Table Of Contents
Content 1 Instruction ............1 1.1 Camera Body Interface ........1 1.2 General Description ......... 2 1.3 Shooting Information Display ......... 2 1.4 Saving Images or Videos ........3 1.5 Cautions ........... 3 2 Quick Start Guide ..........5 2.1 Power Supply ..........5 2.2 Insert the SD card ........... -
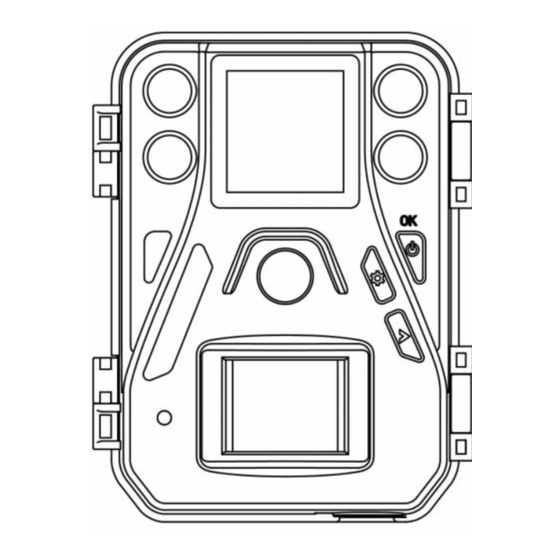
Page 3: Instruction
SG520 Series 1 Instruction 1 Instruction 1.1 Camera Body Interface Page 1... -
Page 4: General Description
SG520 Series 1 Instruction 1.2 General Description This camera, a digital scouting camera with four 940nm black IR LEDs, is a digital infrared surveillance camera, triggered by any movement of animals or humans monitored by a high sensitive Passive Infrared (PIR) -
Page 5: Saving Images Or Videos
SG520 Series 1 Instruction 1.4 Saving Images or Videos The camera uses a standard SD (Secure Digital) memory card to save images (in .jpg format) and videos(in .avi format). SD and SDHC(High Capacity) cards up to 32GB are supported. Before inserting the SD card be sure that the SD card is unlocked. - Page 6 SG520 Series 1 Instruction ★ (Only for SG520-W) Please insert the SD card with wireless WIFI, if you want to use the WIFI function. ★ Please do not insert or take out the SD card when camera is working. ★ It is recommended to format the SD card by camera when used for the first time.
-
Page 7: Quick Start Guide
SG520 Series 2 Quick Start Guide 2 Quick Start Guide 2.1 Power Supply Use 4 AA batteries or 6V external power supply to support the camera. high-capacity high-performance alkaline batteries (recommended), rechargeable Lithium batteries or rechargeable Nimh batteries. 2.2 Insert the SD card Open the lock, insert SD card into the card slot. - Page 8 SG520 Series 2 Quick Start Guide 1.2 Install the APP in your device. The icon appeared , means installing is completed; 1.3 Turn on the WIFI button. When the camera is turned on, in any modes, press the “ON” button on the wireless WIFI remote control;...
-
Page 9: Power On
SG520 Series 2 Quick Start Guide In WIFI mode, the indication LED (red) will be steady until turn off WIFI. 2.For Windows PC/Mac PC: 2.1 Fill in the below URL on your browser. http://www.toshiba.co.jp/p-media/wwsite/flashair.htm 2.2 Click ‘Configuration Software Download’, and saving APP in your local storage. -
Page 10: Power Off
SG520 Series 2 Quick Start Guide record a video and again to stop a video. Key Notes: “OK”: turn on the camera, save settings and go to next item, playback image or video in preview mode, wake up the camera in hunting mode. -
Page 11: Item Settings
SG520 Series 3 Item Settings 3 Item Settings 3.1 Camera Menu To view the camera settings menu, press “MENU” to enter into setup mode. Use “RIGHT” key to select the different options, press “OK” to save and go to next item and “MENU”... - Page 12 SG520 Series 3 Item Settings Advanced Description Menu Video Length Choose duration of recording video. It has three values: 10s, 30s and 60s. Time lapse means the camera can capture images or videos at a preset time interval regardless of whether motions are detected.
-
Page 13: Default Setting
SG520 Series 3 Item Settings will be deleted, so make sure that you have made a backup of important data. Version Version information. Default Set Restore all settings to default values. 3.2 Default Setting Setting Items Default Options Submenu Suomi... -
Page 14: Playback Mode
SG520 Series 3 Item Settings 30 Sec 1Min 5 Min Format SD Enter Version Enter Default Set Enter 3.3 Playback Mode Press “OK” to enter into playback mode, images can be viewed on the LCD screen of camera, but videos can only be played on your computer. -
Page 15: Trouble Shooting
SG520 Series 4 Trouble Shooting 4 Trouble Shooting 1 There is something in front of the camera lens. Is the camera broken? A: The camera is not broken. It’s an IR-cut filter. When the camera is powered on, the IR-cut will be reset and cover the lens. -
Page 16: Pir Detection Zone
SG520 Series 5 PIR Detection Zone 5 PIR Detection Zone This camera has a new design of PIR and the new PIR is patented. The new patented PIR’s detection range can reach to 85ft in good environments. Following picture shows the compared detection zone between normal PIR and the new patented PIR. -
Page 17: Technical Specifications
SG520 Series 6 Technical Specifications 6 Technical Specifications 5MP CMOS Sensor Image Sensor 10MP, 12MP Interpolation F/NO=2.2 Lens FOV(Field of View)=55° PIR detection range 85ft Display Screen of 1.44” LCD Remote Control Memory Card Up to 32 GB 12MP=4032×3024 Image Resolution 10MP = 3648 ×2736... -
Page 18: Parts List
SG520 Series 7 Parts List 7 Parts List Part Name Quantity Camera Belt User Manual Warranty Card Version 1.0 Page 16...
Need help?
Do you have a question about the SG520 Series and is the answer not in the manual?
Questions and answers