Quickie QM710 Instructions For Use Manual
Hide thumbs
Also See for QM710:
- Owner's manual (98 pages) ,
- Owner's manual (31 pages) ,
- Owner's manual (32 pages)
Table of Contents
Advertisement
Quick Links
Advertisement
Table of Contents

Subscribe to Our Youtube Channel
Related Manuals for Quickie QM710


Summary of Contents for Quickie QM710
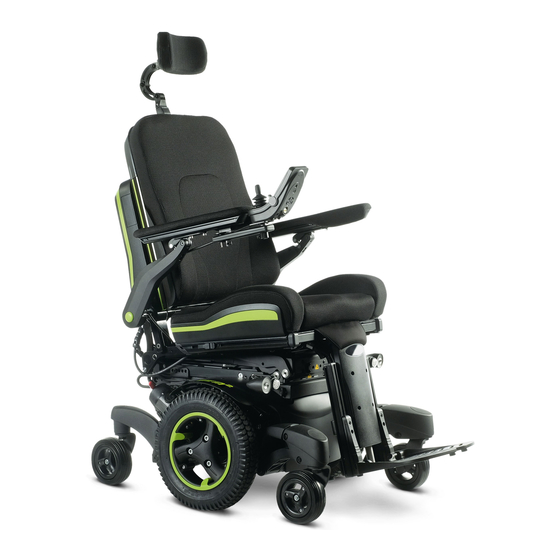
- Page 1 Powered Wheelchair Instructions for Use Quickie Jive Up QM710 STAND UP 000690706...
- Page 2 IF YOU ARE VISUALLY IMPAIRED, THIS DOCUMENT CAN BE VIEWED IN PDF FORMAT AT WWW.SUNRISEMEDICAL.COM OR ALTERNATIVELY IS AVAILABLE ON REQUEST IN LARGE TEXT. FOR FURTHER INFORMATION ON THE FULL SPECIFICATION AND OPTIONS AND ACCESSORIES PLEASE REFER TO THE ORDER FORM. ALL INFORMATION IS SUBJECT TO CHANGE WITHOUT NOTIFICATION.
-
Page 3: User Information
Indications elderly people who still have the strength in the upper The Quickie Jive Up / QM-710 Stand Up wheelchair with body. Standing function is specifically developed for people • Persons who are mentally and physically able to who have lost to their ability to stand (e.g. - Page 4 • Gastrointestinal complications: As with breathing, Positioning Belt: standing also reduces the pressure on the digestive Quickie positioning belts are designed to position the user system. This facilitates digestion (intestinal peristalsis) only and will not protect you in an accident. You may even and helps with the improvement of bowl and bladder receive further injury from the belts.
- Page 5 FOOT RESTS CASTORS Due to its modular design, simplicity and wide range of adjustments, the Quickie Jive is a perfect choice for easy service, refurbishment and recycle requirements. As a part of our ongoing product improvement initiative, Sunrise Medical reserves the right to change specifications and design without notice.
-
Page 6: Table Of Contents
14.11 Recommended maintenance routines 6.0 Seating 15.0 Specification sheets 6.1 Seat cushions 15.1 Model: Quickie Jive Up / QM-710 Stand Up 6.2 Changing seat depth on the Jive Up seat 6.3 Changing seat height 16.0 Service History 6.4 Removable seat covers 6.5 JAY backrests... -
Page 7: Your Wheelchair
The guarantee form is included in the Sunrise Pack. The Quickie has been designed for use by an individual Please fill in the relevant details and return to us to on a daily basis. It is suitable for both indoor and outdoor register your entitlement. -
Page 8: Label Explantation / Word Definitions
4) Any repaired or replaced part will benefit from these 3.0 Label Explantation / Word definitions arrangements for the balance of the warranty period applicable to the wheelchair. 3.1 Definitions of words used in this manual 5) Parts replaced after the original warranty has expired are covered for a further twelve months. - Page 9 WARNING – Danger of finger entrapment back into the lock position to hold the seat upright. QUICKIE Jive Up / QM-710 Stand Up SN JIVE XXXXXXXX The serial number and information label is located on the front right hand side of the main frame.
-
Page 10: General Safety Warning And User Tips
4.0 General safety warning and user tips 4.4 Routine service The recommended service interval is one year. (See 4.1 General warnings service history table in section 16). 4.5 Emergency freewheel WARNING! • Always ensure that your wheelchair is switched off before attempting to mount or dismount. -
Page 11: Emergency Braking
4.7 Emergency braking WARNING! There are three ways to stop your wheelchair: Avoid contact with acid on damaged sealed type 1. Simplest and safest way to stop the wheelchair is to batteries or wet batteries. Battery acid can cause burns release the joystick (see Hand Control section 7). -
Page 12: Wheelchair Motors
4.12 Wheelchair motors 4.14 Road use After prolonged use, the motors will produce heat, which Please show the utmost consideration for the other traffic is radiat ed through the motors’ outer casing. on the road. DANGER! WARNING! Remember that the last thing a car or lorry driver expects Do not touch the motors’... -
Page 13: Transfer To And From The Chair
4.17 Transfer to and from the chair WARNING! WARNING! • In certain circumstances your wheelchair could become unstable. Before attempting to climb or • Sunrise Medical recommend that you consult your descend a slope or a kerb, caution should be taken healthcare professional for assistance in developing when using weight shift options (e.g. -
Page 14: Using A Vehicle Mounted Passenger Lift
NOTE: The solid state controller has the benefit of a logic 4.25 Stability of your wheelchair system that will help compensate when driving along a Please follow the user instructions in this manual camber or up a hill. This is an added safety feature on regarding the use of standing modules and the use of your wheelchair. -
Page 15: Wheels
4.27 Wheels 4.30 Lights and indicators DANGER! WARNING! Always use the pump that is supplied with the chair, Ensure that the lights and indicators are functioning Never use a forecourt pump. correctly and lens are clean before going outdoors at Inspect all tyres regularly for signs of wear. -
Page 16: Kerb Climbing
4.33 Kerb climbing 4.33.2 Dismounting the kerb. WARNING! WARNING! Always approach a kerb at 90° (Fig 4.3). Move the chair slowly and carefully in a forward direction until both front wheels are on the edge of the kerb, again Approach the kerb (step) head on driving forwards slowly in a 90°... -
Page 17: Lap Strap
4.34 Lap strap Put a washer on the bolt. Fig.4.11 Fig.4.4 Pass the bolt through the lap The 5 cm (2“) Aircraft Buckle lap strap. (Fig. 4.2). strap fixing bracket. Put the next washer on to the bolt, (Fig. 4.11). Fig.4.12 Screw the bolt into the lowest Fig.4.5... -
Page 18: Preparing Your Wheelchair For Use
5.0 Preparing your wheelchair for use WARNING! 5.1 Handling the wheelchair Never lift the wheelchair by the armrests or the leg rests, since they are detachable and harm could be done to the NOTE: To dismantle the chair for transport or storage no user or to the wheelchair. -
Page 19: Drive Wheel Suspension Jive Up / Qm-710 Stand Up
5.5 Control joystick unit position: Depending on your chosen control system, there are two principles of control systems: Quickie VR2 and Quickie R- net controls (for details please see the controls section 7). The remote is mounted on a sliding mechanism which enables the control to be moved forwards and backwards. -
Page 20: Standard Armrests
5.7 Standard Armrests: 5.7.1 Armrests-removing and replacing (Standard Seat). The armrests on both sides of the wheelchair can be flipped up to allow side transfer, (Fig. 5.9). For side transfer flip the armrest all the way up until it goes Fig. - Page 21 2.Basic coarse adjustment. PART 1 1. To achieve more than one inch of adjustment, remove the 6mm armrest rotation bolts on both sides of the seat, (Fig.5.14). 2. Remove both armrest assemblies. (Fig.5.15) 3. Remove both sets of 4mm armrest adjustment ring bolts.(Fig.5.16) 4.
-
Page 22: Leg Rests And Foot Plates
5.8 Leg Rests and Foot Plates Fig.5.21 WARNING! • Be aware of your environment to make sure you do not injure your legs when Leg Rests are extended. • Always ensure that the Leg Rests or foot plates do not come into contact with the castors before driving the wheelchair. -
Page 23: Powered Center Mount Leg Rest, (R-Net)
5.9 Powered Center mount leg rest, (R-Net): Fig.5.23 See Fig. 5.23-5.25 WARNING! There is an option on the programme of the leg rest that MODE PROFILE allows you to send the footrest to the floor to allow for easier mounting and dismounting for the user. Be aware that when powered the area around and underneath the footplate needs to be clear of all personal items and bodily extremities to prevent injury or damage to... -
Page 24: Powered Seat Lifting
5.11 Powered seat Lifting: 5.12 Powered seat Tilting: The seat can lift up to 20 cm by operating it through your The seat can be tilted by operating your control system. control system. WARNING! WARNING! Before operating the seat function, ensure that the immediate area around the wheelchair is clear of Before operating the seat lift function ensure that possible obstructions, (eg wall shelving), and potential... -
Page 25: Leg Rests
5.13 Leg Rests 5.14 Front Knee Fixation (Fig.5.27-5.28) To remove: WARNING! • Grip and squeeze the Red ever on the inside edge of the front knee fixation assembly. There is an option within the programming of the leg • Gently lift the assembly up and out of the reciever. rest that allows you to send the footrest to the floor to allow for easier mounting and dismounting for the user. -
Page 26: Seating
6.0 Seating 6.3 Changing seat height 6.1 Seat cushions There are four adjustable seat posts, one at each corner Seat cushions supplied by Sunrise Medical will have of the drive base, (Fig.6.2). Velcro® strips that correspond to patches on the seat. The posts are held in place by bolts inserted through adjustment holes. -
Page 27: Headrest (Fig.6.3)
6.6 Headrest (Fig.6.3) 6.7.2 Powered seat lift To fit the headrest, fit the location bracket to the backrest The seat can lift up to 20 cm by operating it through your bracket, using the screws and nuts supplied, ensuring control system. that they are fully tightened. -
Page 28: Stand Up And Related Functions
• To adjust the length of the chest strap use the buckles on both sides of the straps. Fig.7.2 7.2 Electric Standing function The Quickie Jive Up / QM-710 Stand Up has an electric Standing function. This function makes it possible for the user to stand up in the wheelchair. WARNING! •... -
Page 29: Seat Memory Position
7.7 Seat Memory Position Fig.7.4 The control system on the Jive Up / QM-710 Stand Up has 5 predefined seat memory positions. Each memory location has a set of factory seat positioning presets: Seating, Stand-Up, Lie-Down, Transfer and Relax. There PROFILE MODE is a 6th Memory position (Custom Position) that can be... - Page 30 7.7.2 Return to drive mode Fig.7.7 Press the ”Mode” button one or more times until a standard display image with speed indicator appears in the LCD control panel display. 7.7.3 Saving a new position to memory 1. Remove the rear cover of the backrest and connect a Switch with a 3,5mm Jack to the socket on the 12V potentiometer power supply box, (Fig.
-
Page 31: Troubleshooting The R-Net Control
7.7.4 Delete custom programmed memory positions Battery Gauge flashes rapidly (even with the joystick released) Refere to Fig.7.7 - 7.10 on previous page. The control system safety circuits have operated and the control system has been prevented the wheelchair from moving. - Page 32 Self help guide, (Fig.8.1-8.2). If a system trip occurs you can find out what has happened by counting the number of LED’s on the battery gauge that are flashing. Go to the number on the list which matches the number of flashing bars and follow the instructions. Slow or sluggish movement - If the wheelchair does not travel at full speed or does not respond quickly enough and the battery condition is good, check the maximum speed setting.
-
Page 33: R-Net Control System
9.0 R-net Control System 10.2 Parallel swing-away general warnings, (Fig.10.1) 9.1 R-net control system information WARNING! An alternative control system called R-net is available for the wheelchair. • Before adjusting the swing-away arm, switch off the The R-net system has extended options and is suitable controller to avoid accidental displacement of the for individuals with complex needs or when there joystick which would cause unwanted movement of... -
Page 34: Attendant Control, (Fig.10.2)
10.3 Attendant control, (Fig.10.2) 10.6 Swing-away tray mounted centre control (R-net) The swing-away tray mounted centre control enables the hand control to be flipped over, providing a flat surface WARNING! when the tray is required and back around when the user requires access to the hand control •... -
Page 35: Speciality Controls
11.0 Speciality Controls 11.2 Driving with the head array (Fig 11.1) The head array uses 3 zero touch sensors for driving, 11.1 Proximity head array one in each head pad. The sensor in the centre of the headpiece controls WARNINGS forward and reverse. -
Page 36: Proportional Head Control
11.3 Proportional head control Fig. 11.2 Operation of the head control (Fig 11.2). 1. The drive is based on displacement of the headrest. A small amount of pressure must be exerted on the headrest to generate results. 2. Neutral position is when the headrest is not displaced. 3. -
Page 37: Proportional Chin Control (Fig.11.6)
12.0 Batteries and charging 11.6 Proportional chin control (Fig.11.6) The proportional chin control must be used in conjunction with the Omni Plus module. This is to give WARNING! visual feedback for the selection of drive profiles and seating options. • Please read the owner’s manual with the charger supplied carefully. -
Page 38: Safety Cut-Outs
To fit the batteries reverse the above procedure. Commonly two 12 volt batteries are used together in a mobility product, giving a total voltage of 24 volts. The 12.2 Safety cut-outs size of the battery (e.g. its available power) is expressed in amps per hour e.g. -
Page 39: Maintenance Free Battery Care Plan
12.6 Maintenance free battery care plan 12.7 General charger information The external charger has been designed to charge two CAUTIONS! 12V Gel type batteries connected in series (= 24 V). 1. Only use an approved Sunrise Medical charger 12.7.1 Charger safety features compatible with the vehicle to be charged. - Page 40 12.7.2 Procedure for connecting the charger and DANGER! charging • An extension cord should not be used unless • Connect the battery charger round output plug to the absolutely necessary. Use of an improper extension charging socket on the front of the joystick module, cord could result in a risk of fire and electric shock.
-
Page 41: The Range Of Your Vehicle
12.8 The range of your vehicle WARNINGS! Please refer to the specification tables at the back of this • Make sure the cord is located so that it will not be manual for Energy Consumption, (Maximum Range), stepped on, tripped over or otherwise subjected to information. -
Page 42: Transportation
13.0 Transportation DANGER! A wheelchair secured in a vehicle will not provide the • Alterations or substitutions must not be made to equivalent level of safety and security as a vehicle the wheelchair securement points or to structural seating system. Sunrise Medical recommends that and frame or components without consulting the the user transfers to the vehicle seating and uses the manufacturer. -
Page 43: User Weight Less Than 22 Kg
Due to the weight of the Jive wheelchair it is always DANGER! necessary to use a 6 strap tie down system, 4 straps at the rear of the wheelchair and 2 at the front. • The safety of the user during transportation depends A representative Jive Up / QM-710 Stand Up wheelchair upon the diligence of the person securing the tie has been tested in accordance with the dynamic... -
Page 44: Occupant Restraint Instruction
13.3 Occupant Restraint Instruction: Fig.13.6 • The pelvic restraint belt must be worn low across the front of the pelvis so that the angle of the pelvic belt is within the preferred zone of 30 to 75 degrees to the horizontal. -
Page 45: Using Your Wheelchair On The Train
13.5 Using your Wheelchair on the train: 13.7 Special shipping requirements: If you wish to use your wheelchair on the train, we The wheelchair may be transported by road, rail, sea or recommend that you contact the train operator in air and the batteries conform to IATA regulations. -
Page 46: Maintenance And Cleaning
14.0 Maintenance and Cleaning Fig. 14.1 CAUTION! It is important that you follow the following cleaning and maintenance schedule in order to keep your wheelchair in tip top condition. 14.1 Tyre maintenance and pressures 14.1.1 Tyre pressure CAUTION! If pneumatic tyres are fitted to your wheelchair it is important to regularly check the air pressure and for signs of wear. - Page 47 14.1.3 Drive wheel tyre repair Fig. 14.3 To remove the wheel/tyre: Please see below and next page for photographs. • Use a 8.0 mm hex key to loosen the 3-Socket studs, (Fig. 14.2). • Jack the wheel up and support it using blocks, •...
-
Page 48: Removing The Castor Wheels
Fig. 14.8 Fig. 14.7 Fig. 14.9 Fig. 14.10 Valve Gap 14.2 Removing the castor wheels. Fig. 14.11 • Use a 13.0 mm spanner/socket to undo the axle bolt, (Fig.14.11). • Remove the nyloc nut, (Fig.14.12). Refitting: When refitting do not try to force the bolt through. Gently move the wheel back and forth until the bolt slips through. -
Page 49: Cleaning And Your Wheelchair
14.4 Cleaning and your wheelchair CAUTION! The wheelchair should be wiped over once per week • Do not use solvents, bleaches, abrasives, synthetic with a slightly damp, not wet, cloth and any fluff or dust detergents, wax polishes or aerosols. that has accumulated around the motors should be •... -
Page 50: Lighting Maintenance
14.4.2 Cleaning controls 14.7 How to connect the cables to the batteries Should the control of your wheelchair become soiled or dirty, it can be wiped with a damp cloth with a dilute WARNING! disinfectant until clean. If you are in any doubt about performing any maintenance on your wheelchair, please contact your WARNING! Sunrise Medical authorised dealer. -
Page 51: Controller Access
Fig. 14.22 Fig. 14.19 Fig. 14.23 Fig. 14.20 Fig. 14.21 Fig.14.24 Fig.14.25 14.8 Controller access For the Jive Up / QM-710 Stand Up please follow the “battery access instruction in section 12. This also gives access to the Motor Control Module (Fig. 14.24) on Jive F. -
Page 52: Storage
14.9 Storage Weekly checks: When storing your powerchair for long periods of time Parking brake: (in excess of one week) first fully charge, and then This test should be carried out on a level floor with at disconnect the batteries, to minimise battery discharge. least one metre clearance all around the chair. - Page 53 WARNING! • If you are in any doubt about the performance requirements of your wheelchair contact your Sunrise Medical authorised dealer. • After performing any maintenance or repairs on the wheelchair you must make sure that it is functioning correctly before it is used. •...
-
Page 54: Specification Sheets
No restrictions on humidity and air pressure. Deutschland Tel.: +49 (0) 7253/980-0 Fax: +49 (0) 7253/980-222 kundenservice@sunrisemedical.de www.SunriseMedical.de 15.1 Model: Quickie Jive Up / QM-710 Stand Up ISO 7176-15 Comments Overall length (with legrest) 1070 mm 1130 mm With 50mm leg extesions fitted... -
Page 55: Service History
16.0 Service History 17.0 Disposal This section is designed to assist you in keeping a record The symbols below mean that in accordance with local of any service and repairs to your wheelchair. Should laws and regulations your product should be disposed you decide to sell or exchange your vehicle in the future, of separately from household waste. -
Page 56: Addendum 2.0 - Additional Information
ADDENDUM 2.0 ADDITIONAL INFORMATION TO THE OWNERS MANUAL FOR THE JIVE UP / QM-710 STAND UP Important! Please make sure that this additional information is always supplied with the chair if not already available in the standard Owners Manual. User Instructions for the upper chest strap on the JIVE UP / QM-710 STAND UP To assemble the chest strap the following tool is required: 5mm Allen key. - Page 57 Positioning: Seat the user in the chair into the correct seating position. Define the position for the chest strap. To do this, loosen the bolt with the Smm Allen Key and position the chest strap in the correct height on each side of the backrest. Tighten the bolts securely with 2,3 Nm. To prevent choking hazards the belt may not be adjusted too high or too low relative to the users body.
- Page 58 Usage: ATTENTION! This product is only to be used to position a single person in a wheelchair. It is not suitable for use as a transportation restraint. Failure to heed these warnings may result in severe injury or death. ATTENTION! An unintended opening of the chest strap can result in the user falling forward out of the chair.
- Page 59 Sunrise Medical GmbH & Co. KG Kahlbachring 2-4 Sunrise Medical GmbH & Co. KG 69254 Malsch/Heidelberg Kahlbachring 2-4 Deutschland 69254 Malsch/Heidelberg Tel.: +49 (0) 7253/980-0 Deutschland Fax: +49 (0) 7253/980-222 Tel.: +49 (0) 7253/980-0 www.SunriseMedical.de Fax: +49 (0) 7253/980-222 Sunrise Medical www.SunriseMedical.eu Thorns Road Místní:...
Need help?
Do you have a question about the QM710 and is the answer not in the manual?
Questions and answers
Sorry it GM 710 battery
How to change the battery on quickie gm 710
I bought used chair for my child. It has not turned on in couple years. I replaced battery and the light on the battery is just blinking. We cannot get the chair to turn on. Battery gauge flashes rapidly.