Table of Contents
Advertisement
WEATHER WALL CLOCK
« Instant Transmission+» is the up and coming state-of-the-art new wireless
transmission technology, exclusively designed and developed by LA CROSSE
TECHNOLOGY.
"IT +" offers you an immediate update of all your outdoor data measured from the
transmitters: follow your climatic variations in real-time!
FEATURES:
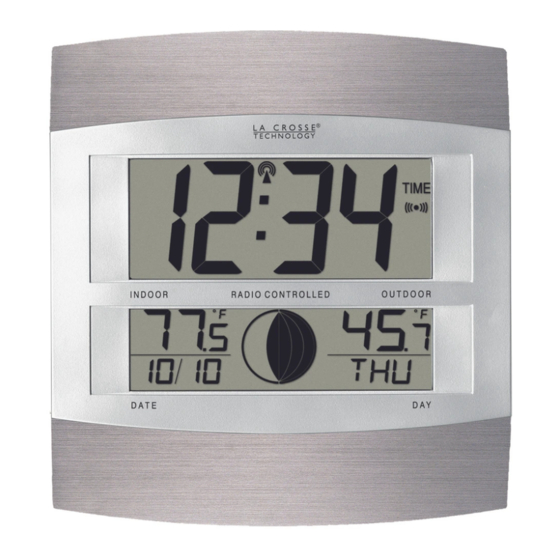
WEATHER WALL CLOCK:
LCD1
display
LCD2
display
•
DCF-77 Radio controlled time with manual setting option
•
24 hour time display
•
Time display: hour, minute, second
•
Alarm setting with snooze function
•
Calendar display
•
Weekday display (3 languages to choose from: German, English, and French)
Instruction Manual
19
Hanging holes
Function keys
Battery cover
Foldable stand
Advertisement
Table of Contents

Related Manuals for La Crosse Technology WS6158-IT


Summary of Contents for La Crosse Technology WS6158-IT
- Page 1 WEATHER WALL CLOCK Instruction Manual « Instant Transmission+» is the up and coming state-of-the-art new wireless transmission technology, exclusively designed and developed by LA CROSSE TECHNOLOGY. “IT +” offers you an immediate update of all your outdoor data measured from the transmitters: follow your climatic variations in real-time! FEATURES: WEATHER WALL CLOCK:...
-
Page 2: Outdoor Temperature Transmitter
• Weather forecasting with 3 weather icons • Weather tendency indicator • Time zone setting • ºC or ºF temperature display selectable • Indoor temperature display • Outdoor temperature display via 868MHz transmission • Low battery indicator • Signal reception intervals at 4-second •... -
Page 3: To Install And Replace Batteries In The Temperature Transmitter
TO INSTALL AND REPLACE BATTERIES IN THE TEMPERATURE TRANSMITTER The transmitter uses 2 x AA, IEC LR6, 1.5V batteries. To install and replace the batteries, please follow the steps below: Remove the cover. Insert the batteries, observing the correct polarity (see marking inside battery compartment). -
Page 4: Radio Controlled Time
the received time will override the manually set time. The date is also updated with the received time (Please refers to notes on “DCF Radio controlled time” and “Manual time setting”). Note: In the event of changing batteries of the unit ensure that the batteries do not spring free from the contacts. -
Page 5: Function Keys
• During nighttime, the atmospheric disturbances are usually less severe and reception is possible in most cases. A single daily reception is adequate to keep the accuracy deviation below 1 second. FUNCTION KEYS The weather wall clock has four easy to use keys: SET key : To enter into the set mode for the following setting: Time zone, language, hour, minute, year, month, day, weekday, ºC or ºF temperature display. -
Page 6: Manual Settings
MANUAL SETTINGS Note: If the weather wall clock has already successfully received the DCF time signal and displays the correct time and date, then the Manual settings can be skipped. After completion of the above described procedures in “Setting up”, the manual setting modes can be entered by pressing the SET key. -
Page 7: Manual Time Setting
Set the desired language for the weekday display in LCD 2 by use of the + key. Press and release the SET key to enter the mode “Manual Time Setting”. MANUAL TIME SETTING In case the weather wall clock is not able to detect the DCF-signal (disturbances, transmitting distance, etc.), the time can be manually set. -
Page 8: Date Setting
DATE SETTING The digits for the day will start flashing on LCD2 (Default setting 1). Set the desired day by use of the + key. Note: The data can only be set in conjunction with the selected month. For example, it is not possible to set the data 30 if the months of February is selected. -
Page 9: Exit The Manual Setting Modes
EXIT THE MANUAL SETTING MODES • To return to the normal display mode from anywhere in manual setting mode simply press the SNZ key anytime. • If no keys are pressed for about 15 seconds in setting mode, the weather wall clock will automatically switch back to normal display mode. - Page 10 THE WEATHER FORECASTING ICONS: There are 3 weather icons on the middle section of LCD 2, which can be displayed in any of the following combinations: SUNNY CLOUDY WITH SUNNY INTERVALS RAINY For every sudden or significant change in the air pressure, the weather icons will update accordingly to represent the change in weather.
-
Page 11: The Weather Tendency Indicator
mistake the new location as being a possible change in air-pressure when really it is due to the slight change of altitude. Again, disregard weather forecasts for the next 12 to 24 hours, as this will allow time for operation at a constant altitude. THE WEATHER TENDENCY INDICATOR Working together with the weather icons are the weather tendency indicators (located on the left and right hand side of the weather icons). - Page 12 Using other electrical products such as headphones or speakers operating on the same signal frequency (868MHz) may prevent correct signal transmission and reception. Neighbors using electrical devices operating on the 868MHz signal frequency can also cause interference. Note: When the 868 MHz signal is received correctly, do not re-open the battery cover of either the outdoor temperature transmitter or Weather wall clock, as the batteries may spring free from the contacts and force a false reset.
- Page 13 transmitter is not waterproof and should not be placed anywhere it will become submerged in water or be directly in the rain. POSITIONING THE WEATHER WALL CLOCK: There are two possible ways to mount the weather wall clock: • use of the foldout table stand, or •...
-
Page 14: Care And Maintenance
POSITIONING THE OUTDOOR TEMPERATURE TRANSMITTER The remote temperature transmitter can be placed onto any flat surface or wall mounted using the bracket which doubles as a stand or wall mount base. To wall mount: Secure the bracket onto a desired wall using the screws and plastic anchors. -
Page 15: Specifications
• Immediately remove all low powered batteries to avoid leakage and damage. Replace only with new batteries of the recommended size. • Do not make any repairs to the units. Please return it to the original point of purchase. Opening and tampering with the units may invalidate the warranty. SPECIFICATIONS: Temperature measuring range Indoor... -
Page 16: Liability Disclaimer
LIABILITY DISCLAIMER • The electrical and electronic wastes contain hazardous substances. Disposal of electronic waste in wild country and/or in unauthorized grounds strongly damages the environment • Please contact your local or/and regional authorities to retrieve the addresses of legal dumping grounds with selective collection •...
Need help?
Do you have a question about the WS6158-IT and is the answer not in the manual?
Questions and answers