Table of Contents
Advertisement
Advertisement
Table of Contents

Related Manuals for Avol ALT32G81M


Summary of Contents for Avol ALT32G81M
- Page 1 32" Multi System LCD TV Model No.: ALT32G81M Attention; Please Kindly refer to "TV Broadcasting system"(Page 9 of User's manual) for the choosing suitable TV broadcasting system as per your living area when you use this unit firstly.TV Color system is...
-
Page 3: Table Of Contents
Contents Contents Caution Safety Information Accessories Technical Specification Product Introduction Front View Wall Mounting Connections Remote Control Basic Operation OSD Menu 9-14 1. Channel menu 9-10 2. Picture menu 3. Sound menu 4. Time menu 5. OPTION menu Multimedia Operation 15-18 Simple Troubleshooting... -
Page 4: Caution
Caution Caution The lightning flash with arrowhead symbol, within an equilateral triangle is intended to alert the user to the presence of un-insulated “dangerous voltage” within the products enclosure that may be of sufficient magnitude to constitute a risk of electric shock to the persons. The exclamation point within an equilateral triangle is intend to alert the user to the presence of important operating and maintenance (servicing) instructions in the literature accompanying the appliance. -
Page 5: Safety Information
Safety Information Safety Information To ensure reliable and safe operation of this equipment, please read carefully all the instructions in this user guide, especially the safety information below . Electrical safety • The TV set should only be connected to a main supply which matches that stated on the label on the mains adaptor. -
Page 6: Accessories
Accessories & Technical Specification Accessories SOURCE CH.list PICTURE SOUND SLEEP ZOOM MUTE SUBTITLE DISPLAY VOL+ MENU VOL- EXIT TV/TXT SIZE SUBPAGE HOLD ROOT INDEX REVEAL NICAM/A2 SLOW LANG. GOTO REP. User’s Manual Remote control Din to F Connector Power Cord 220V Power Socket (Model no.: MA001) * Note: The configuration of the components may look different from the following illustration... -
Page 7: Product Introduction
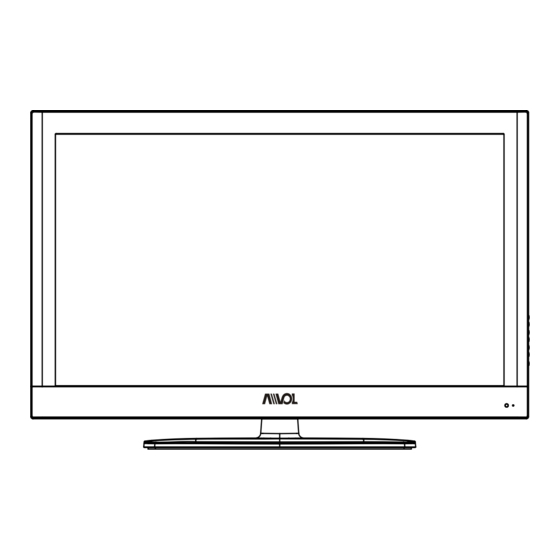
Product Introduction Product Introduction Front View & Led Indicator Remote Control window (Keep clear) POWER to turn on and off. Indicator on(Green) Power on mode SOURCE: MENU: CH+/-: Press to scan through channels. VOL+/-: POWER: Wall Mounting The TV is provided with mounting holes for a VESA approved wallmounting bracket (NOT SUPPLIED). Remove the Posi screws holding the base to the base bracket and lift the base away (do not remove the basemounting bracket).Mount the VESA bracket using 4xM4x10mm ISO metric threaded screws (not supplied). -
Page 8: Connections
Connections Connections SWITCH Turn on/off the power supply. AC POWER IN Connect to an earth 100-240V~ 50/60Hz outlet with the Power Cable. USB:Connect to USB device for multimedia and upgrading HDMI1/2/3: Connect it to the HDMI of DVD or other equipment. VGA:Connect to the PC VGA output to display PC graphics. -
Page 9: Remote Control
Remote Control Remote Control The remote control is using Infra-Red(IR). Point it towards the front of the LCD TV. The remote control may not work correctly if it is operated out of range or out of angle. POWER : Turn on/standby the TV SOURCE SOURCE : Press to display the input source menu... - Page 10 Remote Control Remote Control SOURCE CH.list PICTURE SOUND SLEEP ZOOM MUTE SUBTITLE DISPLAY ROOT: Come back to the home page. : Play program VOL+ MENU : pause program : Stop program VOL- : fast reverse EXIT : fast forward TV/TXT SIZE SUBPAGE HOLD...
-
Page 11: Basic Operation
Basic Operation Basic Operation Power on/off 1. Connect to the power supply with the power cord, and turn on the switch on the rear cabinet of TV. 2. -To turn on the TV Press POWER button on the TV or remote control. -To turn off theTV Press POWER button on the TV or remote control. -
Page 12: Channel Menu
OSD Menu OSD Menu 1. CHANNEL menu Description Auto Scan Press OK button to start auto tuning. You could press MENU/EXIT button to exit the process of tuning, there will be a hint on the screen, and you should press button to confirm, or press button to cancel the operation. -
Page 13: Osd Menu
OSD Menu OSD Menu Programme Edit Press OK button to enter the Programme Edit menu as the following picture. Delete: Select a channel and press RED button to delete. Swap: Select a channel, and press YELLOW button to highlight the channel, then you can use buttons to select the channel you want to be swapped, press OK button to confirm. -
Page 14: Picture Menu
OSD Menu OSD Menu 2. PICTURE menu Description Picture Mode: Choose from Standard, Dynamic, User and Mild. Note: Contrast, Brightness, Color and sharpness are only available and can be adjusted in the User mode option in the Picture Mode Settings. Contrast: Controls the difference between the brightest and darkest regions of the picture. -
Page 15: Sound Menu
OSD Menu OSD Menu 3. SOUND menu Description Sound Mode: Allows you to select among: Standard, Music, Movie, Sports and User. Treble(Can be adjusted when the sound mode is User): Controls the relative intensity of higher pitched sounds. Bass (Can be adjusted when the sound mode is set to User): Controls the relative intensity of lower pitched sounds. -
Page 16: Time Menu
OSD Menu OSD Menu 4. TIME menu Description Clock: Use the buttons to select the position, and use the buttons to set the time. Off Time: Press OK button to enter the submenu, you could set the time when the TV set will be turned off automatically, you could also set the frequency. -
Page 17: Option Menu
OSD Menu OSD Menu 5. OPTION menu Description OSD Language: Allows you to select menu language. TTX Language: Allows you to select teletext language. OSD Duration: Allows you to select the time for the OSD display on the screen. Blue Screen: Turn on/off the blue screen function when there’s no signal. Restore Dafault: Press OK button to restore factory default. -
Page 18: Multimedia Operation
Multimedia Operation Multimedia Operation Basic Operation 1). Press the SOURCE button on the remote control to display the input source menu, select USB source by the buttons, and press OK button to enter the Multimedia menu seen below. S-Video SCART YPBPR HDMI1 HDMI2... - Page 19 Multimedia Operation Multimedia Operation 1. Photo Play the photo Press DISPLAY button to display playing list. Press button to select the option on the table, and press OK button to change. Repeat: Select the repeat mode from Repeat All, Repeat 1, Repeat None. Playlist: Display the playlist on the screen, and you can select the photo by button, and press OK button to program.
- Page 20 Multimedia Operation Multimedia Operation 3. Movie Play the movie Press button to select the option on the table, and press OK button to change. Repeat ALL: Select the repeat mode from Repeat All, Repeat 1, Repeat None. None A-B: Select and play the preferable paragraph of the program by seting A and B at the beginning and end, and there will be a sign on the left screen, press OK button again to cancel.
- Page 21 Multimedia Operation USB Memory Device Compatiblity Supported Codec Remark Type File format The max Resoultion And Frame Rate:720p@30fps MJPEG MP3, Max Data Rate : 10Mbps WMA, MPEG-4 Movie file format AAC, MPEG-2 The max Resoultion And Frame MP2, XVID Rate:720p@30fps MPEG-1 Max Data Rate : 20Mbps MPEG-2...
-
Page 22: Simple Troubleshooting
Simple Troubleshooting Simple Troubleshooting If the display fails or performance dramatically deteriorates check the Display in accordance with the following instructions.Remember to check the peripherals topinpiont the source of the failure. If the display still fails to perform as expected,connect your helpline for assistance. No power - Check SWITCH on rear cabinet of TV. - Page 25 32D3 32D6底座安装说明 A5尺寸 200g铜版纸印刷 Instructions for fixing TV stand Note: the pictures below are only for reference The parts Installation needed for installing the stand (supplied) (Put your TV on the table with its rear cabinet facing upwards.) 1. Insert the stand into TV set Rear cabinet of TV 2.
Need help?
Do you have a question about the ALT32G81M and is the answer not in the manual?
Questions and answers