Gamma 5003 Owner's Manual
6 point sc mounting
Hide thumbs
Also See for 5003:
- Owner's manual (24 pages) ,
- Owner's manual (20 pages) ,
- Owner's manual (19 pages)
Table of Contents
Advertisement
Advertisement
Table of Contents

Related Manuals for Gamma 5003


Summary of Contents for Gamma 5003
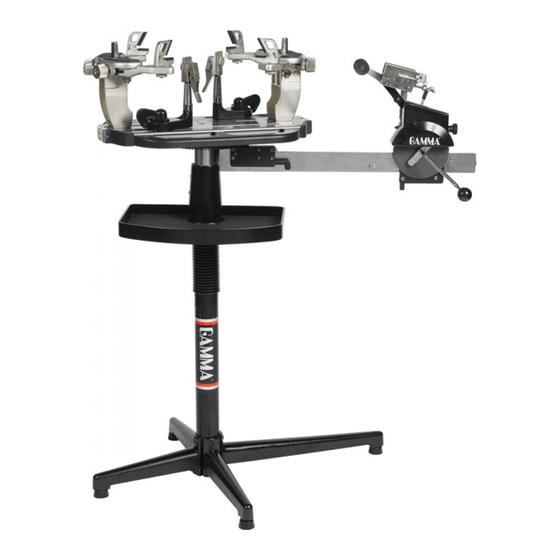
- Page 1 5003 STRINGING MACHINE 6 POINT SC MOUNTING OWNER’S MANUAL Issue 1 - April 2010...
-
Page 2: Table Of Contents
GAMMA will at its option, repair or replace the defective EQUIPMENT provided it is returned to GAMMA prepaid at the purchaser’s expense. This warranty does not apply to any damage or defect caused by negligence, abuse, misuse, unauthorized alteration, shipping, handling or part wear and tear as a result of normal use. -
Page 3: Features
FEATURES MACHINE FEATURES Manual Spring Tension Winder w/ 11 to 89 lbs Tension Range Patented Roller Guide for Maximum Accuracy and Consistency Parallel Jaw Gripper w/ Diamond Dust Coated Gripping Sur- faces Professional Six Point Self-Centering “Quick Mount” Racquet Mounting System- Accommodates All Racquets Professional “Quick Action”... -
Page 4: Package Contents
The Mounting System Carton has the turntable, clamps and mounting system. Please save the cartons and packing materi- als for possible shipments in the future. Gamma Sports cannot be responsible for machines that are not returned, shipped in their original, undamaged packaging. The tools you will need to assemble the machine are provided with the machine. -
Page 5: Assembly Instructions
The stringing machine uses a four leg base design. The legs must be assembled to the lower column support before use. This is the larger of the two posts with the GAMMA label. Note: For illustration purposes, the support column has been painted white for these instructions. - Page 6 ASSEMBLY INSTRUCTIONS Bellows Installation The bellows assembly is supplied in two pieces and should be assembled as follows. Place the bellows section with the flange over the upper support column with the flange on the top. Place the remaining bellows over the upper support column and mate it with the flange on the lower bellows.
- Page 7 ASSEMBLY INSTRUCTIONS Turntable and Mounting System Installation To install the turntable remove the four nuts holding the mounting bolts in place during shipment. Position the turntable over the turntable pin and align the bolts with the holes in the flange. Secure them with the included allen wrench.
-
Page 8: Mounting The Frame
ASSEMBLY INSTRUCTIONS Height Adjustment The turntable height can be adjusted to suit the stringer. To adjust, loosen the two set screws on the lower column support post below the bellows assembly. Adjust the amount of engagement between the upper and lower column supports until the desired height is attained. - Page 9 MOUNTING THE FRAME Adjusting the Frame Shoulder Sup- ports Being sure the shoulder supports are free to swivel in their mountings, simultaneously rotate the shoulder support adjustment knobs clockwise until both shoulder supports gently and squarely contact the frame. Securing the Frame Lock the shoulder supports in position by turning the knob at the base clockwise.
-
Page 10: Stringing The Frame
STRINGING THE FRAME Clamp Base Operation To lock the string clamp base to the turntable, rotate the clamp base locking lever clockwise. To release the string clamp base from the turntable, rotate the clamp base locking lever counter-clockwise. The locking lever should be tightened enough to prevent clamp base slippage on the turn- table when the desired tension is placed on the string. - Page 11 STRINGING THE FRAME Setting Tension The tensioner utilizes a rotary adjusting knob along with a linear tension scale to indicate the tension setting. The scale is divided into 3 lb. increments and each 1/3 turn of the ten- sion knob changes tension by 1 lb. To set the desired tension, rotate the tension knob and align the mark on the spring guide with the desired tension setting on the scale.
-
Page 12: Additional Features
STRINGING THE FRAME Pulling Tension Wrap the loose section of string once around the roller guide and insert the string between the diamond dust coated string gripper plates. Pull the string perpendicular to the gripper plates while slowly rotating the tensioner crank clockwise until the brake lever pops out of the latching block. -
Page 13: Pathfinder Awl
PATHFINDER AWL The machine includes the pathfinder string- ing awl which creates a pathway between or around strings to make inserting a string through blocked grommets easier and quicker. Insert the awl through the grommet hole in the same manner as for traditional awls. The pathfinder awl must be in the closed position before insertion. -
Page 14: Maintenance & Adjustment
MAINTENANCE & ADJUSTMENT Tension Calibration Procedure Set the tension to 60 lbs. as indicated by the linear scale and rotary knob. Place the string on one end of a tension calibrator into a string clamp and secure. Place string located on the other end of the calibrator into the string tensioner and apply tension. - Page 15 It can be accessed through the hole on the face of the tensioner cover (above the ‘GAMMA’ logo). Note: The tensioner cover does not need to be removed for the adjustment. The cover has been removed in the pictures for illustra- tion purposes.
- Page 16 MAINTENANCE & ADJUSTMENT Adjusting the String Clamp Jaw Spacing The string clamps will need minor adjustments according to what string type, construction, and gauge you are using. To adjust the gap (clamping pressure) between the clamp jaws, insert the string through the racquet as if you were beginning the main strings.
-
Page 17: Troubleshooting Tips
TROUBLESHOOTING TIPS PROBLEM SOLUTION String slips in clamps - Adjust gap between clamp jaws - Clean clamp jaws String slips in gripper - Clean gripper jaws - Adjust gripper jaw stop screw String clamp base slips on turntable - Clean bottom of clamp & top of turntable with alcohol - Adjust clamp base locking nut String tension too tight or too loose... -
Page 18: Parts List
PARTS LIST PART # DESCRIPTION TOOLS & ACCESSORIES CAP SCREW- M8x30 10MM WRENCH* FRAME SUPPORT SLIDE NEEDLE NOSE PLIERS* BENT NOSE PLIERS* TENSIONER ASSEMBLY RETAINER SCREW DIAGONAL CUTTERS* TOOL TRAY 17MM SOCKET* HEX WRENCH SET* LONG LEG SHORT LEG STRINGER’S AWL* FLAT HEAD SCREW- M8x25 MFSPP FRAME SUPP PADS... -
Page 19: Parts Drawing
PARTS DRAWING 148R MMSC MQAC MMSPP 148L 120A 116A MFSPP MBMSP... - Page 20 GAMMA SPORTS 200 Waterfront Drive Pittsburgh, Pennsylvania 15222 Phone: 800.333.0337 Fax: 412.323.0317 Visit our website at www.gammasports.com Copyright 2010 GAMMA Sports - All Rights Reserved...
Need help?
Do you have a question about the 5003 and is the answer not in the manual?
Questions and answers