
Subscribe to Our Youtube Channel
Related Manuals for Gamma 5002


Summary of Contents for Gamma 5002
- Page 1 5002 STRINGING MACHINE OWNER'S MANUAL Issue 1 / Version 1 June 23, 1998 Copyright 1998 GAMMA Sports - All Rights Reserved...
-
Page 2: Table Of Contents
(1) year from the date of purchase for string clamps. Should any defects develop under normal use within the specified time periods, GAMMA will at its option, repair or replace the defective EQUIPMENT provided it is returned to GAMMA prepaid at the purchaser's expense. This warranty does not apply to any damage or defect caused by negligence, abuse, misuse, unauthorized alteration, shipping, handling, or part wear and tear as a result of normal use. -
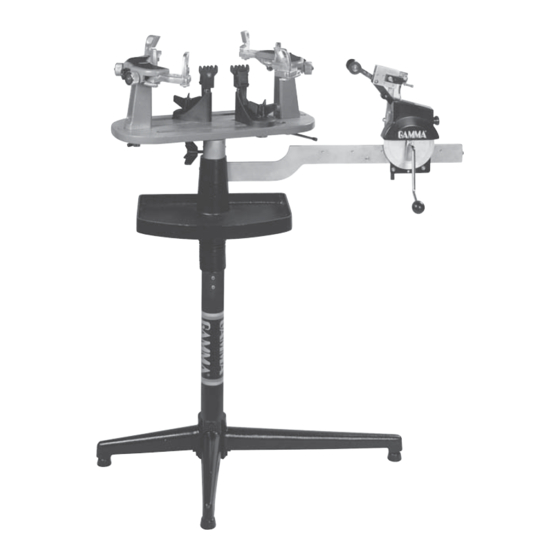
Page 3: Features
FEATURES Manual Spring Tensioner Diamond Coated String Gripper Tension Range: 11lbs. - 89lbs. 6 Point Mounting System Diamond Coated Dual Action Swivel Composite String Clamps Full 360 Degree Turntable Rotation Large Convenient 141 sq. in. Tool Tray Height Adjustable From 36” to 48”... -
Page 4: Assembly Instructions
ASSEMBLY INSTRUCTIONS Base Leg Assembly The GAMMA 5002 stringing machine uses a four leg base design. The legs must be assembled to the support post before use. Remove the lower column support from the carton. This is the larger of the two posts and has the GAMMA label. - Page 5 ASSEMBLY INSTRUCTIONS Bellows Installation The bellows assembly is supplied in two pieces and should be assembled as follows. Place the bellows section with the flange over the upper support column with the flange on the top. Place the remaining bellows over the upper support column and mate it with the flange on the lower bellows.
- Page 6 Insert the center post of the turntable into the bushing located in the top of the tensioner bar post. Installing the Frame Support Posts The GAMMA 5002 support post assemblies are precision aligned at the factory and are marked for proper installation on the turn- table.
- Page 7 ASSEMBLY INSTRUCTIONS Place the load bushing into the top of the clamp base mating it to the lower guide bushing. After checking that the thrust bear- ing is positioned correctly in the base of the winged lock knob, screw the knob into the base bushing until fully seated.
-
Page 8: Mounting The Frame
MOUNTING THE FRAME Adjusting the Frame Support Posts Place the racquet frame over the center posts and onto the frame support. Loosen the lever lock bolt on one support post. Slide the post outward until the center support of the racquet support slide is positioned near the inside surface of the racquet frame. -
Page 9: Stringing The Frame
Fixed Clamp Operation - Step 1 The fixed clamps for the GAMMA 5002 are of a dual action design. The string clamp and the clamp base operate independently of one another. - Page 10 STRINGING THE FRAME Fixed Clamp Operation - Step 2 Rotate the winged lock knob clockwise to secure the clamp base to the turntable. Reverse the clamping procedure to unlock the string clamp. The winged lock knob should be tightened enough to prevent clamp base slippage on the turntable, when the desired tension is placed on the string.
- Page 11 STRINGING THE FRAME Weaving the Cross Strings Weave the cross strings over and under the main strings being careful to alternate the weave direction of each consecutive cross string so as to be opposite of the previously installed cross string. Once the final cross string is tensioned and clamped, tie off at the appropriate hole speci- fied by the racquet manufacturer.
-
Page 12: Pathfinder Awl
PATHFINDER AWL The GAMMA 6002 includes the new Path- finder stringing awl which creates a pathway between or around strings and through tight grommets. Insert the awl through the grommet hole in the same manner as for traditional awls. The Pathfinder awl must be closed before inser- tion. -
Page 13: Care And Cleaning
- Check tension using a tension calibrator and adjust machine calibration if necessary For additional assistance, contact Gamma Sports Customer Service at 1-800-333-0337 CARE and CLEANING With time and use, the clamping surfaces of your machine may become oily or dirty and result in string or clamp slippage while stringing. - Page 14 MAINTENANCE Tension Calibration Procedure Step 1 Set the tension to 60 lbs. as indicated by the linear scale and rotary knob. Place the string on one end of a tension calibrator into a string clamp and secure. Place string located on the other end of the calibrator into the string tensioner and apply tension.
- Page 15 MAINTENANCE Adjusting the Tensioner Brake Step 1 After stringing many racquets, the brake of the tensioner may need to be adjusted. To tighten the braking mechanism, the cover of the tensioner must be removed. To remove the cover, remove the 2 button head screws located on the back side of the tensioner frame near the top of the frame, and the flat head screw located behind the tensioner...
- Page 16 COMPONENTS 120A 116A...
-
Page 17: Mounting Stand Parts
MOUNTING STAND PARTS PART # DESCRIPTION PART # DESCRIPTION WASHER - M8 MTNG. STAND PAD POST LOCKING LEVER SUPPORT ARM - LEFT WASHER - M10 SUPPORT ARM - RIGHT SUPPORT POST SHOULDER SUPP. LOCK KNOB FRAME SUPPORT SLIDE SUPP. ARM RETURN SPRING BADMINTON ADAPTER ARM ADJUSTMENT KNOB TENNIS ADAPTER... -
Page 18: Parts Listing
5002 Parts Listing Part # Description Cap Screw - M8 x 30 Washer - M8 Clamp Head Assembly Clamp Base Guide Bushing Guide Bushing Nut Load Bushing Radial Thrust Bearing Winged Knob Tensioner Assembly Wing Locking Knob Screw Tensioner Track...
Need help?
Do you have a question about the 5002 and is the answer not in the manual?
Questions and answers