Table of Contents
Advertisement
Quick Links
Download this manual
See also:
User Manual
Advertisement
Table of Contents

Related Manuals for Planet WDAP-W7200AC


Summary of Contents for Planet WDAP-W7200AC
- Page 1 1200Mbps 802.11ac Dual Band Wall-mount Wireless Access Point WDAP-W7200AC Quick Installation Guide...
-
Page 2: Table Of Contents
3.3 DIN-Rail Mounting Installation .............. 6 3.4 Magnet Installation ................8 3.5 Power on the Wireless AP ..............9 4. Wired Network Configuration (Windows 7) ...........10 5. Entering into the Web Management .............11 6. Wireless Network Connection ..............13 7. WDAP-W7200AC Installed with Wireless AP Controller ........14 Further Information: ..................16... -
Page 3: Package Contents
1. Package Contents Thank you for choosing PLANET WDAP-W7200AC. Before installing the AP, please verify the contents inside the package box. The package should contain the following items: WDAP-W7200AC 2.4GHz Antenna x 2 Quick Guide 5GHz Antenna x 2 DIN-rail Kit... -
Page 4: Hardware Description
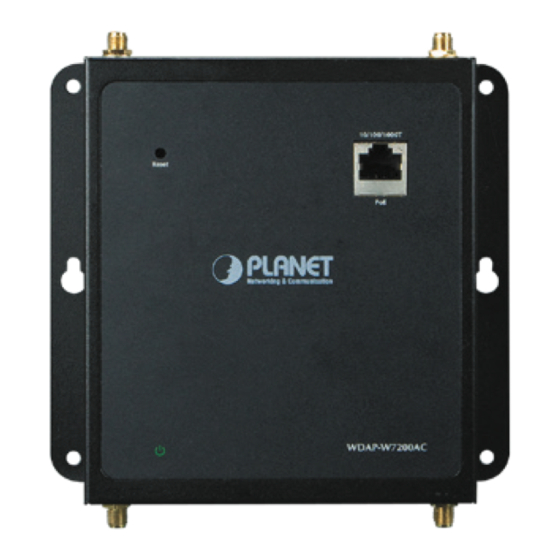
2. Hardware Description 5GHz Antenna Connector 5GHz 5GHz 10/100/1000T Reset Button PoE LAN Port Reset WDAP-W7200AC Power LED 2.4GHz 2.4GHz 2.4GHz Antenna Connector Reset: Press and hold the button for more than 10 seconds to reset to the factory default setting. -
Page 5: Hardware Installation
3. Hardware Installation 3.1 Antenna Installation Step 1 Connect the 2.4GHz antennas to the RP-SMA connectors of the WDAP- W7200AC that indicates “2.4GHz” on the bottom panel. 2.4GHz 2.4GHz Step 2 Connect the 5GHz antennas to the RP-SMA connectors of the WDAP- W7200AC that indicates “5GHz” on the top panel. 5GHz 5GHz... -
Page 6: Wall Mount Installation
Step 3 Screw the bolts into the conductor pipe. The WDAP-W7200AC is between bolts and conductor pipe, as shown below. Re set 10 /10 0/1 00 0T Po E W D AP -W 72 00 AC 3.3 DIN-Rail Mounting Installation The DIN-rail kit is included in the package. For the WDAP-W7200AC that needs to be DIN-rail mounted, please refer to the following figures:... - Page 7 Step 1 Screw the DIN-rail on the WDAP-W7200AC Step 2 Lightly press the button of DIN-rail into the track Push Click...
-
Page 8: Magnet Installation
0 0 0 P o E A P -W 7 2 0 0 A C 3.4 Magnet Installation To install the WDAP-W7200AC on a magnetic surface, simply follow the diagram below: Re set 10 /10 0/1 00 0T Po E... -
Page 9: Power On The Wireless Ap
3.5 Power on the Wireless AP Step 1 Plug the Ethernet cable into the PoE port. 10/100/1000T Reset WDAP-W7200AC Step 2 Plug the other end of the Ethernet cable into the PoE switch. 10/100/1000T Reset 802.3at PoE Switch WDAP-W7200AC Power Requirement: 802.3at 30W... -
Page 10: Wired Network Configuration (Windows 7)
4. Wired Network Configuration (Windows 7) A computer with wired Ethernet connection is required for the first-time configuration of the wireless AP. 1. Click the “Start” button located on the lower-left corner of your computer. 2. Click “Control Panel”. 3. Double-click the “Network and Sharing Center” icon. 4. Click “Change Adapter Settings”. 5. -
Page 11: Entering Into The Web Management
Default IP Address: 192.168.1.253 Default Username: admin Default Password: admin Default SSID (2.4GHz): Planet AP 2.4G Default SSID (5GHz): Planet AP 5G Step 1 The Web management allows you to access and manage the wireless AP easily. Launch the Web browser and enter the default IP address http://192.168.1.253. - Page 12 Step 3 After you enter into the Web User Interface, go to Setup Wizard to configure your wireless network. For security reasons, configuring the Encryption Method and Passphrase of your wireless network is strongly recommended. Step 4 Once the basic configuration of the WDAP-W7200AC is done, click the “Finished” button to make the change take effect.
-
Page 13: Wireless Network Connection
6. Wireless Network Connection Step 1 Right-click on the network icon displayed in the system tray. Step 2 Highlight the wireless network (SSID) to connect and click the [Connect] button. Step 3 Enter the encryption key of the WDAP-W7200AC if necessary. -
Page 14: Wdap-W7200Ac Installed With Wireless Ap Controller
7. WDAP-W7200AC Installed with Wireless AP Controller The WDAP-W7200AC can be managed from the computer via PLANET’s Wireless AP Controller. Follow the steps below to set up the WDAP-W7200AC from the operation mode to the managed AP mode. Step 1 Setting to “Managed AP” mode 1. Log in the WDAP-W7200AC’s Web User Interface. 2. Click “Operation Mode”. 3. Click “Managed AP”. 4. After setting it up, press “Apply Change”. In this mode, multiple WDAP-W7200ACs can connect directly or indirectly to the... - Page 15 Step 3 Launch the Web browser to Log in to the WAPC Wireless AP Controller Web pages. Configure the Wireless setting for the WDAP-W7200AC under “AP Control”. For information about configuring the WDAP-W7200AC in Managed AP mode by using PLANET Wireless AP Controller, refer to the user manual of the WAPC AP Controller series.
-
Page 16: Further Information
Further Information: The above steps introduce the simple installations and configurations of the WDAP- W7200AC. For further configurations of different operation modes, please refer to the user manual, which can be downloaded from the website. http://www.planet.com.tw/en/support/download.php?type1=4&model=48744&type=3 If you have further questions, please contact the local dealer or distributor where you purchased this product.
Need help?
Do you have a question about the WDAP-W7200AC and is the answer not in the manual?
Questions and answers