
Related Manuals for Homemaker LB-FS-40


Summary of Contents for Homemaker LB-FS-40
- Page 1 40cm Misting Fan User Manual Model No.: LB-FS-40 Item No.: 900285 Rev 3 Note: The specifications and/or components of this appliance are subject to change without prior notice.
-
Page 2: Table Of Contents
1 Safety Instructions ................. 3 2 Components ................... 5 3 Assembly ..................6 3.1 Base ........................6 3.2 Fan Head / Controller Assembly ..............8 3.3 Fan Blade and Safety Grille ................8 3.4 Misting Generator and Water Tank .............. 10 4 Filling the Water Tank .............. -
Page 3: Safety Instructions
1 Safety Instructions When using electrical appliances, basic safety precautions should always be followed, including the following: • Carefully read this instruction manual before using appliance. • Keep appliance out of reach of young children. • This appliance is not intended for use by persons (including children) with reduced physical, sensory or mental capabilities, or lack of experience and knowledge, unless they have been given supervision or instruction concerning use of the appliance by a person responsible for their safety. - Page 4 Do not operate appliance underneath or near flammable or combustible materials (e.g. • curtains). Keep at least 300mm clearance around sides, back, front and top. • Unplug this apparatus during lightning storms or when unused for long periods of time. •...
-
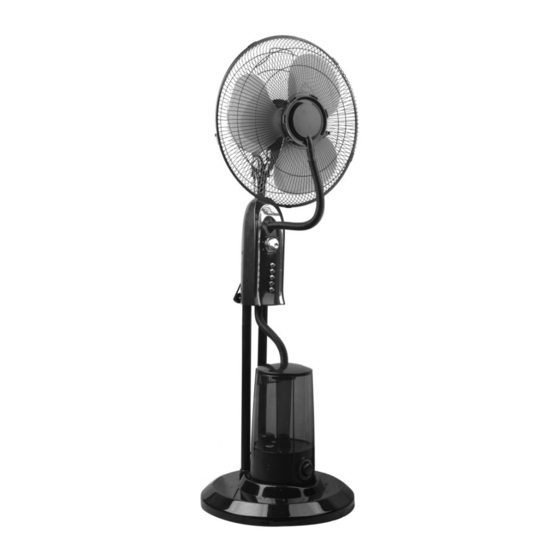
Page 5: Components
2 Components Fan Blade Safety Grille Mist Aperture Tilt Adjustable Neck Timer 3 Speed and Mist Function Push Button Control Flexible Mist Hose Water tank Misting Generator Base Page 5 of 16... -
Page 6: Assembly
3 Assembly Your Pedestal Fan has been boxed unassembled to minimise packaging waste. Each part is designed to fit together and be disassembled easily for cleaning or storage. 3.1 Base • To Assemble the Posts to the Base, first place the Heavy Base Weight on a flat level surface. - Page 7 • Whilst holding the posts in place, tip the Base up so that the underneath can be accessed. Take the domed Washer and the Screw and fit as shown. • • Using the small spanner supplied, tighten the screw. • Repeat on the other post.
-
Page 8: Fan Head / Controller Assembly
3.2 Fan Head / Controller Assembly • Take the Fan Head / Controller assembly and unscrew the two thumb screws located on the back. Do not fully unscrew otherwise the two nuts will fall off. • Locate the two holes on the underneath of the Fan Head / Controller assembly onto the two posts and push down until it stops. - Page 9 • Place the Fan Blade onto the motor spindle. Note: The groove in the rear centre of the fan blade aligns with a T-bar on the motor spindle to ensure correct positioning. Fix the blade into place by gently hand tightening the spinner anticlockwise onto •...
-
Page 10: Misting Generator And Water Tank
• Open up all locking clips on the front safety grille by rotating outward • Place the Front safety grille into position and secure it by closing the clips over the outer rim. The screw and nut at the bottom of the grille must be fitted. 3.4 Misting Generator and Water Tank •... - Page 11 • Fit the Top Cap to the top of the Water Tank. • Push the end of the flexible hose into the hole in the top of the cap and push in as far as you can. (Do not kink the hose) •...
-
Page 12: Filling The Water Tank
4 Filling the Water Tank Warning: Unplug the appliance during filling and cleaning. • To Fill the Water Tank, turn it upside down to access the filer cap. Unscrew the filler cap and lift it up to remove. Note the filler cap is tight so as to •... -
Page 13: Setting The Fan Head Angle
5 Setting the Fan Head Angle The Fan Head can be adjusted Up and Down so as to blow air at the required height. • To Adjust, whilst holding the Fan Grille to support it, unscrew the knob located on the side of the fan head assembly enough to allow the Fan Head to be tilted up or down. -
Page 14: Using The Misting Generator
6.2 Using the Misting generator Caution: Be careful when using the fan with the mist function on some types of surfaces as depending on the environmental conditions (i.e. humid days) the mist may cause the surface to become wet and slippery. Keep the surface dry at all times to prevent any injury from slipping over etc. -
Page 15: Oscillating Function
Note: Should the light turn Red during use when there is water still in the water tank, there may be an air lock preventing the water entering the mist generator. If this should happen, lift the water tank up and down just a little to allow the valve to open and allow the water to flow. -
Page 16: Warranty Against Defect
9 Warranty Against Defect 12 Month Warranty Thank you for your purchase from Kmart. Kmart Australia ltd warrants your new product to be free from defects in materials and workmanship for the period stated above, from the date of purchase, provided that the product is used in accordance with accompanying recommendations or instructions where provided.
Need help?
Do you have a question about the LB-FS-40 and is the answer not in the manual?
Questions and answers