Table of Contents
Advertisement
Quick Links
Advertisement
Table of Contents

Related Manuals for TomTom VIO


Summary of Contents for TomTom VIO
- Page 1 TomTom VIO User Manual...
-
Page 2: Table Of Contents
Starting your TomTom VIO ..................6 Connecting and pairing your VIO device ............... 7 Reconnecting your VIO device ................... 7 Connecting your VIO device to a different phone............7 Language ......................8 Sending information to TomTom ................8 About TomTom services ..................8 Updating your VIO .................... - Page 3 Planning a route using the map ................32 Planning a route using My Places ................33 Selecting a saved location on your VIO device ............. 34 Planning a route to a MyPlaces contact ..............35 Planning a route from your contacts app ..............35 Planning a route using coordinates ................
- Page 4 Appearance ....................... 58 Voices ......................58 Maps ........................ 59 Route Planning ....................60 Sounds and Warnings .................... 61 Phone Calls ......................61 Units ........................ 62 TomTom Account ....................62 System ......................62 Getting Help Support ......................63 Addendum Copyright notices...
-
Page 5: Welcome To Navigation With Tomtom
Your VIO is a device that you mount on your scooter, and an app for your smartphone. You can only use the device and app together - they won't work separately. You use the app to plan a route, and the route is shown on the device. -
Page 6: Get Going
Motorways - Choose whether you want to use motorways in your planned routes. Phone Calls - Your VIO can show you who is calling you. You only see this screen on the VIO app for iPhone because you must setup a second Bluetooth connection. This step is not required for Android phones. -
Page 7: Connecting And Pairing Your Vio Device
Connecting and pairing your VIO device Before you can use your VIO device and app, you must first connect your device to your phone using Bluetooth. To connect your device, do the following: 1. -
Page 8: Language
Downloading a map When you start the VIO you have to download a map. Choose a map from the list of maps shown for your current location. You can select All Maps to see a list of all the maps that are available. -
Page 9: Location Services
You can pause a map download at any time. If connection to Wi-Fi is lost, the download automati- cally pauses to prevent high data charges. You must keep the VIO open while paused or you will lose the part of the map you have already downloaded. You can use other apps while paused. -
Page 10: Charging Your Device
If the app is paused in the background for a long time your phone eventually closes the app. Resetting your VIO device To reset your VIO device, switch it off then press and hold the On/Off button for more than 20 seconds until the screen says "Resetting". -
Page 11: Incoming Calls
Incoming calls Your VIO device can show you when someone is calling you on your phone. If your contact has an image in your contacts list then you see the image on the device screen too. You can talk to the caller using your Bluetooth headset, if your headset supports hands-free calling. -
Page 12: What's On The Screen
Places locations and your contacts. Your location and your saved places are also shown on the VIO device. Your contacts are not shown. Your current location is shown as soon as your GPS location is found. You can use the app's map view in the same way as you might look at a traditional paper map. You can move around the map and zoom in and out using gestures. - Page 13 If you have planned a route, your complete route is shown on the map. You can add stops to your route directly from the map. When you start to drive, guidance is shown on your VIO device. 1. Speed cameras/Danger zones on your route. Select a speed camera danger zone to display information about that camera.
-
Page 14: The Vio Device Screen
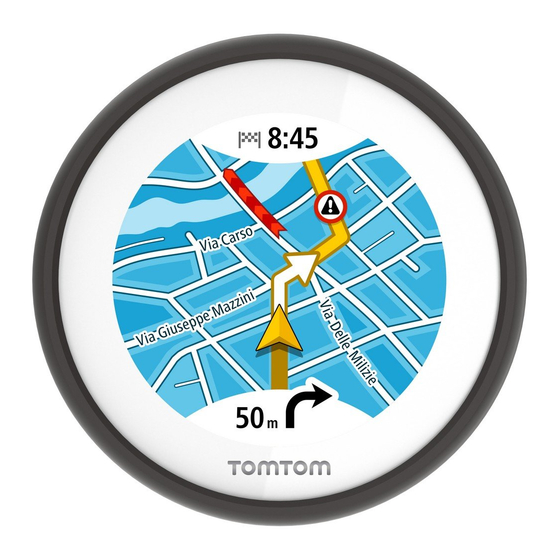
The VIO device screen The VIO device is installed on your scooter and you use it to guide you along the route to your destination. The device shows the route you planned on the VIO app, zoomed in to clearly show the details of the next part of your route. -
Page 15: The App Main Menu
Note: You can't plan a route to a new location on your device. Use the VIO app to plan new routes. 1. Map. When in map view, you can tap the map to zoom in and out. The same map symbols are shown on the device as on the map. -
Page 16: My Tomtom Vio
Menu. My TomTom VIO You can connect to your VIO device and set brightness and sound levels from the app. Select the following button on the app to open the My TomTom VIO screen: This button also shows the status of your VIO: connected, not connected or update required. -
Page 17: The Quick Menu
Not connected When your VIO device is not connected you see a message that says to make sure your device is in range and switched on. If your device does not connect automatically, tap try to pair again. If your... -
Page 18: Traffic
If there is a traffic incident on your planned route, your VIO checks to see if a faster route is available. An alternative route is shown on the map, and the time you save is shown at the top of the device map. -
Page 19: Looking At Traffic On Your Route
Tip: You see weather symbols on the map if there is bad weather such as heavy rain or snow. 3. The traffic delay in minutes on your planned route. 4. The alternative route to avoid the incident. Ride towards the alternative route to select it. VIO automatically calculates and shows your new route. -
Page 20: Traffic Incidents
Tap the map or the back button to close the information panel. Traffic incidents Traffic incidents and warnings are shown on the VIO app map and on the device. The expected delay time in minutes is shown in the symbol. If the reason for the jam is known, for example road works or an accident, then this is also shown in the symbol. -
Page 21: Advanced Lane Guidance
Advanced Lane Guidance helps you prepare for motorway exits and junctions by showing the correct driving lane for your planned route. As you approach an exit or junction, the lane you need is shown on the VIO device. Tip: To close the lane image, tap the device screen. -
Page 22: Using Quick Search
Entering search terms Tap the search bar at the top of the VIO app to start searching for addresses, POIs or contacts. The search screen opens showing the device keyboard and the following buttons:... - Page 23 Tip: Hide the phone keyboard to show the whole search screen. 1. Back button Select this button to go back to the previous screen. 2. Search input box Enter your search term here. As you type, matching addresses, POIs and contacts are found. 3.
-
Page 24: Working With Search Results
In town or city Select this option to use a town or city as the centre for your search. You need to enter the town or city name using the keyboard. When you have selected the town or city from the results list, you can search for an address or POI in that city. -
Page 25: About Postcodes
If you show the result on the map, you can use the pop-up menu to add the location to My Places. Note: The best search results are shown on the map. When you zoom in, the lower ranked search results are gradually shown. About postcodes When searching using a postcode, your results depend on the type of postcode used in the country that you are searching in. -
Page 26: About Mapcodes
About mapcodes In countries where roads and houses have no names or addresses, you can use a mapcode instead. A mapcode represents a location. Every location on Earth, including those in the sea like islands and oil rigs, can be represented by a mapcode. - Page 27 Police station Veterinarian Doctor Fire station Car-related services Outside parking Petrol station Parking garage Car wash Car dealer Vehicle inspection centre Rental car facility Electrical car charging point(s) Rental car parking Car repair facility Other services Embassy Pet services Government office Telecommunication Company Community service...
- Page 28 College or university School Library Convention centre Leisure Casino Winery Theatre Tourist attraction Cinema Concert hall Amusement park Museum Exhibition centre Opera Cultural centre Nightlife Leisure centre Children's Farm Sport Playing field Swimming pool Mountain peak Water sports Beach Tennis court...
- Page 29 Park or recreation area Ice skating rink Yacht basin or marina Sports centre Stadium Golf course Religion Church Place of worship Travel Railway station Mountain pass Airport Scenic or panoramic view Ferry terminal Postcode Note: Not used in all countries. Border crossing Residential area Bus station...
-
Page 30: Planning A Route
To plan a route to an address using search, do the following: 1. Tap Search at the top of the VIO app map. 2. Enter the name of the address, Point of Interest or contact you want to plan a route to. -
Page 31: Planning A Route To A City Centre
6. For a POI or a contact, the location is shown on the map. 7. Select Ride. A route is planned and then guidance to your destination begins on your VIO device. Tip: You can add a stop to a route that you have already planned. -
Page 32: Planning A Route Using The Map
To plan a route using the map, do the following: 1. On the VIO app map, move the map and zoom in until you can see the destination that you want to navigate to. -
Page 33: Planning A Route Using My Places
A pop-up menu shows the nearest address. 3. Select Ride. A route is planned and then guidance to your destination begins on your VIO device. Tip: Select the pop-up menu to use the location other ways, such as adding it to Places. -
Page 34: Selecting A Saved Location On Your Vio Device
My Places in the VIO app. Note: You can't plan a route to a new location. You must do that in the VIO app. 1. Tap the device arrival panel at the top of the device screen to open the menu. -
Page 35: Planning A Route To A Myplaces Contact
A route is planned to your chosen location. The route is shown on the VIO app and device. 4. Just start riding. Guidance to your destination begins on your VIO device or tap Ride. Planning a route to a MyPlaces contact Important: In the interest of safety and to avoid distractions while you are driving, you should always plan a route before you start driving. -
Page 36: Planning A Route Using Coordinates
The VIO opens and the contact's address is shown on the map. 5. Select Ride. A route is planned and then guidance to your destination begins on your VIO device. Planning a route using coordinates Important: In the interest of safety and to avoid distractions while you are driving, you should always plan a route before you start driving. -
Page 37: Planning A Route Using A Mapcode
4. Select the map code. 5. Select Ride. A route is planned and then guidance to your destination begins on your VIO device. Finding an alternative route Important: In the interest of safety and to avoid distractions while you are driving, you should always plan a route before you start driving. -
Page 38: Planning A Route In Advance
8. To drive to the starting point, select Ride to Route in the Current Route menu. The starting point of the route is converted to your first stop and then the route is planned. Guidance to your destination begins on your VIO device from your current location. Finding a petrol station Important: In the interest of safety and to avoid distractions while you are driving, you should always plan a route before you start driving. - Page 39 To find a petrol station, do the following: 1. Tap Search at the top of the VIO app map. 2. Enter "petrol station". 3. Select the type of search button and choose the location you want to search for a petrol station, for example Near me, or Along route if you have a route planned.
- Page 40 A pop-up opens on the map showing the name of the petrol station. 6. Select Ride. A route is planned and then guidance to your destination begins on your VIO device. Tip: If you have a route planned, select the pop-up menu then select Add to Current Route.
-
Page 41: Changing Your Route
Changing your route The Current Route menu When you have planned a route, select Current Route in the VIO app Main Menu to open the Current Route menu. The following buttons are available in the menu: Note: Some of these features are only available in the VIO app for Android. -
Page 42: Avoiding A Blocked Road
Select this button to stop the preview of your planned route or track. Avoiding a blocked road Note: This feature is only available in the VIO app for Android. If there is a blocked road on your route you can change your route to avoid it. -
Page 43: Types Of Route
Adding a stop to your route from the current route menu Note: This feature is only available in the VIO app for Android. 1. In the Main Menu, select Current Route. -
Page 44: Adding A Stop To Your Route Using The Map
Adding a stop to your route using the map Note: This feature is only available in the VIO app for Android. 1. On the VIO app map, move the map and zoom in until you can see the stop that you want to add. -
Page 45: My Routes
My Routes About My Routes Note: This feature is only available in the VIO app for Android. My Routes provides an easy way to save and retrieve routes. You may want to use My Routes in one or more of the following situations: While working - Your job involves driving several routes with multiple stops on a daily basis. -
Page 46: Navigating Using A Saved Route
Tip: You can also save a route using the Add to My Routes button in the Current Route menu. Navigating using a saved route To navigate using a previously saved route, do the following: 1. In the Main Menu, select My Routes. 2. -
Page 47: Adding A Stop To A Saved Route Using The Map
Tip: You can also press and hold a location on the map and select Add to Current Route from the pop-up menu. 1. On the VIO app map, select the route. 2. Select the pop-menu button to open the menu. -
Page 48: My Places
You can use My Places to create a collection of useful addresses. Your saved places and recent destinations are also shown in your VIO device. You can easily plan a route to a saved location directly from your device - your phone can stay in your pocket. -
Page 49: Changing Your Home Or Work Location
You can only add contacts to your contacts list using your phone's contacts app. Note: When you use VIO for the first time, or when you change maps, there may be a short delay while the app finds all your contacts that have full addresses. The time taken depends on the... -
Page 50: Adding A Location From My Places
7. Select Done to save your location in the My Places list. Adding a location to My Places by marking Note: This feature is only available in the VIO app for Android. To mark a location and temporarily add it to My Places, do the following: 1. -
Page 51: Deleting A Recent Destination From My Places
Your location is shown on the map. 3. Select Add to My Places from the pop-up menu. The name of the location appears in the edit screen. 4. Edit the name of the location so you can easily recognise it. 5. -
Page 52: Speed Cameras
The Speed Cameras service also warns you about accident blackspot locations and when you are speeding. (iPhone only.) To get TomTom services in your VIO, your phone must have a mobile data connection. Important: If you are outside of the area covered by your mobile data plan, you may be liable for extra roaming charges while using TomTom services. -
Page 53: Speed Camera Types
Tip: In the VIO app map, you can select a speed camera symbol on the map bar to see the type of camera, the maximum speed and also the length of an average speed check area. The warning screen closes after 10 seconds. You can also tap the device screen to clear the warning. -
Page 54: Changing The Way You Are Warned
When your phone is connected to the Internet, all camera updates for fixed and mobile camera locations are received in real time. You do not need to do anything to receive updates – they are sent to your VIO app automatically. -
Page 55: Danger Zones
zone. To get TomTom services on your VIO, your phone must have a mobile data connection. Important: If you are outside of the area covered by your mobile data plan, you may be liable for extra roaming charges while using TomTom services. -
Page 56: Danger Zone And Risk Zone Types
Tip: In the VIO app map, you can select a danger zone symbol on the map bar to see the zone information. The warning screen closes after 10 seconds. You can also tap the device screen to clear the warning. -
Page 57: Updating Locations For Danger Zones And Risk Zones
The locations of danger zones and risk zones can change frequently. New zones can also appear without warning. When your phone is connected to the Internet, all zone updates are received in real time. You do not need to do anything to receive updates – they are sent to your VIO app automatically. -
Page 58: Settings
Select Settings in the Main Menu, then select Appearance. Select Display to change the colours of the VIO app and device map and route. You can also select Switch to night colours when dark to automatically switch to night colours when it gets dark. -
Page 59: Maps
Important: A map is a large file that can take a long time to download. To prevent high data charges we advise you to download a map using a Wi-Fi connection. Once downloading has started, you must download the complete map before you can use the VIO. -
Page 60: Route Planning
You can pause a map download at any time. If connection to Wi-Fi is lost, the download automati- cally pauses to prevent high data charges. You must keep the VIO open while paused or you will lose the part of the map you have already downloaded. You can use other apps while paused. -
Page 61: Sounds And Warnings
Switch on Read aloud traffic warnings to hear spoken warnings about traffic on your route. Phone Calls Select Settings in the Main Menu, then select Phone Calls. Select See who is calling on your TomTom VIO to receive a notification on your VIO device when... -
Page 62: Units
About This is an information screen rather than a setting and shows you information about the VIO. You may be asked to go to this screen during a call to TomTom Customer Support. The information on this screen includes app version, map version of current map, app ID, copyright, licences, and certifications. -
Page 63: Getting Help
Getting Help Support Select Support in the Main Menu. On this screen, you can see the following information to get help for your VIO: Reference Guide This option opens an Internet link to a webpage where you can find the User Manual for your app. -
Page 64: Addendum
Drivers are solely responsible for complying with applicable road traffic laws and avoiding distractions while on the road. TomTom shall not be liable for any penalties arising from failure to comply with these laws and regulations. - Page 65 1 hour. Do not use the device outside of this temperature range. Caution: Risk of explosion if battery is replaced by an incorrect type. Do not remove or attempt to remove the non-user-replaceable battery. If you have a problem with the battery, please contact TomTom customer support.
- Page 66 ACCORDING TO THE LOCAL LAWS AND REGULATIONS AND ALWAYS KEPT SEPARATE FROM HOUSEHOLD WASTE. BY DOING THIS YOU WILL HELP CONSERVE THE ENVIRONMENT. USE YOUR TOMTOM DEVICE ONLY WITH THE SUPPLIED DC POWER LEAD (CAR CHARGER/BATTERY CABLE), AC ADAPTER (HOME CHARGER), IN AN APPROVED CRADLE OR USING THE SUPPLIED USB CABLE TO CONNECT TO A COMPUTER FOR BATTERY CHARGING.
- Page 67 20cm (8 inches) during normal operation. Certifications To see the product certification information for your device, do the following in the TomTom VIO app: Select Settings in the app Main Menu.
- Page 68 The information in this document is subject to change without notice. TomTom shall not be liable for technical or editorial errors or omissions contained herein, nor for incidental or consequential damages resulting from the performance or use of this document. This document contains information protected by copyright.
-
Page 69: Copyright Notices
TomTom or its suppliers. The use of this material is subject to the terms of a licence agreement. Any unauthorised copying or disclosure of this material will lead to criminal and civil liabilities.
Need help?
Do you have a question about the VIO and is the answer not in the manual?
Questions and answers