TomTom VIA Reference Manual
Hide thumbs
Also See for VIA:
- User manual (87 pages) ,
- Get started (2 pages) ,
- Quick start manual (2 pages)

Related Manuals for TomTom VIA


Summary of Contents for TomTom VIA
- Page 1 TomTom VIA Reference Guide...
-
Page 2: Table Of Contents
Contents Read me first Installing in your car ........................... 6 Switching on and off .......................... 6 Setting up............................6 GPS reception ............................. 6 About MyTomTom ..........................7 Setting up MyTomTom ........................7 Device not starting ..........................8 Charging your device ......................... 8 Take care of your navigation device .................... - Page 3 Changing your route Making changes to your route ......................25 Change route menu .......................... 25 View map About viewing the map ........................27 View map ............................27 Options .............................. 28 Cursor menu ............................. 28 Map corrections About Map Share ..........................31 Correcting a map error ........................
- Page 4 Status bar ............................46 Maps..............................46 Turn off voice guidance / Turn on voice guidance ................. 47 Units ..............................47 Use night colours / Use day colours ....................47 Version information .......................... 48 Voices ..............................48 Volume .............................. 48 Points of Interest About Points of Interest ........................
- Page 5 Customer support Getting help to use your navigation device ..................64 Status & information ......................... 64 Addendum and Copyright Copyright notices...
-
Page 6: Read Me First
Answer the questions by tapping the screen. GPS reception When you first start your TomTom VIA navigation device, the device may need a few minutes to determine your GPS position and show your current position on the map. In future, your position will be found much faster, usually within a few seconds. -
Page 7: About Mytomtom
MyTomTom helps you manage the contents and services of your TomTom VIA navigation device, as well as giving you access to the TomTom community. You log in to MyTomTom on the TomTom website. It is a good idea to frequently connect your navigation device to MyTomTom to ensure you always have the latest updates. -
Page 8: Device Not Starting
USB hub or USB port on a keyboard or monitor. Take care of your navigation device Never leave your TomTom VIA or accessories on view when you leave the car as they may become an easy target for thieves. -
Page 9: Safety
Dashboard Mount Disk to attach the mount to your dashboard. The following diagrams show where you can safely attach the mount. TomTom also offers alternative mounting solutions for your TomTom navigation device. For more information about Dashboard Mount Disks and alternative mounting solutions, go to tomtom.com/accessories. -
Page 10: Planning A Route
Important: In the interest of safety and to reduce distractions while you are driving, you should always plan a route before you start driving. To plan a route on your TomTom VIA, do the following: 1. Tap the screen to open the Main menu. - Page 11 When the correct locality or city appears in the list, tap the name to select it. 5. Enter the landmark name or streetname. Landmarks or streets with similar names are shown in the list while you type. When the correct landmark or street name appears in the list, tap the name to select it. Tip: Landmarks include chowks.
- Page 12 If you choose a street, you can enter a cross road or landmark. The location is shown on a 1km x 1km area of the map. 7. After you have selected a landmark or street, you can use this map screen to explore the area around this point and select a new destination.
-
Page 13: Route Summary
To plan a different route, tap Change route. Your TomTom VIA starts to guide you to your destination, using spoken instructions and on- screen directions. Route summary The route summary shows an overview of your route, the remaining distance to your destination and the remaining estimated journey time. -
Page 14: Selecting A Route Type
Select a button to use for this destination and answer the questions about the destination. Show my frequent destinations You can set your TomTom VIA to ask if you want to plan a route to one of your frequently visited destinations every time the device starts. -
Page 15: Using Arrival Times
8. If you want to change the image, tap Yes then follow the instructions shown on the screen. Otherwise, tap No. Every time your TomTom VIA starts, you are asked if you want to plan a route. If you tap Cancel, you are shown the Main Menu. -
Page 16: Navigation Menu Options
Tap Status bar in the Settings menu, to enable or disable arrival time notifications. To enable arrival time notifications, select Leeway. Status bar Navigation menu options When you tap Navigate to, you can set your destination in many ways, not just by entering the address. -
Page 17: Planning A Route In Advance
Position of last stop Planning a route in advance You can use your TomTom VIA to plan a route in advance, selecting your starting point and your destination. Here are some more reasons to plan a route in advance: Find out how long a journey is going to take before you start. - Page 18 You can then select from the following options: Tap this button for a list of all the turn instructions on the route. This is very useful if you need to explain a route to someone else. Show instructions Tap this button to see an overview of the route using the map browser. Show map of route Tap this button to watch a demo of the journey.
-
Page 19: Voice Control
About voice control Note: Voice control is not supported on all devices or in all languages. Instead of tapping the screen to control your TomTom VIA, you can use your voice to control your VIA. For example, to increase the volume on your VIA, you can say "Increase volume". - Page 20 If the command is incorrect, say "No" and repeat the command after you hear the prompt and tone again. Your VIA plans a route from your current location to your destination. Tip: To stop your VIA from listening out for further commands, say "Cancel". To go back one step, say "Back".
-
Page 21: The Driving View
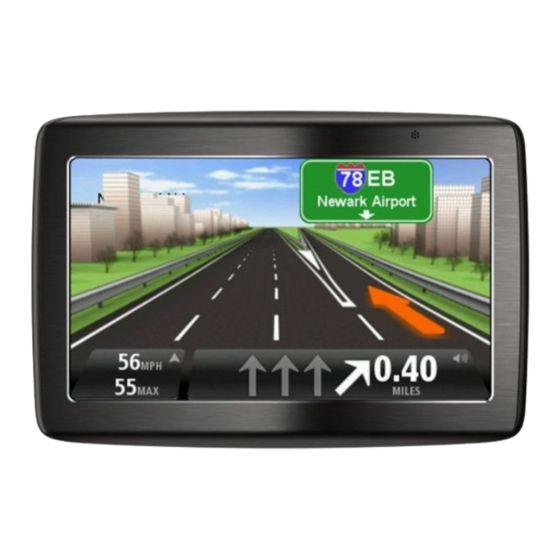
The Driving View About the Driving View When your TomTom VIA device starts for the first time, you are shown the Driving View along with detailed information about your current position. Tap the centre of the screen at any time to open the Main Menu. -
Page 22: Driving View Symbols
7. Navigation instruction for the road ahead and the distance to next instruction. If the second instruction is less that 150m after the first instruction, you see it shown immediately instead of the distance. Tap this part of the status bar to repeat the last voice instruction and to change the volume. You can also tap here to mute the sound. -
Page 23: Advanced Lane Guidance
About lane guidance Note: Lane guidance is not available for all junctions or in all countries. Your TomTom VIA helps you prepare for major and secondary road junctions and motorway exits by showing the correct driving lane for your planned route. - Page 24 Tip: If no lane guidance is shown in the status bar and all lanes are highlighted, you can use any lane.
-
Page 25: Changing Your Route
To change the current route, tap Change route in the Main menu: Tap this button to change the current route. This button is only shown while there is a planned route on your VIA. Change route Change route menu To change the current route or your destination, tap one of the following buttons: Tap this button to find an alternative to the current route. - Page 26 You are shown a list of the street names on your route. When you tap one of the street names, your VIA calculates a detour to avoid the selected street. The route summary shows both the new route and your original Avoid part of route route.
-
Page 27: View Map
View map About viewing the map You can view the map in the same way as you might look at a traditional paper map. The map shows your current location and many other locations such as Favourites and POIs. To view the map in this way, tap View map or View route in the Main menu. You view different locations on the map by moving the map across the screen. -
Page 28: Options
Blue - points to your current location. If you lose your GPS signal, the marker is grey and shows your last known location. Yellow - points to your home location. Red - points to your destination. Tap a marker to centre the map on the location pointed to by the marker. You can also set your own marker. - Page 29 Tap this button to create a POI at the cursor position on the map. Add as POI Tap this button to travel via the cursor position on the map as part of your current route. Your destination remains the same as before, but your route now includes this location.
- Page 30 Note: Hands-free calling is not supported on all devices. Tap this button to call the location at the cursor position. This button is only available if your VIA has the phone number for the Call... location. The phone numbers for many POIs are available on your VIA.
-
Page 31: Map Corrections
To make corrections to your own map, tap Map corrections in the Settings menu. Note: Map Share is not available in all regions. For more information, go to tomtom.com/mapshare. Correcting a map error Important: For safety reasons, do not enter the full details of a map correction while you are driving. - Page 32 Tap this button to block or unblock a street. You can block or unblock the street in one or both directions. For example, to correct a street near to your current location, do the following: (Un)block street 1. Tap (Un)block street. 2.
- Page 33 Tap this button to change the name of a street on your map. For example, to rename a street near to your current location: 1. Tap Edit street name. Edit street name 2. Tap Near you. 3. Select the street or section of a street you want to correct by tapping it on the map.
- Page 34 Tap this button to add a new Point of Interest (POI). For example to add a new restaurant near to your current location: 1. Tap Add missing POI. Add missing POI 2. Tap Restaurant in the list of POI categories. 3.
- Page 35 Tap this button to report a missing street. You have to select the start and end points of the missing street. Missing street Tap this button to report an error about a locality, city, town or village. You can report the following types of error: Locality or city is missing ...
-
Page 36: Sounds And Voices
English computer voice can read and pronounce French street names. Selecting a voice To select a different voice on your TomTom VIA, tap Voices in the Settings menu. Then tap Change voice and select the required voice. Changing the volume level You can change the volume on your TomTom VIA in several ways. -
Page 37: Automatic Volume Control
Automatic volume control To set your TomTom VIA to automatically adjust the volume, do the following: 1. Tap Settings in the Main menu. 2. Tap Volume. 3. Select Link volume to car speed to automatically adjust the volume inside the car in response to changes in the speed of your driving. -
Page 38: Settings
Settings About Settings You can change the way your TomTom VIA looks and behaves. Most of the settings on your device can be accessed by tapping Settings in the Main Menu. 2D/3D settings Tap this button to set the default view of the map. To switch between 2D and 3D views while driving, tap the centre part of the status bar in Driving View. -
Page 39: Advanced Settings
shown on the map in the Driving View. You do not need to select this option when your VIA is set to read aloud street names using a computer voice. Show next street name - when this setting is selected, the name of the ... -
Page 40: Battery Saving
Battery saving To change the power saving settings, tap this button on your VIA. Battery saving Brightness Tap this button to set the brightness of the screen. Move the sliders to adjust the brightness level. To view the map and menus in day or night colours, tap Use day colours or Use night colours in the Settings menu. -
Page 41: Favourites
Favourites Tap this button to add, rename or delete Favourites. Favourites provide an easy way to select a location without the need to enter the address. They do not need to be favourite places, they can simply be seen as a collection of useful addresses. Favourites To create a new Favourite, tap Add. -
Page 42: Gps Status
Language Tap this button to change the language used for all the buttons and messages you see on your VIA. You can choose from a wide range of languages. When you change the language, you are also given the opportunity to change the voice. -
Page 43: Manage Pois
Tap this button to manage your own Point of Interest (POI) categories and locations. You can set your VIA to let you know when you are near to selected POI locations. For example, you could set the device to let you know when you Manage POIs are approaching a petrol station. -
Page 44: Operate Left-Handed / Operate Right Handed
Toll road, ferry, carpool lanes and unpaved road settings Set how your VIA should manage each of these four road features when the device calculates a route. Carpool lanes are sometimes known as High Occupancy Vehicle Lanes and are not present in every country. -
Page 45: Reset Factory Settings
Important: This feature deletes all your personal settings! If you want to keep your personal information and settings, you should perform a full backup of your VIA before you reset the device. You can then restore all your personal information and settings after you reset the device. -
Page 46: Start Up
Current time Remaining distance - the distance to your destination. Leeway - your VIA shows how late or early you will arrive, compared with your preferred arrival time that was set when you planned the route. Maps Tap this button to select the map you want to use for route planning and navigation. -
Page 47: Turn Off Voice Guidance / Turn On Voice Guidance
Turn on Voice guidance Units Tap this button to set the units used on your VIA for features such as route planning. Units Use night colours / Use day colours Tap this button to reduce the brightness of the screen and display the map in darker colours. -
Page 48: Version Information
Tap this button to set the type of spoken directions and other route instructions your TomTom VIA will read aloud. Voice settings Volume Tap this button to set the volume level for your TomTom VIA. Move the slider to change the volume. Volume... -
Page 49: Points Of Interest
Tip: Landmarks include most residential and commercial buildings as well as gated communities, toll gates, monuments, cemeteries, tourist attractions etc. Creating POIs Tip: For help on managing third party POIs, see: tomtom.com/13814 1. Tap the screen to open the Main Menu. 2. Tap Settings. 3. Tap Manage POIs. - Page 50 Tap this button to set your Home location as a POI. This is useful if you decide to change your Home location, but first want to create a POI using the current Home address. Home Tap this button to create a POI from a Favourite. You might want to create a POI from a Favourite because you can only create a limited number of Favourites.
-
Page 51: Using Pois To Plan A Route
3. Tap POI in locality or city. Tip: The last POI you viewed on your VIA is also shown in the menu. 4. Enter the name of the locality or city and select it when it is shown in the list. -
Page 52: Calling A Poi
Many of the POIs on your TomTom VIA include phone numbers. This means that if your device supports hands-free calling, you can use your VIA to call the POI and plan a route to the location of the POI. If your device doesn't support hands-free calling, you can still get the phone number of POI from your TomTom navigation device and then call the POI using another phone or device. -
Page 53: Manage Pois
Tap Manage POIs to manage your POI categories and locations. You can set your VIA to let you know when you are near to selected POI locations. In this way you could, for example, set the device to let you know you when you are approaching a petrol station. -
Page 54: Help
5. Select a centre from the list, the nearest is shown at the top of the list. Your VIA shows your position on the map, relative to the nearest landmark, along with a description of the location. This helps you explain where you are while making a call. - Page 55 Tap this button to find the contact details and location of a service centre. Note: Hands-free calling is not supported on all devices. Phone for help Tap this button to navigate your way by car to a service centre. Drive to help Tap this button to navigate your way on foot to a service centre.
-
Page 56: Hands-Free Calling
You may have to enter the password '0000' on your phone in order to connect to your TomTom VIA. To avoid having to enter '0000' every time you use the phone, save your TomTom VIA as a trusted device on your phone. -
Page 57: Receiving A Call
Note: Your phonebook is automatically copied to your VIA when you first establish a connection with your mobile phone. Not all phones can transfer the phonebook to your VIA. For more information, go to tomtom.com/phones/compatibility. Tap Recently dialed to select from a list of people or numbers you have called recently using ... - Page 58 Tap this button to manage the mobile phones that will be connected to your VIA. You can add a profile for up to five different mobile phones. Manage phones Tap this button to disable or enable hands-free calling. Disable hands-free Tap this button to make a phone call.
-
Page 59: Favourites
Favourites About Favourites Favourites provide an easy way to select a location without the need to enter the address. They do not need to be favourite places, they can simply be seen as a collection of useful addresses. Creating a Favourite To create a Favourite, do the following: 1. -
Page 60: Using A Favourite
Position of last stop Your VIA suggests a name for your new Favourite. To enter a new name, there is no need to delete the suggested name, you just start typing. Tip: It is a good idea to give your Favourite a name that is easy to remember. -
Page 61: Changing The Name Of A Favourite
Your VIA will immediately start guiding you to your destination with spoken instructions and visual instructions on the screen. Changing the name of a Favourite To change the name of a Favourite, do the following: 1. Tap the screen to bring up the Main Menu. -
Page 62: Mytomtom
MyTomTom helps you manage the contents and services of your TomTom VIA navigation device, as well as giving you access to the TomTom community. You log in to MyTomTom on the TomTom website. It is a good idea to frequently connect your navigation device to MyTomTom to ensure you always have the latest updates. -
Page 63: Mytomtom Account
MyTomTom account To download content and services from TomTom, you need a MyTomTom account. You can create an account when you start using MyTomTom. Note: If you have more than one TomTom device, you need a separate account for each device. -
Page 64: Customer Support
For warranty information, go to tomtom.com/legal. Status & information Tap this button to view technical information about your device, such as your serial number for your device and the version of the main TomTom application. Version information Tap this button to see the current status for GPS reception. -
Page 65: Addendum And Copyright
TomTom device. TomTom does not accept any liability for the availability and accuracy of GPS. Use with Care Use of a TomTom device for navigation still means that you need to drive with due care and attention. Aircraft and Hospitals Use of devices with an antenna is prohibited on most aircraft, in many hospitals and in many other locations. - Page 66 ACCORDING TO THE LOCAL LAWS AND REGULATIONS AND ALWAYS SEPARATE FROM HOUSEHOLD WASTE. BY DOING THIS YOU WILL HELP CONSERVE THE ENVIRONMENT. USE YOUR TOMTOM DEVICE ONLY WITH THE SUPPLIED DC POWER LEAD (CAR CHARGER/BATTERY CABLE), AC ADAPTER (HOME CHARGER), IN AN APPROVED CRADLE OR USING THE SUPPLIED USB CABLE TO CONNECT TO A COMPUTER FOR BATTERY CHARGING.
- Page 67 The information in this document is subject to change without notice. TomTom shall not be liable for technical or editorial errors or omissions contained herein; nor for incidental or consequential damages resulting from the performance or use of this material. This document contains information protected by copyright.
-
Page 68: Copyright Notices
TomTom or its suppliers. The use of this material is subject to the terms of a licence agreement. Any unauthorised copying or disclosure of this material will lead to criminal and civil liabilities.
Need help?
Do you have a question about the VIA and is the answer not in the manual?
Questions and answers