Table of Contents
Advertisement
Available languages
Available languages
Quick Links
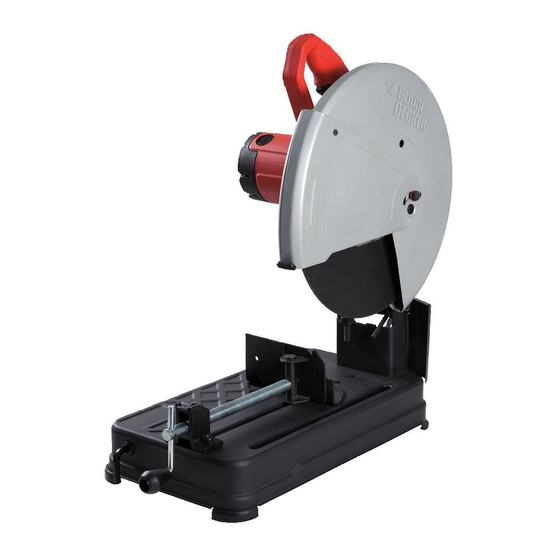
14 inch (355mm) chop saw
INSTRUCTION MANUAL
CATALOg NUMBeR
BDeBCS14
Thank you for choosing Black & Decker! To register your new product, call 1-800-544-6986
or visit www.Blackanddecker.com/NewOwner
PLeASe ReAD BefORe ReTURNINg ThIS PRODUCT fOR ANy ReASON.
If you have a question or experience a problem with your Black & Decker purchase, go to
http://www.blackanddecker.com/instantanswers
If you can't find the answer or do not have access to the Internet,
call 1-800-544-6986 from 8 a.m. to 5 p.m. eST Mon. - fri. to speak with an agent.
Please have the catalog number available when you call.
SAve ThIS MANUAL fOR fUTURe RefeReNCe.
veA eL eSPANOL eN LA CONTRAPORTADA.
INSTRUCTIvO De OPeRACIÓN, CeNTROS De SeRvICIO y PÓLIZA De gARANTÍA.
ADveRTeNCIA: LÉASe eSTe INSTRUCTIvO ANTeS De USAR eL PRODUCTO.
Advertisement
Table of Contents

Related Manuals for Black & Decker BDEBCS14


Summary of Contents for Black & Decker BDEBCS14
- Page 1 14 inch (355mm) chop saw INSTRUCTION MANUAL CATALOg NUMBeR BDeBCS14 Thank you for choosing Black & Decker! To register your new product, call 1-800-544-6986 or visit www.Blackanddecker.com/NewOwner PLeASe ReAD BefORe ReTURNINg ThIS PRODUCT fOR ANy ReASON. If you have a question or experience a problem with your Black & Decker purchase, go to http://www.blackanddecker.com/instantanswers...
-
Page 2: Safety Guidelines - Definitions
SAfeTy gUIDeLINeS - DefINITIONS It is important for you to read and understand this manual. The information it contains relates to protecting YOUR SAFETY and PREVENTING PROBLEMS. The symbols below are used to help you recognize this information. DANgeR: Indicates an imminently hazardous situation which, if not avoided, will result in death or serious injury. - Page 3 • Maintain tooLS With caRe. Keep tools sharp and clean for best and safest performance. Follow instructions for lubricating and changing accessories. • DiSconnect tooLS before servicing; when changing acces sories, such as blades, bits, cutters, and the like. • ReDuce the RiSK oF unintentionaL StaRtinG. Make sure switch is in off position before plugging in.
-
Page 4: Power Supply
WARNINg: Some dust created by power sanding, sawing, grinding, drilling, and other construction activities contains chemi cals known to the State of California to cause cancer, birth defects, or other reproduc tive harm. Some examples of these chemicals are: • lead from lead-based paints, • crystalline silica from bricks and cement and other masonry products, and • arsenic and chromium from chemically-treated lumber (CCA). -
Page 5: Standard Equipment
feATUReS (fIgUReS A) 1. Spark deflector 8. Wheel 2. Base 9. Guard 3. Fence 10. Spindle Lock 4. Vise 11. Depth Stop Bolt and Jam Nut 5. Wrench 12. Trigger Switch 6. Crank 13. Padlock Hole 7. Vise Lever 14. Lock MAXIMUM CUTTINg CAPACITy NOTe: Capacity shown on chart assumes no wheel wear and optimum fence position. - Page 6 TO CARRy Fold down unit to position where you can carry the saw. Hook lock chain to lock arm down. UNLOCKINg To unlock tool and raise head, depress motor arm slightly and unhook lock chain out. Motor arm will then pivot upward. SPARK DefLeCTOR ADJUSTMeNT (fIg.
- Page 7 vISe OPeRATION (fIg. g) The vise (4) has a quick-travel feature. To release the vise when it is clamped tightly, turn the crank (6) counterclockwise one or two times to remove clamping pressure. Lift vise lever (7) up. Pull crank assembly out as far as desired.
-
Page 8: Maintenance
OPeRATION TIPS fOR MORe ACCURATe CUTS • Allow the wheel to do the cutting. Excessive force will cause the wheel to glaze reducing cutting efficiency and/or to deflect causing inaccurate cuts. • Properly adjust fence angle. • Make sure material is laying flat across base. • Properly clamp material to avoid movement and vibration. -
Page 9: Troubleshooting Guide
Troubleshooting guide TROUBLe! TOOl WIll NOT START WhAT’S WRONg? WhAT TO DO… 1. Tool not plugged in. 1. Plug in saw. 2. Fuse blown or circuit breaker tripped. 2. Replace fuse or reset circuit breaker. 3. Cord damaged. 3. Have cord replaced by authorized service center. - Page 10 LIMITeD TWO-yeAR hOMe USe WARRANTy Black & Decker (U.S.) Inc. warrants this product for two years against any defects in material or workmanship. The defective product will be replaced or repaired at no charge in either of two ways. The first, which will result in exchanges only, is to return the product to the retailer from whom it was purchased (provided that the store is a participating retailer).
- Page 11 SCIe feNDeUSe De 355 MM (14 PO) MODe D’eMPLOI NUMeRO De CATALOgUe BDeBCS14 Merci d’avoir choisi Black & Decker! Consulter le site Web www.BlackandDecker.com/NewOwner pour enregistrer votre nouveau produit. à LIRe AvANT De ReTOURNeR Ce PRODUIT POUR QUeLQUe RAISON QUe Ce SOIT : Si des questions ou des problèmes surgissent après l’achat d’un produit Black &...
-
Page 12: Consignes De Sécurité Importantes
LIgNeS DIReCTRICeS eN MATIèRe De SÉCURITÉ - DÉfINITIONS Il est important que vous lisiez et compreniez ce mode d’emploi. Les informations qu’il contient concernent VOTRE SÉCURITÉ et visent à ÉVITER TOUT PROBLÈME. Les symboles ci-dessous servent à vous aider à reconnaître cette information. DANgeR : Indique une situation dangereuse imminente qui, si elle n’est pas évitée, causera la mort ou des graves blessures. - Page 13 • PoRteR DeS vêteMentS aPPRoPRiÉS; ne pas porter de vêtements amples ni de gants, de cravate, de bague, de bracelet ou d’autres bijoux, car ceux-ci peuvent rester coincés dans les pièces mobiles. le port de chaussures antidérapantes est recommandé. Couvrir ou attacher les cheveux longs. Se tenir éloigné des évents puisque ces derniers pourraient cacher des pièces mobiles.
- Page 14 • Pendant le fonctionnement, protéger le disque contre tout choc ou traitement brutal. Dans cette éventualité, arrêter l’outil et vérifier que le disque de tronçonnage ne comporte ni fissures ni défauts. • Nettoyer la scie fendeuse régulièrement en suivant la procédure inclue dans ce manuel. • Ne jamais retirer les protèges disque ou la base. • touJouRS utiLiSeR un Étau ou tout autRe DiSPoSitiF De FiXation PouR aRRiMeR SoLiDeMent La PiÈce À DÉcouPeR. Tout autre dispositif, tels pinces à...
- Page 15 MiniMaL De 4300 R/Min. • LoRS De L’entRetien, n’utiLiSeR que DeS PiÈceS De RechanGe iDentiqueS. • touJouRS : PoRteR DeS LunetteS De PRotection, utiLiSeR un DiSPoSitiF De PRotection, MainteniR La PiÈce À tRavaiLLeR DanS un Étau, utiLiSeR un aPPaReiL ReSPiRatoiRe antiPouSSiÈReS aDÉquat. • ne PaS eXPoSeR L’outiL À...
-
Page 16: Équipement Standard
CAPACITÉ De COUPe MAXIMALe ReMARQUe : la capacité indiquée dans le tableau ne tient pas compte de l’usure de la meule ni de la position optimale du guide. Forme de la pièce : A X B Angle de coupe de 90° A = 125 mm A = 115 mm 115 mm x 130 mm A = 115 mm x 137 (4 7/8 po) - Page 17 SeRRAge eT SOUTIeN DU MATÉRIAU (fIg. e, f) • Il est plus facile de serrer et de couper les pièces DIAMÈTRE DE LA PIÈCE DE TRAVAIL angulaires si les deux montants reposent contre la base. • On peut utiliser une cale d’écartement légèrement plus étroite que la pièce pour pouvoir CALE D’ÉCARTEMENT utiliser davantage la meule (fig.
- Page 18 DÉPOSe eT INSTALLATION DeS MeULeS (fIg. J, K) MISe eN gARDe : Éteindre et débrancher l’outil avant d’effectuer tout réglage ou d’enlever ou installer tout accessoire. S’assurer que l’interrupteur est en position d’arrêt. Ne pas effectuer de réglage tandis que la meule tourne. Ne pas effectuer de réglage tandis que la scie fendeuse est branchée à...
-
Page 19: Entretien Et Réparation
renferment des produits chimiques pouvant grandement endommager le plastique. En outre, ne pas utiliser d’essence, de térébenthine, de diluant à peinture-laque, de liquides pour nettoyage à sec ou tout autre produit semblable qui pourrait endommager gravement les composants en plastique. Ne jamais laisser de liquide pénétrer dans l’outil et n’immerger aucune partie de l’outil dans un liquide. - Page 20 guide de depannage PROBLeMe! l’OUTIl REFUSE DE DEMARRER RAISONS ACTION 1. L’appareil n’est pas branché. 1. Brancher la scie. 2. Un fusible a sauté ou le circuit a disjoncté. 2. Changer le fusible ou réenclencher le disjoncteur. 3. Le cordon est endommagé. 3.
- Page 21 SeRRA MULTI-CORTe De MeTAIS De 14 PULg. (355MM) MANUAL dE iNstrUccioNEs CATáLOgO N° BDeBCS14 LEA EL MANUAL ANtEs dE dEvoLvEr EstE prodUcto por cUALqUiEr Motivo: Si tiene una consulta o algún inconveniente con su producto Black & Decker, visite http://www.blackanddecker.com/instantanswers para obtener respuestas instantáneas las 24 horas del día.
-
Page 22: Pautas De Seguridad/Definiciones
PAUTAS De SegURIDAD/DefINICIONeS Es importante que lea y comprenda este manual. La información que contiene se relaciona con la protección de SU SEGURIDAD y la PREVENCIÓN DE PROBLEMAS. Los símbolos que siguen se utilizan para ayudarlo a reconocer esta información. PeLIgRO: indica una situación de peligro inminente que, si no se evita provocará... - Page 23 • uSe RoPa aDecuaDa. No lleve ropa suelta, guantes, corbatas, anillos, pulseras u otras joyas que podrían engancharse en las piezas móviles. Se recomienda el uso de calzado antideslizante. Cúbrase y recójase el pelo si lo tiene largo. los orificios de ventilación suelen cubrir piezas en movimiento, por lo que también se deben evitar.
- Page 24 • No quite los protectores del disco o la base. • SieMPRe uSe eL toRno o DiSPoSitivo De FiJaciÓn eSPeciaL PaRa SoSteneR bien La PieZa De tRabaJo. Otros dispositivos tales como abrazaderas de resorte, de barra o en C pueden ser apropiadas para piezas de trabajo de diferentes tamaños y formas. Tenga cuidado al seleccionar y colocar estas abrazaderas y haga un movimiento de práctica antes de hacer un corte.
-
Page 25: Alimentación Eléctrica
• cuanDo ReaLice ManteniMiento, uSe SÓLo RePueStoS oRiGinaLeS. • SieMPRe: utiLice PRotecciÓn ocuLaR; uSe LoS PRotectoReS De hoJa; SuJete La PieZa De tRabaJo con eL toRno; utiLice La PRotecciÓn ReSPiRatoRia aPRoPiaDa. • no eXPonGa a LLuvia ni uSe en LuGaReS hÚMeDoS. Símbolos •... - Page 26 CAPACIDAD MáXIMA De CORTe NOTA: La capacidad indicada en la tabla supone que el disco no está desgastado y que la guía está en la posición óptima. Forma de la pieza de trabajo: A X B Ángulo de corte A = 4-7/8 pu A = 4-1/2 pu 4 1/2 pux 5 1/8 pu A = 4 1/2 pux 5 3/8 de 90°...
- Page 27 de la herramienta, instale un candado estándar (no incluido) en el orificio para candados (13) ubicado en el gatillo. SOPORTe y fIJACIÓN DeL MATeRIAL (fIg. e, f) DIÁMETRO DE LA PIEZA DE TRABAJO • Los materiales en ángulo se aseguran y cortan mejor con ambas patas apoyadas contra la base.
- Page 28 ReTIRO e INSTALACIÓN De DISCOS (fIg. J, K) PReCAUCIÓN: Apague y desenchufe la herramienta antes de realizar ajustes o de quitarle o ponerle accesorios. Asegúrese que la maquina esta APAgADA. No realice ningún ajuste mientras el disco esté en movimiento. No realice ningún ajuste mientras la tronzadora de metales esté...
-
Page 29: Piezas De Repuesto
Tampoco utilice gasolina, aguarrás, barniz o solvente, líquidos para limpieza en seco o productos similares, que podrían dañar seriamente las piezas de plástico. Nunca permita que penetre líquido dentro de la herramienta ni sumerja ninguna de las piezas en un líquido. RePARACIONeS Las reparaciones, el mantenimiento y los ajustes de este producto deberían ser realizados por centros de servicio autorizados u otras organizaciones de servicio... - Page 30 guía de resolución de problemas ¡PROBLeMA! lA HERRAMIENTA NO ARRANCA ¿QUÉ SUCeDe? QUÉ hACeR… 1. La herramienta no está enchufada. 1. Enchufe la sierra. 2. Un fusible está quemado o el interruptor 2. Cambie el fusible o reposicione el de circuito fue activado. interruptor de circuito.
- Page 31 · gARANTÍA BLACK & DeCKeR · BLACK & DeCKeR WARRANTy . SOLAMeNTe PARA PROPOSITOS De MeXICO Distributor Name · Sello firma del distribuidor Date of purchase · Fecha de compra Invoice No. · No. de factura PRODUCT INfOMATION · iDentiFicaciÓn DeL PRoDucto Cat. No. · Catalogo ó Modelo Serial Number · No. de serie Name · Nombre Last Name · Apellido Address ·...
- Page 32 BLACK & DeCKeR S.A. De C.v. BOSQUeS De CIDROS ACCeSO RADIATAS NO. 42 COL. BOSQUeS De LAS LOMAS. 05120 MÉXICO, D.f TeL. (01 55) 5326 7100 01 800 847 2309/01 800 847 2312 Catalog Number BDeBCS14 form # 90605965 December 2013 Printed in China...
Need help?
Do you have a question about the BDEBCS14 and is the answer not in the manual?
Questions and answers