Table of Contents
Advertisement
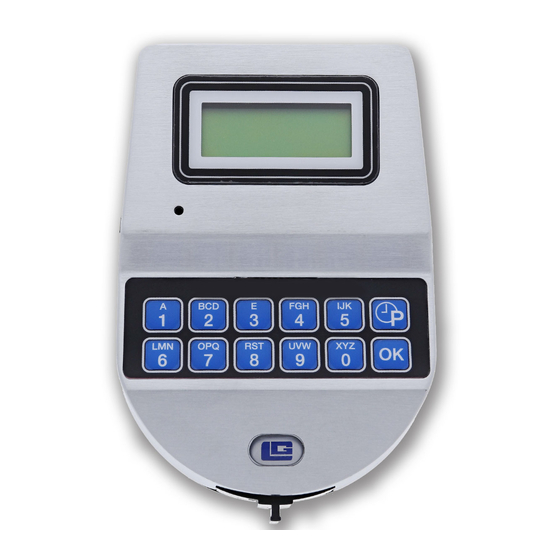
SMARTPOInT/SMARTLInC II
This system is available with or without biometric identification ability. If using the SMARTLInC II, without biometric ability, please
disregard any reference in these instructions to fingerprints. The functionality of the two systems is identical except for the use of
fingerprints for identification.
AVAILABLE FEATURES
Master Code cannot open locks, it only controls menus and functional abilities.
MASTER CODE 0 (Default set to 1-2-3-4-5-6-7-8)
MASTER CODE 1 (Default set to 8-7-6-5-4-3-2-1)
• Change Own Code
• Access to Master Menu
• Set Time and Date
• Set Time Lock & Special Events Periods
• Download or View Audit
• Install/Remove/Assign Locks
• Set System Operation Mode (Code, Fingerprint, etc)
• Set User Code Access Limit
• Add/Delete Users and Enroll Fingerprint
• Set Time Delay and Open Offset
The SMARTPOINT is a feature-rich product with many possible options available. Please read through the instructions carefully before
attempting any programming. After reading through the entire manual, highlight any features to be programmed in the system.
© copyright 2008
(P/N)702.087 v1 • 8/08
Biometric Recognition Safe Locking System
MASTER OPERATING INSTRUCTIONS
MASTER MODE TABLE OF COnTEnTS
1.0
Change Own Code ...................................................... page 2
2.0
Master Menu................................................................ page 2
2.1 Time/Date .................................................................... page 2
2.2 Time Lock Standard Week Verify................................. page 2
2.2.1 Add/Remove Opening Periods......................... page 3
2.3 Time Lock Special Events Verify.................................. page 3
2.3.1
Add/Remove Special Events........................... page 3
2.4 View Audit.................................................................... page 4
2.5 PC Link ....................................................................... page 4
2.6 System Set-up ............................................................ page 4
2.6.1 Install Locks to Logic Module .......................... page 4
2.6.2 Remove Locks from Logic Module .................. page 5
2.6.3 Assign Lock ...................................................... page 5
2.6.4 System Operation Mode .................................. page 5
2.6.5 Access Limit ..................................................... page 5
2.6.6 System Information .......................................... page 5
2.7 Audit Functions............................................................ page 6
2.7.1 Audit Lock Via Logic Module............................ page 6
2.7.2 Download Audit from Logic Module................. page 6
2.8 Users .......................................................................... page 7
2.8.1 Add User............................................................. page 7
2.8.2 Delete User ......................................................... page 8
2.8.3 Disable User ....................................................... page 8
2.8.4 Enable User ........................................................ page 8
2.8.5 Access Lock ....................................................... page 9
2.8.6 Add/Remove Manager........................................ page 9
2.8.7 Add/Remove Time Delay Override ..................... page 9
2.8.8 Re-Enroll ......................................................... page 10
2.9 Time Delay................................................................. page 10
2.10 Open Offset .............................................................. page 10
Addendum - Lock Codes ..................................................... page 11
Kaba Mas LLC
page 1 of 11
Advertisement
Table of Contents

Related Manuals for La Gard SmartPoint


Summary of Contents for La Gard SmartPoint
-
Page 1: Table Of Contents
• Set Time Delay and Open Offset The SMARTPOINT is a feature-rich product with many possible options available. Please read through the instructions carefully before attempting any programming. After reading through the entire manual, highlight any features to be programmed in the system. -
Page 2: Master Menu
1.0 CHAnGInG YOUR CODE - MASTER MASTER CODE 1. Press any key to power up SMARTPOINT. XXXXXXXX • Display will show either “ENTER CODE” or SELECT LOCK NUMBER” when two or more locks are installed. 2. Hold down “zero” until the display shows “MASTER CODE, X-X-X-X-X-X-X-X”. - Page 3 In this menu you can enter a new opening period, modify and verify all stored opening periods. XXXXXXXX 1. Press any key to power up SMARTPOINT. • Display will show either “ENTER CODE” or “SELECT LOCK” when two or more locks are installed.
-
Page 4: View Audit
• Press P for NO and OK for YES, display will show, “OK, LOCK # INSTALLED” Do You • If the display shows “LOCK=1, COMM FAIL!”, the SMARTPOINT is not communicating with the lock or lock CONFIRM? has not been programmed. Check the lock ID, power connection and all cable connections & retry. - Page 5 2.6.2 SYSTEM SET-UP - Remove a Lock from the Logic Module LOCKS Follow the four (4) steps for system set-up. INSTALL 1. Press OK to select this function, display will show “LOCKS INSTALL”. 2. Press P to select the next function, display will show “LOCKS REMOVE”. LOCKS 3.
-
Page 6: Audit Lock Via Logic Module
4. Select a date range or leave circle for all events checked. 5. Connect cable to port on Logic Module. PC LINK 6. Press any key to power up SMARTPOINT. • Display will show either “ENTER CODE” or SELECT LOCK” when two or more locks are installed. PC LINK 7. -
Page 7: Users
2.8 USER FUNCTIONS 2.8.1 MASTER MEnU - USER - Add User MASTER CODE 1. Press any key to power up SMARTPOINT. XXXXXXXX • Display will show either “ENTER CODE” or “SELECT LOCK” when two or more locks are installed. 2. Hold down “zero” until the display shows “MASTER CODE, X-X-X-X-X-X-X-X”. -
Page 8: Copyright 2008 (P/N)702.087 V1
2.8.2 MASTER MEnU - Users - Delete A User MASTER CODE 1. Press any key to power up SMARTPOINT. XXXXXXXX • Display will show either “ENTER CODE” or “SELECT LOCK” when two or more locks are installed. 2. Hold down “zero” until the display shows “MASTER CODE, X-X-X-X-X-X-X-X”. -
Page 9: Add/Remove Manager
2.8.5 MASTER MEnU - Users - Access Lock MASTER CODE 1. Press any key to power up SMARTPOINT. XXXXXXXX • Display will show either “ENTER CODE” or “SELECT LOCK” when two or more locks are installed. 2. Hold down “zero” until the display shows “MASTER CODE, X-X-X-X-X-X-X-X”. -
Page 10: Re-Enroll
2.8.8 MASTER MEnU - USER - Re-Enroll Fingerprint MASTER CODE 1. Press any key to power up SMARTPOINT. XXXXXXXX • Display will show either “ENTER CODE” or “SELECT LOCK” when two or more locks are installed. 2. Hold down “zero” until the display shows “MASTER CODE, X-X-X-X-X-X-X-X”. - Page 11 EEPROM MEMORY INIT LA GARD’s customer service department can be reached 24 hours a day, seven days a week. They are ready to assist with any questions regarding the SMARTPOInT or any LA GARD product. Please contact them, toll-free at (877-522-2627).
Need help?
Do you have a question about the SmartPoint and is the answer not in the manual?
Questions and answers