
Subscribe to Our Youtube Channel
Related Manuals for Proline PCI300G-E-2


Summary of Contents for Proline PCI300G-E-2
- Page 1 PCI300G-E-2 BUILT-IN FRIDGE FREEZER Instruction booklet RÉFRIGÉRATEUR COMBINÉ ENCASTRÉ Guide d’utilisation INBOUW COMBI KOELKAST-VRIESKAST Handleiding...
-
Page 2: Table Of Contents
Contents SAFETY ....................2 WARNINGS ....................2 IMPORTANT SAFETY INSTRUCTIONS .............3 Before installing and operating your appliance ..........4 PARTS OF THE APPLIANCE AND THE COMPARTMENTS ....5 HOW TO OPERATE THE APPLIANCE ............. 6 Thermostat Setting ..................6 Warnings about Temperature Adjustments ..........6 Accessories ....................7 Ice tray ........................7 Plastic scraper ......................7... -
Page 3: Safety
PART - 1. SAFETY Notes: Please read this instruction manual carefully before installing and using your appliance, and keep it in a safe place for future reference. We are not responsible for any damage caused by misuse or non-compliance with the instructions. WARNINGS •... -
Page 4: Important Safety Instructions
IMPORTANT SAFETY INSTRUCTIONS • If you are discarding an old freezer or refrigerator with a lock / catch fi tted to the door, ensure that it is left in a disabled condition to prevent the entrapment of young children when playing. •... -
Page 5: Before Installing And Operating Your Appliance
Before installing and operating your appliance Before starting to use your fridge, you should pay attention to the following points: • Operating voltage for your fridge is 220-240 V at 50Hz. • The plug must be accessible after installation. • Your appliance may have a smell when it is operated for the fi rst time; the smell will fade away when your appliance starts to cool. -
Page 6: Parts Of The Appliance And The Compartments
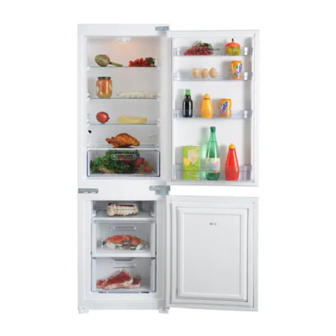
PART - 2. PARTS OF THE APPLIANCE AND THE COMPARTMENTS A) Refrigerator compartment 6) Freezer compartment fl ap door B) Freezer compartment 7) Freezer compartment top drawer 1) Thermostat knob 8) Freezer compartment bottom drawer 2) Refrigerator light & cover 9) Ice tray 3) Refrigerator shelves 10) Lower rack... -
Page 7: How To Operate The Appliance
PART - 3. HOW TO OPERATE THE APPLIANCE Thermostat Setting Thermostat knob The thermostat automatically regulates the inside temperature of the compartments. Turn the knob from position 1 to 5 to adjust to the desired temperature. Freezer & Refrigerator Thermostat Setting 0 : Off position. -
Page 8: Accessories
Notes for use: - Clean and defrost your appliance regularly (See "Defrosting" section). - Check the contents of the compartments every now and then. - Store commercially prepared food in accordance with the instructions given on the package. - Choose high-quality fresh food and make sure it is thoroughly clean before freezing it. - Do not store poisonous or any dangerous substances in your freezer. -
Page 9: Temperature Indicator
Temperature indicator In order to help you make the right settings, your appliance has been fi tted with a temperature indicator, located in the coldest area of your refrigerator (that is, just above the crisper). To enjoy good food preservation in your refrigerator, especially in the coldest area, make sure the logo “OK”... -
Page 10: Storing Food In The Appliance
PART - 4. STORING FOOD IN THE APPLIANCE Refrigerator Compartment The refrigerator compartment is used for storing fresh food for a few days. • Do not place food in direct contact with the rear wall of the refrigerator compartment. Leave some space around food to allow circulation of air. •... -
Page 11: Cleaning And Maintenance
PART - 5. CLEANING AND MAINTENANCE • Unplug your appliance. • Remove all substances. • Clean the inside and outside walls with a clean sponge or soft cloth using warm and soapy water. Do not try to wash your appliance by pouring water. •... -
Page 12: Defrosting Operation
Defrosting operation Note: The refrigerator and freezer compartments of your appliance should be defrosted twice a year. Defrosting the Refrigerator Compartment (Evaporating tray) • The fridge defrosting process is carried out automatically every time the compressor stops. The defrost water is automatically routed to the drain port and into a tray placed on the top of the compressor to the rear of the appliance from which it evaporates. -
Page 13: Replacing The Refrigerator Light Bulb
Replacing the Refrigerator Light Bulb 1. Unplug the unit from the power supply, 2. Remove the refrigerator light cover (A) by pressing the hooks placed on both sides of the cover. 3. Change the light bulb (B) with a new one (E14, no more than 15 W). -
Page 14: Before Calling Your After Sales Service
PART - 7. BEFORE CALLING YOUR AFTER SALES SERVICE If your refrigerator is not working properly, please check the following before calling for help. Your appliance is not working. Check that; • The appliance is plugged in. • The general switch in your home is not disconnected. •... -
Page 15: Tips For Saving Energy
Recommendations • The compressor protection thermal fuse will cutout after sudden power breakdowns or after unplugging the appliance, because the gas in the cooling system is not stabilised. This is quite normal, and the fridge will restart after 4 or 5 minutes. •... -
Page 16: Installation Manual
INSTALLATION MANUAL Installation instructions and door reversibility Installation ! Before installation, read the instructions carefully. ! Fit the refrigerator/freezer in stable kitchen units only. ! If necessary, reverse the door according to instructions. ! Check the installation dimensions according to fi g.C. The position of the joint between the unit doors must be level with the position of the joint between the appliance doors. - Page 17 Figure A 1770 1770-1790 Figure B Figure C Figure D Figure E EN - 16 -...
- Page 18 Figure F Figure G Figure H Figure J EN - 17 -...
- Page 19 Figure K Door reversing 1. Unscrew upper door hinge and take upper door to safe place. 2. Unscrew door hinge pin and screw it to opposite side fi rmly and take to safe place. 3. Unscrew middle door hinge and take lower door to safe place.
-
Page 20: Technical Data
TECHNICAL DATA Brand Appliance type Fridge-Freezer Star rating Net Freezer volume (l.) 158L Net Fridge volume (l.) Freezing capacity (kg/24h) N (+16 C to +32 Climate Class +Ambient Range Energy class Gross weight (kg) 51,25 Power consumption (kWh/year) 220-240V / 50Hz Supply voltage (V/Hz) Light Power (Watts) 42 dB... - Page 21 Sommaire INSTRUCTIONS PRÉALABLES ............. 21 MISES EN GARDE IMPORTANTES ............21 INSTRUCTIONS DE SÉCURITÉ GÉNÉRALES ........22 Avant d’installer et d’utiliser votre appareil ..........22 PARTIES ET PIÈCES DE VOTRE RÉFRIGÉRATEUR ......24 FONCTIONNEMENT DE L'APPAREIL ............ 25 Réglage du thermostat ................25 Avertissements relatifs aux réglages de la température ......
-
Page 22: Instructions Préalables
PARTIE - 1. INSTRUCTIONS PRÉALABLES Veuillez lire attentivement ce manuel d’utilisation avant de procéder à l’installation et à l’utilisation de votre appareil. Notre responsabilité ne saurait être engagée en cas de dommages dus à une mauvaise utilisation du produit ou au non-respect des instructions. MISES EN GARDE IMPORTANTES •... -
Page 23: Instructions De Sécurité Générales
demandez de l’aide à un personnel professionnel et qualifi é, si besoin. • Toujours manipuler l’appareil avec soin afi n d’éviter d’endommager celui-ci. INSTRUCTIONS DE SÉCURITÉ GÉNÉRALES • Si votre ancien réfrigérateur est doté d’un système de verrouillage, veillez à ce que celui- ci soit désactivé... - Page 24 • La prise doit être facilement accessible après l'installation. • Il peut y avoir une odeur lors de la première mise en marche de l’appareil. Ne vous inquiétez pas : cette odeur disparaîtra dès que l'appareil commencera à refroidir. • Avant d’effectuer le raccordement électrique, assurez-vous que la tension indiquée sur la plaque signalétique correspond à...
-
Page 25: Parties Et Pièces De Votre Réfrigérateur
PARTIE - 2. PARTIES ET PIÈCES DE VOTRE RÉFRIGÉRATEUR A) Compartiment réfrigérateur 6) Abattant du compartiment congélateur B) Compartiment congélateur 7) Tiroir supérieur du compartiment congélateur 8) Tiroir inférieur du compartiment congélateur 1) Thermostat 9) Bac à glaçons 2) Lampe (avec protection) du réfrigérateur 10) Compartiment à... -
Page 26: Fonctionnement De L'appareil
PARTIE - 3. FONCTIONNEMENT DE L'APPAREIL Réglage du thermostat Thermostat Le thermostat de l'appareil régule automatiquement la température interne des compartiments. Tournez le bouton sur une position située entre 1 et 5 en fonction de la température souhaitée. Réglage du thermostat du congélateur et du réfrigérateur ; 0: Position d’arrêt. -
Page 27: Accessoires
Remarques concernant l’utilisation de votre appareil : - Nettoyez et dégivrez régulièrement votre appareil (voir la section « Dégivrage »). - Vérifi ez de temps en temps le contenu des compartiments. - Conservez les aliments industriels conformément aux instructions fi gurant sur le paquet. - Choisissez des aliments frais de bonne qualité... -
Page 28: Indicateur De Température
Indicateur de température Pour vous aider au bon réglage de votre appareil nous avons équipé votre réfrigérateur d’un indicateur de température, celui-ci étant placé dans la zone la plus froide (soit juste au-dessus du bac à légumes). Pour la bonne conservation des denrées dans votre réfrigérateur et notamment dans la zone la plus froide, veillez à... -
Page 29: Conservation Des Aliments Dans L'appareil
CONSERVATION DES ALIMENTS DANS PARTIE - 4. L'APPAREIL Compartiment réfrigérateur Le compartiment réfrigérateur est utilisé pour conserver des aliments pendant quelques jours. • Ne placez pas d’aliments au contact direct de la paroi arrière du compartiment réfrigérateur. Laissez un peu d’espace autour des aliments pour permettre la circulation de l’air. -
Page 30: Nettoyage Et Entretien
• Une fois les aliments décongelés, ils ne doivent pas être recongelés ; vous devez les cuisiner rapidement afi n de les consommer ou de les recongeler. • Conservation : Si vous souhaitez utiliser la capacité maximale nette de votre congélateur, vous pouvez retirer les deux tiroirs et l’abattant, et placer les articles directement sur les conduits de congélation. -
Page 31: Dégivrage
Dégivrage Note : les compartiments réfrigérateur et congélateur doivent être dégivrés deux fois par an. Compartiment réfrigération (Gouttière) • le dégivrage s'effectue automatiquement chaque fois que le compresseur s'arrête. L'eau de dégivrage est automatiquement dirigée vers l'orifi ce d'évacuation d'où elle s'écoule dans un bac placé... -
Page 32: Remplacement De L'ampoule Du Réfrigérateur
Remplacement de l’ampoule du réfrigérateur 1. Débranchez l’appareil. 2. Appuyez sur les crochets de part et d’autre de la protection de l’ampoule (A) pour la retirer. 3. Remplacez l’ampoule (B) par une nouvelle ampoule E14 de 15W maximum. 4. Replacez la protection, puis rebranchez l’appareil. - Page 33 • que les portes sont correctement fermées. • qu'aucune poussière ne s'est accumulée sur le condenseur. • que l'espace laissé à l'arrière et sur les côtés de l'appareil est suffi sant. Votre appareil est bruyant. Le gaz réfrigérant qui circule dans l'appareil peut émettre un léger bruit (bruit semblable à...
-
Page 34: Astuces D'économie D'énergie
Informations relatives à la conformité • La classe normale est défi nie pour les températures environnementales comprises entre 16 et 32°C conformément aux normes TS EN ISO 15502. • L'appareil est conçu en conformité avec les normes EN15502, CEI60335-1 / CEI60335- 2-24, 2004/108/CE. -
Page 35: Manuel D'installation
MANUEL D'INSTALLATION Instructions de montage ! Avant l’installation veuillez lire attentivement ces instructions. ! N’installez le réfrigérateur/congélateur que dans un meuble de cuisine stable et à niveau. ! Si nécessaire inversez le sens d’ouverture de la porte en suivant les instructions (ci- dessous). - Page 36 Figure A 1770 1770-1790 Figure B Figure C Figure D Figure E FR - 35 -...
- Page 37 Figure F Figure G Figure H Figure J FR - 36 -...
-
Page 38: Inversement Du Sens D'ouverture Des Portes
Figure K Inversement du sens d’ouverture des portes 1. Dévissez la charnière supérieure et démontez la porte du haut 2. Dévissez l’axe de la charnière et remontez-le de l’autre côté de la charnière. 3. Dévissez la charnière du milieu et démontez la porte du bas . -
Page 39: Fiche Technique
FICHE TECHNIQUE Marque Type d’appareil Réfrigérateur - Congélateur Classement par étoiles Volume net du congélateur (l.) Volume net du Réfrigérateur (l.) 158L Capacité de congélation (kg/24) Classe climatique + température ambiante N (+16 C to +32 Classe énergétique Poids brut (en Kg): 51,25 Consommation électrique (kWh/an) Tension d’alimentation (V/Hz) - Page 40 Inhoudsopgave VOORDAT U HET APPARAAT GAAT GEBRUIKEN ......40 Veiligheidsmaatregelen ................42 Aanbevelingen .....................42 Inschakelen van het Apparaat ..............44 BEDIENING VAN HET APPARAAT ............45 Thermostaat instelling ..................45 Waarschuwingen voor temperatuurinstellingen ...........45 Accessoires ....................46 Ijslade ..........................46 Plastic schraper ......................46 VOEDSEL IN HET APPARAAT PLAATSEN ........... 47 Koelingscompartiment .................47 Vriezer ......................47 REINIGING EN ONDERHOUD ..............
-
Page 41: Voordat U Het Apparaat Gaat Gebruiken
DEEL 1. VOORDAT U HET APPARAAT GAAT GEBRUIKEN WAARSCHUWING: Houd de ventilatieopeningen, in de apparaat behuizing of de ingebouwde structuur, vrij van belemmeringen. WAARSCHUWING: Gebruik geen mechanische apparaten of andere middelen om het ontdooiproces te versnellen behalve de middelen aanbevolen door de fabrikant. WAARSCHUWING: Gebruik geen elektrische apparaten in de etenswaren opslagcompartimenten van het apparaat. - Page 42 • Dit apparaat is niet bestemd voor gebruik door personen (inclusief kinderen) met verminderde fysieke, zintuiglijke of mentale mogelijkheden, of personen met een gebrek aan ervaring en kennis, tenzij zij onder toezicht staan van of instructies hebben ontvangen met betrekking tot het gebruik van het apparaat door een persoon die instaat voor hun veiligheid.
-
Page 43: Veiligheidsmaatregelen
Veiligheidsmaatregelen • Let op: Zorg ervoor dat de ventilatieopeningen in de ombouw van het apparaat of de constructie waarin het apparaat wordt ingebouwd niet afgedekt worden. • Gebruik geen mechanische apparatuur of andere kunstmatige middelen om het proces van ontdooien te versnellen. •... - Page 44 • Plaats nooit zuurhoudende dranken in glazen fl essen en blikjes in het vriesvak van uw koelkast. De fl essen blikjes kunnen barsten. • Voor uw veiligheid mag u nooit explosief en ontvlambaar materiaal in de koelkast plaatsen. Plaats dranken met een hoog alcoholgehalte in het koelvak van het apparaat met hun doppen stevig gesloten en in verticale positie.
-
Page 45: Inschakelen Van Het Apparaat
Inschakelen van het Apparaat • Wacht na installatie ten minste 3 uur voordat u het apparaat inschakelt. Het koelcircuit moet zich eerst stabiliseren alvorens het apparaat effi ciënt kan werken. • Maak voor ingebruikname het apparaat schoon; vooral het interieur. (Zie Schoonmaken en Onderhoud). •... -
Page 46: Bediening Van Het Apparaat
DEEL 2. BEDIENING VAN HET APPARAAT Thermostaat instelling Thermostaat knop De thermostaat regelt de temperatuur in de koelkast en de vriezer automatisch. Door de knop van stand 1 naar 5 te draaien, verlaagt u de temperatuur. Instelling van de thermostaat voor koel- en vriezercompartiment 0 : Geen koeling. -
Page 47: Accessoires
• Er wordt een vertragingsfunctie van 5 minuten toegepast om schade aan de compressor van de koelkast te vermijden wanneer u de stekker verwijdert en opnieuw invoert om ze in te schakelen of tijdens een stroompanne. Uw koelkast begint na 5 minuten normaal te werken. -
Page 48: Voedsel In Het Apparaat Plaatsen
DEEL 3. VOEDSEL IN HET APPARAAT PLAATSEN Koelingscompartiment • Het koelcompartiment wordt gebruikt voor het bewaren van verse levensmiddelen die een paar dagen bewaard dienen te worden. • Plaats geen levensmiddelen tegen de achterwand van het koelcompartiment. Laat wat ruimte rondom de levensmiddelen zodat de lucht kan circuleren. Plaats geen hete levensmiddelen of verdampende vloeistof in de koelkast. -
Page 49: Reiniging En Onderhoud
• Voor het maken van ijsblokjes dient u het ijslaatje te vullen met water en in het vriescompartiment te plaatsen. Nadat het water volledig is bevroren, kunt u het ijslaatje buigen zoals hieronder afgebeeld om de ijsblokjes eruit te krijgen. Opslag: Als u gebruik wilt maken van de maximale nettocapaciteit, kunt u de laden verwijderen en de artikelen rechtstreeks op de koelhuizen plaatsen. -
Page 50: Ontdooien
Ontdooien Koelingscompartiment • Het koelgedeelte beschikt over een automatische ontdooiing. Het dooiwater wordt opgevangen in het dooiwatergootje aan de onderzijde van de achterwand van het koelgedeelte en het wordt via een slangetje naar buiten de koelkast getransporteerd waar het verdampt. •... -
Page 51: Voor Het Vervangen Van De Lamp In De Koelkast
Voor het vervangen van de lamp in de koelkast 1. Verbreek eerst de aansluiting met het elektriciteitsnet. 2. Druk op de haakjes aan de zijkant van de afdekking van de lamp en verwijder de afdekking (A). 3. Vervang de oude gloeilamp (B) door een nieuwe lamp van niet meer dan 15 W. - Page 52 Wat moet ik doen als de koelkast niet naar behoren functioneert? Controleer of ; • Het apparaat niet overladen is met producten; • De deuren perfect gesloten zijn; • Er geen stof is op de condensor; • Er aan de achterzijde genoeg ruimte is; Als het apparaat veel lawaai maakt ;...
-
Page 53: Tips Om Energie Te Besparen
Tips om energie te besparen 1– Installeer het apparaat in een koele, goed geventileerde ruimte, maar niet in direct zonlicht en niet in de buurt van een warmtebron (radiator, fornuis, etc.). Zo niet moet u een isolerende plaat gebruiken. 2– Laat warme dranken en etenswaren eerst afkoelen buiten het apparaat. 3–... -
Page 54: De Onderdelen Van Het Apparaat En De Compartimenten
DEEL 7. DE ONDERDELEN VAN HET APPARAAT EN DE COMPARTIMENTEN Deze presentatie is alleen bedoeld als informatie over de onderdelen van het apparaat. Onderdelen kunnen afhankelijk van het toestelmodel variëren. A) Koelkast 6) Afdekking vriesvak B) Vriesvak 7) Bovenste Lade vriezer compartiment 8) Onderste Lade vriezer compartiment 1) Thermostaatknop 9) Ijslade... -
Page 55: Installatie Instructies Sleepdeurmontage
Installatie instructies sleepdeurmontage ! Lees voor u met de installatie begint zorgvuldig deze installatie instructies. ! Plaats koelkast alleen stabiel keukenmeubel voldoende ventilatievoorzieningen. (fi g.B en fi g.C) ! Wijzig indien noodzakelijk de draairichting van de deur volgens de instructies. ! Kontroleer de inbouwafmetingen aan de hand van fi... - Page 56 Figure A 1770 1770-1790 Figure B Figure C Figure D Figure E NL - 55 -...
- Page 57 Figure F Figure G Figure H Figure J NL - 56 -...
- Page 58 Figure K Wijziging openingszijde apparaatdeur 1. Démonteer bovenste apparaatdeur door het losschroeven van bovenste deurscharnier 2. Schroef pen bovenste deurscharnier los en schroef deze stevig vast aan tegenoverliggende zijde in het bovenste deurscharnier 3. Démonteer onderste apparaatdeur door het losschroeven van middenste deurscharnier Schroef bevestigingsbeugel weer vast in zijn oorspronkelijke...
-
Page 59: Technische Specificaties
TECHNISCHE SPECIFICATIES Merk Apparaat type Koelkast-Diepvriezer Ster classifi cering Netto diepvriezer volume (l.) 158L Netto koelkast volume (l.) Vriesvermogen (kg/24u) N (+16 C to +32 Klimaatklasse +Omgevingsbereik Energieklasse Brutogewicht (kg) 51,25 Stroomverbruik (kWu/jaar) 220-240V / 50Hz Voedingspanning (V/Hz) Lichtvermogen (Watt) 42 dB Geluid [dB(A)re 1 pW] R600a / 55g... - Page 60 52118244...
Need help?
Do you have a question about the PCI300G-E-2 and is the answer not in the manual?
Questions and answers