
Related Manuals for McIntosh MHA100


Summary of Contents for McIntosh MHA100
-
Page 1: Headphone Amplifier
McIntosh Laboratory, Inc. 2 Chambers Street Binghamton, New York 13903-2699 Phone: 607-723-3512 www.mcintoshlabs.com MHA100 Headphone Amplifier Owner’s Manual... -
Page 2: Safety Instructions
WARNING - TO REDUCE RISK To prevent the risk of electric OF FIRE OR ELECTRICAL shock, do not remove cover or NO USER-SERVICEABLE PARTS SHOCK, DO NOT EXPOSE back. No user-serviceable parts INSIDE. REFER SERVICING TO THIS EQUIPMENT TO RAIN OR inside. -
Page 3: Table Of Contents
Thank You Customer Service Your decision to own this McIntosh MHA100 Head- If it is determined that your McIntosh product is in Setup Mode: con’t need of repair, you can return it to your Dealer. You Input Renaming ............18 phone Amplifier ranks you at the very top among Speaker Size ............... -
Page 4: General Information
MHA100. with the other McIntosh Component and look in Input Connectors on the MHA100. Refer to the dia- 2. Apply AC Power to the MHA100 and other McIn- the “Setup Section - Remote Control Codes” of gram for connection: PIN 3 the manual. -
Page 5: Introduction
Internet via an McIntosh Sentry Monitor power output stage protec- USB Computer connection. tion circuits ensure the MHA100 will have a long and The MHA100 reproduction is sonically transparent trouble free operating life. The Sentry Monitor also The Power Control Output connection provides conve- and absolutely accurate. -
Page 6: Dimensions
Dimensions Dimensions The following dimensions can assist in determining the best location for your MHA100. There is addition- al information on the next page pertaining to install- ing the MHA100 into cabinets. Front View of the MHA100 " 29.2cm "... -
Page 7: Installation
Installation Installation The MHA100 Headphone Ampifier is designed to be placed upright on a table or shelf, standing on its feet. The required ventilation requirements are shown. Always provide adequate ventilation for your MHA100. Cool operation ensures the longest possible 6"... -
Page 8: Rear Panel Connections
Digital Optical, Coaxial and Balanced sending digital audio signals Main Fuse holder, refer to information on the back panel of your MHA100 to determine the correct fuse size and rating BALANCED INPUT PREAMP OUTPUT receives a turn On/Off signal from a... - Page 9 Notes...
-
Page 10: Connecting Components And Optional Loudspeakers
(30.48 meters) Impedance terclockwise until an opening or less or less or less page 12. If the MHA100 will be used with an exter- nal Power Amplifier, please refer to page 13. 8 Ohms 16AWG 14AWG 12AWG Power Control Connections: 1. - Page 11 Terminal to the Loudspeaker Terminal Connections being careful to observe the correct polarities. Refer to “General Information” Note 7 on page 4 for additional information. 5. Connect the MHA100 power cord to an active AC Connect to Computer outlet. AC Outlet Spade Lug or Wire Connections: 6.
-
Page 12: System Thru Connections
System Thru Connections System Thru Connections The MHA100 can also be part of an existing Audio or Audio/Video Sound System. The MHA100 allows connection of Headphones for private listening. It can also drive Loudspeakers in a second room. The MHA100 becomes active when the Main Preamplifier or Audio/Video Controller is On. -
Page 13: External Power Amplifier Connections
External Power Amplifier Connections External Power Amplifier Connections The MHA100 has the ability to drive an External Power Amplifier. In the example below, the MHA100 automatically switches the External Power Amplifier On/Off via Power Control function. 1. Connect Audio Cables from the MHA100 PRE- AMPlifier OUTPUT jacks to the External Power 2. -
Page 14: Remote Control Push-Buttons
Mutes and unmutes the audio Powers the MHA100 ON or OFF Selects the PREVIOUS Station Selects the NEXT Station Preset Preset on contemporary McIntosh on contemporary McIntosh Tuners Tuners Note: Push-buttons whose function is not identified above are for use with other McIntosh Products. -
Page 15: How To Use The Remote Control
The supplied Remote Control performs the various When using an optional contemporary McIntosh Operating Functions for the MHA100 Headphone Tuner with the MHA100, select the next Station Preset Amplifier. Note: Refer to the “How to Operate” Section of this by press the Push-button. -
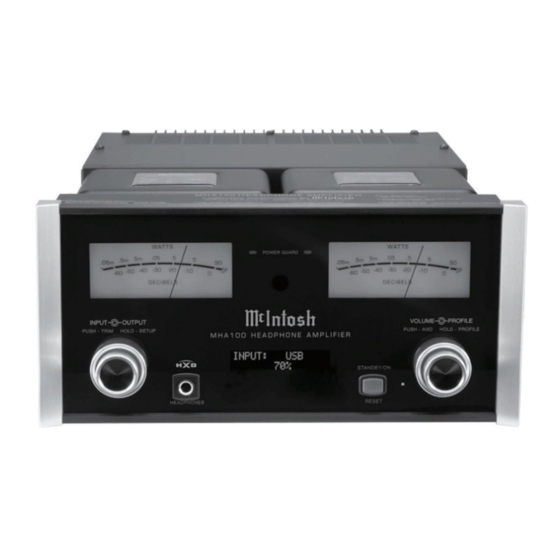
Page 16: Front Panel Displays, Controls, Push-Button And Jack
OUTPUT Control allows the Indicates the Dynamic Crossfield STANDBY/ON Push-button with selection of either Headphones circuitry is active when illuminated indicator switches the MHA100 speakers. When in Setup Mode the microprocessors used for changing the various Connection for dynamic INFORMATION DISPLAY indicates PROFILE Control allows function settings. -
Page 17: How To Operate The Setup Mode
V_._ _ V_.__ MHA100 Front Panel Display. Refer to the MHA100 Front Panel S/N: _ _ _ _ _ _ _ Illustration on the previous page while performing an Figure 3 McIntosh USB Audio V_.__... -
Page 18: Firmware Version
The MHA100 functionality is controlled by internal The MHA100 Default Input Names (UNBAL, BAL- INPUT: UNBAL software that is known as Firmware. The MHA100 ANCED, OPTICAL, COAX and AES/EBU as indi- NAME: MNBAL has two different Firmwares, one is the “System Firmware”... -
Page 19: Speaker Size
80Hz. It is recommended the Professionals The MHA100 allows for the connection of Loud- The MHA100 is designed to work with an external at your McIntosh Dealer, who are skilled in all Powered Subwoofer. The subwoofer would be used speakers with different performance capabilities. -
Page 20: Remote Control
Operation can be disabled in the event there is a con- flict with another McIntosh component located in the same room as the MHA100. Refer to “General Infor- mation, note 6” on page 4 for additional information. Disable the Front Panel IR Sensor by performing the following steps: 1. -
Page 21: How To Operate The Mha100
The Red LED beside the STANDBY/ON Push-button Control. Refer to figures 50 and 53. a TRIM Setting without lights to indicate the MHA100 is in Standby mode. changing it, press the To switch ON the MHA100, press the STANDBY/ON Volume Control... -
Page 22: Balance
Input Selection and Volume Level. Source Components can have slightly different volume INPUT Control to select the OPTICAL Input and levels resulting in the need to readjust the MHA100 note if the relative volume is louder or quieter BALANCE Volume Control when switching between different than the volume level of the UNBAL. -
Page 23: Trim Level
MONO / STEREO Power Amplifiers will also switch On/Off when Control until “DISPLAY” appears on the Front Mono connected to the MHA100 via a power control Panel Display. Refer to figure 68. cable. Refer to “Power Control Connections” Figure 63 DIGITAL AUDIO on page 4. -
Page 24: Headphone Jack, Headphone Hxd Tm
2. To disable the HXD Mode momen- tarily press the Front Panel VOLUME Figure 76 Profile Mode Control. The MHA100 has the ability to store up to 5 differ- Note: HXD Mode is automatically Figure 71 ent Profile Settings for Headphone use. Each profile... - Page 25 Figure 83 NO PROFILE SAVED RENAMING A PROFILE NAME PROFILE Figure 79 The MHA100 Profile Name (Profile1 thru Profile5 as Y1ofile1 Create new Profile1 by following the below steps: Figure 87 4. Press and hold in the VOLUME CONTROL until ized with a different name up to eight characters long the Front Panel Display indicates “SAVE PRO-...
-
Page 26: Power Output Meters And Power Guard
Figure 91 Figure 81 21. Rotate the Profle Control to select “DELETE peaks in the audio signals. In the event the MHA100 15. To exit the Profile Rename Mode momentarily over heats, due to improper ventilation, high ambient ALL, Saved Profiles”. Refer to figure 92. -
Page 27: Optical And Coaxial Digital Inputs
For the best performance, the volume When using a PC Computer with Windows, a spe- control on the MHA100 should be set to 70%. The cial McIntosh USB Audio Software Driver needs to be It is important to first install the downloaded software Volume Control on the Main Preamplifier or Audio/ installed on the PC Computer. - Page 28 Figure 108 Figure 109 figures 115, 116 and 117. Figure 115 Figure 119 Notes: 1. When the McIntosh USB Audio MHA100 is not connected to your computer, the previ- Figure 111 Figure 110 ous default Audio Device will be selected.
-
Page 29: Of Microprocessors
Sampling Rate to the active Windows Playback STANDBY/ON Indicator switches Off. Program. 2. When the MHA100 cycles On then Off, release the Note: In general, when the original music is recorded at a higher Sampling Rate, the result is usually STANDBY/ON Push-button. -
Page 30: Specifications
8V unbalanced Standby: Less than 0.25 watt Total Harmonic Distortion 16V balanced Note: Refer to the rear panel of the MHA100 for the cor- 0.005% maximum with both channels operating from rect voltage. 250 milliwatts to rated power, 20Hz to 20,000Hz... -
Page 31: Packing Instructions
(Read Above) only if they are all in good serviceable condition. If needed, please call or write Customer Service Depart- ment of McIntosh Laboratory. Refer to page 3. Please see the Part List for the correct part numbers. LEFT FOAM... - Page 32 McIntosh Laboratory, Inc. 2 Chambers Street Binghamton, NY 13903 www.mcintoshlabs.com The continuous improvement of its products is the policy of McIntosh Laboratory Incorporated who reserve the right to improve design without notice. Printed in the U.S.A. McIntosh Part No. 04145500...
- Page 33 20. JRiver 20 is availiable as a 30 day free trial from www.jriver.com 3-Connect the McIntosh to your computer with a USB 2.0 High Speed A-to-B type cable and turn on. 4-In your PC go to Settings-> Control Panel and open Sound. See screen below: McIntosh Laboratory, Inc 2 Chambers Street •...
- Page 34 The Sound window should show JR as the default device. McIntosh Laboratory, Inc 2 Chambers Street • Binghamton, NY 13903 • (800) 538 6576 • www.mcintoshlabs.com...
- Page 35 If the McIntosh USB shows up as Default or Default Communications Device Check on the Properties tab and Disable. Although the system could be run with two devices checked we are going to use JR- MC20 as the main USB device.
- Page 36 Select full-range speakers and then with no other music playing and the USB–D/A input selected on the McIntosh stereo, click one speaker at a time. You will hear the chime sounds come out of your left and right speaker. After the chimes are played, click Next then Finish in the final box.
- Page 37 In the Supported Format tab/window, all six, 44.1kHz through 192kHz should be shown. Bit depth will be set later in the JR20 Music program so ignore the 16 bit. McIntosh Laboratory, Inc 2 Chambers Street • Binghamton, NY 13903 • (800) 538 6576 • www.mcintoshlabs.com...
- Page 38 Level tab should always be set to 100% as shown since listening Volume is set in the connected McIntosh model and all bits are always sent from the JRiver player to the McIntosh for Bit Perfect conversion to stereo analog playback.
- Page 39 The McIntosh driver will look like this when playing and will reflect the setup in JRiver, no adjustments are needed. The sample rate will change with the music file and the driver will remain in 32 bit mode as that is the size of the digital ‘package’...
- Page 40 JR operation. To be an expert on all computers is beyond the scope of this outline but these basic settings will work well with the McIntosh 32/192 USB 2.0 High Speed input for music playback of all file types using a Windows 7 or 8 machine.
- Page 41 Digital Output will list all of the USB audio drivers on the computer. Please check McIntosh (ASIO). This matches the McIntosh 32/192 USB input. If it does not appear in the list please see the driver download directions on the first page of this Doc.
- Page 42 All of these following adjustments are being made to match the way the data from the WIN computer is sent to the McIntosh ASIO USB input. If only ONE type of digital file was used for all music this would be simple. If however, ANY audio file type and all resolutions are to be played then the JR 20 settings must match the switching cadence of the McIntosh DAC.
- Page 43 DAC. By checking No change, the McIntosh USB input will see each file in its’ original format. If all the formats are set to 192,000Hz, as an example, this will only increase the file size or ‘container’ of the original music file with no change in sound quality.
- Page 44 5-Check - Play Files from memory instead of disk. Note: This will pull the music from the solid state memory instead of the spinning disc drive which is more precise. McIntosh Laboratory, Inc 2 Chambers Street • Binghamton, NY 13903 • (800) 538 6576 • www.mcintoshlabs.com...
- Page 45 As shown below, Live playback latency: Minimum, should be set. This will aid in sound and picture synchronization when watching Youtube or other streaming AV web content. McIntosh Laboratory, Inc 2 Chambers Street • Binghamton, NY 13903 • (800) 538 6576 • www.mcintoshlabs.com...
- Page 46 These are all of the settings needed for smooth playback from the computer to the McIntosh Asio USB input. Please refer to the JRiver Wiki Help forum for detailed advice and information on JRiver operation. Additional questions on the McIntosh ASIO USB input may be sent to McIntosh Tech Support.
- Page 47 MHA100 h e a d p h o n e a m p l i f i e r The new MHA100 is the first dedicated headphone ■ amplifier from McIntosh and employs a new adaptation of our Autoformer technology to produce...
- Page 48 For the Consumer’s Protection: One preamplifier (stereo) In order to ensure the highest level of customer satisfaction, “new” McIntosh products may only be One set of stereo speaker terminals purchased over-the-counter or delivered and installed by an Authorized McIntosh Dealer. McIntosh (8 Ohms) products that are purchased over the Internet, by phone or mail order are presumed to be “used”...
- Page 49 HOME ELECTRONICS THREE YEAR LIMITED WARRANTY elcome to the family of McIntosh McIntosh provides for your Product, and that no owners. This is the Warranty for your one, including your dealer, has any authority to new McIntosh Home Electronic Product either modify or expand upon this Warranty.
- Page 50 Product for which the owner has neither completed and submitted the Warranty shall return the Product to its owner at the owner’s expense. In the alternative, McIntosh may at its sole Registration Card at the time of purchase nor included the original sales receipt with the Product when option either replace the Product without charge, or if replacement is not commercially practicable delivered for service, at McIntosh’s or its Authorized Service Agency’s then-current repair rates.
Need help?
Do you have a question about the MHA100 and is the answer not in the manual?
Questions and answers