Advertisement
Available languages
Available languages
Quick Links
A A
S S
6 6
N N
G G
A A
L L
A A
S S
6 6
N N
G G
A A
L L
S S
C C
R R
S S
C C
R R
INSTRUCTION MANUAL
Thank you for choosing Black & Decker!
Go to www.BlackandDecker.com/NewOwner
to register your new product.
PLEASE READ BEFORE RETURNING THIS
PRODUCT FOR ANY REASON:
If you have a question or experience a problem
with your Black & Decker purchase, go to
HTTP://WWW.BLACKANDDECKER.COM/INSTANTANSWERS
for instant answers 24 hours a day.
If you canʼt find the answer or do not have access to the internet,
call 1-800-544-6986 from 8 a.m. to 5 p.m. EST Mon. -- Fri.
to speak with an agent.
Please have the catalog number available when you call.
KEY INFORMATION YOU SHOULD KNOW:
• TO OPERATE: Rotate the collar to the position marked
. Press the button on the right side of the screwdriver to operate in
forward mode; press the button on the left side to operate in
reverse. Rotate the collar to the position marked
conventional non-powered screwdriver.
• TO INSTALL A BIT : Insert bit firmly into the cavity in the spindle
until it snaps into place. If the bit does not fit into the spindle, rotate
the bit and re-insert it.
• Use only with AA alkaline batteries.
SAVE THIS INSTRUCTION MANUAL FOR FUTURE REFERENCE.
VEA EL ESPAÑOL EN LA CONTRAPORTADA.
INSTRUCTIVO DE OPERACIÓN, CENTROS DE SERVICIO Y PÓLIZA DE GARANTÍA.
ADVERTENCIA: LÉASE ESTE INSTRUCTIVO ANTES DE USAR EL PRODUCTO.
Cat No. AS6NG
Form No. 90564817
Copyright © 2010 Black & Decker
GENERAL SAFETY RULES - FOR ALL BATTERY OPERATED TOOLS
WARNING! READ AND UNDERSTAND ALL INSTRUCTIONS.
Failure to follow all instructions listed below, may result in electric shock, fire and/or serious
personal injury.
SAVE THESE INSTRUCTIONS
Work Area
• Keep your work area clean and well lit. Cluttered benches and dark areas invite
accidents.
• Do not operate power tools in explosive atmospheres, such as in the presence of
flammable liquids, gases, or dust. Power tools create sparks which may ignite the dust or
fumes.
• Keep bystanders, children, and visitors away while operating a power tool.
Distractions can cause you to lose control.
Electrical Safety
• Do not abuse the cord. Never use the cord to carry the tool. Keep cord away from
heat, oil, sharp edges or moving parts. Replace damaged cords immediately.
Damaged cords may create a fire.
• A battery operated tool with integral batteries or a separate battery pack must be
recharged only with the specified charger for the battery. A charger that may be suitable
for one type of battery may create a risk of fire when used with another battery.
• Use battery operated tool only with specifically designated battery pack. Use of any
other batteries may create a risk of fire.
Personal Safety
• Stay alert, watch what you are doing and use common sense when operating a power
tool. Do not use tool while tired or under the influence of drugs, alcohol, or
medication. A moment of inattention while operating power tools may result in serious
personal injury,
• Dress properly. Do not wear loose clothing or jewelry. Contain long hair. Keep your
hair, clothing, and gloves away from moving parts. Loose clothes, jewelry, or long hair
can be caught in moving parts.
• Avoid accidental starting. Be sure switch is in the locked or off position before
inserting battery pack. Carrying tools with your finger on the switch or inserting the battery
pack into a tool with the switch on invites accidents.
• Remove adjusting keys or wrenches before turning the tool on. A wrench or a key that
is left attached to a rotating part of the tool may result in personal injury.
• Do not overreach. Keep proper footing and balance at all times. Proper footing and
balance enable better control of the tool in unexpected situations.
• Use safety equipment. Always wear eye protection. Dust mask, non-skid safety shoes,
hard hat, or hearing protection must be used for appropriate conditions.
Tool Use and Care
• Use clamps or other practical way to secure and support the workpiece to a stable
platform. Holding the work by hand or against your body is unstable and may lead to loss of
control.
• Do not force tool. Use the correct tool for your application. The correct tool will do the
job better and safer at the rate for which it is designed.
• Do not use tool if switch does not turn it on or off. A tool that cannot be controlled with
the switch is dangerous and must be repaired.
• Disconnect battery pack from tool or place the switch in the locked or off position
before making any adjustments, changing accessories, or storing the tool. Such
preventive safety measures reduce the risk of starting the tool accidentally.
• Store idle tools out of reach of children and other untrained persons. Tools are
dangerous in the hands of untrained users.
• When battery pack is not in use, keep it away from other metal objects like: paper
clips, coins, keys, nails, screws or other small metal objects that can make a
connection from one terminal to another. Shorting the battery terminals together may
cause sparks, burns, or a fire.
• Maintain tools with care. Keep cutting tools sharp and clean. Properly maintained tools,
with sharp cutting edge are less likely to bind and are easier to control.
K K
A A
L L
I I
N N
E E
B B
A A
T T
T T
E E
R R
K K
A A
L L
I I
N N
E E
B B
A A
T T
T T
E E
R R
E E
W W
D D
R R
I I
V V
E E
R R
E E
W W
D D
R R
I I
V V
E E
R R
to use as a
MAY 2010
Printed in China
• Check for misalignment or binding of moving parts, breakage of parts, and any other
condition that may affect the toolʼs operation. If damaged, have the tool serviced
before using. Many accidents are caused by poorly maintained tools.
• Use only accessories that are recommended by the manufacturer for your model.
Accessories that may be suitable for one tool may create a risk of injury when used on
another tool.
Service
Y Y
Y Y
• Tool service must be performed only by qualified repair personnel. Service or
maintenance performed by unqualified personnel may result in a risk of injury.
• When servicing a tool, use only identical replacement parts. Follow instructions in
the Maintenance section of this manual. Use of unauthorized parts or failure to follow
Maintenance Instructions may create a risk of shock or injury.
SPECIFIC SAFETY RULES
• Hold tool by insulated gripping surfaces when performing an operation where the
cutting tool may contact hidden wiring or its own cord. Contact with a "live" wire will
make exposed metal parts of the tool "live" and shock the operator.
• Avoid body contact with grounded surfaces such as pipes, radiators, ranges and
refrigerators. There is an increased risk of electric shock if your body is grounded.
The label on your tool may include the following symbols.
V ..........................volts
Hz ........................hertz
min ........................minutes
......................direct current
.......................... Class II Construction
........................safety alert symbol
WARNING: Some dust created by power sanding, sawing, grinding, drilling, and
other construction activities contains chemicals known to the State of California to
cause cancer, birth defects or other reproductive harm. Some examples of these
chemicals are:
• lead from lead-based paints,
• crystalline silica from bricks and cement and other masonry products, and
• arsenic and chromium from chemically-treated lumber.
Your risk from these exposures varies, depending on how often you do this type of
work. To reduce your exposure to these chemicals: work in a well ventilated area, and
work with approved safety equipment, such as those dust masks that are specially
designed to filter out microscopic particles.
WARNING: Fire or burn hazard. Batteries can explode or leak, and can cause injury
or fire. To reduce this risk:
• Carefully follow all instructions and warnings on the battery label and package.
• Always insert batteries correctly with regard to polarity (+ and -), marked on the battery and
the equipment.
• Do not short battery terminals.
• Do not recharge.
• Do not mix old and new batteries. Replace all of them at the same time with new batteries of
the same brand and type.
• Remove dead batteries immediately and dispose of per local codes.
• Do not dispose of batteries in fire.
• Keep batteries out of reach of children.
• Remove batteries if the device will not be used for several months.
Transporting batteries can possibly cause fires if the battery terminals inadvertently come
in contact with conductive materials such as keys, coins, hand tools and the like. The
US Department of Transportation Hazardous Material Regulations (HMR) prohibits
transporting batteries in commerce or on airplanes (i.e. packed in suitcases and carryon
luggage) UNLESS they are properly protected from short circuits. So when transporting
individual batteries, make sure that the battery terminals are protected and well insulated
from materials that could contact them and cause a short circuit. NOTE: Batteries
should not be put in checked baggage.
A
C
Position Instructions
Directives concernant la position
des piles
Instrucciones de posición de
funcionamiento
E
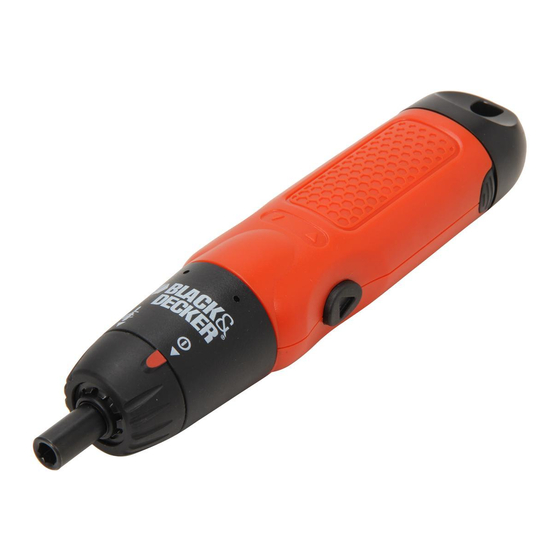
FEATURES (FIGURE A)
1. Switch (forward direction)
2. Switch (reverse direction)
3. Bit holder
4. Spindle lock collar
5. Battery holder
BATTERY INSTALLATION
The AS6NG screwdriver uses four size AA alkaline batteries only.
To install batteries in your tool, remove the end cap by depressing the two tabs, as shown
in Figure B. Pull the end cap out of the tool, as shown in Figure C, and observe the battery
position instructions printed on the battery holder. (The plus and minus ends of the batter-
ies are marked with + and - signs.) NOTE: Some battery manufacturers mark only the plus
(+) ends of the batteries. In these cases, the unmarked end of the battery is the (-) end.
Install the batteries as indicated and reinstall the cap.
The end cap and battery holder assembly will only fit back into the tool one way. If it does
not seem to fit properly, donʼt force it. Rotate it one half way around and try it again. When
it is in all the way, ensure that the two tabs snap into place. IMPORTANT: Incorrectly
installed batteries will reduce the toolʼs performance or prevent its operation entirely. If your
batteries are fresh and you feel the tool lacks power or doesnʼt run, double check the bat-
tery holder to see if the batteries are installed properly (+ and - signs aligned as shown.) If
proper installation and fresh batteries do not yield satisfactory performance, take or send
the tool to your local Black & Decker Service Center for a thorough inspection.
Be careful when storing the tool so that the switch is not inadvertently depressed by some
object. This would, of course, deplete the batteries in just a short while.
Operating Instructions
BIT INSERTION
To install a bit simply insert it into the cavity in the spindle until it snaps into place (Figure D).
To remove the bit pull it straight out. If bit does not fit into spindle, rotate the bit and re-insert it.
A..........................amperes
W ........................watts
......................alternating current
n o ........................no load speed
........................earthing terminal
.../min ..................revolutions or
reciprocations per minute
B
D
F
Advertisement

Related Manuals for Black & Decker AS6NG


Summary of Contents for Black & Decker AS6NG
- Page 1 BATTERY INSTALLATION • Use safety equipment. Always wear eye protection. Dust mask, non-skid safety shoes, The AS6NG screwdriver uses four size AA alkaline batteries only. hard hat, or hearing protection must be used for appropriate conditions. To install batteries in your tool, remove the end cap by depressing the two tabs, as shown Tool Use and Care in Figure B.
- Page 2 • Ne pas utiliser des outils électriques en présence de vapeurs explosives (comme OPERATING IN POWER MODE celles dégagées par des liquides, des gaz ou des poussières inflammables). Les Forward étincelles générées par le moteur des outils électriques peuvent enflammer les poussières •...
- Page 3 5. Compartiment des piles INSTALLATION DES PILES LEA EL MANUAL ANTES DE DEVOLVER Le tournevis AS6NG fonctionne au moyen de quatre piles alcalines AA. ESTE PRODUCTO POR CUALQUIER MOTIVO: Pour les installer, retirer le capuchon dʼextrémité en enfonçant les deux languettes, tel quʼillustré...
- Page 4 INSTALACIÓN DE BATERÍAS Nuestra garantía incluye la reparación o reposición del producto y/o componentes sin El destornillador AS6NG sólo usa cuatro baterías alcalinas de tamaño AA. cargo alguno para el cliente incluyendo la mano de obra, esta incluye los gastos de trasportación erogados para lograr cumplimiento de esta garantía en los domicilios...
Need help?
Do you have a question about the AS6NG and is the answer not in the manual?
Questions and answers