Table of Contents
Advertisement
Quick Links
Download this manual
See also:
Installation Manual
Advertisement
Table of Contents

Related Manuals for AIPTEK Pocket DVII


Summary of Contents for AIPTEK Pocket DVII
- Page 1 Electronic-Manual...
- Page 2 English English...
- Page 3 Notice 1. Do not drop, puncture or disassemble the camera. 2. Remove batteries during long periods between use. 3. Avoid using batteries of different brands at the same time. 4. Avoid using leaking or distorted batteries. 5. Avoid all contact with water and dry hands before using.
-
Page 4: Bundled Accessories
Bundled Accessories CD driver Camera User guide USB cable AV-out cable 2 x AA Alkaline batteries Strap Bundled Accessories... -
Page 5: Your Camera
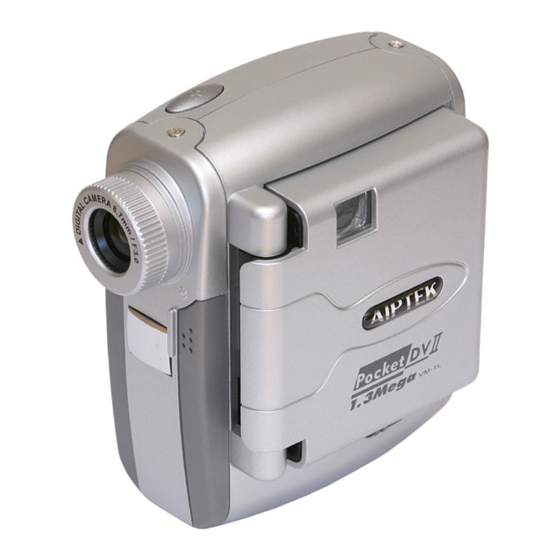
Your Camera Camera Parts (1) Shutter (2) Lens (3) Focus (10) (4) Mirror (11) (5) Microphone (13) (12) (6) View finder LCD display (8) Record button (9) MENU control (14) (10) USB port (15) (11) CF Card slot (12) AV-out port (13) Eject ( CF Card) (16) (14) Strap-holder... -
Page 6: Battery Installation
Battery Installation Battery Installation Your camera runs on two AA alkaline batteries. High performance batteries are recommended for this camera for maximum battery life. Battery Indicators on the LCD display indicates low battery. Transfer data from SDRAM to your PC immediately to avoid data loss. - Page 7 Using a CF Card External Memory/ CF Card In addition to 128 Mbits SDRAM, your camera can store data on Compact Flash Cards ( 8 MB- 512 MB). Data will be automatically stored on the CF card until it is full, with additional data stored on SDRAM.
-
Page 8: Strap And Tripod Use
Strap and Tripod Use Strap Attach the carrying strap for convenience and safety. Tripod (optional) Use a tripod to minimize camera movement and ensure optimal image quality, especially while shooting longer movies, self-portraits or video Tight conferencing. Loose Strap and Tripod Use... -
Page 9: Using Your Camera
Using Your Camera Opening LCD panel Swing the LCD panel 90 away from the camera ° body. Be careful not to over extend the panel. 90 ° Turning on your camera Press and hold the MENU control for 3 seconds to turn on your camera. -
Page 10: Lcd Display
LCD Display (6) (7) (8) LCD Display (11) Counter Picture quality AV out setting Still picture Format CF card (10) Self-Timer Battery indicator (11) Voice record Picture resolution (10) Voice playback Erase Mode Selecting Rotate (MENU control) up or down to shift between modes. - Page 11 Focus Focus Set focus before taking pictures. 16"~40" (40cm~100cm) 40"~ (100cm~ Focus...
- Page 12 Recording and Taking Pictures How to hold your camera Microphone Do not cover the lens. Do not cover the microphone. 20cm~40cm Distance between the camera and your eyes Subjects in the viewfinder should be clear. Recording and Taking Pictures...
-
Page 13: Taking Avi Movies
Taking AVI Movies Estimated maximum Built-in Memory recording time Your movies are stored as AVI files. Image size is SDRAM Memory About 2 min 320x240 pixels, with frame rate 10 fps. Maximum recording time is determined by the capacity of your Estimated maximum CF Card Storage Capacity CF Card... -
Page 14: Still Pictures
Still Pictures Still pictures Images taken in Still picture mode are stored as JPEG files. Steps (1) Select image resolution see below) (2) Center the target in the viewfinder. (3) Press the shutter button. (4) After red light stops, image is successfully captured. Image resolution &... - Page 15 Still Pictures Pictures Storage Capacity Icon Pictures storage capacity depends on CF 1280x1024 pixels 640x480 pixels Resolution (1.3M pixels) Card storage capacity and your SDRAM memory. Quality High quality High quality Normal Normal About About About About 8MB Memory ( Example ) 20 pictures 40 pictures 80 pictures...
-
Page 16: Voice Recording And Playback
Voice Recording and Playback Voice Recording Built-in Memory Estimated Voice Recording Time Voice recording capacity depends on CF Card storage SDRAM Memory About 30 min. capacity and your SDRAM Memory. Steps: CF Card Storage Capacity Estimated Voice Recording Time (1) Rotate (MENU control) to highlight About 1 hour 16MB... -
Page 17: Erase All
Erase Erase Last The last saved file ( AVI, JPEG, or WAV) will be deleted. Steps: (1) Rotate (MENU control) to highlight and press to erase last file. (2) Press stars blinking. (3) Press again to confirm. Erase All All files (AVI, JPEG, or WAV) saved in CF Card will be deleted. -
Page 18: For Best Results
For Best Results Keep the focus set to except for extreme close-ups. Make sure your subject is well lit from the front. Keep the camera level and steady when releasing the shutter. Make sure you have adequate light when taking still pictures or movies, especially indoors. -
Page 19: Av Out Mode
AV OUT Mode AV out mode Connect your camera and TV via A/V out cable for real A / V A / V time display, and AVI, JPEG, and WAV playback on your Select AV out Color System Audio The AV out color system of camera must be selected as same as your TV. - Page 20 TV Preview TV Preview TV preview will appear while camera success- fully enters AV-out mode. Rotate (MENU TV Preview TV Preview TV Preview control) up or down to shift between modes. Press to select mode. (10) As image is exported to TV, LCD preview will be temporarily disabled.
- Page 21 Playback Movies, Still Pictures and Voice Record Playback movies, still pictures and voice record on TV Select to playback movies, still pictures and voice record on TV. TV Preview TV Preview Steps: Steps: " Playback" icon (10) (1) Rotate (MENU control) to highlight (2) Press and you enter thumbnail mode.
-
Page 22: Bundled Software
Bundled Software Mega DV Manager and other Applications Main Feature bundled software packages Mega DV Manager configuration (1) Mega DV Mega DV Manager is your camera's driver as well as Manager software basic operating software. Your camera also comes Total Video Conference Software Total Video Conference Software Total Video Conference Software (2) NetMeeting... -
Page 23: Installation Notes
Mega DV Manager Installation Mega DV Manager Installation Mega DV Manager features The Mega DV Manager allows you to: Download pictures, AVI movies and WAV to your PC. View pictures and AVI movies on screen. Playback WAV files. Video Conference function. Installation Notes MS Windows XP and 2000 users might encounter these messages during installation. -
Page 24: Software Installation
Software Installation Installing the Mega DV Manager (1) Insert the CD-ROM in your CD drive. The installation menu should open automatically. Click to start Mega DV Manager installation. (3) Follow the onscreen instructions to complete installation. icon will appear on PC desktop after Installation. -
Page 25: Hardware Installation
Hardware Installation Connect the smaller end of the USB cable to the USB port of your camera. Plug the larger end of the USB cable to the USB port of your PC. Software installation must be completed before hardware installation. Hardware Installation... - Page 26 Hardware Installation Win XP Installation Please follow the steps to complete hardware installation. Win 2000 / 98 / ME users may encounter different installation screens. Click " Next ". Click " Continue anyway. " 98SE users may be asked to insert licensed 98SE CD- ROM in your CD Drive.
- Page 27 Hardware Installation Click " Next ". Click " Finish". Click " Continue anyway. " Click " Next ". Click " Finish" to complete Click " Continue anyway. " Hardware installation. Hardware Installation...
- Page 28 Launching Mega DV Manager Follow the following two ways to launch Mega DV Manager Click the " " icon on the Desktop to execute the program where you can begin to use your camera. Click on the "Start" menu and go up to "Programs".
- Page 29 Select Modes in Mega DV Manager Two modes can be selected in Mega DV Manager- One is DV Disk mode; the other one is LIVE mode. In DV Disk mode, you can transfer data in CF Card or in SDRAM to PC and display files ( AVI, JPEG, and WAV) .
- Page 30 DV Disk Mode Double-click icons to display files DV Disk Mode DV Disk Your camera's storage disk is DV Disk. DCIM is DCIM the main storage folder of DV Disk. In DV Disk LIVE Album mode, you can double-click thumbnails to display files ( AVI, JPEG, and WAV ).
- Page 31 DV Disk Mode Two ways to download files to your PC In DV Disk Mode: 1. Press " Select All " button or select one single file. 2. Press " Copy files to " and save file in any folder you want. Via Windows Explorer: Use Windows Explorer to copy files to any folder from DV Disk.
-
Page 32: Live Mode
LIVE Mode LIVE Mode Preview Window Record a video clip Stop recording Snapshot Format Taken pictures and movies are stored in LIVE album in DV Disk mode. Please Source switch to DV Disk mode. Preview or stop preview window Before you switch to DV Disk mode, preview window must be stopped. -
Page 33: Set Image Size
LIVE Mode Set Image Size Color Space Select one of the following functions when you have different needs. - RGB 24: better image quality - I420: faster speed Output Size Setting output size can change the size of the preview window. The default size is 320x240. Choose larger pixels when you need a larger preview window. -
Page 34: Video Setting
LIVE Mode Set Source Video Setting - Banding Filter: When your PC screen flickers, please change the banding filter in Video Setting. The refresh rate (the number of times the screen is redrawn per second) is the most likely cause of flicker. Select 50Hz or 60Hz until your PC screen stops flickering. -
Page 35: Set Settings
LIVE Mode Set Settings Your camera has default flicker settings. If pictures in DV Disk mode appear unnatural flickering noise, please select "Cancel Flicker" in the setting dialog. Nether- Country England Germany Italy Spain France lands Setting 50Hz 50Hz 60Hz 50Hz 50Hz 50Hz... -
Page 36: Troubleshooting
Troubleshooting Symptom Actions Press the MENU control for 3 seconds. Camera is not turned on. Make sure that batteries are well-installed. LCD display can't show any message after the camera Change new batteries or check your backlight. . is turned on. Memory is full. -
Page 37: Aiptek Service
AIPTEK Service If you have any problems, please contact AIPTEK office which your country is assign to. Taiwan AIPTEK, Inc. AIPTEK Int'l., Inc. 51 Discovery, Suite 100 No. 5-1 Innovation Road I Irvine, CA 92618, USA Science-Based Industrial Park TEL: 949-585-9600...
Need help?
Do you have a question about the Pocket DVII and is the answer not in the manual?
Questions and answers