Table of Contents

Related Manuals for KERN PBJ 420-3M


Summary of Contents for KERN PBJ 420-3M
- Page 1 KERN & Sohn GmbH Ziegelei 1 Phone: +49-[0]7433- 9933-0 D-72336 Balingen Fax: +49-[0]7433-9933-149 E-Mail: info@kern-sohn.com Internet: www.kern-sohn.com Operating instructions Precision balances KERN PBS/PBJ Version 1.4 03/2013 PBS/PBJ-BA-e-1314...
- Page 2 Vous trouverez d’autres versions de langue online sous www.kern-sohn.com/manuals Further language versions you will find online under www.kern-sohn.com/manuals A használati utasítás egyéb nyelveken a www.kern-sohn.com/manuals címről tölthető le Trovate altre versioni di lingue online inwww.kern-sohn.com/manuals Ytterligere språkversjoner finner du online under www.kern-sohn.com/manuals Bijkomende taalversies vindt u online op www.kern-sohn.com/manuals...
-
Page 3: Table Of Contents
KERN PBS/PBJ Version 1.4 03/2013 Operating instructions Precision balances Contents Technical data ....................7 Declaration of conformity ................11 Appliance overview ..................12 Keyboard overview .....................13 3.1.1 Numeric entry ........................14 3.1.2 Setting the decimal point when entering numerical values ..........15 Overview of display ....................16... - Page 4 Adjustment ....................... 27 Manual adjustment by CAL button ..............27 8.1.1 Adjustment with internal weight (only models PBJ) ............27 8.1.2 Adjustment with external weight (factory setting models PBS) ........29 Adjustment test ....................31 8.2.1 Adjustment test with external weight ................32 8.2.2 Adjustment test with internal weight .................
- Page 5 Switch-over weighing unit ................55 15.1 Percentage conversion ..................56 Application Functions ................. 57 16.1 Parts counting .....................57 16.2 Control weighing and target weighing ..............58 16.2.1 Control weighing (comparator) display type 1 ............. 58 16.2.2 Control weighing (comparator) – display type 2 ............58 16.2.3 Target weighing mode ....................
-
Page 6: Technical Data
1 Technical data KERN PBJ 420-3M PBJ 620-3M PBJ 1020-3 Readability (d) 0.001 g 0.001 g 0.001 g Weighing range (max) 420 g 620 g 1020 g Minimum load (Min) 0.02 g 0.1 g Verification value (e) 0.01 g 0.01 g... - Page 7 KERN PBJ 4200-2M PBJ 6200-2M PBJ 8200-1M Readability (d) 0.01 g 0.01 g 0.1 g Weighing range (max) 4.2 kg 6.2 kg 8.2 kg Minimum load (Min) 0.5 g Verification value (e) 0.1 g 0.1 g Verification class Reproducibility 0.01 g 0.01 g...
- Page 8 KERN PBS 420-3M PBS 620-3M PBS 1020-3 Readability (d) 0.001 g 0.001 g 0.001 g Weighing range (max) 420 g 620 g 1020 g Minimum load (Min) 0.02 g 0.1 g Verification value (e) 0.01 g 0.01 g Verification class Reproducibility 0.001 g...
- Page 9 KERN PBS 4200-2M PBS 6200-2M PBS 8200-1M Readability (d) 0.01 g 0.01 g 0.1 g Weighing range (max) 4.2 kg 6.2 kg 8.2 kg Minimum load (Min) 0.5 g Verification value (e) 0.1 g 0.1 g Verification class Reproducibility 0.01 g 0.01 g...
-
Page 10: Declaration Of Conformity
EN 61010-1: 2010 27.03.2013 Datum Signatur Date Signature 72336 Balingen Albert Sauter Ort der Ausstellung KERN & Sohn GmbH Place of issue Geschäftsführer Managing director KERN & Sohn GmbH, Ziegelei 1, D-72336 Balingen, Tel. +49-[0]7433/9933-0 Fax +49-[0]7433/9933-149, E-Mail: info@kern-sohn.com, Internet: www.kern-sohn.com PBS/PBJ-BA-e-1314... -
Page 11: Appliance Overview
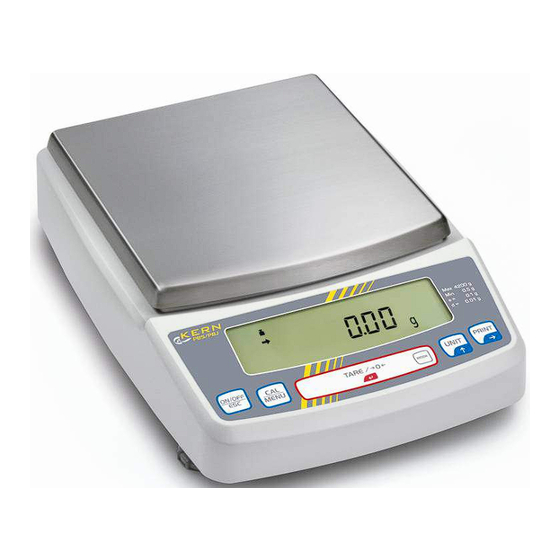
3 Appliance overview Models with readability d = 0.001 g: Models with readability d ≥ 0.01 g: 1. Windshield 2. Weighing pan 3. Display 4. Keyboard 5. Levelling screw PBS/PBJ-BA-e-1314... -
Page 12: Keyboard Overview
3.1 Keyboard overview In weighing mode: Pressed once and released Keep pressed for about 3 Button Description seconds Switches between the Exit menu / Return to operation and standby ON/OFF [ON/OFF] weighing mode modes. Invokes adjustment or To display the menu [CAL] menu selection. -
Page 13: Numeric Entry
In menu: Pressed once and released Keep pressed for about 3 Button Description seconds To return to a submenu or Return to weighing mode ON/OFF [ON/OFF] weighing mode. To display the menu Moves to the next menu item. [CAL] element recently set. MENU To select or set the menu TARE /... -
Page 14: Setting The Decimal Point When Entering Numerical Values
3.1.2 Setting the decimal point when entering numerical values Entering a decimal point is necessary only for determining the specific gravity or if a multiplier shall be defined for the user-defined unit. PRINT PRINT • Repeat actuating the button until the last digit flashes. Actuate the button again in order to call up the decimal point setting mode. -
Page 15: Overview Of Display
3.2 Overview of display Display of units Capacity display Display Designation Description Indicates that the weighed value is stable. (*1) It marks the Stability display currently selected element during menu element selection. Tare symbol Informs about setting an initial tare value. It is displayed during adjusting the measuring range. -
Page 16: Basic Information (General)
The balance may only be used according to the described conditions. Other areas of use must be released by KERN in writing. 4.3 Warranty Warranty claims shall be voided in case •... -
Page 17: Monitoring Of Test Resources
Information is available on KERN’s home page (www.kern-sohn.com with regard to the monitoring of balance test substances and the test weights required for this. In KERN's accredited DKD calibration laboratory test weights and balances may be calibrated (return to the national standard) fast and at moderate cost. -
Page 18: Unpacking, Setup And Commissioning
7 Unpacking, Setup and Commissioning 7.1 Installation Site, Location of Use The balances are designed in a way that reliable weighing results are achieved in common conditions of use. You will work accurately and fast, if you select the right location for your balance. Therefore, observe the following for the installation site: •... - Page 19 Scope of delivery / serial accessories: Models with readability d = 0.001 g: Models with readability d ≥ 0.01 g: Wiindshield Weighing pan Carrier weighing pan Protective cover Main weighing unit 2 screws 2 Fixiing screws Protection hood • Mains adapter •...
-
Page 20: Placing
7.3 Placing Remove transport guard (models PBJ) To loosen the transport guard, turn both transport screws [1] anti-clockwise until they are locked (refer to sign [2]). For transport, turn both transport screws clockwise until they are locked. Mount safety hood Remove protective foil from adhesive strips and mount the safety hood so that it does not contact the weighing plate. - Page 21 Levelling Turn in all three foot screws [1] as far as they go. Slightly press down the left front side of the scale and turn out the two front foot screws until the air bubble [3] in the spirit level [2] is within the prescribed circle.
- Page 22 Installation of weighing plate Models with readability d ≥ 0.01 g: PBS/PBJ-BA-e-1314...
- Page 23 Models with readability = 0.001 g: Remove rubber plug as shown in picture. Attach wind guard and fix it by means of screws. Install weighing pan as per illustration. Note the correct position. Place the wind guard cover. PBS/PBJ-BA-e-1314...
-
Page 24: Mains Connection
7.4 Mains connection Power is supplied via the external mains adapter. The stated voltage value must be the same as the local voltage. Only use original KERN mains adapters. Using other makes requires consent by KERN. Models PBJ: Prior to mains connection, loosen the transport guard screws at the scale according to the sign in any case, see chapter 7.3... -
Page 25: Connection Of Peripheral Devices
Before connecting or disconnecting of additional devices (printer, PC) to the data interface, always disconnect the balance from the power supply. With your balance, only use accessories and peripheral devices by KERN, as they are ideally tuned to your balance. -
Page 26: Adjustment
8 Adjustment As the acceleration value due to gravity is not the same at every location on earth, each balance must be coordinated - in compliance with the underlying physical weighing principle - to the existing acceleration due to gravity at its place of location (only if the balance has not already been adjusted to the location in the factory). - Page 27 When an optional printer is connected and the GLP function is connected, the adjustment log will be edited, see chap. 8.5 Printout example (KERN YKB-01N): - - - - - - - - - - - - - - - - - CAL –INTERNAL...
-
Page 28: Adjustment With External Weight (Factory Setting Models Pbs)
Information about test weights you will find in the internet under http://www.kern-sohn.com In weighing mode press . E CAL is displayed. If „E-CAL“ is not displayed, press to return into weighing mode and activate menu element 3, see menu overview. - Page 29 When an optional printer is connected and the GLP function is connected, the adjustment log will be edited, see chap. 8.5. Printout example (KERN YKB-01N): - - - - - - - - - - - - - - - - - CAL –EXTERNAL...
-
Page 30: Adjustment Test
8.2 Adjustment test Activate function: Press 3 times in weighing mode. Menu group 1 „Adjustment“ is displayed, the indicator flashes. Acknowledge by , the current setting flashes. Adjustment with internal weight „I-CAL“ (only models PBJ, see chap. 8.1.1), Menu element 1 Adjustment test with internal weight „I-tESt“... -
Page 31: Adjustment Test With External Weight
8.2.1 Adjustment test with external weight • Condition: Menu setting „E-tESt“ / Menu element 4 • At verified balances, the adjustment test is locked by a switch (except accuracy class I). To disable the access lock, destroy the seal and actuate the adjustment switch. - Page 32 Remove adjustment weight and press Wait for a short period of time, the difference to the previous adjustment is displayed. Either press , the d-value is reset to zero. Adjustment of balance by resetting. press , the d-value is not reset to zero. No adjustment occurs.
-
Page 33: Adjustment Test With Internal Weight
8.2.2 Adjustment test with internal weight Condition: Menu setting „I-tESt“/ menu element 2 In weighing mode press . I-tESt is displayed. If „i-tESt“ is not displayed, press to return into weighing mode and activate menu element 2, see menu overview. ... -
Page 34: Automatic Adjustment By Psc (Perfect Self Calibration), Only Models Pbj
8.3 Automatic adjustment by PSC (Perfect Self Calibration), only models PBJ The PSC function determines the ambient temperature of the scale at any time. If the tolerance groups are exceed upwards or downwards, this is signalled and the necessary adjustment is carried out fully automatically. This will ensure that the scale is ready at any time. -
Page 35: Automatic Adjustment By Clock-Cal (Model Pb Only)
• The flashing weight symbol signals that automatic adjustment is imminent . • In order to avoid that adjustment is started possibly during a series of measurements, actuate as soon as the weight symbol flashes. This will interrupt automatic adjustment. •... - Page 36 Setting the time for Clock-CAL: Example „ACALt1“ to 12:00 p.m.. Press 3 times in weighing mode. Menu group 1 „Adjustment“ is displayed, the indicator flashes. Acknowledge by , the current setting flashes. Press several times until „t“ flashes. ...
-
Page 37: Iso/Glp Log
8.5 ISO/GLP log Quality assurance systems require printouts of weighing results as well as of correct adjustment of the balance stating date and time and balance identification. The easiest way is to have a printer connected. Make sure that the communication parameter of balance and printer are the same. - Page 38 Acknowledge selection by Return to menu by Use to invoke menu element 70 Acknowledge by , the currently set scale identification number is displayed (the active digit flashes). Use the navigation buttons and enter a 4-digit number between„0000“...
-
Page 39: Verification
9 Verification General introduction: According to EU directive 90/384/EEC or 2009/23EG balances must be officially verified if they are used as follows (legally controlled area): a) For commercial transactions if the price of goods is determined by weighing. b) For the production of medicines in pharmacies as well as for analyses in the medical and pharmaceutical laboratory. -
Page 40: Basic Operation
10 Basic Operation 10.1 Switch on off balance Start-up: 1. After connection to the power supply the balance displays . For switching on, press , the scale carries out a segment test and starts automatically in weighing mode. 2. If the scale is in standby mode, press . -
Page 41: Simple Weighing
Overload, the capacity of the scale has been exceeded Under-load, the load at the scale is too low When an optional printer is connected, the weighing value can be edited. Printout examples (KERN YKB-01N): 1. Verified models: 50.5[7] g Weighing value, the non-calibrated value is given in brackets in calibrated scales. -
Page 42: Taring
10.3 Taring The dead weight of any weighing container may be tared away by pressing a button, so that the following weighing procedures show the net weight of the goods to be weighed. Put weighing container on the weighing pan. ... -
Page 43: Underfloor Weighing
10.4 Underfloor weighing Objects unsuitable for placing on the weighing scale due to size or shape may be weighed with the help of the flush-mounted platform. Proceed as follows: • Switch off the balance. • Open closing cover at the balance bottom. •... -
Page 44: The Menu
11 The menu 11.1 Navigation in the menu The menu consists of 7 groups and 4 levels. The configuration of the menu shows this structure where access to the required functions is facilitated by the numbering of the relevant menu elements. For navigation in the menu please use the enclosed menu is displayed. - Page 45 Menu group Flashing symbol Description Adjustment Analog display Capacity display, control and target weighing Installation environment and taring Application measurements and automatic output Conversion of units and specific weight measurement Setting of time and generation of an adjustment data set Communication with external devices Making settings: As an example, the condition for evaluating the stability of 1 count...
- Page 46 Press , „Eb-1“ (menu element 27 ) is displayed. The stability display ( ) lights if „Eb-1“ is the current setting. Repeatedly press , until „Eb-4“ (menu element 29 ) is displayed. Save by . „SET“ followed by the current setting „Eb-4“ is displayed, characterized by the stability display ( ).
-
Page 47: Useful Functions
11.2 Useful functions 11.2.1 Recall of last menu This function is useful if an application requires frequent changes at a certain menu element. In weighing mode or when selecting the menu, keep the button pressed for MENU approx. 3 seconds. Then the menu element is displayed which has been changed or set lastly. -
Page 48: Menu Lock
11.3 Menu Lock Locking the access to the menu: Connect scale to power supply. During the off display, keep pressed until „Locked“ appears. Menu access is rejected now and the message „Locked“ appears as soon as the operator tries to select a menu. Canceling the access lock: ... -
Page 49: Set The Installed Clock
12 Set the installed clock 12.1 Date Select menu element 63, see chap. 11.1 Actuate in weighing mode until „S“ flashes. Acknowledge with Press several times until „d“ flashes. Press Press again, the current date is displayed. ... -
Page 50: Time
is used to select among the following formats Menu element 63a Y.m.d. Menu element 63b d.m.Y. Menu element 63c m.d.Y. Confirm input by Back to weighing mode - press repeatedly or for 3 s. • The installed clock will carry out the corrections automatically for a leap year. -
Page 51: Setting The Display For The Standby Mode
12.3 Setting the display for the standby mode Define the items which shall be displayed in standby mode. Select menu element 65 if the time shall be displayed, see chapter 11.1 Select menu element 66 is the date shall be displayed, see chapter 11.1 Select menu element 67 if neither the time nor the date shall be displayed, see chapter 11.1 If the time is displayed in standby mode, you have the following functions... -
Page 52: Functions For Adaptation To Ambient Conditions
13 Functions for adaptation to ambient conditions 13.1 Stability and reaction (average value) Exists the possibility to tune the stability of the display and the degree of reaction of the balance to the requirements of certain applications or the installation environment. -
Page 53: Stability Detection Band
13.2 Stability Detection Band (up to 8 counts for verifiable, up to 64 counts for non verifiable models) The band makes it possible to select conditions at which the balance should be considered as stable. If „1 count” is selected, and the reading (within counting the readings) remains constant, the balance is considered as stable and the stability display is shown. -
Page 54: Switch-Over Weighing Unit
15 Switch-over weighing unit UNIT Press the button several times to switch over the display between the activated units. The default setting provides the following options: [g] → [%] → [PCS] → [%] Other settings must be activated in the menu as follows: Menu overview No. -
Page 55: Percentage Conversion
15.1 Percentage conversion UNIT In weighing mode, press the key repeatedly until the „%” symbol will be seen on the display. Setting 100% of the reference value: TARE / Press the key to tare the balance. Put the reference sample which represents 100% value. This value must correspond to 100 or more counts in „g”... -
Page 56: Application Functions
16 Application Functions 16.1 Parts counting With parts counting you can either count parts into a container or remove parts from a container. To count a greater number of parts the average weight per part has to be determined with a small quantity (reference quantity). The larger the reference quantity, the higher the counting exactness. -
Page 57: Control Weighing And Target Weighing
16.2 Control weighing and target weighing 16.2.1 Control weighing (comparator) display type 1 It is the most suitable method which makes it possible to assess weighing courses or errors on the basis of the sample weight. Select the menu element 15 in the menu overview. Display elements used The upper threshold value, indicated with the upper triangle symbol, is defined with the menu element... -
Page 58: Target Weighing Mode
16.2.3 Target weighing mode This mode is used for weighing constant liquid quantities or for assessment of missing quantities or excess quantities. The target value is the numeric value which corresponds to the nominal quantity of the used unit. The target value is a numerical value which corresponds to quantity of the set unit to be used for weighing. -
Page 59: Density Determination
16.3 Density determination 16.3.1 Specific measurement of solid weight In the case of specific measurement of solid weights, the sample (solid) weight is measured in air as well as in the liquid with known density and the sample density is calculated on the basis of that results. -
Page 60: Table Of Temperatures And Densities
16.3.2 Table of temperatures and densities Temperatur Density p [g/cm e [°C] Water Ethyl Alcohol Methyl Alcohol 0.9997 0.7978 0.8009 0.9996 0.7969 0.8000 0.9995 0.7961 0.7991 0.9994 0.7953 0.7982 0.9993 0.7944 0.7972 0.9991 0.7935 0.7963 0.9990 0.7927 0.7954 0.9988 0.7918 0.7945 0.9986 0.7909... -
Page 61: Specific Measurement Of Liquid Weight
16.3.3 Specific measurement of liquid weight In the case of specific measurement of liquid weight, the weight of reference solid with known volume is measured in air and the liquid to be tested. The specific liquid weight is calculated on the basis of those both values. The display unit for the specific liquid weight is „d”. -
Page 62: Auto Print Function
16.5 Auto Print function (models with non-verifiable setting only) Using the Auto Print function ensures automatic data printing without necessity to PRINT press the button for each single measurement. If the function is activated, the (Auto-Print) symbol is displayed. It is possible to select from six types of automatic printing. Information concerning setting the zero range can be found in chapter 11.7 Printing whilst loading: Select the menu element 42 in the menu overview. -
Page 63: Automatic Zero Setting
16.6 Automatic zero setting (models with non-verifiable setting only) If the displayed value is within the zero range and the stability display lights up, zero setting occurs automatically. The zero symbol appears. To switch-on the zero setting function, select menu symbol 41 16.7 Zero range The „zero range“... -
Page 64: Formulation Mode
16.9 Formulation mode This mode is used for convenient weighing of individual recipe components. PRINT Weights of each component are displayed and saved after each pressing the button. The weights of those component are sent with the RS-232C or DATA I/O interface, and the display is automatically zeroed to weigh the next component. -
Page 65: Automatic Saving And Zeroing
16.10 Automatic saving and zeroing This function is used for weighing large number of single samples. If the function is activated, the automatic saving and zeroing symbol is illuminated. Select the menu element 52 in the menu overview. TARE / •... -
Page 66: Animal Weighing
16.11 Animal weighing (only possible with non verifiable setting) This function is used for weighing animals. The animal symbol is displayed when the animal weighing mode is active. Select the menu element 53 in the menu overview. TARE / • Place the weighing container on the scale pan and press the button. -
Page 67: Data Output
17 Data output 17.1 Personal Computer - RS-232C 17.1.1 Connecting the Cable ATTENTION: By using the RS-232C/AUX interface of the PBS/PBJ type balances it is also possible to output other signals than RS-232C ones. Incorrect connection of those signal cables may lead to the personal computer or balance failure. Therefore, make sure that the suitable and correctly connected cable provides communication between the balance and computer. -
Page 68: Data Formats
17.2 Data Formats The following explanations refer to the case when the menu element 77 (EB type format) is selected. Explanations concerning other formats are included in the data of computers compatible with the suitable data formats. Note: mark indicates the space code, and <Limiter> indicates the limiter code. 1. -
Page 69: Using Codes Of Commands
17.3 Using codes of commands Note: Incorrect setting of communication parameters results in displaying the communication error „ComErr”. 1. Commands ending with a digit, letter or symbol different than [=]: commands to the balance must be transmitted with a limiter for each command code. Example 1: PRINT PRINT<CR>... - Page 70 Notes: • If 0 is at the beginning of the four-position number, the setting is finished at this point, and the menu selection is finished. • The result of such a command depends on the balance type. #=2.56 <CR> Example 6: #=12.345.67 <CR>...
- Page 71 (ii) Commands concerning user buttons POWER ON/OFF Corresponds to the button. ON/OFF Corresponds to the button. MENU MENU Corresponds to the button. TARE ON/OFF Corresponds to the button. MENU Corresponds to the button. UNIT UNIT Corresponds to the button. PRINT PRINT Corresponds to the button.
- Page 72 (v) Reading commands for set values TARGET Readout of the set target value. LIMIT Readout of the set limit value. Readout of the set lower limit value on the display of the check weighing G.LO Readout of the set upper limit value on the display of the check G.UP weighing 1.
- Page 73 (vii) Commands of special functions Calls up measuring range calibration mode. Calls up measuring range calibration mode. LOCK Sets menu lockout. RELEASE Releases menu lockout. TIME Reads date and time. ADJCLK Carries out correction by ± 30 seconds. RSTMN Resetting the menu MENU= Makes it possible to call up any menu.
-
Page 74: User Settings
17.4 User Settings 17.4.1 Overview This menu is used to determine technical data of communication between the balance and a computer or electronic printer. Note: This menu applies both to the RS-232C interface and DATA I/O interface. For the device to which the DATA I/O interface is connected e.g. electronic printer, the balance communication parameters should be set to the standard settings i.e. -
Page 75: Format
Specify the format of data output by the balance. For the standard format of the KERN electronic balances • Select menu element 77 . For the old data output format of the KERN electronic balances: • Select menu element 78 . 17.4.4... -
Page 76: Service, Maintenance, Disposal
Spilled weighing goods must be removed immediately. 18.2 Service, maintenance The appliance may only be opened by trained service technicians who are authorized by KERN. Before opening, disconnect from power supply. 18.3 Disposal Disposal of packaging and appliance must be carried out by operator according to valid national or regional law of the location where the appliance is used. -
Page 77: Instant Help
19 Instant help In case of an error in the program process, briefly turn off the balance and disconnect from power supply. The weighing process must then be restarted from the beginning. General display: Display Explication Wait for the next display. Date and time are output. - Page 78 Error message: Displayed error Explication Remedy code Disturbances in weight loading Check transport screws. mechanical elements. Weight on the scale pan is unstable during calibration. Large zero point drift during Empty the scale pan. calibration. Large drift during the PCAL function. Use the correct weight.
- Page 79 Fault finding Procedures: Symptom Possible cause Remedy Display is empty. • Mains adapter is not connected. Check mains voltage and • The room mains circuit-breaker is connect the mains adapter switched off. correctly. • Incorrect voltage. „OL” or „-OL” display The transport screws are not locked.
Need help?
Do you have a question about the PBJ 420-3M and is the answer not in the manual?
Questions and answers