Table of Contents
Advertisement
Available languages
Available languages
English
Français
CITY MULTI Control System
MA Remote Controller
PAR-30MAAU
Instruction Book
ON
MENU
RETURN
SELECT
HOLD
OFF
Prior to use, thoroughly read the instructions in this manual to use the product correctly.
Retain for future reference.
Make sure that this manual, Installation Manual, and Initial Setting Manual are passed on to
any future users.
To ensure safety and proper operation of the remote controller, the remote controller should
only be installed by qualified personnel.
Advertisement
Chapters
Table of Contents

Related Manuals for Mitsubishi Electric PAR-30MAAU


Summary of Contents for Mitsubishi Electric PAR-30MAAU
- Page 1 English Français CITY MULTI Control System MA Remote Controller PAR-30MAAU Instruction Book MENU RETURN SELECT HOLD Prior to use, thoroughly read the instructions in this manual to use the product correctly. Retain for future reference. Make sure that this manual, Installation Manual, and Initial Setting Manual are passed on to any future users.
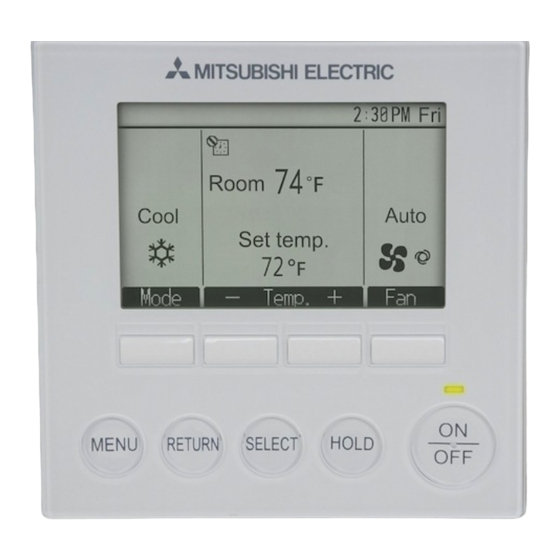
- Page 2 Product features Feature 1 Large, easy-to-see display Room Setback Full-dot LCD display with large characters for easy viewing Set temp. Mode Temp. MENU RETURN SELECT HOLD Feature 2 Simple button arrangement Feature 3 Large, easy-to-press buttons Buttons are arranged according to usage to allow for intuitive navigation.
-
Page 3: Table Of Contents
Contents Safety precautions ........4 Names and functions of controller components ..6 Controller interface ............6 Display ...............8 Read before operating the controller ..10 Menu structure............10 Icon explanations............. 11 Basic operations .......... 12 Power ON/OFF ............12 Operation mode, temperature, fan speed, and HOLD settings ..14 Navigating through the menu ...... -
Page 4: Safety Precautions
Safety precautions • Thoroughly read the following safety precautions before using the unit. • Observe these precautions carefully to ensure safety. WARNING Indicates a risk of death or serious injury. CAUTION Indicates a risk of serious injury or structural damage. •... - Page 5 This controller is designed for exclusive use with the cloth, and wipe off water with a dry cloth. Building Management System by Mitsubishi Electric. The use of this controller for with other systems or To avoid damage to the controller, provide protection for other purposes may cause malfunctions.
-
Page 6: Names And Functions Of Controller Components
Names and functions of controller components Controller interface MENU RETURN SELECT HOLD Function buttons... - Page 7 1 ON/OFF button The functions of the function buttons change depending on the screen. Press to turn ON/OFF the indoor unit. Refer to the button function guide that appears at the bottom of the LCD for the functions they serve on a given 2 HOLD button screen.
-
Page 8: Display
Names and functions of controller components Display The main display can be displayed in two different modes: "Full" and "Basic." The factory setting is "Full." To switch to the "Basic" mode, change the setting on the Main display setting. (Refer to page 46.) Full mode * All icons are displayed for explanation. - Page 9 1Operation mode Page 29 Page 14 Indoor unit operation mode appears here. Appears when the On/Off timer is enabled. 2Preset temperature appears when the Hold function is enabled. Page 16 Preset temperature appears here. Page 32 3Clock Appears when the Weekly timer is enabled. (See the Initial Setting Manual.) Current time appears here.
-
Page 10: Read Before Operating The Controller
Read before operating the controller Menu structure Main menu Press the Vane•Louver•Vent. (Lossnay) Page 24 MENU button. Page 26 High power Move the cursor Timer to the desired Page 28 On/Off timer item with the F1 and Auto-Off timer Page 30 F2 buttons, Weekly timer Page 32... -
Page 11: Icon Explanations
Service Refer to the indoor unit Installation Test run Manual. Refer to the indoor unit Installation Input maintenance info. Manual. Function setting Refer to the Installation Manual. Lossnay Refer to the Installation Manual. Refer to the indoor unit Installation Check Manual. -
Page 12: Basic Operations
Basic operations Power ON/OFF Button operation Press the ON/OFF button. The ON/OFF lamp will light up in green, and the operation will start. Press the ON/OFF button again. The ON/OFF lamp will come off, and the operation will stop. - Page 13 Operation status memory Remote controller setting Operation mode Operation mode before the power was turned off Preset temperature Preset temperature before the power was turned off Fan speed Fan speed before the power was turned off Settable preset temperature range Operation mode Preset temperature range Cool/Dry...
-
Page 14: Operation Mode, Temperature, Fan Speed
Operation mode, temperature, fan speed, and HOLD settings Button operation Operation mode Press the F1 button to go through the operation modes in the order of "Cool, Dry, Fan, Auto, Room Setback, and Heat." Select the desired operation Cool Auto mode. - Page 15 TC-24A for the setback mode. When using both TC-24A and PAR-30MAAU in a system, make a setting for the setback function only from one of them. Do not make a setting from both of them.
- Page 16 Preset temperature When the operation mode is NOT "Setback" Press the F2 button to decrease the preset temperature by 1ºC (1ºF), and press the F3 Room button to increase. Cool Auto •Refer to the table on page 13 for the settable Set temp.
- Page 17 When the operation mode is "Setback" The current setting (the upper/lower limit temperature) will appear. Room Set temp. Setback Auto Set temp. Lower limit Upper limit temperature temperature Mode Temp. Press the F2 or F3 button to go to the setting screen.
-
Page 18: Fan Speed
Fan speed Press the F4 button to go through the fan speeds in the following order. Room Auto Cool Set temp. Auto Mode Temp. •The available fan speeds depend on the models of connected indoor units. MENU RETURN SELECT HOLD •Fan speed can be changed even when the buttons are locked or when the system is centrally controlled. - Page 19 Hold Press the HOLD button to enable/disable the Hold function. Room If the Hold function is enabled, the following Auto Setback Set temp. functions will be prohibited, and will appear. Mode Temp. • ON/OFF timer • Auto-Off timer • Weekly timer •...
-
Page 20: Navigating Through The Menu
Navigating through the menu Main menu list Setting and display Setting details Reference items page Vane•Louver•Vent. Use to set the vane angle. •Select a desired vane setting from fi ve different settings. (Lossnay) Use to turn ON/OFF the louver. •Select a desired setting from "ON" and "OFF." Use to set the amount of ventilation. - Page 21 Setting and display Setting details Reference items page Filter information Use to check the fi lter status. •The fi lter sign can be reset. Error information Use to check error information when an error occurs. •Error code, error source, M-NET address, unit model, manufacturing number, contact information (dealer's phone number) can be displayed.
-
Page 22: Navigating Through The Main Menu
Navigating through the menu Navigating through the Main menu Button operation Accessing the Main menu Main Main menu Press the MENU button. Vane·Louver·Vent. (Lossnay) High power Timer The Main menu will appear. Weekly timer OU silent mode Main display: RETURN Cursor Page MENU... - Page 23 Saving the settings OU silent mode Select the desired item, and press the SELECT Tue Wed Thu Fri Sat Start Stop Silent button. The screen to set the selected item will appear. Setting display: SELECT MENU RETURN SELECT HOLD Exiting the Main menu screen Press the RETURN button to exit the Main menu and return to the Main display.
-
Page 24: Controller Operation-Function Settings
Controller operation-Function settings Vane•Louver•Vent. (Lossnay) Button operation Accessing the menu Select "Vane•Louver•Vent. (Lossnay)" from the Main Main menu Vane·Louver·Vent. (Lossnay) Main menu (refer to page 22), and press the High power SELECT button. Timer Weekly timer OU silent mode Main display: RETURN Cursor Page MENU... - Page 25 Louver setting Press the F4 button to turn the louver swing ON and OFF. Vane Vent. Louver MENU RETURN SELECT HOLD Vent. setting Press the F3 button to go through the ventilation setting options in the order of "Off," "Low," and "High." * Settable only when LOSSNAY unit is connected.
-
Page 26: High Power
Controller operation-Function settings High power Function description High-power operation function allows the units to operate at higher-than-normal capacity so that the room air can be conditioned to an optimum temperature quickly. This operation will last for up to 30 minutes, and the unit will return to the normal operation mode at the end of the 30 minutes or when the room temperature reaches the preset temperature, whichever is earlier. -
Page 27: Clock
Clock Button operation Select "Initial setting" from the Main menu (refer Main Main menu to page 22), and press the SELECT button. Initial setting Service Main display: RETURN Cursor Page Clock setting is required before making the following settings. • On/Off timer •... -
Page 28: Timer (On/Off Timer)
Controller operation-Function settings Timer On/Off timer Button operation Select "Timer" from the Main menu (refer to page Main Main menu 22), and press the SELECT button. Vane·Louver·Vent. (Lossnay) High power Timer Weekly timer OU silent mode Main display: RETURN Cursor Page The On/Off timer will not work in the following cases: when On/Off timer is disabled, during an error, during... - Page 29 Change the setting with the F3 or F4 button. Timer On/Off timer: No (disable)/Yes (enable) • On/Off timer / Yes On: Operation start time • (settable in 5-minute increments) Repeat No / * Press and hold the button to rapidly advance Select: SELECT the numbers.
-
Page 30: Auto-Off Timer
Controller operation-Function settings Timer Auto-Off timer Button operation Bring up the Timer setting screen. Timer (Refer to page 28.) On/Off timer Repeat Select "Auto-Off", and press the SELECT Auto-Off Stop in --- min button. Setting display: SELECT Cursor The Auto-Off timer will not work in the following cases: when Auto-Off timer is disabled, during an error, during check (in the service menu), during test run, during remote controller diagnosis, when the clock is not set,... - Page 31 Press the SELECT button to save the settings. Auto-Off timer Auto-Off Stop in Select: SELECT Cursor Time MENU RETURN SELECT HOLD A confirmation screen will appear. Auto-Off timer Auto-Off Stop in Navigating through the screens Changes saved • To go back to the Main menu ..MENU button Main menu: MENU •...
-
Page 32: Weekly Timer
Controller operation-Function settings Weekly timer Button operation Select "Weekly timer" from the Main menu (refer Main Main menu to page 22), and press the SELECT button. Vane·Louver·Vent. (Lossnay) High power Timer Weekly timer The Weekly timer will not work in the following cases: OU silent mode when the On/Off timer is enabled, when the weekly timer Main display: RETURN... - Page 33 The weekly timer setting screen will appear and Weekly timer the current settings will be displayed. Sun Mon Tue Wed Thu Fri Sat Up to eight operation patterns can be set for each day. Input display: SELECT Move the cursor to the desired day of the week Select Page with the F1 or F2 button, and press the...
-
Page 34: Ou Silent Mode
Controller operation-Function settings OU silent mode Function description This function allows the user to set the time periods in which priority is given to quiet operation of outdoor units over temperature control. Set the start and stop times each day of the week for the quiet operation. - Page 35 The OU silent mode setting screen will appear. OU silent mode Sun Mon Tue Wed Thu Fri Sat Start Stop Silent To make or change the setting, move the cursor to the desired day of the week with the F1 or Select: SELECT F2 button, and press the F3 button to select it.
-
Page 36: Restriction
Controller operation-Function settings Restriction Setting the temperature range restriction Button operation Select "Restriction" from the Main menu (refer to Main Main menu page 22), and press the SELECT button. Restriction Energy saving Filter information Error information Maintenance Main display: RETURN Cursor Page MENU... - Page 37 Change the settings with the F3 or F4 button. Temp. range • Temp. range: No (unrestricted) or Temp. range No / Cool·Dry Yes (restricted) Heat Auto • Cool•Dry: Upper and lower limit temperature Select: SELECT • Heat: Upper and lower limit temperature Cursor Temp.
- Page 38 Controller operation-Function settings Restriction Operation lock function To enable the operation lock function, set the item "Operation locked" to " Yes". Button operation Bring up the Restriction setting screen. (Refer to Restriction page 36.) Operation locked On/Off Mode Set temp. Vane Hold Move the cursor to "Operation locked"...
- Page 39 will appear on the Main display in the Full mode when the operation lock function setting is enabled. Room Cool Auto Operation guide that corresponds to the locked Set temp. function will be suppressed. Mode (When Set temp. is locked)
-
Page 40: Energy Saving
Controller operation-Function settings Energy saving Automatic return to the preset temperature Button operation Select "Energy saving" from the Main menu Main Main menu (refer to page 22), and press the SELECT Restriction Energy saving button. Filter information Error information Maintenance Main display: RETURN Cursor Page... - Page 41 Change the settings with the F3 or F4 button. Auto return Auto return: No (disable)/Yes (enable) • Auto return No / Cool: After Cool: Timer setting range is 30 to 120 minutes • back to Heat: After in 10-minute increments. back to Select: SELECT Temperature setting range is 19 to 30ºC...
- Page 42 Controller operation-Function settings Energy saving Setting the energy-saving operation schedule Button operation Bring up the "Energy saving" screen. (Refer to Energy saving page 40.) Auto return Cool: min, Heat: min, Schedule Move the cursor to the "Schedule," and press the Sun Mon Tue Wed Thu Fri Sat Setting display: SELECT SELECT button.
- Page 43 The setting change/day of the week selection Energy saving screen will appear. Sun Mon Tue Wed Thu Fri Sat Up to four operation patterns can be set for each day. Input: SELECT Move the cursor to the desired day of the week Select with the F1 or F2 button, and press the F3 button to select it.
-
Page 44: Manual Vane Angle
Controller operation-Function settings Manual vane angle Button operation Select "Maintenance" from the Main menu (refer Main Main menu to page 22), and press the SELECT button. Restriction Energy saving Filter information Error information Maintenance Main display: RETURN Cursor Page MENU RETURN SELECT HOLD... - Page 45 The current vane setting will appear. Manual vane angle Select the desired outlets from 1 through 4 with the F1 or F2 button. Select: SELECT Outlet: "1," "2," "3," "4," and "1, 2, 3, 4, (all outlets)" • Outlet Angle Press the F3 or F4 button to go through the option in the order of "No setting (reset),"...
-
Page 46: Main Display
Controller operation-Function settings Main display Button operation Select "Initial setting" from the Main menu (refer Main Main menu to page 22), and press the SELECT button. Initial setting Service Main display: RETURN Cursor Page MENU RETURN SELECT HOLD Move the cursor to the "Main display" with Initial setting menu the F1 or F2 button, and press the SELECT Main/Sub... -
Page 47: Contrast
Contrast Button operation Select "Initial setting" from the Main menu (refer Main Main menu to page 22), and press the SELECT button. Initial setting Service Main display: RETURN Cursor Page MENU RETURN SELECT HOLD Move the cursor to the "Contrast" with the F1 or Initial setting menu F2 button, and press the SELECT button. -
Page 48: Language Selection
Controller operation-Function settings Language selection Function description The desired language can be set. The language options are English, French, and Spanish. Button operation Select "Initial setting" from the Main menu (refer Main Main menu to page 22), and press the SELECT button. Initial setting Service Main display: RETURN... - Page 49 Move the cursor to the language you desire with Language selection the F1 through F4 buttons, and press the English Français Español SELECT button to save the setting. Select: SELECT Cursor Cursor MENU RETURN SELECT HOLD Language selection English Français A screen will appear that indicates the setting Español has been saved.
-
Page 50: Maintenance
Maintenance Filter information will appear on the Main display in the Full mode when it is time to clean the filters. Room Wash, clean, or replace the filters when this Cool Auto sign appears. Set temp. Refer to the indoor unit Instructions Manual for details. - Page 51 Select "OK" with the F4 button. Filter information Reset filter sign? Cancel MENU RETURN SELECT HOLD A confirmation screen will appear. Filter information Filter sign reset Navigating through the screens • To go back to the Main menu ..MENU button Main menu: MENU •...
-
Page 52: Troubleshooting
Troubleshooting Error information When an error occurs, the following screen will appear. Check the error status, stop the operation, and consult your dealer. Button operation Error code, error unit, M-NET address, unit Error information Error code model name, and serial number will appear. Error unit M-NET address The model name and serial number will appear... - Page 53 Press the F4 button or the ON/OFF button to Error information reset the error that is occurring. Error code Error unit M-NET address Model name Serial No. Errors cannot be reset while the ON/OFF Reset error: Reset button operation is prohibited. Page Reset blinks...
-
Page 54: Specifications
Specifications Controller specifications Specifi cation Product size 120(W) x 120(H) x 19(D) mm (4 3/4 x 4 3/4 x 3/4 [in]) (not including the protruding part) Net weight 0.25 kg (9/16 lb.) Rated power supply voltage 12 VDC (supplied from indoor units) Power consumption 0.3 W Usage environment... - Page 55 Function list (as of November 1, 2010) : Supported : Unsupported Function City Multi Required password Operation/ Power ON/OFF Operation mode switch Display Room temperature setting Fan speed setting Vane angle setting Louver setting Ventilation setting Hold setting High power operation Auto descending panel Backlight Contrast setting...
- Page 56 List of functions that can/cannot be used in combination High On/Off Auto-off Weekly Temperature Operation Auto Energy Setback power timer timer timer silent range lock return saving mode schedule High power On/Off timer Auto-off timer Weekly timer OU silent mode Temperature range Operation lock...
- Page 57 Français Système de contrôle CITY MULTI Contrôleur à distance MA PAR-30MAAU Manuel d'instructions MENU RETURN SELECT HOLD Avant toute utilisation, lire attentivement les instructions de ce manuel pour utiliser le produit correctement. Conservez le pour vous y référer ultérieurement. Assurez-vous que ce manuel, le manuel d'installation et le manuel de paramétrage initial sont bien remis à...
- Page 58 Caractéristiques du produit Caractéristique 1 Affi chage large et facile à voir Amb. Affi chage LCD à gros caractères pour Invers. faciliter la lecture Consigne Mode Temp. MENU RETURN SELECT HOLD Caractéristique 2 Disposition intuitive des touches Caractéristique 3 Grosses touches faciles à appuyer Les touches sont conçues en fonction de l'utilisation pour permettre une navigation intuitive.
- Page 59 Table des matières Consignes de sécurité ......... 4 Noms et fonctions des parties composant la télécommande ..6 Interface de la télécommande ........6 Afficheur ..............8 À lire avant de mettre en route la télécommande ..10 Structure des menus ..........10 Explication des icônes ..........
-
Page 60: Consignes De Sécurité
Consignes de sécurité • Lisez attentivement les consignes de sécurité ci-après avant toute utilisation. • Respectez scrupuleusement ces consignes pour assurer la sécurité. AVERTISSEMENT Signale un risque de blessure grave, voire mortelle. ATTENTION Signale un risque de blessure grave ou de dommage matériel. •... - Page 61 Mitsubishi Electric. L'utilisation de ce contrôleur avec d'autres systèmes ou à d'autres fins peut entraîner des dysfonctionnements. Protégez le contrôleur contre l'électricité statique...
-
Page 62: Noms Et Fonctions Des Parties Composant La Télécommande
Noms et fonctions des parties composant la télécommande Interface de la télécommande MENU RETURN SELECT HOLD Touches fonctions... - Page 63 1 Touche ON / OFF Les fonctions réalisées par les touches varient en fonction de l'écran. Pressez pour allumer ou éteindre Consultez le guide des touches en bas l'appareil intérieur. de l'écran LCD pour voir les fonctions correspondant à un écran donné. 2 Touche HOLD Lorsque le système est piloté...
-
Page 64: Afficheur
Noms et fonctions des parties composant la télécommande Afficheur L'écran principal peut être affiché dans deux modes différents : "complet" et "basic". Le réglage usine est "complet". Pour passer au mode "basic", changez-le dans l'écran principal. (Veuillez vous référer à la page 46.) Mode complet * Toutes les icônes sont affichées pour la... - Page 65 1Mode de fonctionnement page 14 page 29 Le mode de fonctionnement de l'appareil intérieur Apparaît lorsque le Timer On / Off ou d'une s'affiche ici. fonction ralenti de nuit est activé. 2Température programmée page 16 s'affiche lorsque la fonction Verrouillage La température programmée s'affiche ici.
-
Page 66: À Lire Avant De Mettre En Route La Télécommande
À lire avant de mettre en route la télécommande Structure des menus Menu général Pressez la Vane•Volet•Vent (Lossnay) page 24 touche MENU . page 26 Forte puissance Placez le Timer curseur sur page 28 ON/OFF Timer à l'endroit désiré avec les Arrêt Auto Timer page 30 touches F1 ou... -
Page 67: Explication Des Icônes
Service Veuillez vous référer au manuel Test fonctions d'installation de l'appareil intérieur. Veuillez vous référer au manuel Informations maintenance d'installation de l'appareil intérieur. Réglage des fonctions Veuillez vous référer au manuel d'installation. Lossnay Veuillez vous référer au manuel d'installation. Vérification Veuillez vous référer au manuel d'installation de l'appareil intérieur. -
Page 68: Opérations De Base
Opérations de base Marche / Arrêt Fonctionnement des touches Marche Pressez la touche ON / OFF . La lampe Marche / Arrêt s'allume en vert, et l'appareil démarre. Arrêt Pressez à nouveau la touche ON / OFF . La lampe Marche / Arrêt s'éteint, et l'appareil s'arrête. - Page 69 Mémoire de l'état de fonctionnement Réglage de la télécommande Mode de fonctionnement Mode de fonctionnement avant la mise hors tension Température programmée Température programmée avant la mise hors tension Vitesse du ventilateur Vitesse du ventilateur avant la mise hors tension Plage de réglage de la température Mode de fonctionnement Plage de réglage de la température...
-
Page 70: Modes De Fonctionnement, Réglages De La Température, De La Ventilation Et De Verrouillage
Modes de fonctionnement, réglages de la température, de la ventilation et de Verrouillage Fonctionnement des touches Mode de fonctionnement Appuyez sur la touche F1 pour balayer les modes de fonctionnement parmi : "Froid, Déshu., Ventil., Auto, Invers. et Chaud". Sélectionnez le Amb. - Page 71 à utiliser TC-24A pour le mode de inversion. Si vous utilisez à la fois TC-24A et PAR-30MAAU dans un système, veillez à régler la fonction de inversion à partir d'un seul d'entre eux. Ne la réglez par pour les deux.
- Page 72 Température programmée Si le mode de fonctionnement n'est PAS "Invers." Pressez F2 pour diminuer la température programmée de 1 ºC (1 ºF), et F3 pour l'augmenter. Amb. Froid Auto Consigne •Consultez le tableau de la page 13 pour la plage de température réglable en fonction du mode de fonctionnement.
- Page 73 Si le mode de fonctionnement est "Invers." Le réglage en cours (la température de la limite supérieure/inférieure) s'affiche. Amb. Consigne Auto Invers. Consigne Température Température limite inférieure limite supérieure Mode Temp. Ventil Appuyez sur la touche F2 ou F3 pour accéder à...
- Page 74 Vitesse du ventilateur Pressez F4 pour changer la vitesse du ventilateur, dans l'ordre suivant. Amb. Froid Auto Consigne Auto Mode Temp. Ventil •Les vitesses de ventilation disponibles dépendent du modèle d'appareil intérieur. MENU RETURN SELECT HOLD •La vitesse du ventilateur peut être changée même si les touches sont verrouillées ou lorsque le système est piloté...
- Page 75 Verrouillage Appuyez sur la touche HOLD pour activer/ désactiver la fonction Verrouillage. Si la fonction Verrouillage est activée, Amb. Invers. Auto Consigne les fonctions suivantes sont interdites et Mode Temp. Ventil s'affiche. • ON/OFF Timer • Arrêt Auto Timer • Horloge hebdomadaire •...
-
Page 76: Naviguer Dans Le Menu
Naviguer dans le menu Menu général Réglages et paramè- Détail des réglages Se référer tres affi chés à la page Vane•Volet•Vent Sert à régler l'angle du défl ecteur. •Sélectionnez le réglage désiré parmi 5 positions possibles du défl ecteur. (Lossnay) Sert à... - Page 77 Réglages et paramè- Détail des réglages Se référer tres affi chés à la page Information filtre Sert à tester l'état du fi ltre. • Le témoin d'état du fi ltre peut être remis à zéro. Information défaut Sert à vérifi er les informations d'erreur lorsqu'une erreur se produit. •Le code d'erreur, la source de l'erreur, l'adresse M-NET, le modèle d'appareil, le numéro de fabrication, les coordonnées (numéro de téléphone du revendeur) peuvent être affi...
-
Page 78: Naviguer Dans Le Menu Général
Naviguer dans le menu Naviguer dans le Menu général Fonctionnement des touches Menu général Menu général Maître Pressez la touche MENU . Vane Volet Vent (Lossnay) Forte puissance Timer Le Menu général apparaît. Horloge hebdomadaire OU mode silence Ecran principal: RETURN Page Curseur MENU... - Page 79 Enregistrer les paramètres Mode silience unité extérieure Sélectionnez l'élément désiré, et appuyez sur la Mar Mer Jeu Ven Sam Marche Arrêt Silence touche SELECT . L'écran correspondant s'affiche. Ecran réglage: SELECT Jour MENU RETURN SELECT HOLD Fermer le Menu général Pressez la touche RETURN pour sortir du Menu général, et retourner sur l'écran principal.
-
Page 80: Fonctionnement De La Télécommande - Réglage Des Fonctions
Fonctionnement la télécommande - réglage des fonctions Vane•Volet•Vent (Lossnay) Fonctionnement des touches Accéder au menu Sélectionnez "Vane•Volet•Vent (Lossnay)" dans Menu général Maître Vane Volet Vent (Lossnay) le Menu général (voir page 22), et appuyez sur la Forte puissance touche SELECT . Timer Horloge hebdomadaire OU mode silence... - Page 81 Réglage de la grille Appuyez sur la touche F4 pour activer ou désactiver le mouvement de la grille. Vanne Vent. Volet MENU RETURN SELECT HOLD Réglage de la ventilation Pressez F3 pour choisir l'option de ventilation parmi : "OFF", "Ptit" et "Gd". Ptit * Réglable seulement lorsque le Lossnay est connecté.
-
Page 82: Forte Puissance
Fonctionnement la télécommande - réglage des fonctions Forte puissance Descriptions des fonctions Le fonctionnement à forte puissance permet aux appareils de fonctionner à capacité plus élevée que la normale de façon à atteindre la température désirée plus rapidement. Ce mode de fonctionnement va durer 30 minutes au maximum, puis l'appareil revient en mode de fonctionnement normal à... -
Page 83: Horloge
Horloge Fonctionnement des touches Sélectionnez "Réglages initiaux" dans le Menu Menu général Maître général (voir page 22), et appuyez sur la touche Réglages initiaux Service SELECT . Ecran principal: RETURN Curseur Page L'heure doit avoir été réglée avant de procéder aux réglages suivants. -
Page 84: Timer (On/Off Timer)
Fonctionnement la télécommande - réglage des fonctions Timer ON/OFF Timer Fonctionnement des touches Sélectionnez "Timer" dans le Menu général (voir Menu général Maître page 22), et appuyez sur la touche SELECT . Vane Volet Vent (Lossnay) Forte puissance Timer Horloge hebdomadaire OU mode silence La ON/OFF Timer ne fonctionne pas dans les cas Ecran principal: RETURN... - Page 85 Modifiez le réglage avec les touches F3 ou F4 . Timer ON/OFF timer : Non (désactivé) / Oui (activé) • ON/OFF timer / Oui Marche Marche : Heure de mise en marche • Arrêt (Réglable par pas de 5 minutes) Répéter Non / * Appuyez et maintenez la touche appuyée pour...
-
Page 86: Arrêt Auto Timer
Fonctionnement la télécommande - réglage des fonctions Timer Arrêt Auto Timer Fonctionnement des touches Affichez l'écran de réglage de la Timer. Timer (Veuillez vous référer à la page 28.) ON/OFF timer Marche Arrêt Répéter Sélectionnez "Arrêt Auto" et appuyez sur la Arrêt Auto Arrêt dans --- min... - Page 87 Pressez la touche SELECT pour enregistrer les Arrêt Auto Timer paramètres. Arrêt Auto Arrêt dans Sélection: SELECT Curseur Heure MENU RETURN SELECT HOLD Un écran de confirmation s'affiche. Arrêt Auto Timer Arrêt Auto Arrêt dans Naviguer dans les écrans Enregistrer les modifications •...
-
Page 88: Horloge Hebdomadaire
Fonctionnement la télécommande - réglage des fonctions Horloge hebdomadaire Fonctionnement des touches Sélectionnez "Horloge hebdomadaire" dans le Menu général Maître Menu général (voir page 22), et appuyez sur la Vane Volet Vent (Lossnay) Forte puissance touche SELECT . Timer Horloge hebdomadaire OU mode silence Le Horloge hebdomadaire ne fonctionne pas dans Ecran principal: RETURN... - Page 89 L'écran de réglage du programmateur Horloge hebdomadaire hebdomadaire s'affiche, avec les paramètres Dim Lun Mar Mer Jeu Ven Sam N° actuels. Jusqu'à huit programmes peuvent être définis Ecran entrée: SELECT pour chaque jour. Jour Sélect Page Placez le curseur sur le jour de la semaine choisi avec F1 ou F2 , et sélectionnez le avec F3 .
-
Page 90: Mode Silience Unité Extérieure
Fonctionnement la télécommande - réglage des fonctions Mode silience unité extérieure Descriptions des fonctions Cette fonction permet à l'utilisateur de définir les périodes de temps pour lesquelles la priorité est donnée à un fonctionnement silencieux des appareils extérieurs plutôt qu'à la régulation de la température. Régler les heures de démarrage et d'arrêt du mode silence pour chaque jour de la semaine. - Page 91 L'écran de réglage du mode silence OU s'affiche. Mode silience unité extérieure Dim Lun Mar Mer Jeu Ven Sam Marche Arrêt Silence Pour créer ou modifier le réglage, placez le curseur sur le jour de la semaine désiré Sélection: SELECT avec F1 ou F2 , puis appuyez sur F3 pour Jour Sélect...
-
Page 92: Limites
Fonctionnement la télécommande - réglage des fonctions Limites Réglage de la limitation de la plage de température Fonctionnement des touches Sélectionnez "Limites" dans le Menu général Maître Menu général (voir page 22), et appuyez sur la touche Limites Economie d'énergie SELECT . - Page 93 Modifiez les réglages avec les touches F3 ou F4 . Temp.consigne • Temp.consigne : Non (libre) ou Oui (limitée) Temp.consigne Non / Froid·Déshu • Froid•Déshu : température maximale et minimale Chaud Auto • Chaud : température maximale et minimale Sélection: SELECT •...
- Page 94 Fonctionnement la télécommande - réglage des fonctions Limites Fonction de verrouillage Pour activer la fonction verrouillage, réglez le paramètre "Commande bloquée" à "Oui". Fonctionnement des touches Affiche l'écran de réglage des limitations. Limites (Veuillez vous référer à la page 36.) Commande bloquée ON/OFF Mode Consigne Vanne...
- Page 95 apparaît sur l'écran principal en mode complet lorsque le verrouillage est activé. Amb. Le guide de fonction des touches n'apparaît pas Froid Auto Consigne pour les touches verrouillées. Mode Ventil (Lorsque la température est verrouillée)
-
Page 96: Économie D'énergie
Fonctionnement la télécommande - réglage des fonctions Économie d'énergie Retour automatique à la température programmée Fonctionnement des touches Sélectionnez "Economie d'énergie" dans le Menu Maître Menu général général (voir page 22), et appuyez sur la touche Limites Economie d'énergie SELECT . Information filtre Information défaut Maintenance... - Page 97 Modifiez les réglages avec les touches F3 ou F4 . Retour automatique Retour auto : Non (désactivé) / Oui (activé) • Retour auto Non / Froid: Après Froid : Réglage de la minuterie de 30 à • retour à Chaud: Après 120 minutes par incréments de 10 minutes.
- Page 98 Fonctionnement la télécommande - réglage des fonctions Économie d'énergie Réglage du programmateur d'économie d'énergie Fonctionnement des touches Affichez l'écran de réglage "Economie d'énergie". Economie d'énergie (Veuillez vous référer à la page 40.) Retour auto Froid: min, Chaud: min, Programmation Placez le curseur sur "Programmation", et Dim Lun Mar Mer Jeu Ven Sam Ecran réglage: SELECT appuyez sur la touche SELECT .
- Page 99 L'écran de réglage du jour de la semaine Economie d'énergie apparaît. Dim Lun Mar Mer Jeu Ven Sam N° Jusqu'à quatre programmes peuvent être définis pour chaque jour. Entrée: SELECT Placez le curseur sur le jour de la semaine choisi Jour Sélect avec F1 ou F2 , et sélectionnez le avec F3 .
-
Page 100: Angle De Rotation Des Volets
Fonctionnement la télécommande - réglage des fonctions Angle de rotation des volets Fonctionnement des touches Sélectionnez "Maintenance" dans le Menu Menu général Maître général (voir page 22), et appuyez sur la touche Limites Economie d'énergie SELECT . Information filtre Information défaut Maintenance Ecran principal: RETURN Curseur... - Page 101 Le réglage actuel du déflecteur s'affiche. Angle de rotation des volets Sélectionnez la sortie d'air désirée, de 1 à 4, à l'aide de F1 et F2 . Sélection: SELECT Sortie : "1", "2", "3", "4" et "1, 2, 3, 4 (Tous les appareils)" •...
-
Page 102: Ecran Principal De Réglage
Fonctionnement la télécommande - réglage des fonctions Ecran principal de réglage Fonctionnement des touches Sélectionnez "Réglages initiaux" dans le Menu Menu général Maître général (voir page 22), et appuyez sur la touche Réglages initiaux Service SELECT . Ecran principal: RETURN Curseur Page MENU... -
Page 103: Contraste
Contraste Fonctionnement des touches Sélectionnez "Réglages initiaux" dans le Menu Menu général Maître général (voir page 22), et appuyez sur la touche Réglages initiaux Service SELECT . Ecran principal: RETURN Curseur Page MENU RETURN SELECT HOLD Placez le curseur sur "Contraste" avec les Menu de réglage initial touches F1 ou F2 , et appuyez sur la touche Principal / Secondaire... -
Page 104: Sélection Du Langage
Fonctionnement la télécommande - réglage des fonctions Sélection du langage Descriptions des fonctions La langue désirée peut être choisie. Les langues disponibles sont anglais, français et espagnol. Fonctionnement des touches Sélectionnez "Réglages initiaux" dans le Menu Menu général Maître général (voir page 22), et appuyez sur la touche Réglages initiaux Service SELECT . - Page 105 Placez le curseur sur la langue que vous désirez Sélection du langage avec les touches F1 à F4 , et appuyez sur la English Français Español touche SELECT pour sauvegarder votre choix. Sélection: SELECT Curseur Curseur MENU RETURN SELECT HOLD Sélection du langage English Français...
-
Page 106: Maintenance
Maintenance Information filtre apparaît sur l'écran principal dans en complet quand les filtres doivent être mode Amb. nettoyés. Auto Froid Consigne Lavez, nettoyez ou remplacez les filtres lorsque cette icône apparaît. Mode Temp. Ventil Veuillez vous référer au mode d'emploi de l'appareil intérieur pour plus de détails. - Page 107 Choisissez "OK" avec la touche F4 . Information filtre Réinitialiser signal filtre ? Annule MENU RETURN SELECT HOLD Un écran de confirmation s'affiche. Information filtre Signal filtre réinitialisé Naviguer dans les écrans • Pour revenir au Menu général .... Touche MENU •...
-
Page 108: Résolution Des Problèmes
Résolution des problèmes Information défaut Lorsqu'une erreur survient, l'écran suivant s'affiche. Vérifiez l'état de l'erreur, arrêtez le système, et consultez votre revendeur. Fonctionnement des touches Le code de l'erreur, l'appareil de l'erreur, Information défaut Code défaut l'adresse M-NET, le nom du modèle de Défaut unité... - Page 109 Pressez la touche F4 ou la touche ON / OFF Information défaut pour acquitter l'erreur. Code défaut Défaut unité Adresse M-Net Type Les erreurs ne peuvent pas être remises à No série zéro tant que la mise en marche ou l'arrêt Reset défaut: Bouton reset Page Reset...
-
Page 110: Caractéristiques
Caractéristiques Caractéristiques de la télécommande Caractéristiques Dimensions 120(L) x 120(H) x 19(P) mm (4 3/4 x 4 3/4 x 3/4 [in]) (non compris la partie qui dépasse) Poids net 0,25 kg (9/16 lb.) Tension d'alimentation 12 V continus (fourni par les appareils intérieurs) Consommation 0,3 W Conditions d'utilisation... - Page 111 Liste des fonctions (au 1er novembre 2010) : présent : absent Fonction City Multi Mot de passe requis Affi chage du Marche / Arrêt mode de Changement de mode de fonctionnement Réglage de la température de la pièce fonctionne- Réglage de la vitesse du ventilateur ment Réglage de l'angle du défl...
- Page 112 Liste des fonctions compatibles / incompatibles entre elles Program- Program- Forte Arrêt Mode Plage de Verrouilla- Retour mateur mateur puis- Auto silence tempéra- ge de automa- Inversion hebdoma- d'économies sance Timer Timer ture fonctions tique daire d'énergie Forte puissance ON/OFF Timer Arrêt Auto Timer Horloge...
- Page 116 This product is designed and intended for use in the residential, commercial, and light-industrial environment. HEAD OFFICE: TOKYO BLDG. , 2-7-3, MARUNOUCHI, CHIYODA-KU, TOKYO 100-8310, JAPAN WT06009X01...
Need help?
Do you have a question about the PAR-30MAAU and is the answer not in the manual?
Questions and answers