Table of Contents
Advertisement
Rapid DRY CLOTHES function: Inverter ca-
pable of blowing a great volume of airflow
Choosing airflow direction freely: By a multi-
flowing louver
Sufficient capacity (20L /day) : By high-power
dehumidifier
Separating operation based on purpose for
use: By a right-left-detached control panel
Large crystal monitor allows you to check
for temperature, humidity and level of room
comfort
Easily know conditions through a mold warn-
ing indicator
A large tank capacity (about 6.4L)
Pre-installed CLEAN AIR function
Casters allow carrying convenience of your
unit
This product is for household use only.
MODEL
DW-209EX
DEHUMIDIFIER
OPERATION MANUAL
CONTENTS
Precautions ............................................ 2
Proper Uses ............................................. 6
Preparations Before Using ..................... 7
Part Names and Functions ..................... 8
Operation Procedure ............................ 10
Changing the Operation Mode ............. 12
How to Operate the Timer .................... 14
Defrosting .............................................. 15
Emptying the Water Tank ..................... 16
Continuous Drainage ............................ 17
(by using caster) ......................................
Maintenance .......................................... 18
General Reference ................................ 20
Specifications ........................................ 21
Optional Accessories ........................... 21
Before Calling for Service .................... 24
Thank you very much for purchasing this SHARP de-
humidifier.
Please read this manual carefully to ensure safe, ef-
fective use of your dehumidifier.
Please read carefully through "Precautions" before
commencing to use this product.
Please keep this manual within easy reach so that
you can refer to it at any time you need.
This dehumidifier complies with the '96 Chlorofluo-
*
rocarbons Control Act, using the chlorofluorocarbon
HFC-134a which has an ozone-depletion factor of
zero.
G
Page
17
1
Advertisement
Table of Contents

Subscribe to Our Youtube Channel
Related Manuals for Sharp DW-209EX


Summary of Contents for Sharp DW-209EX
-
Page 1: Table Of Contents
Separating operation based on purpose for use: By a right-left-detached control panel Large crystal monitor allows you to check Thank you very much for purchasing this SHARP de- for temperature, humidity and level of room humidifier. comfort Please read this manual carefully to ensure safe, ef- Easily know conditions through a mold warn- fective use of your dehumidifier. -
Page 2: Precautions
Warning Should the supply cord be damaged, it must be replaced by a service center approved by Sharp as special tools are required. Do not stick your fingers or any foreign objects into the air outlet or intake. - Page 3 Meaning of the symbols EXTRA CAUTION needed. Actions that should be strictly avoided. Actions that must be taken. Take care to read through the precautions before commencing to use this product. Keep this manual within easy reach so that you can refer to it at any time. Cautions Do not operate the unit in a closet or in a narrow, con- fined space between furniture.
- Page 4 Precautions Precautions Cautions Do not obstruct the air outlet or air intake with clothing or any other materials. Otherwise, air flow will be obstruc- 5cm min. ted, resulting in overheating or fire. Make sure that the airflow louver lever is opened whenever the unit Keep 20 is operating.
- Page 5 Otherwise fire, electric shock or injury may result. When any abnormality (e.g. a burning smell) is noticed, turn the power off, unplug the unit and consult the SHARP Service Center. If the unit continues to be operated despite signs of abnormal- ity, a breakdown, electric shock or fire may result.
-
Page 6: Proper Uses
For maximum operation efficiency, please Proper Uses Proper Uses minimize opening and closing of windows and doors in the room where the unit is located. Dry clothes operation Dehumid Fast Auto dry When you are in a hurry to dry large When you want to quantities of clothes. -
Page 7: Preparations Before Using
Preparations Before Using Preparations Before Using Effective uses Installing the filter Dry bedding Lift the handle. Lift up the handle at the back of the unit, then take It is efficient to dry the bedding etc. out the front filter. Handle Front filter Filter clamp... -
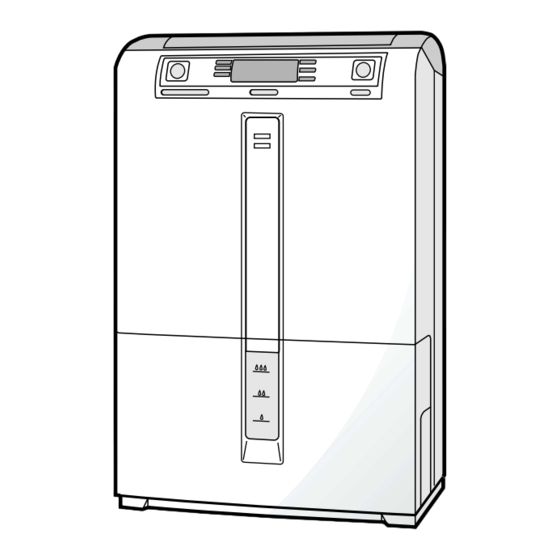
Page 8: Part Names And Functions
Part Names and Functions Part Names and Functions Front view Handle Lift when you move. Mold multiplication indicator This serves as a dehumidifying reminder when it turns red in room tem- perature of about 20°C or more and the humidity of about 70% or more. FULL tank lamp When the water level reaches this FULL line, the lamp blinks in green. -
Page 9: Control Panel
(Operation Procedure Control panel (The liquid-crystal indicator shows all indications for explanation.) Temperature/humidity in- Dehumidification mode dicator Indicates room temperature and humidity AUTO DRY (around the unit). Controls humidity automatically between 55 and Comfort indicator 60%. Indicates comfort levels in a room. ROOM DRY Airflow volume indicator Controls humidity automatically at about 50%. -
Page 10: Operation Procedure
Operation cannot be Operation Procedure Operation Procedure started unless the water tank is installed. Dry clothes operation (Example of indication) Operating state in STANDARD mode DRY CLOTHES mode DRY CLOTHES FAST SETTINGS but- STANDARD DRY CLOTHES SETTINGS Power ON/ GENTLE OFF button ON / OFF Lighting... -
Page 11: Dehumidifying Operation
Dehumidifying operation (Example of indication) Operating state of a little high humidity in AUTO DRY mode DEHUMID SETTINGS button Fan speed/LOW, ON/OFF AUTO DRY button ROOM DRY DEHUMID CONTINUOUS SETTINGS CLEAN AIR Fan speed/LOW, ON/ Lighting Power ON/ OFF button HIGH ON / OFF OFF button... -
Page 12: Changing The Operation Mode
Changing the Operation Mode Changing the Operation Mode It will be changed in the following order whenever Dry clothes operation pressing the DRY CLOTHES SETTINGS button. It begins in the STANDARD operation. (Example of indication) When DRY CLOTHES SETTING is operated. DRY CLOTHES FAST SETTINGS but-... -
Page 13: How To See Indication
Dehumidifiers do not have an air-conditioning function to adjust temperature. How to see If room temperature is too high or too low, the comfort level indicator will not indicate the proper comfort levels. indication Indication of “standby”, “AUTO Indication of “DRY CLOTHES” operation DRY operation”, “CONTINUOUS DRY”, “CLEAN AIR operation”... -
Page 14: How To Operate The Timer
How to Operate the Timer How to Operate the Timer To set on timer (it can be set only when the unit is shut down.) (Example of indication) Standard operation of clothes drying mode Display of ON TIMER after 5 hours DRY CLOTHES SETTINGS DEHUMID SETTINGS button button... -
Page 15: Defrosting
To set off timer (it can be set when the unit is in operation) (Example of indication) AUTO DRY operation at dehumidifying mode. (Indication of OFF TIMER after 1 hour) AUTO DRY FAST ROOM DRY Power ON/OFF STANDARD CONTINUOUS DRY CLOTHES SETTINGS button GENTLE... -
Page 16: Emptying The Water Tank
When taking out the water tank, the Emptying the Water Tank Emptying the Water Tank front full tank green lamp will light up, the FULL tank indicator on the liquid crystal display will start to blink, and the unit stops its operation. If the water tank fills to a level of approx. -
Page 17: Continuous Drainage
Continuous Drainage Continuous Drainage Cautions when using the unit with continuous drainage This dehumidifier is for home use. If you use it with continuous drainage, make sure to have a thorough check for the following at least once every two weeks: dirty front filter, clogging of water hose, and resumption of operation after a power failure. -
Page 18: Maintenance
Maintenance For safety purposes, turn off and unplug the unit Maintenance before carrying out any maintenance. For clean, sanitary and pro-long use, regular maintenance is recommended. Front filter Make sure to clean the front filter once every two weeks. If the filter is clogged with fine dust, the air flow rate will drop and dehumidification efficiency will be reduced. - Page 19 Changing the air purifying filter The required frequency for changing the air purifying filter will depend on where the unit is operated. It is highly recommended that the filter is checked regularly. Signs that the air purifying filter needs to be changed Generally a filter should be changed after six months from the time it is unpacked (depending on the place and conditions of use).
-
Page 20: General Reference
General Reference General Reference The temperature at which the unit can be op- ° ° erated is 5 C to 35 If the room temperature is over 35°C, the built-in protection system will automatically turn off the unit. If the room temperature is below 5°C, water may freeze and cause a failure to the unit. -
Page 21: Specifications
Optional Accessories Air purifying filter (for replacement) (This removes the smell of cigarette smoke, fine dust etc.) Model: DW-10C To purchase this filter, specify this model number to the store where you purchased the product or to the SHARP service center. - Page 22 MEMO - - - - - - - - - - - - - - - - - - - - - - - - - - - - - - - - - - - - - - - - - - - - - - - - - - - - - - - - - - - - - - - - - - - - - - - - - - - - - - - - - - - - - - - - - - - - - - - - - - - - - - - - - - - - - - - - - - - - - - - - - - - - - - - - - - - - - - - - - - - - - - - - - - - - - - - - - - - - - - - - - - - - - - - - - - - - - - - - - - - - - - - - - - - - - - - - - - - - - - - - - - - - - - - - - - - - - - - - - - - - - - - - - - - - - - - - - - - - - - - - - - - - - - - - - - - - - - - - - - - - - - - - - - - - - - - - - - - - - - - -...
- Page 23 MEMO - - - - - - - - - - - - - - - - - - - - - - - - - - - - - - - - - - - - - - - - - - - - - - - - - - - - - - - - - - - - - - - - - - - - - - - - - - - - - - - - - - - - - - - - - - - - - - - - - - - - - - - - - - - - - - - - - - - - - - - - - - - - - - - - - - - - - - - - - - - - - - - - - - - - - - - - - - - - - - - - - - - - - - - - - - - - - - - - - - - - - - - - - - - - - - - - - - - - - - - - - - - - - - - - - - - - - - - - - - - - - - - - - - - - - - - - - - - - - - - - - - - - - - - - - - - - - - - - - - - - - - - - - - - - - - - - - - - - - - - -...
-
Page 24: Before Calling For Service
Before Calling for Service If you think the unit is not working poperly, check the following points before calling for service. Symptoms Check Points Has it been 3 minutes or more after inserting power plug? ( Is the water tank installed properly? Is the water tank full? Unit does not operate Is the unit plugged in properly?
Need help?
Do you have a question about the DW-209EX and is the answer not in the manual?
Questions and answers