
Related Manuals for Marcy E7000D


Summary of Contents for Marcy E7000D
-
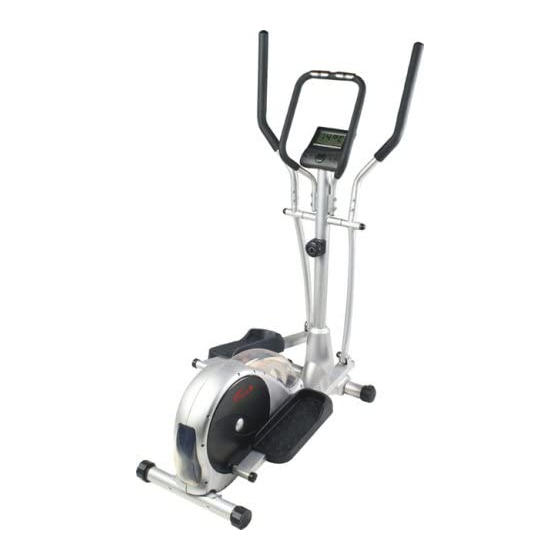
Page 1: Elliptical Trainer
ELLIPTICAL TRAINER PRODUCT CODE: E7000D Escalade International Limited Pleasant Road, Penllergaer, Swansea. SA4 9GE Tel: 00 44 1792 222 550 Fax 00 44 1792 895 781 www.escaladesports.co.uk info@escaladesports.co.uk... - Page 2 Important Safety Information Weight Limit Capacities Exploded Diagram Parts List Parts Identifier Assembly Instructions 8 - 11 User guide Computer Principles of Exercise Fault Finding Chart Additional Information Warranty & Ordering Parts Maintenance & Specifications Supplied by Escalade International Ltd Pleasant Road Penllergaer Swansea...
-
Page 3: Important Safety Information
IMPORTANT SAFETY INFORMATION READ ALL INSTRUCTIONS BEFORE USING THIS OWNER’S MANUAL CONTAINS ASSEMBLY, OPERATION, MAINTENANCE AND SAFETY INFORMATION. IN THE INTEREST OF SAFETY, PLEASE MAKE CERTAIN THAT YOU READ AND UNDERSTAND ALL THE INFORMATION BELOW. 1. This elliptical is intended for class H (H=Domestic) use only. It is not designed for commercial use. - Page 4 WARNING: Before commencing any exercise program, please consult your family physician. If at any time during exercise you feel faint, dizzy or experience pain, stop and consult your family physician. In the event any of the above mentioned warnings are breached by the consumer, the manufacturer may use same as a defence to any claim for injuries, damage or loss.
-
Page 5: Exploded Diagram
EXPLODED DIAGRAM... -
Page 6: Parts List
PARTS LIST PART DESCRIPTION PART NO, DESCRIPTION REAR STABILIZER 1 PCS REAR TRANSPARENT COVER 1 PCS ADJUSTING CAP 2 PCS DISC FOR COVER 2 PCS CARRIAGE BOLT FOR STABILIZER FOAM GRIP FOR RIGHT & LEFT 4 PCS 2 PCS M8*75L HANDLEBAR WAVY WASHER φ... -
Page 7: Parts Identifier
Parts Identifier NO.4 Acorn nut(base stabilizer) (8) NO.5 Curved Washer for M8 bolt (12) NO.25 Allen Bolt (fixed handlebar) M8*35(4) NO.19 lock nut for M8 bolt (2) NO.59 Lock nut for 3/8" bolt (pedal arm) (1) NO.60 Rubber cap for pedal arm (1) NO.56 Flat Washer(1) NO.61 Spring Washer for... -
Page 8: Assembly Instructions
ASSEMBLY INSTRUCTIONS Step 1 Assemble the Rear Stabilizer (1) and Front Stabiliser (6) onto the main frame and secure into position using 4 Carriage Bolts (3), 4 Curved Washers (5) and 4 Acorn Nuts (4). Step 2 Slide one Rubber Sleeve (54), 1 Wavy Washer (44) and 1 Washer # (46) over the Pedal shaft in-order, then install the Right Foot Pedal # (45) onto the Pedal shaft and secure into position using 1 Teflon Washer (14), 1 Flat Washer (15) and 1Nylon Nut # (49). - Page 9 Step 3 Slide the Handlebar Post Cover (9) over the Handlebar Post (8). Connect the Computer Cable Upper (47) to the Computer Cable Lower (53). Assemble the handlebar Post (8) onto the Main Frame using 4 Allen Bolts (10), 4 Spring Washers (55) and 4 Curved Washers (5). Install the Handlebar post cover # (9) by sinking the protrusion at the bottom into the hole punched on the Main base frame.
- Page 10 Step 5 Slide 1 Metal Bushing (50) into the tube welded to the bottom of each Moveable Handlebar (11 & 12). Attach the Right Moveable Handlebar to the Right Pedal Arm using 1 Bolt (18), 2 Washers (20), and 1 Nylon Lock Nut (19).
- Page 11 Step 8 Install the Left Foot Pad (32) onto the Left Pedal Arm Using 2 Carriage Bolts (34), 2 Spring Washers (61), 2 Flat Washers (36) and 2 Fixing Knobs (35). Repeat the above procedure for the Right Foot Pad (33). Step 9 Connect the Computer Cable Upper (47) into the rear of the computer.
- Page 12 User Guide Insert Adaptor Here Insert the AC Adaptor into the rear of the Elliptical Trainer and power on. LEVEL ADJUSTMENT ON FLOOR Your ELLIPTICAL TRAINER has specialized ENDCAPS on the REAR STABILIZER BAR. By rotating these end caps you should be able to level the Elliptical on any floor surface.
- Page 13 EXERCISE COMPUTER PROGRAMABLE TRAINING COMPUTER – SM2820-7 Introduction The computer offers Manual, Programmable, User and Target Heart Rate (THR) modes to control the magnetic resistance. There are 6 program profiles, user memories and 8 levels of resistance. The pre set functions are Time, Distance, Calories, and Pulse. There is also a special recovery feature which monitors the hearts status in 6 grades.
- Page 14 9. TIME: Counts up from zero – 99:59 Minutes. Counts down from pre set value to zero. The computer will sound an alarm on reaching zero. 10. DISTANCE: Counts up from zero to 99.90Km. Counts down from pre set value to zero. The computer will sound an alarm on reaching zero.
- Page 15 Program Mode 1. After selecting PROGRAM mode enter preset values (see Entering Preset Values) or press START/STOP to begin exercising. Display values will begin to count up. 2. Resistance level will increase or decrease automatically according to the program profile. 3.
- Page 16 Warm-up: Any workout needs to begin with a good warm-up for at least 5-10 minutes. The warm-up consists of whole body, low intensity rhythmic movement, stretching and limbering exercises. A common way to warm your body is by jogging on the spot. Start by moving your legs and then your arms until you get your whole body moving.
- Page 17 (220 – Your age is an estimate of your HR) Your THR lies within these two limits. When you THR reaches this zone, it means you have reached a level of activity which contributes to your cardiovascular fitness. Fault Finding Chart FAULT REASON REMEDY...
-
Page 18: Limited Warranty
CARE AND MAINTENANCE Inspect and tighten all parts before using the elliptical. The elliptical can be cleaned using a damp cloth and mild non-abrasive detergent. DO NOT use solvents. Examine the elliptical regularly for signs of damage or wear. Failure to examine the elliptical regularly may affect the safety level of the equipment.
Need help?
Do you have a question about the E7000D and is the answer not in the manual?
Questions and answers