JVC HX-D77 Instructions Manual
Compact component system
Hide thumbs
Also See for HX-D77:
- Instructions manual (102 pages) ,
- Instructions manual (53 pages) ,
- Instructions manual (96 pages)
Table of Contents
Advertisement
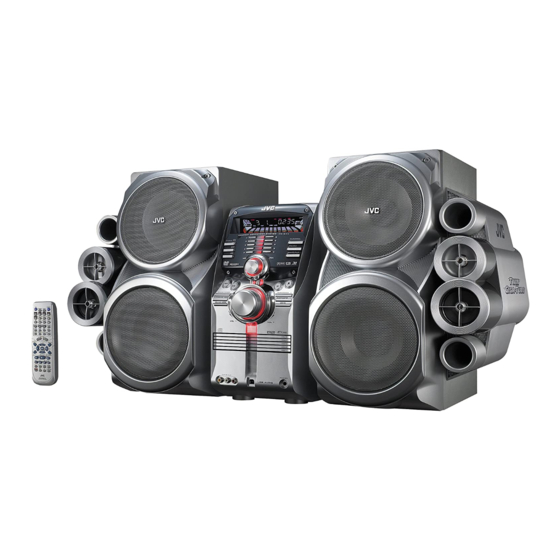
COMPACT COMPONENT SYSTEM
HX-D77
SP-HXD77
Downloaded From Disc-Player.com JVC Manuals
—Consists of CA-HXD77 and SP-HXD77
CA-HXD77
INSTRUCTIONS
SP-HXD77
For Customer Use:
Enter below the Model No. and Serial
No. which are located either on the rear,
bottom or side of the cabinet. Retain this
information for future reference.
Model No.
Serial No.
LVT1540-001B
[J]
Advertisement
Table of Contents

Related Manuals for JVC HX-D77


Summary of Contents for JVC HX-D77
- Page 1 For Customer Use: Enter below the Model No. and Serial INSTRUCTIONS No. which are located either on the rear, bottom or side of the cabinet. Retain this information for future reference. Model No. Serial No. LVT1540-001B Downloaded From Disc-Player.com JVC Manuals...
- Page 2 CAUTION CAUTION To reduce the risk of electrical shocks, fire, etc.: Changes or modifications not approved by JVC could 1 Do not remove screws, covers or cabinet. void the user’s authority to operate the equipment. 2 Do not expose this appliance to rain or moisture.
- Page 3 Front view Side view 1 cm 1 cm Face Côté 15 cm 15 cm 15 cm 15 cm 15 cm SP-HXD77 SP-HXD77 CA-HXD77 HXD77 10 cm Downloaded From Disc-Player.com JVC Manuals...
- Page 4 DO NOT disassemble the System since there are no user serviceable parts inside. Indicates that this operation is only possible using the buttons and controls on Main Unit ONLY the main unit. Downloaded From Disc-Player.com JVC Manuals...
-
Page 5: Table Of Contents
Setting the Clock ............19 Turning Off the Power Automatically....... 19 Unique DVD/VCD Operations ....20 Selecting the Sound Track......... 20 Selecting the Subtitle Language ........ 21 Selecting a View Angle ..........21 Special Picture Playback ........... 22 Downloaded From Disc-Player.com JVC Manuals... -
Page 6: Before Operating The System
About color system This System accommodates the NTSC and PAL system and can play back discs recorded in either the NTSC or the PAL system. • To change the color system, see page 7. Downloaded From Disc-Player.com JVC Manuals... -
Page 7: Getting Started
Finally plug the AC power cord. period of time. Otherwise, the remote control will be damaged from battery Now you can operate this System. leakage. Downloaded From Disc-Player.com JVC Manuals... -
Page 8: Step 3: Hook Up
From the digital output of the digital decoder or amplifier with the built-in digital decoder ⁄ From the speakers See page 7. From a wall outlet Plug in the AC power cord only after all connections are complete. Downloaded From Disc-Player.com JVC Manuals... - Page 9 • The video signals from the external equipment connected Extend the supplied FM antenna horizontally. to GAME/AUX jack are output as composite video signal. The system does not output S-video signals for these external equipment. Downloaded From Disc-Player.com JVC Manuals...
- Page 10 Black Black Digital audio signals are output from this System only when DVD/CD is selected as the source. WOOFER (3-6Ω) DO NOT plug in any equipment until all connections are complete. Downloaded From Disc-Player.com JVC Manuals...
-
Page 11: Display Indication
• ST (stereo): lights while an FM stereo station with sufficient signal strength is tuned in. • MONO: lights while receiving an FM stereo station in monaural. a DTS: lights when a source signal is DTS Surround. Downloaded From Disc-Player.com JVC Manuals... - Page 12 Disc type is displayed with the following abbreviation: “SV (SVCD)”, “VD (VCD)”, and “CD (CD)”. While activating PBC function, “PBC” appears on the display instead of the playing time. At the playback beginning, the file name and ID3 Tag (if any) are shown. Downloaded From Disc-Player.com JVC Manuals...
-
Page 13: Daily Operations-Playback
System or start playback. To cancel the demonstration Main Unit ONLY sec. DEMO OFF DEMO START Press and hold until “DEMO OFF” appears on the display. Downloaded From Disc-Player.com JVC Manuals... -
Page 14: Listening To The Radio
15, press h10, 1, then 5. MONO indicator disappears). To select preset number 30, press h10, 3, then 0. • You can also use ¢/4 on the remote control or the PRESET +/– control on the main unit. Downloaded From Disc-Player.com JVC Manuals... -
Page 15: Playing Back A Disc
Playback of the selected disc starts. To start: To pause: To stop: To release it, press DISC PLAY 3. Downloaded From Disc-Player.com JVC Manuals... - Page 16 To select number 5, press 5. To select number 10, press10. To select number 15, press h10, 1, then 5. To select number 30, press h10, 3, then 0. To select number 114, press h10, h10, 1, 1 then 4. Downloaded From Disc-Player.com JVC Manuals...
-
Page 17: Playing Back From The Pc
USB drivers following the instructions on the DO NOT turn off the System and disconnect PC’s monitor. the USB cable while installing drivers and playing back, and for several seconds after your PC recognizes the System. Downloaded From Disc-Player.com JVC Manuals... -
Page 18: Playing Back From Other External Equipment
TV/monitor with the composite video cable (see page 6). • The video signals from the external equipment connected to GAME/AUX jack are output as composite video signal. The system does not output S-video signals for these external equipment. Downloaded From Disc-Player.com JVC Manuals... -
Page 19: Adjustments
LEVEL – S.TURBO indicator lights up and the subwoofer level automatically increases to the maximum level (level 2). • You can adjust the subwoofer level even if the Sound Turbo is set to TURBO ON. Downloaded From Disc-Player.com JVC Manuals... -
Page 20: Making The Center Channel Sound Clear -Clear Voice
DVD LEVEL2 an outdoor stadium. DVD LEVEL3 ROCK Boosts low and high frequency. Good for acoustic music. • As the number increases, sound level also increases. Good for vocal music. CLASSIC Good for classical music. Downloaded From Disc-Player.com JVC Manuals... -
Page 21: Changing The Picture Tone
Suitable for a movie source. Adjust the parameter. USER1/USER2 You can adjust parameters and can store the settings (see the next column). Finish setting. Repeat steps 2 to 3 to adjust other parameters. Finish setting. Downloaded From Disc-Player.com JVC Manuals... -
Page 22: Turning On Or Off The Key-Touch Tone
Wait until the set time disappears. To check the time remaining until the shut-off time • When you press SLEEP once, you can check (While holding...) (While holding...) the remaining time until the shut-off time. Downloaded From Disc-Player.com JVC Manuals... -
Page 23: Unique Dvd/Vcd Operations
L1/L2/L To listen to the left audio channel. R1/R2/R To listen to the right audio channel. • SVCD can have 4 audio channels. SVCD usually uses these 4 channels to record two 2-channel recordings (ST1/ST2). Downloaded From Disc-Player.com JVC Manuals... -
Page 24: Selecting The Subtitle Language
(see page 27). While playing a DVD Video... Display the subtitle selection window. Select the view angle. Select the subtitle language. Ex.: Ex.: ENGLISH FRENCH JAPANESE JAPANESE ENGLISH FRENCH JAPANESE While playing DVD-VR... While playing an SVCD... Downloaded From Disc-Player.com JVC Manuals... -
Page 25: Special Picture Playback
While playing... Still picture playback starts. Select slow motion speed. Forward slow motion starts. Reverse slow motion* starts. 1/32 1/16 1/32 1/16 * Only for DVD Video. To resume normal playback, press DISC PLAY 3. Downloaded From Disc-Player.com JVC Manuals... -
Page 26: Advanced Disc Operations
3, then 0. To select number 114, press h10, h10, 1, 1 then 4. Repeat the steps 2 until you finish what you want to program. Start playback. Playback starts in the order you have programmed. Downloaded From Disc-Player.com JVC Manuals... -
Page 27: Playing At Random-Random Play
To add another entry to the program: current track, press Repeat step 2 on page 23. To exit from Random Play To exit from Program Play Before or after playback... Before or after playback... PROGRAM RANDOM PROGRAM RANDOM Canceled Canceled Downloaded From Disc-Player.com JVC Manuals... -
Page 28: Playing Repeatedly-Repeat Play
• If you try to eject discs while Tray Lock is in use, On the TV screen “LOCKED” appears to inform you that the disc trays are locked. To cancel the prohibition, repeat the same procedure. “UNLOCKED” appears on the display. Downloaded From Disc-Player.com JVC Manuals... -
Page 29: On-Screen Disc Operations
TIME 3/2/5/∞, SVCD ENTER ON SCREEN DISC 3 TRACK 3 TIME 0:04:58 SVCD ¡ DISC PLAY 3 TIME -/ 4 ZOOM DISC 4 TRACK 3 TIME 0:04:58 TIME DISC 5 TRACK 3 TIME 04:58 TIME Downloaded From Disc-Player.com JVC Manuals... -
Page 30: About The On-Screen Bar
Select to change the audio language or Pop-up window disappears. channel (see page 20). Select to change subtitle language (see page 21). Select to change the view angle (see To erase the on-screen bar page 21). Downloaded From Disc-Player.com JVC Manuals... - Page 31 • Repeat modes depend on the current playback disc. Refer to page 25. 5 Finish the setting. Pop-up window goes off. To cancel Repeat Play, select “OFF” in step 4. To erase the on-screen bar Downloaded From Disc-Player.com JVC Manuals...
- Page 32 • To correct a misentry, press cursor 2 to erase the last • Before pressing ENTER, you can search for the end point using ¡. entry. 5 Finish the setting. The System starts playing from the specified time. To remove the on-screen bar Downloaded From Disc-Player.com JVC Manuals...
-
Page 33: Operations On The Control Screen
(only for MP3/WMA) 8 Operation mode icon 9 Current track number/total number of tracks in the current group (total number of tracks on the loaded disc) 0 Highlight bar - Track list Continue on the next page Downloaded From Disc-Player.com JVC Manuals... - Page 34 3 Recording channels • To cancel slide-show, and display the current still picture, 4 Recording time press 8. 5 Title 6 Highlight bar (current selection) To stop playback 7 Chapters included 8 Playback time Downloaded From Disc-Player.com JVC Manuals...
- Page 35 List. REPEAT 1 DISC Repeats the current disc. DISC REPEAT ALL* Repeats all discs. ALL* Selects to cancel Repeat indication Play mode. * REPEAT ALL ( ALL) may not be available depending on the disc. Downloaded From Disc-Player.com JVC Manuals...
-
Page 36: Timer Operations
Timer—“TIMER ON.” DAILY TIMER (ON) Canceled Clock setting (While holding...) SHIFT Set the hour then minute for on-time. (While holding...) Enter the off-time setting mode. (While holding...) Set the hour then minute for off-time. (While holding...) Downloaded From Disc-Player.com JVC Manuals... - Page 37 When the off-time comes The System stops playback, and turns off (standby). (While holding...) • The timer setting remains in memory until you change Downloaded From Disc-Player.com JVC Manuals...
-
Page 38: Set Up Menu Operations
Finish the setting. SELECT TO SELECT. USE ENTER TO CONFIRM TO EXIT, PRESS [SET UP]. ENTER 1 LANGUAGE Set up Menu 2 PICTURE Set up Menu 3 AUDIO Set up Menu 4 OTHERS Set up Menu Downloaded From Disc-Player.com JVC Manuals... - Page 39 Select from—ENGLISH, SPANISH, FRENCH, CHINESE, GERMAN, ITALIAN, JAPANESE, RUSSIAN, AA – ZU (see “Language Code List” on page 44) or “OFF (no subtitle).” ON SCREEN LANGUAGE Select one of the languages shown on the TV from—ENGLISH, SPANISH, and FRENCH. Downloaded From Disc-Player.com JVC Manuals...
- Page 40 “PCM ONLY”) from this System. Select one of the following: STEREO: To connect a conventional stereo amplifier, receiver, MD player, TV, etc. DOLBY To connect an amplifier with the Dolby SURROUND: Pro Logic decoder. Downloaded From Disc-Player.com JVC Manuals...
- Page 41 • When recording the picture on a VCR, select “OFF” to avoid recording the guide icons on your video tape. Select one of the following: To activate the on-screen guide icons. OFF: To cancel the on-screen guide icons. Downloaded From Disc-Player.com JVC Manuals...
-
Page 42: Operating The Tv
Operating the TV Operating TV Remote ONLY Remote control You can operate the JVC’s TV using this remote control. To turn on or off the TV: To select the input mode (either TV or VIDEO): TV VOL + / – TV VIDEO TV CH + / –... -
Page 43: Additional Information
– It is recommended that you make each MP3/WMA file at a sampling rate of 44.1 kHz and at bit rate of 128 kbps. This System cannot play back files made at bit rate of less than 64 kbps. Downloaded From Disc-Player.com JVC Manuals... - Page 44 – Resume is not available. Subtitles and the information for zooming in always appear – For details about DVD-VR format and play list, refer to on the display regardless of this setting. the manual of the recording equipment. Downloaded From Disc-Player.com JVC Manuals...
-
Page 45: Maintenance
] The path between the remote control and the remote page 24). sensor on the System is blocked. ] The batteries are exhausted. No sound is heard. ] Speaker connections are incorrect or loose. ] Headphones are connected. Downloaded From Disc-Player.com JVC Manuals... -
Page 46: Optical Digital Output Signals
MP3/WMA disc No output While playing some DVDs, digital signals may be emitted at 20 bits or 24 bits (at their original bit rate) through the DIGITAL OUTPUT (OPTICAL) terminal if the discs are not copy-protected. Downloaded From Disc-Player.com JVC Manuals... -
Page 47: Language Code List
Panjabi Zulu Scots Gaelic Polish Galician Pashto, Pushto Guarani Portuguese Gujarati Quechua Hausa Rhaeto-Romance Hindi Kirundi Croatian Rumanian Hungarian Russian Armenian Kinyarwanda Interlingua Sanskrit Interlingue Sindhi Inupiak Sangho Indonesian Serbo-Croatian Icelandic Singhalese Hebrew Slovak Yiddish Downloaded From Disc-Player.com JVC Manuals... -
Page 48: Parts Index
11, 13, 22 22, 32 11–14, 19, 24, 33, 34, 39 Main unit 12, 25 STANDBY lamp 10, 14 10, 11 10, 14 10, 15 12, 19, 24, 25 11, 13 12, 22 10, 16 Downloaded From Disc-Player.com JVC Manuals... -
Page 49: Specifications
Design and specifications are subject to change without Video CD/Super Video CD/MP3/WMA/ notice. JPEG format) DVD-R/DVD-RW (recorded in DVD-Video or DVD-VR format) +R/+RW (recorded in DVD-Video or DVD-VR format) Dynamic range: 90 dB Horizontal resolution: 500 lines Wow and flutter: Immeasurable Downloaded From Disc-Player.com JVC Manuals... - Page 50 Downloaded From Disc-Player.com JVC Manuals...
- Page 51 Downloaded From Disc-Player.com JVC Manuals...
- Page 52 © 2006 Victor Company of Japan, Limited 0206KMMMDWSAM Downloaded From Disc-Player.com JVC Manuals...
Need help?
Do you have a question about the HX-D77 and is the answer not in the manual?
Questions and answers