Table of Contents
Advertisement
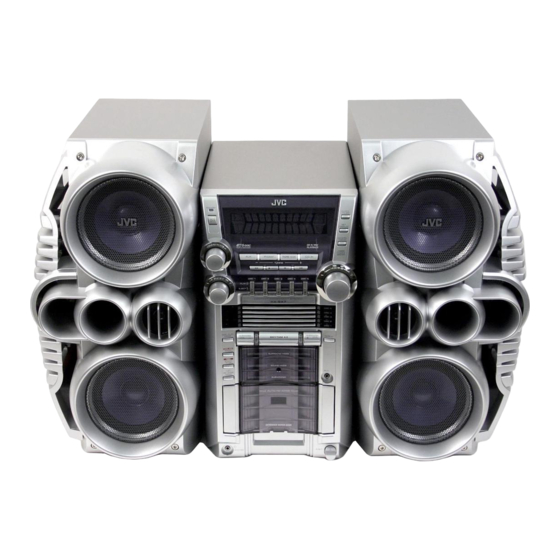
COMPACT COMPONENT SYSTEM
HX-GX7
SP-HXGX7
—Consists of CA-HXGX7 and SP-HXGX7
For Customer Use:
Enter below the Model No. and Serial No.
which are located either on the rear, bot-
tom or side of the cabinet. Retain this
information for future reference.
Model No.
Serial No.
DISC
COMPACT
DIGITAL AUDIO
C O M P A C T
C O M P O N E N T
S Y S T E M
HX-GX7
SURROUND MODE
SOUND MODE
SUBWOOFER
CA-HXGX7
SP-HXGX7
INSTRUCTIONS
For Customer Use:
Enter below the Model No. and Serial No.
which are located either on the rear, bot-
tom or side of the cabinet. Retain this
information for future reference.
Model No.
Serial No.
GVT0124-001A
[J]
Advertisement
Table of Contents

Related Manuals for JVC HX-GX7


Summary of Contents for JVC HX-GX7
- Page 1 COMPACT COMPONENT SYSTEM HX-GX7 DISC C O M P A C T SP-HXGX7 CA-HXGX7 INSTRUCTIONS —Consists of CA-HXGX7 and SP-HXGX7 For Customer Use: Enter below the Model No. and Serial No. which are located either on the rear, bot- tom or side of the cabinet. Retain this information for future reference.
- Page 2 Mises en garde, précautions et indications diverses CAUTION RISK OF ELECTRIC SHOCK DO NOT OPEN CAUTION: TO REDUCE THE RISK OF ELECTRIC SHOCK, DO NOT REMOVE COVER (OR BACK). NO USER SERVICEABLE PARTS INSIDE. REFER SERVICING TO QUALIFIED SERVICE PERSONNEL. The lightning flash with arrowhead symbol, within an equilateral triangle is intended to alert the user to the presence of uninsulated...
- Page 3 For Canada/pour le Canada CAUTION: TO PREVENT ELECTRIC SHOCK, MATCH WIDE BLADE OF PLUG TO WIDE SLOT, FULLY INSERT. ATTENTION: POUR EVITER LES CHOCS ELECTRIQUES, INTRODUIRE LA LAME LA PLUS LARGE DE LA FICHE DANS LA BORNE CORRESPONDANTE DE LA PRISE ET POUSSER JUSQUAU FOND.
-
Page 4: Table Of Contents
Contents Introduction ...2 Precautions ...2 How to Read This Manual...2 Getting Started ...3 Step 1: Unpack ...3 Step 2: Prepare the Remote Control ...3 Step 3: Hook Up ...4 Before Operating the System ...6 Parts Index ...6 Daily Operations—Playback ...8 Canceling the Demonstration ...8 Listening to the Radio ...9 Playing Back a Disc...10... -
Page 5: Introduction
Precautions Installation • Install in a place which is level, dry and neither too hot nor too cold—between 5°C and 35°C. • Install the System in a location with adequate ventilation to prevent internal heat buildup in the System. DO NOT install the System in a location near heat sources, or in a place subject to direct sunlight, excessive dust or vibration. -
Page 6: Getting Started
Step 1 :Unpack the package and check the accessories. Step 2 : Prepare the remote control. Step 3 : Hook up the components such as AM/FM antennas, the speakers, etc. Finally plug the AC power cord. Now you can operate this System. Getting Started Step : Unpack... -
Page 7: Step 3: Hook Up
Step : Hook Up If you need more detailed information, see page 5. Illustrations of the input/output terminals below are typical examples. When you connect other components, refer also to their manuals since the terminal names actually printed on the rear vary among the components. - Page 8 To assemble and connect the AM loop antenna To assemble the AM loop antenna To connect the AM loop antenna cords 1 Hold 3 Release 2 Insert • If the AM loop antenna wire or speaker cords are covered with vinyl, remove the vinyl to expose the tip of the antenna by twisting the vinyl.
-
Page 9: Before Operating The System
DISC 4 DISC 5 PLAY EJECT C O M P A C T C O M P O N E N T S Y S T E M HX-GX7 DISC 5 DISC 4 DISC 3 DISC 2 DISC 1 DISC PLAY... - Page 10 The indications on the display teach you a lot of things while you are operating the System. Before operating the System, be familiar with when and how the indicator illuminates on the display. Display Window 1 2 3 4 TITLE GROUP TRACK SURROUND...
-
Page 11: Daily Operations-Playback
Daily Operations In this manual, the operation using the remote control is mainly explained; however, you can use the buttons and controls on the main unit if they have the same (or similar) name and marks. 10 Keys (1–10,+10) 4/¢,7 —Playback ¥... -
Page 12: Listening To The Radio
Listening to the Radio To select the band (FM/AM) To tune in to a station While FM or AM are is selected... sec. Increases the frequencies. Decreases the frequencies. When a station (frequency) with sufficient signal strength is tuned in, the frequency search stops. To stop searching manually, press either button. -
Page 13: Playing Back A Disc
Playing Back a Disc This System can play back the following discs—regular CD and CD-R/RW (recorded either in the audio CD or MP3 format). To insert discs DISC 1 DISC 2 DISC 3 PLAY EJECT • When using an 8 cm disc, place it on the inner circle of the disc tray. -
Page 14: Playing Back A Tape
To select a track While playing a disc... Increases the track numbers. Decreases the track numbers. To locate a particular portion While playing a disc, press and hold the button until the portion you want is reached. Fast-forwards the track. Fast-reverses the track. -
Page 15: Daily Operations-Sound&Other Adjustments
Daily Operations Remote Control SOUND MODE RHYTHM SUBWOOFER LEVEL +/– Main unit SOUND MODE PRESET 7/BEEP RHYTHM —Sound&Other Adjustments Adjusting the Volume The volume level can be adjusted in 32 steps (VOLUME MIN, VOLUME 1 – VOLUME 30, VOLUME MAX). Remote control: SLEEP To drop the volume in a moment... -
Page 16: Selecting The Sound Modes
Selecting the Sound Modes You can select one of the preset Sound Modes. Remote control: DANCE HALL STADIUM USER 1–3 Main unit: DANCE HALL USER 1–3 Surround modes* DANCE Increases resonance and bass. HALL Adds depth and brilliance to the sound. STADIUM Adds clarity and spreads the sound, as in an outdoor stadium. -
Page 17: Turning On Or Off The Key-Touch Tone
Turning On or Off the Key-Touch Ton e Remote control: BEEP OFF BEEP ON Main unit: sec. BEEP OFF /BEEP BEEP ON Setting the Clock Main Unit ONLY Without setting the built-in clock, you cannot use Daily/ Recording Timers (see page 20) and Sleep Timer. •... -
Page 18: Advanced Disc Operations
Advanced Disc Operations Remote Control 10 Keys (1–10,+10) 4/¢,7 Disc number buttons REPEAT RANDOM Main unit 7 /BEEP ,8 4/¢ EJECT DISC PLAY MODE Programming the Playing Order —Program Play You can arrange the playing order of the tracks (up to 100) before you start playback. -
Page 19: Playing At Random-Random Play
Select tracks you want for Program Play. Disc number Program step number Track number Remote control: Examples: To select track 5, press 5. To select track 15, press +10, then 5. To select track 30, press +10, +10, then 10. Main unit: /DISPLAY •... -
Page 20: Repeating Playback-Repeat Play
To exit from Random Play Before or after playback... Remote control: Main unit: DISC PLAY CD PROGRAM MODE Repeating Playback—Repeat Play You can repeat playback. While playing or before starting playback... REPEAT ALL Canceled Repeat mode indicators TRACK REPEAT ALL Repeats all tracks on all loaded discs. -
Page 21: Advanced Tape Operations
Advanced Tape Operations Remote control START/STOP Main unit 4/¢ DISC REC START REC START /STOP REVERSE MODE IMPORTANT It should be noted that it may be unlawful to re-record pre-recorded tapes, records, or discs without the consent of the owner of copyright in the sound or video recording, broadcast or cable programme and in any literary, dramatic, musical, or artistic embodied therein. -
Page 22: Synchronized Disc Recording
Start playing the source—FM, AM, or CD player, or auxiliary equipment connected to AUX jacks. • When recording a disc, you can also use “Synchronized Disc Recording” (see below). Start recording. sec. To stop recording sec. Synchronized Disc Recording You can start and stop both disc play and tape recording at the same time. -
Page 23: Timer Operations
Main unit 4/¢ Timer Operations Setting the Timer Using Daily Timer, you can wake up with your favorite song. On the other hand, with Recording Timer, you can CLOCK make a tape of a radio broadcast automatically. /TIMER • To correct a misentry during the process, press CANCEL/ DEMO. -
Page 24: Timer Priority
5 For Daily Timers: Select the volume level • You can select the volume level (“VOLUME 5,” “VOLUME 10,” “VOLUME 15” and “VOLUME --”). If you select “VOLUME --,” the volume is set to the last level when the System has been turned off. -
Page 25: Additional Information
Additional Information Learning More about This System Daily Operations—Playback (see pages 8 to 11) Listening to the Radio: ¢ • When you repeatedly press unit), the frequency changes step by step. • If you store a new station into an occupied preset number, the previously stored station in that number will be erased. -
Page 26: Maintenance
Timer Operations (see pages 20 and 21) • When you unplug the AC power cord or if a power failure occurs, the timer will be canceled. You need to set the clock first, then the timer again. • Without stopping the recording, you cannot change the source after Recording Timer starts recording. -
Page 27: Specifications
Specifications Amplifier section—CA-HXGX7 Output Power: SUBWOOFERS: 180 W per channel, min. RMS, driven into 6 Ω at 63 Hz with no more than 10 %total harmonic distortion. MAIN SPEAKERS: 80 W per channel, min. RMS, driven into 6 Ω at 1 kHz with no more than 10 %total harmonic distortion. - Page 28 If service is not available locally, box the product carefully, preferably in the original carton, and ship, insured, with a copy of your bill of sale plus a letter of explanation of the problem to the nearest JVC Factory Service Center, the name and location of which will be given to you by the toll-free number.
- Page 29 To prevent electrical shock, do not open the cabinet. There are no user serviceable parts inside. Please refer to qualified service personnel for repairs. Accessories To purchase accessories for your JVC product, please call toll free:1 (800)882-2345 or on the web at www.JVC.com BT-51001-5 (0301) ®...
- Page 30 VICTOR COMPANY OF JAPAN, LIMITED 0104AIMMDWJEM © 2004 VICTOR COMPANY OF JAPAN, LIMITED...
Need help?
Do you have a question about the HX-GX7 and is the answer not in the manual?
Questions and answers