Table of Contents
Advertisement
Advertisement
Table of Contents

Related Manuals for GME g-radio GR300BT


Summary of Contents for GME g-radio GR300BT
-
Page 2: Table Of Contents
CONTENTS INTRODUCTION ...................... 3 FEATURES ....................... 3 SUPPLIED WITH ....................... 3 OPTIONAL ACCESSORIES ..................3 COMPLIANCE ......................4 LISTENING TO FM IN YOUR BOAT ................4 CONTROLS ......................4 OPERATION ......................5 On/Off ......................5 Clock ....................... 5 Key beeps ......................6 Adjusting the sound .................. -
Page 3: Introduction
INTRODUCTION Congratulations on purchasing your GR300BT marine radio. For simplicity and performance, the GME GR300BT is the entertainment unit of choice where space is limited. Using either the included gimbal mounting bracket or an optional flush mounting kit, the flexibility and size of the GR300BT is suited to vessels where there is insufficient space to install a conventional marine entertainment system. -
Page 4: Compliance
COMPLIANCE This device complies with AS/NZS 61000.6.3:2007. This device complies with part 15 of the FCC rules. Operation is subject to the condition that this device does not cause harmful interference. LISTENING TO FM IN YOUR BOAT The majority of FM broadcasts are music programs. Compared with AM signals, FM signals have a wider dynamic range, are relatively immune to noise and provide virtually distortion free music reproduction. -
Page 5: Operation
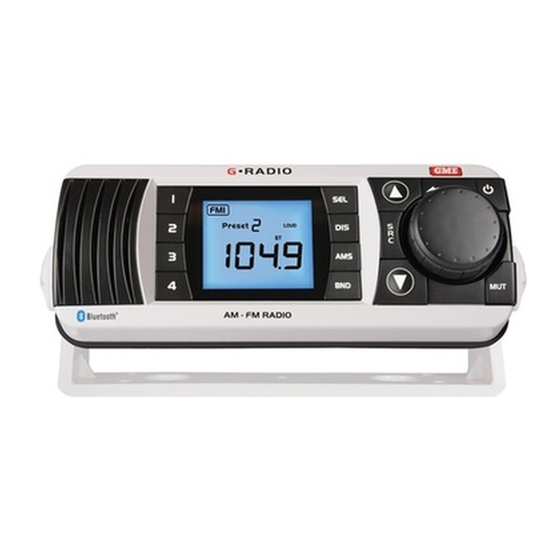
LCD Display FM Bands AM Bands Local/DX Auto Music Search Preset Memories Loudness Treble Stereo Bass Balance Frequency and Status Auxiliary Input OPERATION ON/OFF To switch the GR300BT ON, briefly press the key. To switch the GR300BT OFF, press and hold the key. -
Page 6: Key Beeps
The time setting will be retained as long as the 12V power source remains Note: connected. If the 12V power source is disconnected, the time setting will be lost and will need to be readjusted once the power is restored. Selecting 12 or 24 Hour Mode 1. -
Page 7: Mute
Treble To adjust the Treble, briefly press the SEL key until the icon is displayed. Rotate the Control Knob to the right to increase the Treble or to the left to decrease the Treble. The selected setting will be displayed on the LCD in values from -10 (min) to +10 (max). -
Page 8: Local/Dx Mode
LOCAL/DX MODE The Local/DX mode controls the receiver’s sensitivity. The GR300BT can be set to high sensitivity for long distance reception (DX) or low sensitivity for local reception (LOC). Selecting Local mode when using the AMS feature will help to reduce the strength of distant weaker stations allowing only the stronger local stations to be stored in memory. - Page 9 Scanning for Stations Press and hold the key to automatically scan for stations in the direction selected. The scanning will stop when a station is found and the frequency will be displayed. Memory Keys The GR300BT has 4 preset memory keys which allow up to 4 frequencies to be stored and recalled within each band.
-
Page 10: Stereo/Mono Mode
To store AM stations using AMS 1. Briefly press the BND to select AM1 or AM2. 2. Hold the AMS key until the radio starts scanning for stations. The ‘AMS’ icon will appear and stations will be stored into memory locations 1 – 4 in the AM1 band. The radio will then switch to the AM2 band and any further stations will be stored. - Page 11 Pairing your smart phone or portable media player for the first time 1. On your smart phone or portable media player, select the ‘Settings’ option and select ‘Bluetooth’. If Bluetooth is currently switched Off on your device, switch ® it On. 2.
-
Page 12: Auxiliary Audio Input
MP3 player. Connection is made using a 3.5 mm to 3.5 mm accessory lead. A suitable accessory lead (LE74) is available from your GME dealer. To access the audio input, press the SRC key repeatedly until the ‘AUX’ icon appears. -
Page 13: Installing The Unit
INSTALLING THE UNIT Gimbal Mounting The mounting bracket can be rotated above or below the radio enabling the radio to be mounted to a wide range of locations. After choosing a location, hold the unit with the mounting bracket attached, to the desired position and mark the location with a pencil. -
Page 14: Dc Connections
DC CONNECTIONS Please refer to the wiring diagram in the ‘Speakers’ section of this instruction manual. Connect the RED power lead to the Positive (+) side of the battery or to an accessory point in the vessel or vehicle’s fuse box that provides a +12 volt connection. Connect the BLACK power lead to the Negative (-) side of the battery or to a ground point in your vessel or vehicle. -
Page 15: Antenna Installation
Once the external stereo speakers are connected you can adjust the balance between the left and right speaker using the Balance function available via the SEL key. MP3 player Antenna Speakers and leads DC connector Fuse 6 Amp Black 12 V battery ANTENNA INSTALLATION It is essential to select a good quality AM/FM antenna. -
Page 16: Specifications
Unit Dimensions: 164 (W) x 65 (H) x 70 (D) mm Unit Weight: 540 g approximatively Flush Mounting Depth: 55 mm minimum ENVIRONMENTAL Ingress Protection Rating: IPX7 (connectors not included) Refer: www.gme.net.au Temperature Range: -10°C to +60°C Solar Radiation: Case UV stabilised Compass Safe Distance: 300 mm EXTERNAL CONNECTIONS DC Supply: 2 Pin polarised plug socket External Speakers: 3.5 mm phone jacks... -
Page 17: Standard Communications Warranty Against Defects
This warranty against defects is given by Standard Communications Pty Ltd ACN 000 346 814 (We, us, our or GME). Our contact details are set out in clause 2.7. This warranty statement only applies to products purchased in Australia. Please contact your local GME distributor for products sold outside of Australia. - Page 18 (f) Goods where the serial number has been removed or made illegal. 4. Warranty period 4.1 We provide the following warranty on GME and Kingray products. No repair or replacement during the warranty period will renew or extend the warranty period past the period from original date of purchase.
- Page 19 A division of Standard Communications Pty Ltd. Head Office: PO Box 96, Winston Hills, NSW 2153, Australia. New Zealand: PO Box 58-446 Botany, Auckland, 2163, NZ. T: (09) 274 0955. All other international enquiries email: export@gme.net.au Part Number: 310625 Drawing Number: 47119-1 GR300BT...
- Page 20 MK600 IN DASH FITTING INSTRUCTIONS REAR VIEW Contents: Adhesive Backing Plate 2 S/S brackets 2 adhesive backing strips 4 S/S self tapping screws 4 S/S metal-thread screws Figure 1 6.0 Radius Cut Out 156 mm x 58 mm Figure 2 Ensure that the location selected for in dash mounting is convenient for the operator and that there is sufficient space behind the panel to accommodate the body of the radio and allow a free flow of air.
Need help?
Do you have a question about the g-radio GR300BT and is the answer not in the manual?
Questions and answers