Table of Contents
Advertisement
Quick Links
Advertisement
Table of Contents
Troubleshooting

Related Manuals for Tait T3040II


Summary of Contents for Tait T3040II
- Page 1 Operator’s Manual T3040II...
-
Page 2: Table Of Contents
Contents Introduction ................3 Operating Modes ..............4 Warnings ................4 Features ................5 Components ................ 5 Setup ................... 6 Basic Operations ..............6 Controls ................7 Keypad ................7 Side Panel Keys ............8 Display Window ............9 Switching the Radio On and Off .......... 9 Switching On .............. - Page 3 Telephone Calls ..............52 Special Trunking Functions ..........53 Conventional Operation ............. 54 Appendix V Preset Options ............. 55 Appendix VI How to Care for Your Tait Rechargeable Batteries ................. 58 Types of Batteries .............. 58 New Batteries ..............58 Battery Use ................
-
Page 4: Introduction
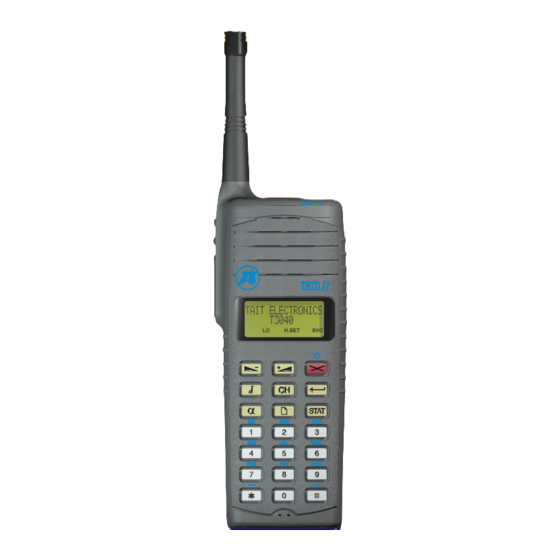
Introduction The Tait T3040 radio is a state-of-the art handportable radio offering outstand- ing communications flexibility in both trunked and conventional mobile radio systems. The T3040 is a compact, rug- ged and reliable unit, with a wide range of accessories available to meet any mo- Antenna bile communications need. -
Page 5: Operating Modes
Operating Modes Your T3040 can be used either in Trunked Call mode, or as a conventional radio. In Trunked Call mode, you communicate with other radios, PABX systems and outside (PSTN) telephone lines through the trunking network. In Conventional mode, ra- dios communicate directly with each other over standard chan- nels. -
Page 6: Features
Features l Small, rugged, reliable l Handset operation l Easy to use l MPT1327 trunking Components When you receive your T3040 radio check the contents to make sure that all the items you ordered are included. Typi- cally, you should receive the following. Operators’... -
Page 7: Setup
Setup Before using the radio, insert the antenna as illus- trated. The antenna should screw easily into the socket at the top of the radio. To ensure proper operation of your radio, you should fully charge the battery prior to initial use. See “Re- charging the Battery”... -
Page 8: Controls
Controls The T3040 controls include the keypad, side panel keys, LCD window, and the LED operations indicator. KEYP KEYP KEYP AD KEYP KEYP Keypad functions are as follows: On/Off/Clear Use to turn the radio on and off, to end calls and to exit from control op- tions. -
Page 9: Side Panel Keys
SIDE PANEL KEYS SIDE PANEL KEYS SIDE PANEL KEYS SIDE PANEL KEYS SIDE PANEL KEYS Function key 1. Function key 2. Use to initiate special preprogrammed functions. Press To Talk key. Use to make the radio transmit each time you talk. This key can also be preprogrammed to initiate a call once you have a call number displayed. -
Page 10: Display Window
DISPLA DISPLA Y WINDOW Y WINDOW DISPLA Y WINDOW Y WINDOW DISPLA DISPLA Y WINDOW The LCD window is optimised to provide rapid access to infor- mation and messages concerning the progress of your call and the status of your radio. Note: Your T3040 features the ability to display messages in several languages. -
Page 11: Switching Off
The final display shows the Received Signal Strength Indicator (RSSI) in the upper right-hand corner, the last number dialled (or the call queue, if there are entries), and the Service indica- tor (SVC). Received Signal Strength Indicator If the Service Indicator is on continuously, your radio has ac- cess to a trunking network and is ready to make or accept calls. -
Page 12: Adjusting The Volume
ADJUSTING THE VOLUM ADJUSTING THE VOLUM ADJUSTING THE VOLUME ADJUSTING THE VOLUM ADJUSTING THE VOLUM The volume display shows the current setting as a series of bars. If this is the first time you have used the radio, adjust the volume level to about the middle of its range (5 bars showing) using the Volume Adjustment (2, 1) keys. -
Page 13: Handset Operation
HANDSET OPERA HANDSET OPERA TION TION HANDSET OPERA HANDSET OPERA HANDSET OPERA TION TION TION To use the T3040 like a telephone handset, select handset mode from the Menu options (see “Using the Menu”) or use the pre- programmed function key. The handset (H.SET) indica- tor appears in the display window and the speaker vol-... -
Page 14: Trunking Call Operations
Trunking Call Operations Your T3040 may be configured to switch between Trunking and Conventional calling mode. Trunking mode is the preferred operating mode because it provides access to your radio’s most advanced features. In Trunking mode, all calls are through the trunked network. You can make calls to other radios that have been assigned numbers in your network, and you may also be able to make calls to PABX and PSTN numbers, depending upon how... -
Page 15: Selecting A Network
This section describes the operations you can perform in Trunking mode. Note that there are two sets of confidence tones available during preprogramming; the MPT set and the Tait set. This manual describes only the Tait set, which is the default. Selecting a Network Your radio may be preprogrammed with the ability to operate on up to four networks, one at a time. - Page 16 On some networks, a buzzing tone indicates that the called unit is ringing, and the display message changes to WAIT- RINGING. When GO AHEAD is displayed you can begin speaking. If your call is not connected, your radio will respond with one of the following messages.
-
Page 17: Dialling
DIALLING DIALLING DIALLING DIALLING DIALLING Your radio can be configured to dial numbers in a variety of ways, depending upon preprogrammed options and network capabilities. You can dial other radios, groups of radios in your fleet, and PSTN/PABX (telephone) numbers. The actual number that you dial may be a direct access number, a label, or a pre- set speed dial number set up at the network level. -
Page 18: Group Call
GROUP CALL GROUP CALL GROUP CALL GROUP CALL GROUP CALL Two short tones sound and the caller’s identity is displayed followed by a GO AHEAD message. The caller will then broad- cast a message to all members of your group. It is not nor- mally necessary for you to reply. -
Page 19: Calling Procedure
Message Type Example Explanation System Message PHONE A call from the PSTN (Public Switched Tel- ephone Network). System Message PABX A call from the PABX (Private Automatic Branch Exchange). Calling Procedure When you have established a connection, hold the radio with its microphone about 15 cm from your mouth and press the PTT key. -
Page 20: Reestablishing A Call
The length of a call may be limited by the network, or by your radio. Normally, your radio displays the time remaining for the call, in seconds. Depending upon the network and call type, the display may show time used, or there may be no time dis- play at all. -
Page 21: Using Callback
USING CALLBACK USING CALLBACK USING CALLBACK USING CALLBACK USING CALLBACK Note: This option may not be installed on your radio. When an incoming call is terminated, the caller’s identity is stored. The radio displays the message CALLBACK, and the identity of the calling party. To call this party back, briefly press the Enter (3) key. -
Page 22: Emergency Operation
Dial one of the function keys. If the radio is used in a vehicle with the Tait Mo- bile Conversion Kit, it may also be connected to a Hidden hidden emergency switch,... -
Page 23: Conventional Radio Operations
Conventional Radio Operations Subject to approval by your radio licensing authority, you can use your T3040 as a conventional two-way radio where it is not appropriate to use it on a trunking network. Up to 10 chan- nels (from 101 to 110) may be preprogrammed for conven- tional operation. -
Page 24: Receiving
To override CTCSS muting, press the monitor function key. The BUSY indicator flashes green and a short high-pitched tone sounds. If you are not sure if your T3040 has been preprogrammed with this facility, consult your fleet manager or Tait dealer. -
Page 25: Transmitting
Your radio may be preprogrammed to prevent you from trans- mitting if the channel is busy (your fleet manager or Tait dealer will advise you if this is so.) If it is, and you attempt to transmit while the channel is in use, the speaker sounds a warning tone. -
Page 26: Special Features
Special Features Most special features must be enabled during programming to allow you to use or change them. Of these features, only Low Power mode is available in Conventional operation. Alphanumeric Entry Mode Your T3040 can be preprogrammed with up to 100 preset numbers, each of which may have an alphanumeric label of up to eight characters. - Page 27 Using the Alphanumeric Keypad Using the Alphanumeric Keypad Using the Alphanumeric Keypad Using the Alphanumeric Keypad Using the Alphanumeric Keypad Each key corresponds to a set of numbers and letters (the 2 key may be used as a ‘2’, an ‘A’, a ‘B’ or a ‘C’). Sequentially press the keys that match the letters or numbers in the label.
-
Page 28: Short-Dial Preset Numbers
Short-Dial Preset Numbers Your network may contain preset short-dial numbers to make dialling easier. These numbers are between 1 and 49. To use one of these numbers, simply dial two stars (--), the number, then the Enter (3) or Hash (6) key. These numbers differ from the stored numbers in Alphanumeric Entry mode in that they are stored at the network level, rather than in your radio. -
Page 29: Automatic Message/Number Selection
Automatic Message/Number Selection Automatic Message/Number Selection Automatic Message/Number Selection Automatic Message/Number Selection Automatic Message/Number Selection To send a preprogrammed status message to another party, select the appropriate Alphanumeric Entry mode label. If the label was preprogrammed to send a status message, the sta- tus message is paired with the number and is sent automati- cally when you dial the selection. -
Page 30: Manual Message/Number Entry
4. Dial the required party in the normal way, using direct entry or the alphanumeric list. 5. Press the Enter (3) or Hash (6) keys (or the PTT key if preprogrammed to initiate calls) to make the call. Your display shows ACCEPTED when the called party’s radio receives your message. -
Page 31: Call Queuing
If you want to call the party that sent you the status message, simply press the Enter (3) key. To clear the message from your display, press the Clear (5) key. Call Queuing If you are unable to answer your incoming calls immediately, you can have your T3040 save up to 20 call-return mes- sages from other radios in a queue for later callback. - Page 32 As calls are received and queued, the display shows CALL X OF Y where Y is the total number of calls presently queued, and X is the position of the current call in the sequence. The first call is always displayed until you scroll through the queue. The identity of the caller (a number or label) and their status message (if sent) are also displayed.
-
Page 33: Dtmf Operation
Your fleet may be set up with users allocated to several groups. This allows a user to send a message simultaneously to a number of people with a related interest or activity. BUSY TX TAIT ELECTRONICS T3020 α STAT Using your T3040 ’s menu, you may join, or withdraw from,... - Page 34 Changing group membership affects only the reception of mes- sages. You may send messages to any group simply by dialling its number (see Appendix IV, "Common Dialling Functions”). To see which groups you currently belong to, press the Menu (4) key and select the “VIEW GROUP” option by scrolling it into the display.
-
Page 35: Quiet Mode
Message Example Explanation No Star Symbol No star indicates that you do not currently belong to the dis- played group. Press Enter to join the group. The radio will emit two long beeps if this choice is accepted. Star Symbol Shows that you belong to this group. -
Page 36: Low Power Transmission
To initiate Quiet mode, use the Menu to set the QUIET MODE option ON . (This feature can also be set by using a dialling sequence. For more information, see Appendix IV, “Common Dialling Functions”.) When you return to normal operation from the Menu, QUIET MODE ON no longer appears in the display, and normal opera- tion resumes. -
Page 37: Using The Menu
If the party you call has no scrambler, or has theirs inactive, they, too, will hear only a garbled message. You should con- sult your Fleet Manager to find out which other members of you fleet have scramblers and what your fleet policy for using them is. - Page 38 The table following shows the options which appear in the menu (not all options may be available on your radio). Options marked with an asterisk (*) may be preprogrammed to a function key. Option Setting Description AUXILIARY* ON/OFF The auxiliary option turns an installed device ON or OFF.
- Page 39 KEYPAD LOCK* ON/OFF The Keypad Lock prevents ac- cidental operation by locking the keypad so that only the ON/ OFF, Clear, Volume Adjustment and PTT keys are active. The function keys are also disabled unless they are programmed as additional Clear keys. Turn Keypad Lock on in the normal manner, using the En- ter (3) key.
- Page 40 PTT REDIAL ON/OFF PTT Redial lets you initiate calls simply by pressing the PTT key. If this is not convenient you may turn it off and calls will only be initiated when you press the Enter (3) or Hash (#) keys.
-
Page 41: Recharging The Battery
Recharging the Battery Under normal usage your radio battery can be expected to last approximately eight hours before it requires recharging. If you spend a lot of time transmitting, this time will be reduced; if you rarely transmit it may be considerably longer. When battery voltage is low, the (TX / BUSY) indicator flashes red and the radio sounds a low-pitched beep every 20 sec- onds. -
Page 42: Mounting The Battery In The Charger
Mounting the Battery in the Charger 1. Turn the radio off using the front panel ON/OFF (5) key. 2. Remove the battery pack from the back of the radio by pressing down the spring latch in the middle of the radio back panel. -
Page 43: Recharging
Recharging To recharge using a Tait battery charger, perform the following steps: 1. Make sure the indicator at the top corner of the charger confirms that the battery pack is charging. If it does not illuminate red within a few seconds, check whether the... -
Page 44: Maintenance And Troubleshooting
Avoid storing the battery for extended periods without first fully recharging it. l Avoid repeatedly recharging the battery when it has only had a small amount of use. l Use only a Tait recommended charger. l Maintain an ambient temperature of 5 to 40 C during... -
Page 45: Avoiding High Temperatures
If all appears to be in order, or if the message ERROR XX ap- pears in the display window, then contact your Tait dealer for assistance. The high capacity battery pack is fitted with a thermal fuse which operates at temperatures exceeding 90 C and renders the pack unserviceable. -
Page 46: Appendix I Indications
Appendix I Indications The indications refer to the abbreviated messages which ap- pear in the bottom of the T3040 display window, the RSSI and volume indications in the upper line of the display, and the LED indicator on the top front corner of the radio. Display Window Indicators The Service indicator appears as the three charac- ters SVC across the bottom of the display. -
Page 47: Led Indicator
LED Indicator The LED Indicator at the top of the radio provides a variety of indications as displayed in the following table. Indication Condition Meaning Steady Red The radio is transmit- ting. This should oc- cur each time you press the PTT key and automatically during call setup when an- other party calls you. -
Page 48: Appendix Ii Audible Indicators
Appendix II Audible Indicators Following are some of the audible indicators provided by your radio in addition to those shown on page 15. High T High T High Temperature W emperature W emperature Warning emperature W arning arning arning High T High T emperature W arning... -
Page 49: Appendix Iii Display Window Messages And Indicators
SWITCH RADIO OFF error number before switching the ra- dio off for a few seconds and then back on. Consult your Tait dealer. This mes- sage uses both text display lines. GO AHEAD Your radio has established a call, and you are now able to converse. - Page 50 INT.SPEAKER ON The internal speaker is active. INT.SPEAKER OFF An external speaker is fitted and active. KEYPAD LOCKED The keypad is locked to prevent accidental entry, and must be released by using the ON/OFF (5) key. MENU Your radio is in MENU mode and is waiting for a Menu entry.
-
Page 51: Appendix Iv Common Dialling Functions
For more information about the facilities available on your network or radio, please refer to your fleet manager or Tait dealer. Note: Your T3040 may be preprogrammed so that you can initiate the call by pressing the PTT key instead of the Enter (3) or Hash (6) keys. -
Page 52: Trunking Operation
Trunking Operation Within your radio and network system, certain ranges of num- bers have been set aside for specific purposes. The calling groups listed first all represent numbers that may be called by simply entering the number and following it with the Enter (3) key or the Hash (6) key. -
Page 53: Telephone Calls
ST ST ST ST A A A A A TUS MESSAGE CALLS TUS MESSAGE CALLS TUS MESSAGE CALLS TUS MESSAGE CALLS TUS MESSAGE CALLS Example: Send status message 12 to party 89: -012-893 Code Sequence Function -0ss-number3 Status call -0ss3 Status call to despatcher (ss = Status 1 to 30) NETWORK PRESET CALLS... -
Page 54: Special Trunking Functions
Special Trunking Functions INITIA INITIA INITIA TE SPECIAL FUNCTIONS TE SPECIAL FUNCTIONS TE SPECIAL FUNCTIONS TE SPECIAL FUNCTIONS INITIA INITIA TE SPECIAL FUNCTIONS Example: Set Queue Incoming Calls On: -483 Code Sequence Function Request callback from own Despatcher Emergency call (to prime emer- gency address) -483 Set Queue Incoming Calls On... -
Page 55: Conventional Operation
THIRD PAR THIRD PAR TY CALL DIVERSIONS TY CALL DIVERSIONS THIRD PAR THIRD PAR THIRD PAR TY CALL DIVERSIONS TY CALL DIVERSIONS TY CALL DIVERSIONS Example: Divert calls from 255 to 341: -44-255-3413 Dial Function -44-nn-mm3 Divert 3rd party calls nn to mm CANCEL DIALLED FUNCTIONS CANCEL DIALLED FUNCTIONS CANCEL DIALLED FUNCTIONS... -
Page 56: Appendix V Preset Options
Appendix V Preset Options The following items may be preprogrammed in your radio: l Alphanumeric call strings l Status call messages l Conventional channels l Function keys l Menu options l Confidence tones l Power-up message l Group Membership In addition, your network may contain settings for the follow- ing items: l A number to access your radio by telephone l Preset individual and group radio numbers... - Page 57 Use the space below to record these items. COMMONL COMMONL Y CALLED NUMBERS Y CALLED NUMBERS COMMONL Y CALLED NUMBERS Y CALLED NUMBERS COMMONL COMMONL Y CALLED NUMBERS Name Number ACCESS NUMBERS (THIS RADIO) ACCESS NUMBERS (THIS RADIO) ACCESS NUMBERS (THIS RADIO) ACCESS NUMBERS (THIS RADIO) ACCESS NUMBERS (THIS RADIO) Prefix:...
- Page 58 Do not disturb ALLI calls Edit Group Membership Abbreviated dialling Direct despatcher calls Conventional mode Callback facility CTCSS Option board MPT confidence tone set DTMF Option Board Tait confidence tone set VOX Option Board Scrambler Option Board Network service operator calls...
-
Page 59: Appendix Vi How To Care For Your Tait Rechargeable Batteries
Appendix VI How to Care for Your Tait Rechargeable Batteries The following guidance is intended to help you get maximum life and trouble-free service out of your Tait rechargeable bat- teries. Types of Batteries There are two types of rechargeable battery available for your Tait handportable radio, Nickel Cadmium (NiCd) and Nickel Metal Hydride (NiMH). -
Page 60: Battery Use
NiMH batteries not be routinely subjected to trickle charging. Tait fast chargers are fitted with a device that senses when the battery has reached full capacity and commences trickle charg- ing thus eliminating the possibility of overcharging. They are therefore suitable for “topping up”... -
Page 61: Battery Problems
Battery Problems NiCd batteries sometimes exhibit a symptom commonly called “memory effect”. This is a term used to describe the perform- ance of a battery that has regularly only been partially dis- charged before recharging and seems to “remember” where it previously stopped discharging. -
Page 62: Battery Storage
When no longer in use, you should ensure that your NiCd battery is properly disposed of. Contact your local Tait sales/service outlet or dealer for details of where to send your “spent” battery for recycling. Do not burn or break the... -
Page 63: Optional Accessories For The T3000
Scrambler Module See your Tait dealer for more details Tait Electronics has made every effort to ensure the accu- racy of information in this manual. However, Tait Electron- ics reserves the right to update the radio and / or this manual... - Page 64 If you do not agree to the terms of this Agreement, do not open the product package and immediately return the unopened product package to Tait. If you open the product package that will be deemed to be acceptance of the terms of this licence agreement.
Need help?
Do you have a question about the T3040II and is the answer not in the manual?
Questions and answers