Table of Contents

Related Manuals for Russell Hobbs RHEC1


Summary of Contents for Russell Hobbs RHEC1
- Page 1 Single Cavity Electric Cooker Instruction Manual Model number: RHEC1 For Customer Services & Spare Parts please call 0845 208 8750 Opening times: Monday - Friday 8am – 6pm & Saturday 9am – 1pm or visit us at www.productcareuk.com...
-
Page 2: Table Of Contents
Contents …………………………………………………………………… 3 - 4 Safety Instructions …………………………………………………………………… 5 - 6 Before using the appliance …………………………………………………………………… 7 - 10 Installation How to use …………………………………………………………………… 11 - 18 …………………………………………………………………… Maintenance …………………………………………………………………… Trouble shooting …………………………………………………………………… Transportation Specification …………………………………………………………………… …………………………………………………………………… Spare parts For Customer Services & Spare Parts please call 0845 208 8750 Opening times: Monday - Friday 8am –... -
Page 3: Safety Instructions
Safety Instructions • Please comply with these instructions. If you do not, any damage resulting from improper, incorrect or negligent use or improper connection or installation is not covered by the manufacturer’s guarantee. • Electric oven and hobs must be connected to an electrical cooker powerpoint - consult a qualified electrician. - Page 4 Safety Instructions • Use only stable flat-based pans. • This appliance is not intended for use by persons (including children) with reduced physical, sensory or mental capabilities, or lack of experience and knowledge, unless they have been given supervision or instruction concerning use of the appliance by a person responsible for their safety.
-
Page 5: Before Using The Appliance
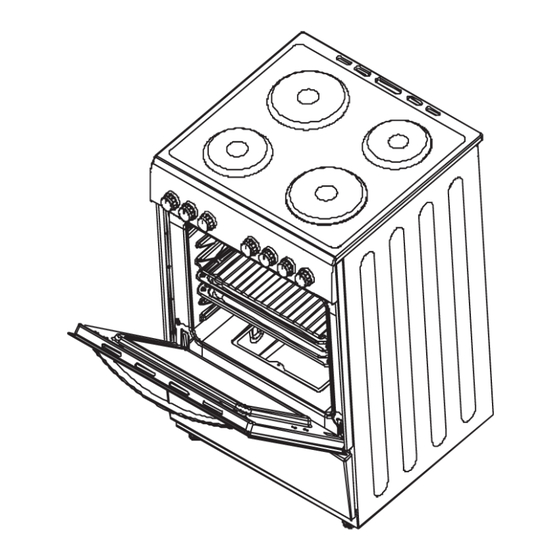
Before using the appliance • Electric oven and hobs must be connected to an electrical cooker powerpoint - consult a qualified electrician. Products must be installed in accordance with the manufacturer's safety recommendations. • This appliance must only be used for its intended purpose, domestic cooking. Any other form of usage is to be considered as inappropriate, dangerous and will void the manufacturer’s guarantee •... - Page 6 Before using the appliance Note The drawings in the book may vary from your cooker model. They are designed to show the different features of all models covered by this book. Your model may not include all features. List of components 1.
-
Page 7: Installation
Installation Electric oven and hobs must be connected to an electrical cooker powerpoint - consult a qualified electrician. Products must be installed in accordance with the manufacturer's safety recommendations, in accordance to the instructions in this guide and in compliance with the current regulations. Failure to do so will void the manufacturer’s guarantee. - Page 8 Installation The distance between the rear edge of the hob and any adjacent wall is dependent on the wall surface. The cooker must not be placed next to or near a refrigerator. Easily combustible material like curtains, paper, clothes, etc. should not be located near the hob.
- Page 9 Installation Adjustment of the feet • The cooker must be switched off before the feet are adjusted or the product moved. • The product has 4 adjustable feet • When the product is placed where it is to be used, check if the product is balanced. If it isn’t, you can adjust any of the feet by turning them clockwise.
-
Page 10: Installation
Installation • Never pour water on the flames of a fire that has been started from any oils, cover the cookware with its lid or cover to choke the fire. Turn off the cooker and contact the emergency services immediately. •... -
Page 11: How To Use
How to use Control panel Hotplates Each hotplate dial has 6 heat levels: Keep warm 2 & 3 Low heat 4,5 & 6 Cooking, roasting & boiling To turn on a required hotplate turn the appropriate dial in a clockwise direction to the necessary heating level. - Page 12 How to use The top part of the hotplates are coated/covered by a protective heat resistant material. Turn the dial(s) of a hotplate or hotplates to 3 and leave on for 5 minutes in order to burn off an toughen the protective layer before using with cookware. •...
- Page 13 How to use Oven & Grill Oven & Grill function switch This switch allows you to select oven and grill functions. The explanation of each function is detailed below and detailed instructions of each function on the following pages: Oven lamp will start operating Oven’s upper and lower heating elements start operating Oven’s lower heating element start operating Oven’s upper heating element start operating...
- Page 14 How to use Important note The oven can not be operated when the timer is in the ‘0’ position and no temperature is selected on the thermostat dial. Important note With all the below functions you have to adjust the thermostat switch to get the required temperature for cooking, as well as having to adjust the timer dial to the required time or the ‘M’...
- Page 15 How to use Grill function This function is used to grill. Pre-heat the grill for 5 minutes, then place the food on the grill pan and then place this on the shelf at the highest level. When your food is cooked, turn the oven and grill dial to the off position, along with the temperature and timer dials.
- Page 16 How to use Mechanical timer Manual operation - when timer dial is turned to the ‘M’ position, (illustrated in the picture below), the oven can be used continuously when the timer dial is in the ‘M’ position). The oven can never be operated when the timer is in the ‘0’ position and no temperature is selected on the thermostat dial.
- Page 17 How to use Oven accessories Oven tray Wire grid Grill pan & handle set Is to be used for stews and Is to be used to place Is to be used for grilling. roasts. different cookware's on it. It has a detachable handle It can be located in any It can be located in any and you must ensure it is...
- Page 18 How to use Accessories used in the oven • You can use glass dishes, cake moulds, special oven trays and silicon bake ware that adhere to the require standards and regulations appropriate to the country of use. • All glass dishes, cake moulds, special oven trays and silicon bake ware that used with the cooker must be placed in the middle of wire tray.
-
Page 19: Maintenance
Maintenance Hotplate cleaning • Before cleaning the oven should be unplugged or turned off at the plug and cool. • Wipe the hob with a suitable washing up liquid and a clean damp cloth. • To dry the hob rub the appliance using a clean dry cloth. •... -
Page 20: Trouble Shooting
Trouble shooting • Electric oven and hobs must be connected to an electrical cooker powerpoint - consult a qualified electrician. Products must be installed in accordance with the manufacturer's safety recommendations. • All repairs must be carried out by an authorised service personal or a qualified electrician. -
Page 21: Transportation
Transportation • If you think you will need to transport the cooker at any point you must keep the original packaging and only transport the product fully packaged. • Follow the transport signs on the packaging and tape the loose cooker parts to the surfaces of the cooker. -
Page 22: Specification
Specification Model RHEC1 Dimension (cm) (H)90.0 X (W)50.0 X (D)60.0 Hotplate features Ø145mm hotplate (W) 1000 Ø180mm hotplate (W) 1500 Ø145mm rapid hotplate (W) 1500 Ø180mm rapid hotplate (W) 2000 Hotplate operation indicator light Standard Oven features Oven type Electric Oven volume (without fan) (lt) 52.5... -
Page 23: Spare Parts
Spare parts Spare part Contact details Oven tray Available at www.productcareuk.com call 0845 208 8750 Wire grid Available at www.productcareuk.com call 0845 208 8750 Grill pan & handle set Available at www.productcareuk.com call 0845 208 8750 Dial Available at www.productcareuk.com call 0845 208 8750 Other Available at... - Page 24 For Customer Services & Spare Parts please call 0845 208 8750 Opening times: Monday - Friday 8am – 6pm & Saturday 9am –1pm or visit us at www.productcareuk.com Revision 1 This symbol is known as the 'Crossed-out wheelie bin Symbol'. When this symbol is marked on a product/batteries, it means that the product/batteries should not be disposed of with your general household waste.
Need help?
Do you have a question about the RHEC1 and is the answer not in the manual?
Questions and answers