Graco XTR 5 Instructions - Parts Manual
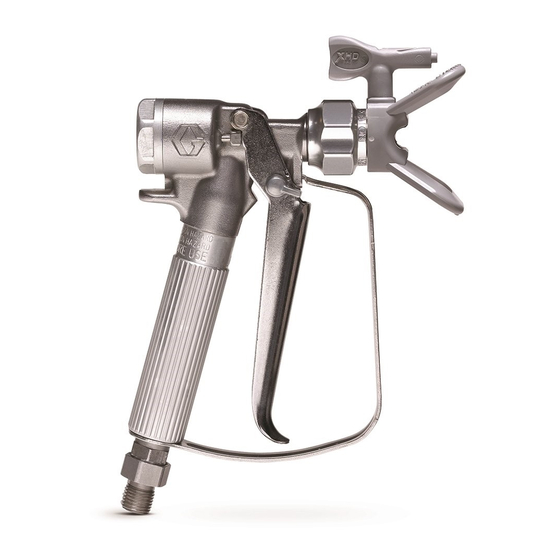
Airless spray gun
Hide thumbs
Also See for XTR 5:
- Instructions-parts list manual (13 pages) ,
- Instruction (20 pages) ,
- Instructions manual (15 pages)
Table of Contents
Advertisement
Quick Links
™
XTR
5 and XTR
Instructions/Parts
See Parts, beginning on page 8, for model numbers.
Maximum Working Pressure:
XTR 5: 5000 psi (35 MPa, 345 bar)
XTR 7: 7250 psi (50 MPa, 500 bar)
For use with protective coating materials
IMPORTANT SAFETY INSTRUCTIONS.
Refer to your sprayer instruction manual for
pressure relief, priming, and spraying
instructions. Keep these instructions.
The following warnings are for the setup, use, grounding, maintenance, and repair of this equip-
ment. The exclamation point symbol alerts you to a general warning and the hazard symbols refer
to procedure-specific risks. Refer back to these warnings. Additional product-specific warnings
may be found throughout the body of this manual where applicable.
SKIN INJECTION HAZARD
High-pressure fluid from gun, hose leaks, or ruptured components will pierce skin. This
may look like just a cut, but it is a serious injury that can result in amputation. Get
immediate surgical treatment.
•
Do not point gun at anyone or at any part of the body.
•
Do not put your hand over the spray tip.
•
Do not stop or deflect leaks with your hand, body, glove, or rag.
•
Do not spray without tip guard and trigger guard installed.
•
Engage trigger lock when not spraying.
•
Follow Pressure Relief Procedure in this manual, when you stop spraying and
before cleaning, checking, or servicing equipment.
PRESSURIZED EQUIPMENT HAZARD
Fluid from the gun/dispense valve, leaks, or ruptured components can splash in the
eyes or on skin and cause serious injury.
•
Follow Pressure Relief Procedure in this manual, when you stop spraying and
before cleaning, checking, or servicing equipment.
•
Tighten all fluid connections before operating the equipment.
•
Check hoses, tubes, and couplings daily. Replace worn or damaged parts immedi-
ately.
™
7 Airless Spray Gun
WARNING
312145G
ti5045b
II 2 G c T6
EN
Advertisement
Table of Contents

Related Manuals for Graco XTR 5


Summary of Contents for Graco XTR 5
- Page 1 7 Airless Spray Gun Instructions/Parts See Parts, beginning on page 8, for model numbers. Maximum Working Pressure: XTR 5: 5000 psi (35 MPa, 345 bar) XTR 7: 7250 psi (50 MPa, 500 bar) For use with protective coating materials IMPORTANT SAFETY INSTRUCTIONS.
-
Page 2: Fire And Explosion Hazard
WARNING WARNING FIRE AND EXPLOSION HAZARD Flammable fumes, such as solvent and paint fumes, in work area can ignite or explode. To help prevent fire and explosion: • Use equipment only in well ventilated area. • Eliminate all ignition sources; such as pilot lights, cigarettes, portable electric lamps, and plastic drop cloths (potential static arc). -
Page 3: Burn Hazard
WARNING WARNING TOXIC FLUID OR FUMES HAZARD Toxic fluids or fumes can cause serious injury or death if splashed in the eyes or on skin, inhaled, or swallowed. • Read MSDS’s to know the specific hazards of the fluids you are using. •... -
Page 4: Pressure Relief Procedure
Pressure Relief Procedure Pressure Relief Procedure Grounding Follow this Pressure Relief Procedure Check your local electrical code and whenever you are instructed to relieve pump/sprayer manual for detailed grounding pressure, stop spraying, check or service instructions. equipment, or install or clean spray tip. •... -
Page 5: Tip Installation
Tip Installation Tip Installation Operation 1. Connect a grounded fluid hose. RAC Tip 2. Without spray tip, flush pump. Use lowest 1. Follow Pressure Relief Procedure. pressure possible. Engage trigger lock. 3. Prime. Refer to sprayer manual. 4. Follow Pressure Relief Procedure. 2. -
Page 6: Maintenance
Maintenance Cleaning Tips/Clearing Clogs 5. Disengage trigger lock, then trigger gun into the paint pail. When solvent appears, release trigger. Clean tip and tip guard at end of each work 6. Trigger gun into solvent pail. Circulate fluid day. until system is thoroughly flushed. 1. - Page 7 Repair Repair 3. Before installing trigger, grease the actuator pins (7) and the pivot pin (16a). XTR 5 Guns 1. Using a socket wrench, remove screw (16c) from each side of the gun body and Disassembly remove trigger. 1. Follow Pressure Relief Procedure.
- Page 8 Parts Parts XTR5 16c† 16c† Flat Tip RAC Tip 13‡ ti10051a ti10050a ti21834a 312145G...
- Page 9 Parts Quantity Ref. Part Description XTR500 XTR501 XTR502 XTR503 XTR504 XTR505 XTR510 15J771 BODY, gun 245881 SEAL, retainer assembly GASKET 15K000 CAP, end 117350 SPRING 15E088 RETAINER, needle 15E085 PIN, actuator 248591 NEEDLE 156766 GASKET 245858 SEAT, valve 255275 HANDLE; includes trigger guard and 13‡...
- Page 10 Parts XTR7 16b† 16a† Flat Tip RAC Tip ti10051a ti10050a ti21835a 312145G...
- Page 11 Parts Quantity XTR700 XTR701 XTR702 XTR703 XTR704 XTR705 Part Description 15E178 BODY, gun 245881 SEAL, retainer assembly GASKET 15A864 CAP, end 117350 SPRING 15E088 RETAINER, needle 15E085 PIN, actuator 248591 NEEDLE 156766 GASKET 245858 SEAT, valve 248952 HANDLE KIT 276997 HANDLE SLEEVE, insulated 15E083 HANDLE SLEEVE, round...
- Page 12 Parts 312145G...
-
Page 13: Technical Data
Maximum working pressure: XTR 5 ......5000 psi (35 MPa, 345 bar) XTR 7 ......7250 psi (50 MPa, 500 bar) Fluid orifice . -
Page 14: Graco Standard Warranty
With the exception of any special, extended, or limited warranty published by Graco, Graco will, for a period of twelve months from the date of sale, repair or replace any part of the equipment determined by Graco to be defective.
Need help?
Do you have a question about the XTR 5 and is the answer not in the manual?
Questions and answers