Table of Contents
Advertisement
Owner's Manual
12.5 A HEAT GUN
54-6505-6
CAUTION:
Before using this heat gun or
any of its accessories, read
this manual and follow all
Safety Rules and Operating
Instructions.
Imported by Mastercraft Canada Toronto, Canada M4S 2B8
Rev 1.3
16/06/2007
General Safety Rules
Specific Safety Rules
and Symbols
Functional Description
Assembly
Operation
Maintenance
Accessories
Advertisement
Table of Contents

Related Manuals for MasterCraft 54-6505-6


Summary of Contents for MasterCraft 54-6505-6
- Page 1 Before using this heat gun or and Symbols any of its accessories, read Functional Description this manual and follow all Assembly Safety Rules and Operating Operation Instructions. Maintenance Accessories Imported by Mastercraft Canada Toronto, Canada M4S 2B8 Rev 1.3 16/06/2007...
-
Page 2: Table Of Contents
This product is not guaranteed if used for industrial or commercial purposes. Mastercraft is a superior line of products selected for their workmanship and materials. These products are designed to meet rigorous quality and performance standards, and are approved by our Quality Assurance laboratory. -
Page 3: Power Tool Safety
POWER TOOL SAFETY WARNING: To avoid electrical hazards, fire hazards or damage to the heat gun, use proper circuit protection. The heat gun is wired at the factory for 110–120 V operation. It must be connected to a 110–120 V, 15 A time delayed fuse or circuit breaker. To avoid shock or fire, replace power cord immediately if it is worn, cut or damaged in any way. - Page 4 POWER TOOL SAFETY GENERAL SAFETY RULES Do not expose power tools to rain or wet conditions. Water entering the power WARNING: tool will increase the risk of electric shock. Read and understand all instructions. Failure to follow all Do not abuse the cord. Never use the instructions listed below may result in cord to carry the tool or pull the plug from electric shock, fire and/or serious personal...
- Page 5 POWER TOOL SAFETY Remove adjusting keys or wrenches Maintain tools with care. Keep cutting before turning the tool ON. A wrench or tools sharp and clean. Properly maintained key that is left attached to a rotating part of cutting tools with sharp cutting edges are the tool may result in personal injury.
-
Page 6: Specific Safety Rules
SPECIFIC SAFETY RULES WARNING – POISON HAZARD: Extreme care must be taken when using a heat gun to strip paint. The softened paint, residue and vapours of the paint may contain lead which is poisonous. Any paint used in the construction industry prior to 1977 may contain lead. - Page 7 SPECIFIC SAFETY RULES WARNING – POISON HAZARD: - cont’d At the end of each work session, place the paint chips and dust in a double Keep food and drinks out of the work plastic bag. Close the bag with a twist tie area.
-
Page 8: Extension Cord Safety
SPECIFIC SAFETY RULES Never touch the nozzle immediately The table below shows the correct size to after use. It will be very hot and can cause use according to cord length and severe burns. nameplate ampere rating. If in doubt, use the next heavier gauge. -
Page 9: Symbols
SYMBOLS WARNING: Some of the symbols below may be used on your tool. Please study them and learn their meaning. Proper interpretation of these symbols will allow you to operate the tool better and safer. volts direct current amperes no load speed hertz alternating or direct current... -
Page 10: Know Your Heat Gun
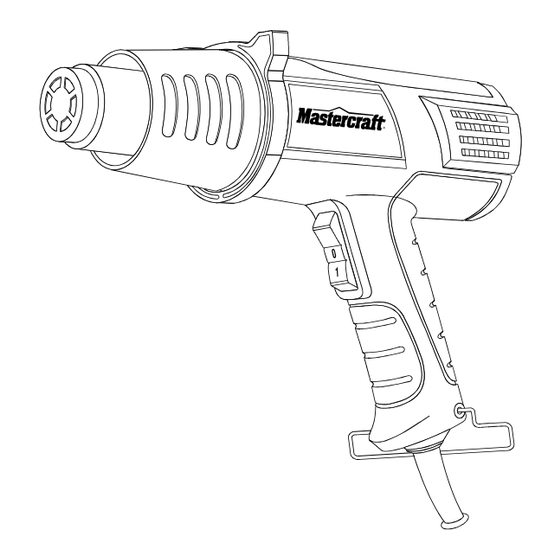
KNOW YOUR HEAT GUN Stabilizing stand Air vents Nozzle Digital control panel Air vents Trigger switch Handle Hanging loop ACCESSORIES AVAILABLE ACCESSORIES Do not use any accessory unless you have completely read the instructions or Owner’s Manual for that accessory. WARNING: Use only heat resistant tools recommended for use with heat... -
Page 11: Contents
CONTENTS CONTENTS Carefully unpack the heat gun. Compare against the “HEAT GUN COMPONENTS” chart below. WARNING: To avoid fire or toxic reaction, never use gasoline, naphtha, acetone, lacquer thinner or similar highly volatile solvents to clean the tool. HEAT GUN COMPONENTS DESCRIPTION Heat gun Nozzle... -
Page 12: Assembly & Operation
ASSEMBLY & OPERATION HEAT GUN APPLICATIONS Heating applications are affected by several factors. The density of the material The heat gun is a tool that can be used for being heated, ambient temperature, wind, many different applications. As with any distance between the nozzle and the power tool, there are many factors that will surface being heated and the heating... - Page 13 ASSEMBLY & OPERATION NOTE: When the heat gun is first turned ON, smoke may appear due to the burning WARNING: of manufacturing oils on the element. The Have you read “POWER TOOL SAFETY”, smoke will disappear within five minutes of operation.
- Page 14 ASSEMBLY & OPERATION Setting the fan speed – cont’d Turn ON/OFF switch to ON position Turn ON/OFF switch to ON position (Fig. 1). (Fig. 1). To increase the air temperature, press To increase the fan speed, press the the right hand temperature button (4) upper fan speed button (1) once once (Fig.
- Page 15 ASSEMBLY & OPERATION ASSEMBLE INTERCHANGEABLE DANGER: Never attempt to SCRAPER BLADES TO THE HANDLE change or attach a deflector to the heat gun immediately after it has been The scraper handle can be assembled with turned ON. The nozzle will be extremely the isosceles, convex or concave scraper hot.
- Page 16 ASSEMBLY & OPERATION STRIPPING PAINT FROM DWELLING – The heat gun will soften putty in window cont’d frames. Be careful not to gouge the soft putty with the scraper. The putty will firm up as it cools. When removing paint from the fascia, do not overheat the edge of the shingles.
-
Page 17: Maintenance
ASSEMBLY & MAINTENANCE OPERATION WARNING: When servicing, use only PAINT STRIPPING PROCESS – cont’d identical replacement parts. Use of any other part may create a hazard or cause For best paint removal results, move the product damage. gun slowly and steadily forward at an angle to the surface to be stripped. -
Page 18: Parts & Service
PARTS DIAGRAM – MODEL 54-6505-6... - Page 19 PARTS LIST – MODEL 54-6505-6 ® WARNING: When servicing, use only Mastercraft replacement parts. Use of any other parts may create a safety hazard or cause damage to the tool. Any attempt to repair or replace electrical parts on this power tool may create a safety hazard unless repair is performed by a qualified technician.
Need help?
Do you have a question about the 54-6505-6 and is the answer not in the manual?
Questions and answers