Table of Contents
Advertisement
Quick Links
Advertisement
Table of Contents

Related Manuals for OWC THUNDERBAY


Summary of Contents for OWC THUNDERBAY
- Page 1 ® T H U N D E R B A Y M I N I Assembly Manual & User Guide...
-
Page 2: Table Of Contents
DEVICE SETUP ....................3 2.1 HARD DRIVE INSTALLATION 2.2 QUICK START 2.3 SOFTWARE RAID 2.4 CHANGING DRIVES 2.4.1 Drive Failure SUPPORT RESOURCES ...................5 3.1 TROUBLESHOOTING 3.2 ABOUT DATA BACKUP 3.3 DATA MIGRATION 3.4 CONTACTING TECHNICAL SUPPORT OWC THUNDERBAY 4 MINI TABLE OF CONTENTS... -
Page 3: Minimum System Requirements
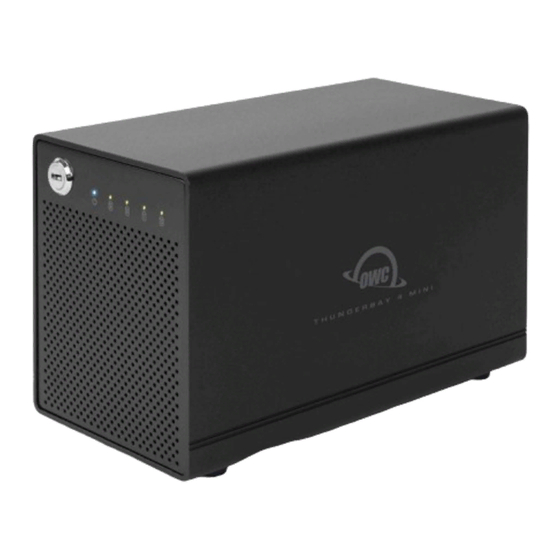
1. Locking faceplate — Use the included keys to lock the faceplate for security, or to remove the faceplate to gain access to the drive bays. 2. LED indicators — See the following chart for details on the ThunderBay 4 mini’s LEDs. ThunderBay... -
Page 4: Rear View
2. Power input — Connect the included power supply here. NOTES: • There is no power switch on the OWC ThunderBay 4 mini. As long as the power supply is connected, the device mini will turn on when it receives a data signal through the Thunderbolt cable. -
Page 5: Hard Drive Installation
7. Fasten the drive into the drive tray using four of the included Phillips screws. 8. Slide the drive tray back into the rails in the ThunderBay 4 mini and push until it is seated fully. If you encounter resistance, do not force the drive tray. Remove it, check to make sure that there are no obstructions and that the drive tray is lined up correctly, then slide it in again. -
Page 6: Quick Start
2. Connect the power supply between the ThunderBay 4 mini and a power outlet. 3. Connect a Thunderbolt cable between the ThunderBay 4 mini and a computer. When you do this, the ThunderBay 4 mini will turn on and the drives will be available for use on the computer. -
Page 7: Troubleshooting
Begin your troubleshooting by verifying that the power cable is connected to the OWC ThunderBay 4 mini and to a power source. If the power cable is connected to a power strip, make sure that the power switch on the strip is turned on. - Page 8 The material in this document is for information purposes only and subject to change without notice. While reasonable efforts have been made in the preparation of this document to assure its accuracy, OWC and its officers and employees assume no liability resulting from errors or omissions in this document, or from the use of the information contained herein.
Need help?
Do you have a question about the THUNDERBAY and is the answer not in the manual?
Questions and answers