Table of Contents
Advertisement
Available languages
Available languages
Quick Links
Advertisement
Chapters
Table of Contents

Related Manuals for Martin System TT200


Summary of Contents for Martin System TT200
- Page 1 Fr eN NL es Tiny Trainer...
- Page 2 TiNY TrAiNer TT200 et TT400 satisfont à toutes les dispositions de la Directive N° 1999/5/CE du 07/04/99 du Conseil Européen comply to all dispositions of the European Council Directives below N° 1999/5/CE...
-
Page 3: Table Of Contents
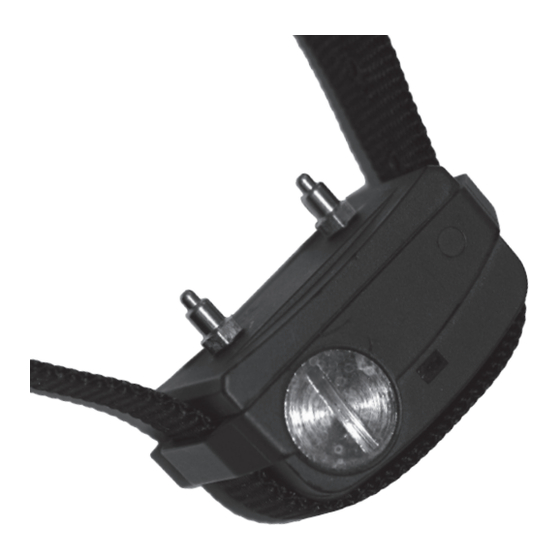
TAbLe des MATières 1. Utilisation - - - - - - - - - - - - - - - - - - - - - - - - - - - 1.1 Mise en route et arrêt de la télécommande 1.2 Mise en route et arrêt du collier 1.3 Attribution du collier 1.4 Choix du niveau de stimulation... - Page 4 TéLéCOMMANde TéLéCOMMANde FACe AvANT FACe LATérALe drOiTe 1. buzzer 4. sablier 5. niveau d’intensité 6. écran LCD 9. point rouge 2. flèche vers le haut 7. envoi 3. flèche vers le bas 8. marche/arrêt COLLier 10. électrodes FACe AvANT 12. point rond 11.
-
Page 5: Utilisation
1. UTiLisATiON Le collier d’éducation «Tiny Trainer» de Martin System est un appareil conçu pour l’éducation des chiens. Le collier placé au cou de l’animal génère, via la télécommande, des stimula- tions qui permettent de maintenir l’attention du chien, facilitant ainsi son édu- cation. -
Page 6: Attribution Du Collier
1.3 Attribution du collier Pour conditionner le collier à fonctionner avec sa télécommande, il est néces- saire de respecter la procédure suivante : Placer, et maintenir, le point rouge de la télécommande face au point rond gravé dans la face avant du collier, jusqu’à ce que la LED de celui-ci clignote en orange. -
Page 7: Remplacement Des Piles
Pour modifier le mode de fonctionnement, maintenir enfoncée la touche «marche/arrêt» de la télécommande. L’écran LCD affiche alors successi- vement un sigle buzzer pour indiquer le mode «son et impulsion simul- tanés», un sigle buzzer et un sablier pour indiquer le mode «pré-avertis- sement sonore», et enfin pas de sigle (hormis le niveau d’intensité) pour indiquer le mode «impulsion sans son». -
Page 8: Vérification Du Fonctionnement
3. vériFiCATiON dU FONCTiONNeMeNT Pour vérifier si votre appareil fonctionne bien, celui-ci est fourni avec une lampe témoin. Placer cette lampe sur les contacts du collier, et envoyer une stimulation à l’aide de la télécommande. Si le collier fonctionne correctement, le témoin s’allume lors des impulsions. Si le témoin ne s’allume pas, vérifier le mode de fonctionnement. -
Page 9: Conseils D'éducation
Utiliser des piles en bon état. 6. CONseiLs d’édUCATiON Le collier d’éducation «Tiny Trainer» de Martin System a été étudié en colla- boration avec des vétérinaires et des éducateurs afin de fabriquer un appareil correspondant à toutes les exigences en terme d’éducation canine, tout en respectant de manière pro-active le bien-être de votre animal. -
Page 10: Précautions D'usage
7. préCAUTiONs d’UsAge • Ne jamais laisser le collier autour du cou de l’animal durant de longues périodes (pas plus de huit heures consécutives). Il pourrait en résulter une détérioration de sa peau suite à la pression exercée par les élec- trodes métalliques du collier. -
Page 11: Caractéristiques Techniques
9. CArACTérisTiqUes TeChNiqUes Télécommande TT200 Dimensions : 73x40x20 mm Poids : 42 g Alimentation : Pile 3V lithium de type CR2430 Autonomie : 2 ans en veille Portée : 200m Fréquence : 869.500 MHz Puissance radio maximum : 2 mW Antenne intégrée... -
Page 12: Garantie
Les pannes résultant d’accident et/ou de mauvaise utilisation ne sont pas cou- vertes par la garantie. En cas de défectuosité, l’appareil sera, au choix de Martin System, réparé ou échangé. La garantie ne couvre aucun des points suivants : •... - Page 13 iNdex 1. Use - - - - - - - - - - - - - - - - - - - - - - - - - - - - - - - - 15 1.1 Switch on/off of the remote control 1.2 Switch on/off of the collar 1.3 Attributing the collar to the remote 1.4 Choice of stimulation level...
- Page 14 reMOTe CONTrOL reMOTe CONTrOL FrONT side LATerAL righT side 1. buzzer 4. eggtimer 5. intensity level 6. LCD screen 9. red point 2. upward arrow 7. send stimulation 3. downward arrow 8. on/off COLLAr 10. probes FrONT side 12. round point 11.
- Page 15 1. Use The Martin System «Tiny Trainer» training collar has been designed for dog training. When the collar is placed on the dog’s neck it can generate impulses to main- tain the dog’s attention, thanks to a remote control. This will make educating your dog easier.
- Page 16 1.3 Attributing the collar to the remote To have the remote controlling the collar, follow the instructions : Hold the remote’s red point (on the right side of the remote) against the collar’s point (engraved in on the front side), until the LED flickers orange.
-
Page 17: Battery Replacement
To change the program, hold your finger on the «on/off-key» on the remote. The LCD screen will display first a buzzer-symbol to indicate the «simultaneous sound and stimulation» program ; then a buzzer with an eggtimer-symbol to indicate the «sound warning» program; then no symbol at all, to indicate the «impulse without sound»... - Page 18 3. CONTrOL The FUNCTiONiNg To control the functioning of the machine, it is provided with a test lamp. Place the test lamp on the collar’s contacts and send an impulse with the remote control. If the collar functions correctly, the lamp will light up with the impulses. If the lamp doesn’t light up, check the program.
- Page 19 Use batteries in a perfect state. 6. edUCATiON AdviCe The Martin System «Tiny Trainer» training collars have been designed by a team including veterinary practitioners and dog trainers in order to fit it to the needs of canine training while respecting pro-actively the welfare of your dog.
- Page 20 7. UsiNg CAUTiON • Never leave the collar on the dog’s neck for too long (not more than eight consecutive hours). Otherwise, the dog’s skin could be dam- maged by the pressure of the collars probes • Verify daily that the skin is not red, nor with cutaneous eruptions, or wounds in the zone in contact with the probes.
- Page 21 9. TeCNiCAL CArACTerisTiCs TT200 remote control Dimensions : 73x40x20 mm Weight : 42 g Alimentation : type CR2430 3V lithium battery Autonomy : 2 years in stand-by Range : 200m Frequency : 869.500 MHz Maximum radio potency : 2 mW...
- Page 22 It covers all defects occurred in normal using conditions. Defects resulting from accidents and/or inadequate use are not covered by the warranty. In case of defect, Martin System will decide to replace or repare the machine. The warranty will never cover : •...
- Page 23 iNdex 1. Gebruik - - - - - - - - - - - - - - - - - - - - - - - - - - - - - 25 1.1 Aan- en uitzetten van de afstandsbediening 1.2 Aanzetten van de halsband 1.3 Halsband en afstandsbediening op elkaar afstellen 26 1.4 Keuze van de impulsniveaus...
- Page 24 AFsTANdsbedieNiNg AFsTANdsbedieNiNg vOOrKANT reChTse ZiJde 1. buzzer 4. zandloper 5. intensiteits- niveau 6. LCD scherm 9. root punt 2. pijlte naar boven 7. impuls sturen 3. pijlte naar beneden 8. aan/uit hALsbANd 10. electroden vOOrKANT 12. rond punt 11. batterij dekseltje 13.
- Page 25 1. gebrUiK De Martin System «Tiny Trainer» trainingshalsband is ontworpen voor het trai- nen van honden. Via een afstandsbediening, geeft de halsband de hond impulsen om zijn aan- dacht te behouden, en zo de opvoeding te vergemakkelijken. De intensiteit van deze impulsen is regelbaar op de afstandsbediening. Zo is de halsband geschikt voor alle type honden en omstandigheden.
- Page 26 1.3 Halsband en afstandsbediening op elkaar afstellen Om de halsband op de afstandsbediening af te stellen, moet men de volgende procedure volgen : Het rode punt van de afstandsbediening (op de rechterzijde) tegen het in de halsband gegraveerde punt (op de voorzijde van de halsband) houden tot de LED oranje wordt.
- Page 27 programma, en uiteindelijk geen enkel symbool meer (behalve het im- pulsniveau), voor het «impuls zonder geluid»-programma. Om het «alléén geluid»-programma in te stellen, selecteert U het im- pulsniveau 0. 2. vervANgeN vAN de bATTeriJeN In geval van rood knipperen van de LED, of abnormale werking van het appa- raat (slechte draagwijdte, geen impuls meer, …), vervangt U de batterij.
- Page 28 3. CONTrOLereN vAN de gOede WerKiNg Om de goede werking van het apparaat te controleren, is er een test lampje voorzien. Plaats het lampje op de contacten van de halsband en druk op de impulsknop van de afstandsbediening. Als de halsband correct werkt, zal het lampje branden terwijl U op de impuls- knop duwt.
- Page 29 Gebruik batterijen in een goede toestand. 6. gebrUiKsTips De Martin System «Tiny Trainer» is samen met dierenartsen en hondenopvoe- ders ontworpen, om een systeem te maken dat over alle benodigdheden voor het trainen van een hond beschikt, en tegelijkertijd pro-actief het welzijn van uw hond respecteert.
- Page 30 7. gebrUiKsvOOrZOrgeN • Laat de halsband nooit te lang rond de nek van het dier (niet meer dan acht uur lang). De huid zou anders beschadigd kunnen worden door de druk van de metallische elektrodes van de halsband. • Onderzoek de hond dagelijks op roodheden, huiduitslag, of wondjes in de zone van de nek waar de elektrodes in contact zijn met de huid.
- Page 31 9. TeChNisChe KeNMerKeN TT200 afstandsbediening Afmetingen : 73x40x20 mm Gewicht : 42 g Energie : 3V lithium batterij, type CR2430 Autonomie : 2 jaar in stand-by Reikwijdte : 200m Frequentie : 869.500 MHz Maximale radio potentie : 2 mW Geïntegreerde antenne Aantal impulsniveaus : 9 Werkingstemperatuur : -20°c à...
- Page 32 De defecten van het product die aan onoplettendheid of gebruiksfou- ten te wijten zijn • De defecten die aan herstellingen door niet door Martin System er- kende personen te wijten zijn • De verantwoordelijkheid van de consecuenties van een slecht gebruik of panne van het apparaat Martin System biedt een snelle en efficientie technische dienst.
- Page 33 iNhALTsverZeiChNis 1. Benutzung - - - - - - - - - - - - - - - - - - - - - - - - - - - 35 1.1 Ein- und Ausschalten der Fernbedienung 1.2 Ein- und Ausschalten des Halsbandes 1.3 Zuweisung des Halsbandes 1.4 Wahl der Intensitätsstufe 1.5 Wahl der verschiedenen Funktionen...
- Page 34 vOrderseiTe reChTeseiTeNANsiehT FerNbedieNUNg FerNbedieNUNg 1. Ton 4. Sanduhr 5. Impulsstufe 6. LCD Bildschirm 9. roter Punkt 2. Impulsstufe aufwärts 7. Impulstaste 3. Impulsstufe alewärts 8. Ein/Aus vOrderseiTe 10. Elektroden hALsbANd 12. Einkerbung 11. Batteriedeckel 13. Leuchte...
-
Page 35: Benutzung
1. beNUTZUNg Der “Tiny Trainer” MARTIN SYSTEM ist ein für die Hundeausbildung entwickel- tes Gerät. Das auf dem Hals des Tieres angelegte Halsband erzeugt, mittels der Fernbedienung, Stimulationen die es erlaubt die Aufmerksamkeit des Hun- des zu erhalten, um somit die Ausbildung des Hundes zu erleichtern. -
Page 36: Zuweisung Des Halsbandes
1.3 Zuweisung des Halsbandes Um das Halsband auf die Fernbedienung zuzuweisen ist es nötig folgende Prozedur zu befolgen: Senden Sie den roten Punkt der Fernbedienung auf die Einkerbung auf der Vorderseite des Halsbandes, das solange, bis die Lampe Orange aufleuchtet. Entfernen Sie dann die Fernbedienung vom Halsband und drücken Sie die Taste „Senden“... -
Page 37: Auswechseln Der Batterie
2. AUsWeChseLN der bATTerie 2.1 Auswechseln der Batterie der Fernbedienung Schieben Sie den Deckel auf der Rückseite der Fernbedienung zurück indem Sie gleichzeitig einen Druck auf der dazu vorgesehenen Stelle ausüben. Entfernen Sie dann die Batterie aus ihrem Halter. Fügen Sie eine neue Batterie im Halter ein in dem Sie die Polarität der Batterie respektieren (+ nach oben). -
Page 38: Prüfen Des Ausbildungshalsbandes
3. prüFeN des AUsbiLdUNgshALsbANdes Um zu überprüfen ob das Gerät korrekt funktioniert, benutzen Sie dazu die mitgelieferte Testlampe. Positzionieren Sie die Lampe auf den beiden Elek- troden des Halsbandes und senden Sie eine Stimulation. Sollte das Halsband korrekt funktionieren, leuchtet die Testlampe bei einer Stimulation auf. Sollte die Testlampe nicht aufleuchten, überprüfen Sie die verschiedenen Funktionen der Fernbedienung. -
Page 39: Verbesserung Der Leistungen
Benutzen Sie nur Batterien in gutem Zustand. 6. rATsChLäge ZUr hUNdeAUsbiLdUNg “Tiny Trainer” der Marke MARTIN SYSTEM ist in Zusammenarbeit mit Tierärzten und Ausbildern konzipiert und entwickelt worden. Dies mit dem Ziel Ihnen ein Dressurhalsband anzubieten dass für die Ausbildung Ihres Hundes bestens geeignet ist und dabei gleichzeitig das Wohlbefinden des Hundes res- pektiert. -
Page 40: Vorsichtsmassnahmen Beim Benutzen Des Ausbildungshalsbandes
7. vOrsiChTsMAssNAhMeN beiM beNUTZeN des AUsbiLdUNgshALsbANdes • Lassen Sie dem Hund das Halsband nie länger als 8 Stunden an. Durch den Druck der Elektroden könnte die Haut des Hundes verletzt wer- den. • Uberprüfen Sie täglich die Hautstellen die in Kontakt mit den Elektro- den sind. -
Page 41: Technische Eigenschaften
9. TeChNisChe eigeNsChAFTeN Fernbedienung TT200 Dimensionen : 73x40x20 mm Gewicht : 42 g Typ der Batterie : 3V Lithium vom Typ CR2430 Autonomie : 2 Jahre bei ausgschaltetem Zustand Reichweite : 200m Frequenz : 869.500 MHz Maximale Ausgangsleistung : 2 mW... -
Page 42: Garantie
Die Garantie wird nur auf Präsentation der Rechnung gewährt. Diese Garantie bezieht sich auf alle Anfallendenstörungen bei normalen Benut- zen des Produktes. Im Falle einer Störung des Fernreizgerätes bleibt es MARTIN SYSTEM vorbehal- ten das Gerät einzutauschen oder reparieren. Die Garantie deckt nicht folgende Punkte: •... - Page 43 iNdiCe 1. Uso- - - - - - - - - - - - - - - - - - - - - - - - - - - - - - - - 45 1.1 Encender y apagar el mando a distancia 1.2 Encender y apagar el collar 1.3 Atribución del collar 1.4 Selección del nivel de impulsión...
- Page 44 MANdO A disTANCiA MANdO A disTANCiA CArA deLANTerA CArA LATerAL dereChA 1. pitido 4. reloj de arena 5. nivel de impulso 6. pantalla LCD 9. punto rojo 2. flecha hacia arriba 7. mandar impulso 3. flecha hacia abajo 8. encender/ apagar COLLAr 10.
-
Page 45: Uso
1. UsO El collar de adiestramiento «Tiny Trainer» de Martin System es un aparato concebido para el adiestramiento de perros. Gracias al mando a distancia, el collar colocado al cuello del perro genera impulsiones permitiendo mantener la atención del perro, simplificando así su adiestramiento. -
Page 46: Atribución Del Collar
1.3 Atribución del collar Para hacer funcionar el collar con el mando, es necesario seguir los pasos siguientes: Acercar y mantener el punto rojo del mando al punto redondo de la cara delantera del collar hasta que parpadee naranja la LED del collar. Apartar enseguida el mando del collar, y apoyar en la tecla de impulsión del mando. -
Page 47: Reemplazar Las Pilas
sonoro», o ningún símbolo (salvo el nivel de intensidad), para indicar el modo «impulsión sin sonido». Para trabajar con el modo «sonido solo», seleccione el nivel de intensidad cero. 2. reeMpLAZAr LAs piLAs En caso de parpadear la LED del collar en rojo, o en caso de funcionamiento anormal del aparato (disminución del alcance, falta de impulso…), cambiar las pilas. -
Page 48: Comprobación Del Funcionamiento Correcto
3. COMprObACióN deL FUNCiONAMieNTO COrreCTO Para comprobar que funcione bien su aparato, se provee con una lámpara test. Colocar la lámpara en los contactos del collar, y mandar un impulso con el mando a distancia. Si el collar funciona correctamente, la lámpara se enciende con el impulso. Si la lámpara no se enciende, comprobar el modo de funcionamiento. -
Page 49: Mejorar Los Resultados
Utilice pilas en buen estado 6. CONseJOs de UTiLiZACióN El collar de adiestramiento «Tiny Trainer» de Martin System se ha ideado en colaboración con veterinarios y adiestradores, para que corresponda a todas las exigencias del adiestramiento canino, respectando de manera pro-activa el bienestar de su animal. -
Page 50: Precauciones De Uso
7. preCAUCiONes de UsO • No deje el collar en el cuello del perro durante mucho tiempo seguido (no más de 8 horas seguidas), ya que podría resultar una deterioración de la piel por la presión de los electrodos del collar. •... -
Page 51: Características Técnicas
9. CArACTerísTiCAs TéCNiCAs Mando TT200 Tamaño : 73x40x20 mm Peso : 42 g Alimentación : Pila 3V lithium de tipo CR2430 Autonomía : 2 años en modo «stand-by» Alcance : 200m Frecuencia : 869.500 MHz Potencia radio máxima : 2 mW Antena integrada Número de niveles de impulsión : 9... -
Page 52: Garantía
La garantía sólo será válida si se presenta el aparato con la factura original de compra. La garantía Martin System cubre durante 2 años las piezas y la mano de obra. Ésta garantía sólo cubre defectos aparecidos en condiciones normales de uso. - Page 53 sUMAriO 1. Uso- - - - - - - - - - - - - - - - - - - - - - - - - - - - - - - - 55 1.1 Avviamento e sospensione del telecomando 1.2 Avviamento e sospensione del collare 1.3 Attribuzione del collare 1.4 Scelta del livello d’intensità...
- Page 54 FrONTe deL LATerALe desTrO deL TeLeCOMANdO TeLeCOMANdO 1. Buzzer 4. Clessidra 5. Livello d’intensità 6. Schermo LCD 9. Punto rosso 2. Freccia verso l’altro 7. Invia 3. Freccia verso il basso 8. Avviare/Fermare FrONTe deL 10. Elettrodi COLLAre 12. Punto rotando 11.
-
Page 55: Uso
1. UsO Il collare d’addestramento “Tiny Trainer” di Martin System è un apparecchio progettato per l’istruzione dei cani. Il collare messo al collo dell’animale genera, attraverso il telecomando, stimo- lazioni che permettono di mantenere l’attenzione del cane, facilitando così la sua istruzione. -
Page 56: Attribuzione Del Collare
1.3 Attribuzione del collare Per condizionare il collare da funzionare con il suo telecomando, è neces- sario rispettare la procedura seguente: Mettere, e mantenere, il punto rosso del telecomando di fronte al punto rotondo inciso nella parete frontale del collare, fino a che la LED di que- st’ultimo tremola in arancia. -
Page 57: Sostituzione Delle Pile
2. sOsTiTUZiONe deLLe piLe In caso di tremolo in rosso della LED sul collare, o in caso di funzionamento sbagliato degli apparecchi (portata non sufficente, o senza stimolazioni..), sostituire le pile. 2.1 emittente Ritirare il coperchio alla parte posteriore dell’apparecchio con una pres- sione del pollice alla posizione segnata a tal fine, facendolo scivolare ver- so il basso. -
Page 58: Sistemazione Del Collare Sul Cane
lunga distanza, per verificare se non si tratta di un problema di portata. Se tale è il caso, sostituire le pile degli apparecchi. Se il collare funziona a lunga distanza con la lampada, ma che il cane non reagisce, verificare la buona sistemazione del suo collare. 4. -
Page 59: Consigli D'istruzione
6. CONsigLi d’isTrUZiONe Il collare d’addestramento “Tiny Trainer” di Martin System è stato studiato in collaborazione con veterinari ed insegnanti per fabbricare un apparecchio che corrisponde a tutte le esigenze in termini d’istruzione canina, pur rispettando in modo pro-attivo il benessere del vostro animale. -
Page 60: Trattamento
Pulire regolarmente gli elettrodi con l’alcool a 90°. Verificare regolarmente lo stringimento del tappo della pila e lo stato del suo giunto di tenuta. 9. CArATTerisTiChe TeCNiChe Telecomando TT200 Dimensioni: 73x40x20 mm Peso: 42 g Alimentazione: Pila 3V litio di tipo CR2430... - Page 61 Telecomando TT400 Dimensioni: 73x40x20 mm Peso: 42 g Alimentazione: Pila 3V litio di tipo CR2430 Autonomia: 2 anni modo economico Portata: 400m Frequenza: 869.500 MHz Potenza radiofonica massima: 8 mW Antenna integrata Numero di livelli di impulsi: 9 Temperatura di funzionamento: -20°c à + 40°c Collare Dimensione: 57x38x30 mm Peso: 64 g...
-
Page 62: Garanzia
I guasti che derivano da incidente e/o di cattivo utilizzo non sono coperte dalla garanzia. In caso di difetto, l’apparecchio sarà, alla scelta di Martin System, riparato o scambiato. La garanzia non copre alcuno dei punti seguenti: •... - Page 64 Martin System Rue J. Martin, 35 B-4450 LANTIN BELGIUM tel: +32.4.263.96.05 fax: +32.4.246.12.90 info@martinsystem.com www.martinsystem.com...
Need help?
Do you have a question about the TT200 and is the answer not in the manual?
Questions and answers