Table of Contents
Advertisement
Quick Links
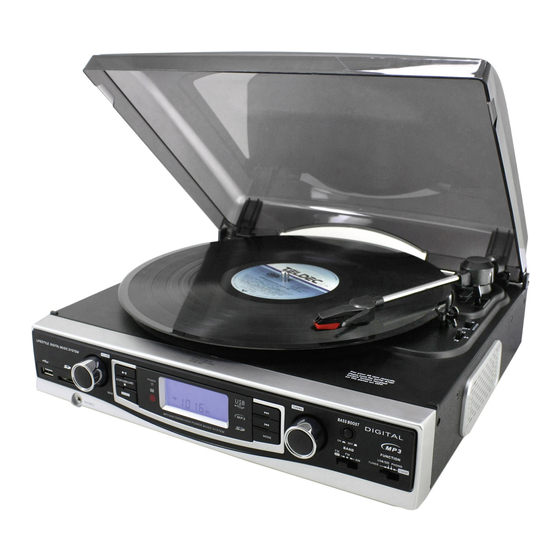
LOCATION OF CONTROLS
1. Turntable
2. 45 RPM Adapter
3. Cue-lever (use this lever to lift the tone arm)
4. Tone Arm
5. Speed Selector
6. Tone Arm Holder
7. Dust Cover
8. Speaker
9. Display
10. Bass Boost Button
11. Function Selector
12. Band Selector
13. Tuning Control
14. Skip + Button
15. Skip – Button
16. Mode Button
Repeat All, Intro, Random)
This Unit is designed to only operate on normal 230V~ 50Hz household power. Do not attempt to
operate the System using any other power source. You could cause damage to the unit and void your
warranty.
The remote control unit operates on 1 CR2025 Lithium battery (Included).
Program,Repeat 1,Repeat Album,
ENGLISH
17. IR Sensor
18. Record Button
19. Stop/USB/Card Button
20. Play / Pause Button
21. Volume Control
22. Headphone Jack
23. USB Port
24. SD/MMC Card Slot
25. Power Indicator
26. FM Antenna
27. Auto Stop (ON/OFF) Selector
28. Line-Out Output Socket for connect to amplifier
I
29.
30. AC Power Cord
POWER SOURCE
ENG 1
nternal Speaker (ON / OFF) Selector
Advertisement
Table of Contents

Summary of Contents for SOUNDMASTER pl530
- Page 1 ENGLISH LOCATION OF CONTROLS 1. Turntable 2. 45 RPM Adapter 3. Cue-lever (use this lever to lift the tone arm) 17. IR Sensor 4. Tone Arm 18. Record Button 5. Speed Selector 19. Stop/USB/Card Button 6. Tone Arm Holder 20. Play / Pause Button 7.
- Page 2 ENGLISH AC OPERATION 1. Plug the AC POWER CORD into a 230V AC ~ 50Hz outlet. 2. Turn the System on by sliding the Function Selector (11) to either “TUNER”, “USB/SD” or “PHONO”. The LCD backlight will turn on. Mains plug should be regularly checked for any damage. If it is damaged do not operate the unit, seek advice from a qualified service technician.
- Page 3 ENGLISH AUTO-STOP SWITCH OPERATION The Auto-Stop area on some records may extend beyond the preset setting. As a result the turntable could possibly stop before the last track finishes. If you experience this during playback, set the AUTO-STOP Switch (27) located on the back of the unit to the “OFF” position. The turntable will now run to the end of the record, but will no longer stop automatically.
- Page 4 ENGLISH Note: To ensure the encoding is successful, remove the USB or Card a few seconds after pressing the STOP Button. 7. To start recording again, press the RECORD Button (18) again and follow step #2 above. PLEASE NOTE : If you want to encode an entire side of a record and have seperate MP3 files for each track, you must manually press the STOP/USB/SD Button (19) at the end of each track and then press the RECORD Button (18) again to start recording the next track.
- Page 5 ENGLISH REPEAT 1/ FOLDER/ ALL PLAYBACK 1. During playback, if you want to repeat the same track, simply press the MODE (9) Button once ‘ ‘ appears in the Display. 2. The track will be repeated and stop until the STOP Button (3) is pressed. 3.
- Page 6 ENGLISH 3. Press the MODE button (16) to confirmed when track No.5 flashed in the Display. The first program selection is now stored in the program memory. The Program Channel No. ‘P 2’ will appear briefly. ‘P’ will disappear and 2 will revert to 5, i.e.
- Page 7 ENGLISH To confirm, briefly press the RECORD button once. ‘DEL’ will appear steadily in the Display for few seconds and then the Display will resume to USB/Card playback stop mode with the total track number deducted by 1. Original 38 Files After Deleting Track 5 Repeat 1-3 above to delete more tracks as desired.
- Page 8 ENGLISH BATTERY CARE If the unit is not to be used for an extended period of time, remove the battery. An old or leaking battery can cause damage to the Remote Control. ii. Do not dispose of batteries in fire, batteries may explode or leak. BATTERY REPLACEMENT When the battery becomes weak, the operating distance of the Remote Control is greatly reduced and you will need to replace the Lithium battery.


Need help?
Do you have a question about the pl530 and is the answer not in the manual?
Questions and answers