Table of Contents
Advertisement
Quick Links
The materials are reusable according to their markings. By reusing, recycling or
other forms of utilization of old devices you make an important contribution to
the protection of our environment.
Please contact your local authorities for details about collection points.
CLASS 1 LASER PRODUCT
KLASSE 1 LASER PRODUKT
LUOKAN 1 LASER LAITE
KLASS 1 LASER APPARAT
PRODUCTO LASER CLASE 1
WARNING
Risk of electric shock
Do not open!
Caution: To reduce the risk of electric shock, do not remove the cover (or back). There
are no user serviceable parts inside. Refer servicing to qualified service personnel.
Safety, Environmental and Setup Instructions
Use the device in dry indoor environments only.
Protect the device from humidity.
Do not open the device. RISK OF ELECTRIC SHOCK! Refer opening and servicing to qualified personnel.
Connect this device to a properly installed and earthed wall outlet only. Make sure the mains voltage corresponds with
the specifications on the rating plate.
Make sure the mains cable stays dry during operation. Do not pinch or damage the mains cable in any way.
A damaged mains cable or plug must immediately be replaced by an authorized service center.
In case of lightning, immediately disconnect the device from the mains supply.
Children should be supervised by parents when using the device.
Clean the device with a dry cloth only.
Do NOT use CLEANING AGENTS or ABRASIVE CLOTHS!
Do not expose the device to direct sunlight or other heat sources.
Install the device at a location with sufficient ventilation in order to prevent heat accumulation.
Do not cover the ventilation openings!
Install the device at a safe and vibration-free location.
Install the device as far away as possible from computers and microwave units; otherwise radio reception may be
disturbed.
Do not open or repair the enclosure. It is not safe to do so and will void your warranty. Repairs only by authorized
service/ customer center.
The device is equipped with a "Class 1 Laser". Avoid exposure to the laser beam as this could cause eye injuries.
Only use mercury and cadmium-free batteries.
Used batteries are hazardous waste and NOT to be disposed of with the household waste!!! Return the batteries to your
dealer or to collection points in your community.
Keep batteries away from children. Children might swallow batteries. Contact a physician immediately if a battery was
swallowed.
Check your batteries regularly to avoid battery leakage.
Return batteries free of charge to public collection points in your
community or to shops selling batteries of the respective kind.
Only return fully discharged batteries.
*) marked Cd = cadmium, Hg = mercury, Pb = lead
ENVIRONMENTAL PROTECTION
Do not dispose of this product with the normal household waste at the end
of its life cycle. Return it to a collection point for the recycling of electrical
and electronic devices. This is indicated by the symbol on the product,
user manual or packaging.
CAUTION - INVISIBLE LASER RADIATION WHEN OPENING
THE COVER OR PRESSING THE SAFETY INTERLOCK. AVOID
EXPOSURE TO THE LASER BEAM.
Used batteries are hazardous waste and NOT to be disposed
of with the household waste! As a consumer you are legally
obligated to return all batteries for environmentally responsible
recycling – no matter whether or not the batteries contain harmful
substances*).
This symbol indicates the presence of dangerous
voltage inside the enclosure, sufficient enough to
cause electric shock.
This symbol indicates the presence of important
operating and maintenance instructions for the
device.
Advertisement
Table of Contents

Related Manuals for SOUNDMASTER PL875USB


Summary of Contents for SOUNDMASTER PL875USB
- Page 1 ENVIRONMENTAL PROTECTION Do not dispose of this product with the normal household waste at the end of its life cycle. Return it to a collection point for the recycling of electrical and electronic devices. This is indicated by the symbol on the product, user manual or packaging.
-
Page 2: Location Of Controls
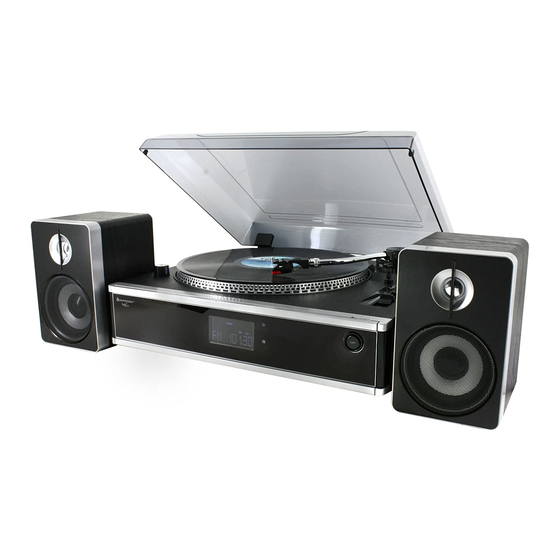
LOCATION OF CONTROLS 1) DUST COVER 2) LCD DISPLAY 3) CD TRAY OPEN/CLOSE BUTTON 4) CD TRAY 5) 3.5MM AUX IN JACK 6) 3.5MM HEADPHONE JACK 7) PANEL COVER 8) USB SOCKET 9) SD/MMC CARD SLOT 10) STANDBY LED INDICATOR 11) POWER ON/STANDBY BUTTON 12) FUNCTION BUTTON 13) MEMORY/CLOCK-ADJUST BUTTON... -
Page 3: Setting The Clock
REMARK : THE WORKING PRESSURE OF THE PROVIDED STYLUS IS FROM THE RANGE 4 – 6 GRAMS ACCORDING TO THE CARTRIDGE MANUFACTURER. ALL STYLUS HAS IT OWN WORKING PRESSUE AND PLEASE REFER TO THE SPECIFICATION RESPECTIVELY. CONNECTION CONNECT THE POWER CORD (37) TO AC OUTLET AND CONNECT THE SPEAKER WIRE TO THE SPEAKER TERMINAL (34) LOCATED ON THE REAR SIDE OF UNIT. - Page 4 THE PRE-SET MEMORIES WILL BE CANCELLED COMPLETELY IF SWITCHING OFF THE MAIN POWER BUTTON ON SYSTEM. YOU ARE RECOMMENDED TO SWITCH THE SYSTEM INTO STANDBY MODE FOR CONVENIENCE USAGE. YOU CAN OVERWRITE A PRESET STATION BY STORING ANOTHER FREQUENCY IN ITS PLACE. FM &...
- Page 5 SONG TITLE/FOLDER NAME SEARCH FUNCTION (BY REMOTE HANDSET) YOU CAN SEARCH THE TRACK BY THE TITLE/FOLDER NAME IN DISC DURING STOP OR PLAYBACK MODE:- PRESS THE “ FIND “ BUTTON ONCE, THEN PRESS THE “SKIP UP ” OR SKIP DOWN BUTTON (18/20), YOU CAN SEARCH THE TITLE OF EACH SONG ONE BY ONE UNDER ALPHABET ORDER &...
- Page 6 3. SELECT A DESIRED TRACK BY PRESSING SKIP UP OR DOWN BUTTONS (18/20). 4. PRESS THE“ MEM/CLK-ADJ ” BUTTON (13) TO STORE THE TRACK INTO MEMORY. 5. REPEAT STEPS 3 AND 4 TO ENTER ADDITIONAL TRACKS INTO THE MEMORY IF NECESSARY. 6.
- Page 7 PRESS THE “ “ BUTTON (15) AND THE UNIT WILL DISPLAY “ ” & “ “ AND FLASHING. ENCODING IS NOW PERFORMING. PRESS THE “ “ BUTTON (15) REPEATLY AGAIN TO SELECT “ REC_ALL “. AFTER COMPLETED OF ENCODING ACCORDING TO THE PRESET PROGRAM, UNIT WILL STOP PLAYBACK AUTOMATICALLY.
- Page 8 • ENCODE AND CONVERT THE MUSIC FILES FROM THE CONNECTED DEVICE TO USB/SD INTO MP3 FORMAT. FOLLOW THE SAME PROCEDURE AS DESCRIBED IN THIS MANUAL. TRACK SEPARATION (BY REMOTE HANDSET) YOU CAN DIVIDE THE RECORDING MUSIC FROM PHONO, OR RADIO TO USB/SD TRACK BY TRACK DURING ENCODING.
- Page 9 PLAY EJECTION PRESS THE EJECT BUTTON (16) ANYTIME DURING PLAYBACK WILL RETURN THE TONE ARM TO THE REST POSITION IMMEDIATELY. Remark : - DUE TO THE LENGTH OF THE RECORD IS VARIOUS, IF YOU FIND THE TONE ARM CANNOT RETURN AUTOMATICALLY AFTER PLAYBACK OF RECORD. PLEASE PRESS THE EJECT BUTTON AND RETURN THE TONE ARM BACK TO THE REST POSITION - USERS SHOULD NOT CHANGE TO A MAGNETIC CARDRIDGE SYSTEM, OTHERWISE UNIT CAN´T BE CONNECTED ANYMORE TO AN AUX-IN OF MUSIC-CENTER...
-
Page 10: Line Out Connection
LINE OUT CONNECTION YOU CAN CONNECT THE SYSTEM TO YOUR WHOLE HI-FI SYSTEM BY CONNECTING THE LINE OUT SOCKET (35) TO THE AUXILIARY INPUT SOCKET WITH A RCA CABLE (NOT PROVIDED). MORE FEATURES A. SLEEP SETTING (BY REMOTE CONTROL) 1. PRESS “SLEEP” BUTTON AND SLEEP INDICATOR “ “... - Page 11 REMOTE CONTROL TRANSMITTER BUTTON DESCRIPTION BATTERY INSTALLATION (BATTERY NOT PROVIDED) THE INFRA-RED TRANSMITTER REQUIRE 2 PC AAA SIZE BATTERY FOR OPERATION BUTTON DESCRIPTION ON/STANDBY PRESS TO SWITCH ON/STANDBY THE SYSTEM FUNCTION PRESS TO SELECT THE FUNCTIONS (TUNER-CD-USB-SD-PHON/AUX) DISPLAY AT POWER ON : PRESS TO DISPLAY CURRENT TIME TUNIGN SKIP UP /DOWN...
Need help?
Do you have a question about the PL875USB and is the answer not in the manual?
Questions and answers