
Subscribe to Our Youtube Channel
Related Manuals for MAXTEK DB-318


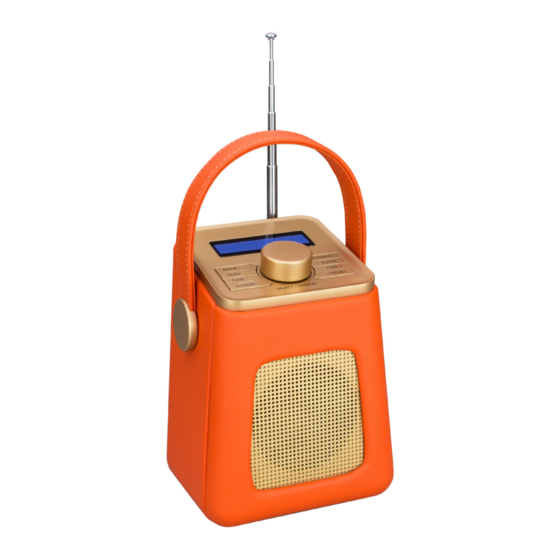
Summary of Contents for MAXTEK DB-318
- Page 1 Mini DAB & FM Radio With AUX & Headphone Port MODEL NUMBER: DB-318 USER GUIDE After Sales Support UK/N.IRELAND HELPLINE N 01270 508538 REP.IRELAND HELPLINE N 1800 995 036 WEBSITE: www.quesh.co.uk EMAIL: enquiries@quesh.co.uk...
-
Page 2: Table Of Contents
Contents Welcome Section AUX Mode • Select AUX Mode Information & Safety Instructions • Using AUX Input • AUX Menu Option Contents & Features 11-14. Standby Mode Controls & Layout • Standby • On/Off Setup • First Time Use System Options •... -
Page 3: Welcome Section
Welcome Section Congratulations! You have made an excellent choice with the purchase of this quality MAXTEK product. ® By doing so you now have the assurance and peace of mind which comes from purchasing a product that has been manufactured to the highest standards of performance and safety, supported by the high quality standards of Quesh Ltd. -
Page 4: Information & Safety Instructions
Information & Safety Instructions This radio is powered by 4 x ‘AA’ size alkaline batteries (not included). Do not dispose of batteries in your household waste. Please contact your local authority for details on safe disposal. • Never throw batteries into a fire or expose to excessive heat sources. •... -
Page 5: Contents & Features
Contents & Features Contents 1 x DAB / FM & AUX Radio 1 x 5V Mains Adaptor Features • DAB receiver (174MHz - 240MHz) • FM receiver (87.5MHz - 108.00MHz) • Stores 10 FM presets • Stores 10 DAB presets •... -
Page 6: Controls & Layout
Controls & Layout Volume/Select/Snooze (Dial) LCD Display Mode Info/Menu Scan Alarm Tune - Tune + On/Off Standby Preset AUX Port 5v DC In Headphone Port Aerial Battery Cover After Sales Support UK/N.IRELAND HELPLINE N 01270 508538 REP.IRELAND HELPLINE N 1800 995 036 WEBSITE: www.quesh.co.uk EMAIL:... -
Page 7: Setup
Setup First Time Use After removing the radio from the packaging, connect the radio to the mains using the adaptor supplied or insert 4 x ‘ A A’ batteries into the battery bay in the back. Fully extend the aerial and press and hold the ‘Standby’... -
Page 8: Dab Mode
DAB Mode Selecting A Station Use the tune +/- buttons to cycle through the available DAB stations on the display. Press the dial to tune the radio into the station that is shown on the display. Scan You can retune or refresh the amount of DAB stations available by pressing the ‘Scan’... -
Page 9: Manually Tune Dab
Manually Tune DAB To manually tune the radio select ‘Manual Tune’ in the menu options. Use the dial to tune the radio in then press the dial to keep the current tuning. Save as a preset if required (see page 14). This helps in poor signal areas to get a clearer signal. -
Page 10: Fm Mode
FM Mode Select FM Mode Press ‘Mode’ to change from DAB to the FM function. Auto Tune FM To auto tune to the next available radio station press and hold either ‘Tune +/-’ buttons for 3 seconds. This will start the FM auto scan. ‘+’... -
Page 11: Scan Settings
Scan Settings You can change the Auto Tune search ability between ‘all stations’ and ‘strong stations’. Select ‘Scan Settings’ from the menu options. Use the dial to cycle between either ‘Strong Stations’ or ‘All Stations’. Press the dial to select the required option. The asterisk in the top right corner indicates current selection. -
Page 12: Aux Mode
AUX Mode Select AUX Mode To select AUX press ‘Mode’ till ‘AUX’ shows on the display. Using AUX Input Connect a 3.5mm jack cable from the device like a mobile, MP3 player, tablet, etc, to the AUX port at the back of the radio. Make sure the device connected has the volume output at maximum in order to play the sound through the radio. -
Page 13: System Options
System Options System Menu Options Press and hold the ‘Info/Menu’ button until you see ‘Scan Setting’ in either DAB or FM mode, and ‘System’ in AUX mode. Turn the dial to cycle to ‘System’ and press the dial to select. Turn the dial to cycle the options and press the dial to select. -
Page 14: Time
System Options Time All the time and date functions and preferences can be altered here. Turn the dial to cycle the options and press the dial to select. The options here are: Time/Date > Auto Update > Set 12/24 > Date Format. Time/Date With this option you can manually set the time and date. -
Page 15: Backlight
System Options Backlight You can change the brightness and light duration of the display. The options here are: Time Out > On Level > Dim Time Out This is to set the duration of time before the display dims. Chose from the options by turning the dial and pressing it to select: On >... -
Page 16: Inactive Standby (Sleep)
System Options Inactive Standby (Sleep) You can set the radio to turn it’s self to standby after a preselect period of time with this feature. Once selected from the system options you will have the following options: OFF > 2 > 4 > 5 > 6 (Hours) Cycle through with the dial and press to select an option. -
Page 17: Dab/Fm Preset
DAB/FM Preset Storing A Preset Press and hold ‘Preset’ for 3 seconds, then use the ‘Tune +/-’ buttons to cycle through the available preset slots. Press the dial to save the station. You will see a saved message appear if successful. The radio has 10 preset slots for both DAB and FM selections. -
Page 18: Alarm
Alarm Setting the Alarm There are 2 alarms you are able to set on this radio. When the radio is on and not in standby Press ‘Alarm’ to set alarm 1 or press ‘Alarm’ twice to set alarm 2 and press the dial to select. The process is controlled by using the dial cycle through the available options and pressing it to select. - Page 19 Specifications Specifications • DAB receiver (174MHz - 240MHz) • FM receiver (87.5MHz - 108.00MHz) • Stores 10 FM presets • Stores 10 DAB presets • Powered by 4 x AA alkaline batteries (not included) • 5v mains adapter (included) • Auto adjusting clock •...
- Page 20 Intentionally Left Blank...
- Page 21 Intentionally Left Blank...
- Page 22 Warranty Certificate Warranty This product is warranted to be free from defects in workmanship and parts for a period of 36 months from the date of purchase. Defects that occur within this warranty period, under normal use and care, will be repaired, replaced or refunded at our discretion, solely at our option with no charge for parts and labour.
- Page 23 Warranty Card Mini DAB & FM Radio with AUX and Headphone Port Model Number: DB-318 Please keep your purchase receipt together with your warranty card Name: Address: Date of purchase: Location of purchase: Fault Description: We recommend that you attach a photocopy of your receipt, showing the date of purchase, to this warranty card and keep it for your reference.
Need help?
Do you have a question about the DB-318 and is the answer not in the manual?
Questions and answers
How to set time
To set the time on the MAXTEK DB-318:
1. Go to the "System Options" menu.
2. Select "Time."
3. Choose "Time/Date."
4. The hour digits will flash. Turn the dial to choose the hour, then press the dial to select.
5. The minute digits will flash. Turn the dial to choose the minutes, then press to select.
6. The next screen will allow you to set the date in the same way.
7. After setting the final value, the display will confirm the new time and date is saved.
This answer is automatically generated