
Related Manuals for Piranha YQ-3888


Summary of Contents for Piranha YQ-3888
- Page 1 Steam Cleaner User Manual Model No.: YQ-3888 Item No.: 900126 Rev 3 READ AND SAVE THESE INSTRUCTIONS Note: The specifications and/or components of this appliance are subject to change without prior notice.
-
Page 2: Table Of Contents
Warnings ..........................3 Safety Direction ........................3 Recommendations ........................ 5 Safety: Protective Cut-Out and Pressure Relief ..............6 Product Characteristics ......................6 Suggested Uses ........................6 Higher Safety ........................6 Durable ..........................7 Energy Efficient ........................7 Easy To Use .......................... 7 Specification .......................... -
Page 3: Warnings
1 Warnings Before using this appliance, read and follow all warnings and instructions in this manual, even if you are familiar with this product. This appliance is not intended for use by persons (including children) with reduced physical, sensory or mental capabilities, or lack of experience and knowledge, unless they have been given supervision or instruction concerning use of the appliance by a person responsible for their safety. - Page 4 Do not place this unit on other appliances, on uneven surfaces or where it could be subject to heat sources (e.g. radiators or stoves), direct sunlight, excessive dust This Appliance should not be placed near a hot gas or electrical burner or placed in a heated oven.
-
Page 5: Recommendations
DO NOT store or use the appliance near or in high temperature areas. DO NOT use the appliance if the power cord is damaged. Do not repair by yourself. It must be repaired by the manufacturer, our customer service department or a similarly qualified person. -
Page 6: Safety: Protective Cut-Out And Pressure Relief
4 Safety: Protective Cut-Out and Pressure Relief This appliance is designed in such a way that when the water in the tank has been used up, the thermostat will activate and cut power off to the heating element thus preventing the appliance from continuing to heat with no water. -
Page 7: Durable
5.3 Durable The appliance is designed with an aluminium alloy die cast boiler tank with an extra-thick inner wall, and can resist high pressures ensuring a long service life. The high strength plastic body is made from high quality PP and PA with anti-corrosion agents added ensuring a long service life. -
Page 8: Components
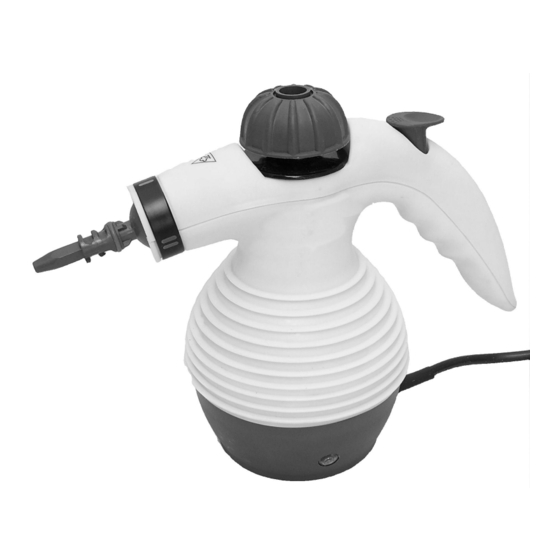
7 Components Item Description Body Short spray nozzle Safety Screw Cap Steam button Handle Power cord and plug Power Indicator Funnel Measuring nozzle Round brush Attachment Bent spray nozzle Long spray nozzle Flexible Extension spray nozzle Accessory Spray Attachment Squeegee plate Towel sleeve 8 Operation Procedures •... - Page 9 • Place the funnel spout into the water tank opening. • Fill the measuring cup up to the marks on the side (175ml) with clean water and pour the water into the tank. Note: Do not overfill the tank as some air space must be left in the tank for correct operation.
-
Page 10: Functions
9 Functions 9.1 Disinfection and Sterilisation Install the Long Spray Nozzle onto the Short Spray Nozzle, aim the spray nozzle at the position that needs disinfection and press the steam button. High-temperature steam will kill most bacteria. 9.2 Steaming Clothes Note: Read the garment care label before proceeding to ensure steaming is permissible. -
Page 11: Installation Of Accessories
10 Installation of Accessories 10.1 Round Brush or Bent Spray Nozzle • For direct installation onto the Short Spray Nozzle, position the Bent Spray Nozzle or the Round Brush over the tip of the Short Spray Nozzle, as shown, and push either the Bent Spray Nozzle or the Round Brush all the way onto the Short Spray Nozzle until it is in position. -
Page 12: Towel Sleeve
10.4 Towel Sleeve • First install the Accessory Spray Attachment onto the Short Spray Nozzle. • Take the Towel Sleeve and stretch it over the bottom face of the Accessory Spray Attachment until it fits neatly. • To remove the Towel Sleeve, gently pull the side down and the pull off. 11 Refill Water During Operation •... -
Page 13: Cleaning Your Steam Cleaner
13 Cleaning Your Steam Cleaner • Turn off and unplug appliance prior to cleaning and let cool. • Do Not immerse the appliance in water, or any other liquid. • Rinse out the water chamber with clean fresh cold water. •... -
Page 14: Guarantee
15 Guarantee WHAT’S COVERED? 1.1 H.E. Group Pty Ltd (“us” “we” or “our”) warrants this good for a full replacement or refund for a period of twelve months from the date of purchase. 1.2 This warranty covers materials and workmanship defects only. WHAT IS NOT COVERED? 2.1 This good is for household use only and if used in any way other than as detailed in the instruction manual will void this warranty.
Need help?
Do you have a question about the YQ-3888 and is the answer not in the manual?
Questions and answers