Table of Contents
Advertisement
Quick Links
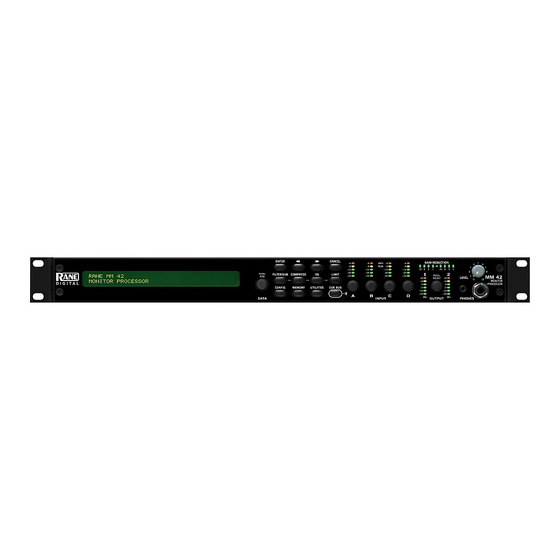
FILTERS, COMPRESSOR, PARAMETRIC EQ, LIMITER
FOR PERSONAL MONITOR APPLICATIONS
Quick Start
We know you're excited about the purchase of your new MM 42. But trust us: take your earphones out for a moment
and read this Quick Start. It covers the basics to get you tweaking your ear mixes into submission in no time. The following
paragraphs assume you're working with a stereo (left/right) mix. For more advanced applications you'll have to dig a bit
deeper into this manual.
First, the hardware. Connect the console aux/groups corresponding to the left and right ear mixes to the MM 42's LINE
INPUT A and LINE INPUT B respectively. Send the MM 42 a good, healthy signal, aiming to keep the loudest peaks
around the -8 dBFS mark (yellow LEDs) on the INPUT meters. Running the Inputs "into the red" is only cool with old-
school analog gear. If needed, make further adjustments using the INPUT controls.
Turn the PHONES LEVEL all the way down and plug your earphones or headphones directly into either the 1/4" or
1/8" PHONES jack. Slowly turn up the PHONES LEVEL to a comfortable listening volume. Not hearing anything? Press
the CUE BUS button.
Press the COMPRESS button and use the Previous
eter. Rotate the DATA control clockwise until SET starts flashing. Don't panic; instead, press the ENTER key to go to the
crossover frequency page. Adjust the frequency splits for each range, pushing and turning the DATA control to make fine
adjustments. Press the ENTER or COMPRESS key to return to the Compressor page. Adjust the THRSH parameter until
you see a few blinky lights on the Gain Reduction meter. Press the COMPRESS button again to move on to band 2, and
again to move to 3, merrily making adjustments. No, you're not hallucinating - the GAIN REDUCTION meter does
indeed switch automatically to show you what's happening within each frequency band.
Okay, if you're comfortable with getting around the various pages then the dry run is over. If you're using a wireless
transmitter, connect the MM 42's main OUT 1 and OUT 2 to the inputs of the transmitter and adjust the transmitter's input
gain to a nominal level. If you're using a hardwired beltpack, connect the MM 42's main Outputs directly to the beltpack
inputs, making sure the beltpack level is turned all the way down. Plug your earphones into the beltpack and slowly turn its
level up to a comfortable listening volume.
That's it! You're ready to rock. Or folk. Or country. Or polka....whatever your musical style. Tweak each processing
section to taste, making sure you go to the MEMORY page once satisfied and store your hard work to one of the 16
available Memory (preset) locations.
There's plenty more you can do with the MM 42. The rest of this manual covers important topics like using the SUB
Output to augment an earphone mix with onstage subwoofers or "shakers", handling two independent mono mixes with one
MM 42, linking and unlinking parameters, connecting multiple MM 42s together via the Cue Bus, and the wonderful world
of MIDI, just to name a few. So don't stop here - keep reading! You still have 3 hours until show time...
Contents
Front Panel ....................................................................... 2
Rear Panel ........................................................................ 3
Connection Examples ................................................... 4
Welcome Page ................................................................ 7
Basic Navigation & Editing .......................................... 7
Output Chain Configuration ........................................ 7
Adjusting Input & Output Levels ................................ 8
Signal Processing .......................................................... 9
Filters & Subwoofer ....................................................... 10
Multi-Band Compressor ............................................... 11
Parametric Equalization ............................................... 12
WEAR PARTS: This product contains no wear parts.
OPERATORS MANUAL
ENTER
CANCEL
-4
-8
-12
-24
PUSH:
FILTER/SUB
COMPRESS
EQ
LIMIT
-36
FINE
CONFIG
MEMORY
UTILITIES
CUE BUS
A
DATA
and Next
cursor keys to navigate to the M-BAND param-
Multi-Band Peak Limiter ............................................... 12
Using the Cue Bus .......................................................... 13
Storing and Recalling Memories (Presets) ............. 14
Utilities .............................................................................. 14
Cue Bus Configuration .................................................. 14
Gain Reduction Meter Mode ....................................... 15
MIDI Configuration & Transfer .................................... 15
Name Device .................................................................... 16
Firmware Update ............................................................ 16
Restoring Factory Defaults .......................................... 17
Appendix: Additional Resources ................................ 17
MIDI Implementation Chart ......................................... 18
MONITOR PROCESSOR
GAIN REDUCTION
-4
dBFS
-4
-4
-8
PEAK
-8
-8
dB
10
6
3
1
10
6
3
1
-12
-12
-12
-24
-24
-24
1
2
PUSH:
-36
-36
-36
LEVEL
+8
SELECT
+8
+4
+4
0
0
-3
-3
-12
-12
-24
-24
B
C
D
dBu
dBu
INPUT
OUTPUT
PHONES
MM 42
4
6
2
8
MM 42
0
10
MONITOR
PROCESSOR
Manual-1
Advertisement
Table of Contents

Related Manuals for Rane MM 42


Summary of Contents for Rane MM 42
-
Page 1: Table Of Contents
Quick Start We know you’re excited about the purchase of your new MM 42. But trust us: take your earphones out for a moment and read this Quick Start. It covers the basics to get you tweaking your ear mixes into submission in no time. The following paragraphs assume you’re working with a stereo (left/right) mix. -
Page 2: Front Panel
CUE BUS: Activates the selected Output(s) on the Cue Bus for soloing purposes. The CUE BUS indicator lights when the Cue Bus is active. Edit Pages: The 2x40 backlit LCD screen displays the edit pages for all MM 42 functions. DATA control: Adjusts the currently selected parameter. Turning the DATA control clockwise increases the parameter, and turning it counterclockwise decreases the parameter. -
Page 3: Rear Panel
MM 42, etc.) to accommodate data transfers, firmware updates, and external control. Power connector: Uses the standard cord provided. The MM 42 has a universal internal switching power supply that accepts 100 to 240 VAC at 50 to 60 Hz, allowing it to work in most countries. -
Page 4: Connection Examples
Connection Examples The MM 42 is intended to be connected in-line between a mixing console and a wireless transmitter, hardwired beltpack or headphone amplifier. Stereo Mix with Optional Mono Subwoofer Output (default) In this configuration a standard Left/Right mix from the console is processed. The Left and Right signals (Inputs A and B) are summed to mono and assigned to the SUB Output. - Page 5 –8 –12 –12 –12 –12 –24 –24 –24 –24 PUSH: FILTER/SUB COMPRESS LIMIT PUSH: –36 –36 –36 –36 FINE MM 42 LEVEL SELECT MONITOR PROCESSOR CONFIG MEMORY UTILITIES CUE BUS –3 –3 –12 –12 –24 –24 DATA INPUT OUTPUT PHONES...
- Page 6 For example, create a single or stereo “full band” mix for a group of background singers, and send this feed from the console to Line Inputs A and B of the MM 42. Augment each person’s mix with an individual feed to Line Input C of each MM 42.
-
Page 7: Welcome Page
MM 42 Welcome Page Output Chain Configuration RANE CORPORATION MM 42 The MM 42 features four line-level Inputs, labeled A PERSONAL MONITOR PROCESSOR through D, which are assignable in any combination to either or both of the output signal chains and the SUB Output. Such The welcome page displays the device name. -
Page 8: Adjusting Input & Output Levels
Adjusting Input Levels Adjusting Output Levels The Input Levels page is automatically displayed any time The Output Levels page is automatically displayed any an INPUT A/B/C/D control is adjusted. time the OUTPUT control is adjusted. This page differs slightly depending on the currently selected configuration INPUT mode. -
Page 9: Signal Processing
(to account for an artist’s hearing difference between right Overview and left ears, for example) or to process two completely So what does the MM 42 have under the hood you ask? independent mono mixes. Plenty! Routing options allow the assignment of any combi-... -
Page 10: Filters & Subwoofer
Filters & Subwoofer Parameters Pressing the FILTER/SUB button again displays the Pressing the FILTER/SUB button displays this edit page: SUBWOOFER SETTINGS edit page: FLT ON | LOW SHELF HIGH SHELF | LOW CUT HIGH CUT LEVEL OUT 1+2| 100Hz 10kHz 20Hz 200Hz 0.0dB... -
Page 11: Multi-Band Compressor
(say, 200 Hz and below) while keeping the vocals and guitars strong and present. The multi-band compressor used in the MM 42 is of the rms (root mean square) variety with a soft-knee characteristic for a pleasant, musical response. -
Page 12: Parametric Equalization
Parametric Equalization Multi-Band Peak Limiter Parameters Parameters Repeatedly press the EQ button to move through each of The Compressor may be used in either full-range (M- the five EQ bands. BAND off) or multi-band (M-BAND on) modes. Repeatedly press the COMPRESS button to move through each fre- PEQ ON | EQ GAIN FREQ... -
Page 13: Using The Cue Bus
Simply connect the multiple MM 42s together using the CUE control. Press ENTER to return to the LIMITER page. BUS jacks, plug your headphones into any MM 42 (it doesn’t matter which one), and press the front panel CUE BUS button |--------X---------X----------| on the unit you wish to monitor. -
Page 14: Storing And Recalling Memories (Presets)
Storing and Recalling Memories Utilities Repeatedly pressing the UTILITIES button cycles through (Presets) the following useful pages. The current CONFIG settings and parameters for all processing sections (filter/sub, compressor, EQ, and limiter) Cue Bus Configuration are saved when you store a Memory. Input and output levels and all UTILITIES settings are not stored. -
Page 15: Gain Reduction Meter Mode
– without disrupting the artist’s mix. Mode When LATCH mode is selected, pressing the CUE BUS button once routes the MM 42’s signal to the Cue Bus and the t a t front panel PHONES jacks. Pressing the CUE BUS button again removes the signal from the Cue Bus. -
Page 16: Name Device
The MM 42 eagerly awaits for the incoming data… Backing up Memories to a PC or other MIDI Device Be sure the MIDI Tx of the MM 42 is not set to off. AWAITING MIDI DATA 1. Connect the MIDI OUT of the transmitting MM 42 to the PRESS CANCEL TO ABORT MIDI IN of the receiving MIDI device. -
Page 17: Restoring Factory Defaults
DOWN before performing a Web: www.hearnet.com reset. The MM 42 can be restored to its original state (minus the Earphone Manufacturers (Custom and Universal Fit) new audio gear smell, of course) by doing the following: Future Sonics Incorporated 1. -
Page 18: Midi Implementation Chart
: l o d to ; l a d to 1 - ; l a , r e d to ; l a ©Rane Corporation 10802 47th Ave. W., Mukilteo WA 98275-5098 USA TEL 425-355-6000 FAX 425-347-7757 WEB www.rane.com Manual-18 107833...
Need help?
Do you have a question about the MM 42 and is the answer not in the manual?
Questions and answers