
Subscribe to Our Youtube Channel
Related Manuals for Air Live MD-3025


Summary of Contents for Air Live MD-3025
- Page 1 MD-3025/MD-3025-IVS 3-Megapixel IR Vandal Mini Dome IPCAM / 3-Megapixel IR Vandal Mini Dome IPCAM with Video Analytics User’s Manual...
- Page 2 This product contains some codes from GPL. In compliance with GPL agreement, AirLive will publish the GPL codes on our website. Please go to www.airlive.com and go to the "Support->GPL" menu to download source code. All Trademarks are properties of their respective holders. AirLive MD-3025 User’s Manual...
- Page 3 The lists of entities entitled to receive used equipment can be found on the websites of municipalities. Some components of devices such as external wiring, circuit boards and liquid crystal displays have a negative impact on the environment. AirLive MD-3025 User’s Manual...
-
Page 4: Table Of Contents
5.1 Live View....................18 5.2 Configuration ..................20 6. Configuration ...................21 6.1 Network....................22 6.2 Video....................29 6.3 Audio....................37 6.4 Event....................38 6.5 Storage ....................45 6.6 System....................47 6.7 Status ....................53 7. Appendix....................55 A. Video Analytics (Only for MD-3025-IVS) ..........55 B. Dropbox....................63 AirLive MD-3025 User’s Manual... -
Page 5: Overview
Users are able to view live video streaming over the Internet, and it is not only one of benefits for using AirLive MD-3025/MD-3025-IVS IP cameras. It is also designed to offer high-performance surveillance by being equipped with PoE switch which allows power and data to be transmitted via a single Ethernet cable. -
Page 6: Features
MicroSD Card Slot for Local Storage Built-in MIC, Two-Way Audio, DI/DO Clear Motion Technology for Moving Objects WDR Enhanced Compatible with OnVIF Standard Built-in Video Analytics (Equipped only for MD-3025-IVS) Free 64-Channel Recording Software 1.3 Product Specification Model MD-3025/MD-3025-IVS Camera... - Page 7 Privacy Masks Text, time and date OSD Digital Zoom Audio Encoder G.711 / AMR (Only for 3GPP) Audio Audio Streaming Two-way Audio Input/Output Built-in microphone, 1 Line out Network Ethernet Ethernet (10/100 Base-T), RJ-45 IEEE802.3af Wireless None AirLive MD-3025 User’s Manual...
- Page 8 108 Ø X 62 H (mm) CamPro Express 64, System Integration Software CamPro Professional Search & Installation-IP Wizard II MD-3025: Motion detection, External input via DI interface, Tamper Detection, Event Triggers Periodically Time, SD Card Read/Write Fail Detection, Network Disconnect, AirLive MD-3025 User’s Manual...
- Page 9 Motion detection, External input via DI interface, Tamper Detection, Periodically Time, SD Card Read/Write Fail Detection, Network Disconnect, Audio Detection, Face Detection, iMotion Detection, Trip Zone, Object Counting, Face recognition, e-Fence Continuous recording Viewing System Windows® XP, Vista, 7, 8 AirLive MD-3025 User’s Manual...
-
Page 10: System Requirement
Internet Explorer 7 or later; Apple Safari 2 or above; Firefox Web Browser 2.00 or above; Google Chrome Note: Please keep updating the latest Windows software and service package. (Ex: Net Framework, Windows Media Player, Enhance ActiveX Security) AirLive MD-3025 User’s Manual... -
Page 11: Package Contents And Installation
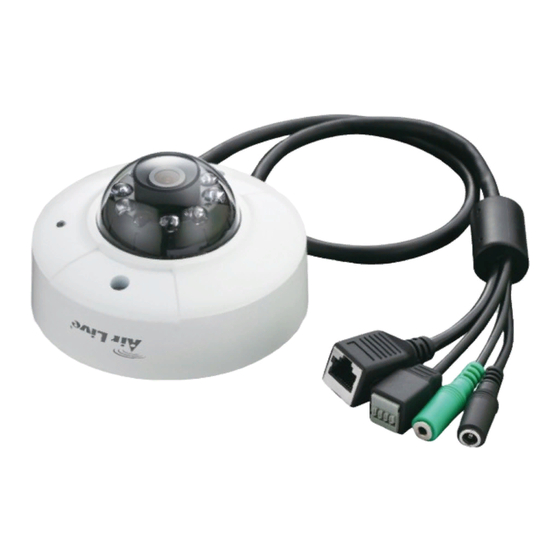
Connector There are various connectors of AirLive MD-3025/MD-3025-IVS as shown in the figures below. Please refer to the diagrams and tables for using of each connector. AirLive MD-3025 User’s Manual... - Page 12 100Mbps Fast Ethernet network switch or hub. 3. Alarm Digital I/O: AirLive MD-3025/MD-3025-IVS supports 2 digital alarm inputs and 1 digital alarm output. Please make sure the alarm connections are properly wired. Please refer to the pin definition table below.
- Page 13 6. MicroSD Card Slot: MicroSD Card Slot allows you to insert a memory card for expansion of storage. 7. Reset Button: This button is used to restore all the factory default settings. Sometimes, restarting the device will make the system back to a normal state. AirLive MD-3025 User’s Manual...
-
Page 14: Mounting The Camera
- Insert the camera body into the hole so that it fits to the camera hole, and fix the body using the ASSY tapping screws. - Refer to “Adjusting the monitoring direction for the camera” to adjust the lens in a desired direction. - Close the top cover. AirLive MD-3025 User’s Manual... - Page 15 Rotation. After installing the camera, adjust the panning angle in consideration of the monitoring direction. When tilting the camera, you should adjust the horizontal angle lest that the image be displayed reversely. AirLive MD-3025 User’s Manual...
-
Page 16: Connect To Ip Camera
Adjust the tilt angle and let the camera faces toward the monitoring object. 2.4 Connect to IP Camera 1. Insert the bundled CD into your PC/Laptop. 2. Auto Run screen shows up, click “Install Software AirLive IP Wizard II” to install the configuration tool. AirLive MD-3025 User’s Manual... - Page 17 2. Package Contents and Installation 3. After completed the installation, run the “Air Live IP Wizard II” to start to search the IP camera. 4. The entire detected IP camera will be listed out. 5. If the Camera’s IP address is in the same IP segment as your LAN, select the founded IP Camera and double click on the item.
-
Page 18: Using Ip Camera Via Web Browser
You can change them in the Account Menu. (Please check “System → Account”) 3. The monitor image will be displayed in your browser. In the left side of main window, you can configure the settings you want. For more details, please refer to the following chapters. AirLive MD-3025 User’s Manual... -
Page 19: Operating Ip Camera Via Ios/Android Device
You can access into your IP camera via the iOS/Android device. Please follow the setup steps below. 1. Download AirLive CamPro Mobile 2. Execute the AirLive CamPro Mobile program from APP store/Android market. 3. Click Setup button. 4. Setup page appears AirLive MD-3025 User’s Manual... - Page 20 4. Operating IP Camera via iOS/Android Device 5. Click Add button 6. Click LAN button and select the camera. AirLive MD-3025 User’s Manual...
- Page 21 7. Model, Address, HTTP Port info then click OK button. appear on the page. 9. The video appears on the main screen. Note: The image is continuous snapshots, not video. Thus, live image can’t be recorded here. AirLive MD-3025 User’s Manual...
-
Page 22: Operating The Network Camera
3. View Options: The device supports multi-profile function for H.264, MPEG4and JPEGsimultaneously. User can choose theproper and/or preferred profile which is listed here. 4. Language: AirLive MD-3025/MD-3025-IVS provide multiple languages to meetcustomer’srequirement. 5. DigitalOutput: Switch digital output interface on or off. - Page 23 Scroll the control bars to adjust the audio attribute. Originalsize / PreviewSize: Switches live image view between original size and preview size (smaller size). DigitalZoom: From1X to10X. Click to full screen first. Click to enable this function. Click to disable it. AirLive MD-3025 User’s Manual...
-
Page 24: Configuration
Record: Click it to start recording an AVI file in local storage. Press to stop the recording process. 5.2 Configuration Click “Configuration” for the camera detail settings. For more information, please refer to Chapter 6. AirLive MD-3025 User’s Manual... -
Page 25: Configuration
6. Configuration Configuration Click the “Configuration” to display sub-menus included Network / Video / Audio / Event / Storage / System / Status / Video Analytics. Note: Video Analytics function is only for MD-3025-IVS. AirLive MD-3025 User’s Manual... -
Page 26: Network
6. Configuration 6.1 Network General AirLive MD-3025 User’s Manual... - Page 27 Enable Multicast: Select this option to enable the multicast function of the camera. Complete thefollowing settings so that you can deliver information from your camera to multi receivers. - Multicast Group Address: Assign a category of IP addresses to receive the information from the camera. AirLive MD-3025 User’s Manual...
- Page 28 To set up the DDNS, select the Provider from the pull-down menu and then enter the required information in the Host Name, User Name and Password text boxes. Note: You have to sign up for DDNS service with the service provider before configuring this feature. AirLive MD-3025 User’s Manual...
- Page 29 - Video DSCP: Assign the DSCP (DiffServ Code Point) of the stream video from the camera by setting the value from 0 to 63. - Audio DSCP: Assign the DSCP (DiffServ Code Point) of the stream audio from the camera by setting the value from 0 to 63. AirLive MD-3025 User’s Manual...
- Page 30 Add, the user whose IP address located within the range will not be allowed to access into the camera. To remove the assigned range of IP addresses for IP Filter, select the setting in the Accept/Deny IP List and then click Delete. AirLive MD-3025 User’s Manual...
- Page 31 URL: Type the server name or the IP address of the HTTP server. HTTP Port: Change it only when needed. HTTP Login name: Type the user name for the HTTP server. HTTP Login Password: Type the password for the HTTP server. AirLive MD-3025 User’s Manual...
- Page 32 6. Configuration iSCSI Enable the iSCSI and key-in server IP address and Port number. The disk of the server will be the storage in IP camera setting. AirLive MD-3025 User’s Manual...
-
Page 33: Video
6. Configuration 6.2 Video 1. Video Profile Intelligent Analysis Mode: You can select Enable or Disable to switch the IVS function. Note: This item will appear on MD-3025-IVS AirLive MD-3025 User’s Manual... - Page 34 Please be noted that higher resolution and frame rate gets better video quality but larger network bandwidth. 720P resolution is recommended. - Main Stream / Second Stream: Select the streaming format as H.264 (High/Main/Baseline Profile) / MPEG4 / MJPEG. AirLive MD-3025 User’s Manual...
- Page 35 RTSP link: rtsp://(IP address of the camera)/3gp Note: Your mobile phone and the service provider must support 3GPP function. Please contact your service provider when you are failed to use this service. 2. Exposure AirLive MD-3025 User’s Manual...
- Page 36 ‐ Brightness: Adjust the brightness level from 0~255. ‐ Contrast: Adjust the contrast level from 0~255. ‐ Saturation: Adjust the colors level from 0~255. ‐ Sharpness: Adjust the sharpness level from 0~255. ‐ Click Default to restore the default value. AirLive MD-3025 User’s Manual...
- Page 37 Others: Mirror: Select Vertical to mirror the image vertically, or select Horizontal to mirror the image horizontally. Power Line Frequency: Select the proper frequency according to the camera’s location to reduce the flicker: NTSC/60Hz or PAL/50Hz. AirLive MD-3025 User’s Manual...
- Page 38 Advance: Digital Noise Reduction: A digitalfilter designed to reduce visible noisefor improving visibility of images. Fog Compensation: Improve visibility of images in fog or smoke by using the Fog compensation function AirLive MD-3025 User’s Manual...
- Page 39 When you select User Define Image, you can click Browse to select the image file from your computer and then click Update to apply the setting. Note: JPG/JPEG file with maximum 65536 bytes. AirLive MD-3025 User’s Manual...
- Page 40 (height and width) you want to cover. Up to 4 private mask windows can be set up on the same screen. AirLive MD-3025 User’s Manual...
-
Page 41: Audio
Enable Speaker: Select the option to enable the camera’s audio out function, so that the connected speaker can play the sound and voice through the camera. 3. Recording File: During an event action, you can upload one audio file in WAV (mono, 8KHZ, <100KB in size) for playback. AirLive MD-3025 User’s Manual... -
Page 42: Event
You can set the attachment that is captured in Pre Event or Post Event time when the event has been triggered. FTP Server: Select “Enable” to enable the FTP server function. AirLive MD-3025 User’s Manual... - Page 43 - User Name: Enter the user name to login into the Network Storage server. - Password: Enter the password to login into the Network Storage server. - Test SMB: When done, click the button to test the network storage server function. AirLive MD-3025 User’s Manual...
- Page 44 - Login Password: Enter the login password of the HTTP server. - Message: Enter the message here. - Test HTTP: Click to test the HTTP server function. 2. Event Schedule Click “Add” for more detail settings. AirLive MD-3025 User’s Manual...
- Page 45 - Enable FTP: The camera will upload the attachment to FTP when triggered. - Enable EMAIL: The camera will send the attachment to the assigned receiver when triggered. - Enable Samba: The camera will transfer the attachment to the network storage when triggered. AirLive MD-3025 User’s Manual...
- Page 46 - Audio File Playback: Playback a recorded audio file when triggered. - Modify/Delete: To change/remove the event profile, select the file on the list and click Modify/Delete. Note: To enable the FTP/Email/Samba/TCP/HTTP services, the required settings of must be completed in the Advance >> Event section. AirLive MD-3025 User’s Manual...
- Page 47 When done, click Apply to save the settings and activate the motion detection function. 4. Audio Detection: Audio Detection: Select to enable or disable the audio detection function. Audio Alarm Level: The higher level means need higher volume to trigger the event. AirLive MD-3025 User’s Manual...
- Page 48 CTD can tolerate the effects of automatic camera gain, camera shaking that causes mild image jitter (less than +/- 4 pixels in any direction), and dimly lit scenes. AirLive MD-3025 User’s Manual...
-
Page 49: Storage
Recording: Select the option to enable the recording to storage function. - NAS/File Server: Enter the IP address of the Network Storage/CIFS server. - Upload Path: Assign the path for uploading the files on the Network Storage/CIFS server. AirLive MD-3025 User’s Manual... - Page 50 This page shows the files list information. User may play or delete the selected file. Note: Please remember to insert a MicroSD card before you start to use this function. You can format MicroSD card in System=> Maintenance. AirLive MD-3025 User’s Manual...
-
Page 51: System
6. Configuration 6.6 System The System menu contains sub-menus as below. When completed, click Apply to save the settings. AirLive MD-3025 User’s Manual... - Page 52 Update Interval. - Manual: Select this option to set the date and time manually. - Synchronize with PC: Select this option and the date & time settings of the camera will be synchronized with the connected computer. AirLive MD-3025 User’s Manual...
- Page 53 - User Name/Password/Confirm Password: Enter the user’s name you want to add to use the camera. Then, enter the password twice for the new user. When done, click Add to add the new user for the camera. AirLive MD-3025 User’s Manual...
- Page 54 HTTPS: Select the Enable HTTPS option to enable HTTPS which is a secure protocol to provide authenticated and encrypted communication within your network. - HTTPS Port: Assign a HTTPS port in the text box. The default HTTPS port is 443. AirLive MD-3025 User’s Manual...
- Page 55 Be aware that you should not turn off the power during updating the firmware and wait for finish message. Furthermore, the firmware upgrade procedure always is risk and do not try to upgrade new firmware if it’s not necessary. AirLive MD-3025 User’s Manual...
- Page 56 Backup to SD CARD Device: Click to save the configuration file to MicroSD card. Configuration Restore: lick Browse to locate the backup file on your PC and then click Restore. Restore From SD CARD Device: Restore the backup file from MicroSD card. Format: Click to format the MicroSD card. AirLive MD-3025 User’s Manual...
-
Page 57: Status
The Status menu shows the current status of the camera, including the basic information, audio/video settings, networking configuration, and system logs. 1. Basic It provides the basic information as above. 2. Audio/Video It provides the information including H.264/MJPEG/Mobile View/Audio as below. AirLive MD-3025 User’s Manual... - Page 58 6. Configuration 3. Network: It provides the information including IP/LAN as below. 4. System Log: It provides the log information as below. Enable remote log: Enter the IP address to enable the remote log function. AirLive MD-3025 User’s Manual...
-
Page 59: Appendix
Appendix A. Video Analytics (Only for MD-3025-IVS) MD-3025-IVS provides multiple intelligent video analytics that helps you to save your human resources and reach the goal of automatic surveillance. Please go to Configuration Video Analytics to experience the entire IVS function. - Page 60 Detection Result Overlay: Select OFF, Privacy Mask or Rectangle to be shown on the face when any face has been detected. Calibration (Min. Face Size): Face detection requires the min. face size is 20x20 pixels, so you can use this for reference. AirLive MD-3025 User’s Manual...
- Page 61 You can save up to 10 face images to the AirLive MD-3025-IVS for recognition, so when the camera catch the face which match the database, the camera will trigger related output devices by necessary reaction.
- Page 62 Edit Users Database: You can edit the registered database here. (See below) Backup/ Restore from SD Card Drive: User can backup and restore the database by MicroSD card. Backup/ Restore: User can backup and restore the database by the computer. AirLive MD-3025 User’s Manual...
- Page 63 ‐ Up to4 zones can be specified when click the Add Zone function. Left click to add the point and points at most can be used in each zone. ‐ SelectDelete Zone/All to delete the zones ‐ Select Enable/Disable to allow the trigger or not. AirLive MD-3025 User’s Manual...
- Page 64 Transform Mode: User can drag the point of the zone to any shape. ‐ Directionality: User can select the detected moving direction from one to another or both the directions Statistics Chart Display: Here will show the result of Trip Zone. AirLive MD-3025 User’s Manual...
- Page 65 –Min.Size of Calibration: The width and length values must be 6 pixels at least. If any false detection caused by smaller objects, you can try to increase the minimum size. AirLive MD-3025 User’s Manual...
- Page 66 This function can be used in many applications, either as a standalone protection system or other protection systems such as airports, power plants, radio towers or even military camps. AirLive MD-3025 User’s Manual...
-
Page 67: Dropbox
Statistics Chart Display: Here will show the detection result of e-Fence. B. Dropbox Please follow below steps to setup Dropbox settings. 1) Enable Dropbox then click ‘Create App’ button, it will pop up Dropbox- Sign in page. AirLive MD-3025 User’s Manual... - Page 68 7. Appendix 2) Please input Dropbox ID and password then click “Sign in” button. 3) Click ‘Create app’ button. AirLive MD-3025 User’s Manual...
- Page 69 7. Appendix 4) Select ‘Dropbox API app’ item. 5) Please follow below steps to create app. AirLive MD-3025 User’s Manual...
- Page 70 7. Appendix 7) Please copy “App key” and “ APP secret” 8) Paste to the BU-3028 Dropbox “App key” and “ APP secret” field then click ‘Get AuthString” button AirLive MD-3025 User’s Manual...
- Page 71 7. Appendix 9) Press “Allow” button 10) Copy the code 11) Paste the key to BU-3028 Authorization String field then click ‘Apply” button AirLive MD-3025 User’s Manual...
- Page 72 7. Appendix 12) Wait for a moment, it will create “Access Token’ key Automatically. 14) Click ‘Get Information” button will pop up the Dropbox information then click “Apply” to save settings. AirLive MD-3025 User’s Manual...
Need help?
Do you have a question about the MD-3025 and is the answer not in the manual?
Questions and answers