Table of Contents
Advertisement
Advertisement
Table of Contents

Related Manuals for DGTEC DG-HDPVR5009


Summary of Contents for DGTEC DG-HDPVR5009
-
Page 2: Need Help
NEED HELP? If you are experiencing difficulty operating this product or require set up assistance please contact the DGTEC Service Centre. The call is free from anywhere in Australia. Our operators will assist you in plain English without the technical jargon:... -
Page 3: Table Of Contents
INDEX INDEX ..........................2 SAFETY AND INSTRUCTIONS..................3 ASSEMBLY AND PARTS LIST ..................4 1.1 PARTS LIST......................4 1.2 FEATURES ......................4 1.3 FRONT PANEL ......................5 1.4 REAR PANEL ......................6 1.5 REMOTE CONTROL UNIT..................7 1.6 INSTALLING THE BATTERIES IN THE REMOTE CONTROL........8 1.7 CONNECTING TO EQUIPMENT ................9 GETTING STARTED .................... -
Page 4: Safety And Instructions
SAFETY AND INSTRUCTIONS CAUTION: TO PREVENT ELECTRICAL SHOCK, DO NOT REMOVE THE COVER. THERE ARE NO USER SERVICEABLE PARTS INSIDE. REFER SERVICING TO QUALIFIED SERVICE PERSONNEL. This symbol indicates that high voltage is present inside. It is dangerous to make contact with any part inside the case. This symbol alerts you of important information concerning operation and maintenance of this product. -
Page 5: Assembly And Parts List
ASSEMBLY AND PARTS LIST 1.1 Parts List Please make sure the following accessories are supplied with the STB. ① High-Definition Personal Video Recorder (PVR ) ② Remote Control ③ RCA Video/Audio Cable ④ Batteries (AAA Size) ⑤ User Manual ⑥ Quick Start Guide ⑦... -
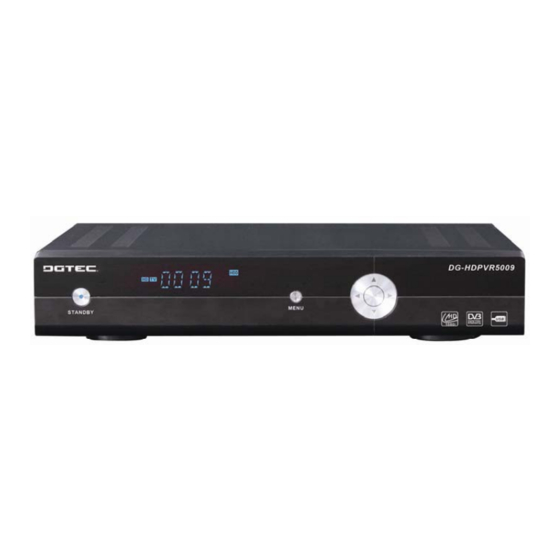
Page 6: Front Panel
ASSEMBLY AND PARTS LIST 1.3 Front Panel 1. Standby Button Press to switch between operation and standby modes. The blue LED illuminates when in the standby mode. 2. Volume Left/Right Button (◄/►) Moves the cursor left/right when in the menu or adjusts the volume level in operational mode. -
Page 7: Rear Panel
Connect to a TV audio input, HD Monitors audio input or an External Audio Amplifier. 9. VGA Connector Connect component video to HD Monitors (VGA Type). 10. USB USB port is used to view JPEG files, play MP3 files and for possible software upgrades. (to be advised by DGTEC technician) -
Page 8: Remote Control Unit
ASSEMBLY AND PARTS LIST 1.5 Remote Control Unit All PVR features can be operated with the remote control. POWER: Press to switch between operation and standby mode. 2. TV/RADIO: Press to switch between TV and RADIO mode. MUTE: Press to mute the sound. 4. -
Page 9: Installing The Batteries In The Remote Control
ASSEMBLY AND PARTS LIST 1.6 Installing the batteries in the remote control 1. Press down on the retaining catch on the lid of the battery recess on the remote control and slide downward to remove the lid. 2. Insert two AAA batteries into the recess. 3. -
Page 10: Connecting To Equipment
ASSEMBLY AND PARTS LIST 1.7 Connecting to Equipment 1. Connect your TV antenna cable to the “ANT IN” jack on the back of the PVR using coaxial RF cable. Make sure the loop cable is connected correctly to activate the second tuner (see the diagram below) YPbPr connection 2. - Page 11 ASSEMBLY AND PARTS LIST HDMI High Definition Multimedia Interface (HDMI) provides both high quality digital video and audio connection in one cable. 4. Connect the HDMI cable from the HDMI output on the rear panel of the PVR to the corresponding HDMI input of HDTV or Amplifier using HDMI cable for both Video and Audio connections.
-
Page 12: Getting Started
GETTING STARTED First time installation After all the connections have been established, switch on your TV. If you are using the PVR for the first time or you have restored it to factory default, channel search will automatically commence and save all digital channels found. When scanning is complete, all active digital channels found will be stored automatically in the Channel List. - Page 13 GETTING STARTED Change screen aspect ratio Press the ASPECT key to switch screen aspect mode (16:9 full screen, 16:9 Letter box, 4:3 full screen, 4:3 letter box, 4:3 panscan). Change TV/Radio mode Press TV/Radio key to toggle between Digital TV and Digital radio mode. View program info 1.
-
Page 14: Menu Tree
GETTING STARTED Navigation in the main menu 1. Press MENU key to bring up the main menu or return to previous item. 2. Press ◄/► keys to move left/right. 3. Press OK key to activate the highlighted menu item. 4. Press EXIT key to exit the main menu. The main menu is divided into 7 sections please refer to the menu tree below. -
Page 15: Instructions
INSTRUCTIONS 2.1 INSTRUCTIONS < Starting up for the First Time > 1. Once the PVR has been correctly set up and channel scan is complete you will need to make a few selections from the menu to customize your set up. 2. -
Page 16: System Settings
INSTRUCTIONS Event Set the event type here. To have the PVR turn on at the time set select POWER ON, to have the system record to the Hard Drive during this period select RECORD or to change to a selected channel at this time select LIVE PLAY. Channel Select Channel for this timer event. - Page 17 INSTRUCTIONS Ratio You can switch aspect ratio between 4:3 and 16:9 Widescreen. Color Format The colour format should be set to Auto for this PVR. < Play Setting > In this menu, use the ◄/► keys to change the settings and the ▲/▼ keys to select the item or press EXIT to cancel.
-
Page 18: Channel Manager
STRU CTIONS 2.4 Channel Manag In this menu, you can use the ◄/►keys to change the settings, ▲/▼to select the item or press EXIT to cance l. (The default password is 0000.) Lock: lock or unlock a channel. If the Channel lock status is enabled, you must enter the PIN code to view the channel. -
Page 19: Parental Control
STRU CTIONS 2.5 Parental Control In this menu, you can use the ◄/►keys to change the settings, ▲/▼keys to select the item or press EXIT to c ancel. (The default password is 0000.) < Lock Setting > Menu Lock Selecting ON in ME NU LOCK will require you to input a correct PIN code to enter the MAIN ME Start Lock... -
Page 20: File Manager
STRUCTIONS 2.6 File Manager < Timer List > Select the timer List and press OK to activate the list of timer events set from the Timer Menu environment. Use the ▲/▼keys to select a timer event EPG or from the and press OK to delete that event. - Page 21 STRUCTIONS < Auto Search > ess OK in Automatic Search in the Installation Menu, the PVR will scan TV and tomatically. (The default password is 0000) RADIO programs au < Version Info > isplay the hardware and software version. < Factory Default > lecting this option will require you to confirm the action by selecting YES to commence the Defaul t process.
-
Page 22: Epg
EXIT to return to the file list on the Usb drive. Usb Upgrade n upgrade can be performed using the USB port. (Only to be advised by DGTEC technician) Note: A Stor age Media Must Be Connected to the HDPVR5009 USB Port. Do ot remove the USB device when viewing files in the USB storage device. -
Page 23: Teletext
STRU CTIONS 1. Press EPG key on the remote control to activate the EPG. Use the ▲/▼keys to scroll up and down to each channel, program information will be displayed in the right hand screen panel. . Use the ◄/► keys to change dates in the EPG. . -
Page 24: Pvr Settings
INST RUCT IONS . Set a Timer Event using the Timer Press the TIMER key on the remote control to activate the timer function. In this environment you can set numerous timer events (r efer to page 13) Set a Timer Event from the EPG Press the EPG key on the remote control to display the EPG, naviga te to the nt to record and press the GREEN key to add... -
Page 25: Record List
STRU CTIONS ecord Settings elect record settings using the ▲/▼keys then press OK to display the following items: Rec Time: Sets recording duration for one touch recordings, use the ◄/►keys to select fr om UnLimit (Unlimited), 30min, 60min, 90min, 120min. Time Shift: Use the ◄/►keys to select either ON or OFF. - Page 26 STRUCTIONS remote control. A ke ypad will be displayed, follow the onscreen instructions to rename the file then press OK you will be asked to confirm your changes. DELETE A FILE Use the ▲/▼keys to highlighted a file then press the RED key, you will be asked to confirm the file del etion.
- Page 27 STRU CTIONS < Playback Function > tton Description Start playback at the beginning of a recorded file or return normal ► playback spe ed from fast forward or pause ◄◄ Large incremental backward jump ►► Large incremental forward jump X2, X4, X8, X16 Fast Rewind X2, X4, X8, X16 Fast Forward ▍▍...
-
Page 28: Trouble Shooting
PVR according to the procedures detailed below. If the PVR does not work p roperly after conducting Problem Solving Protocols, please contact the DGTEC technical department on 1800 189 941. This unit contains dangerous voltages, never remove the cover. -
Page 29: Specification
SPECIFICATION 4.2 Specification Section etailed Section Explanation Input Frequency 49 ~ 861MHz UHF& VHF Input Impedance 75 Ohm Channel Bandwidth 6M, 7M & 8MHz Input Signal OFDM Spectrum 2K/8K-carrier hierarchical Modulation Mode QPSK, 16QAM, 64QAM Guard Interval Modes 1/4, 1/8, 1/16, 1/32 Code Modes 1/2, 2/3, 3/4, 5/6, 7/8 Algorithm...
Need help?
Do you have a question about the DG-HDPVR5009 and is the answer not in the manual?
Questions and answers