
Related Manuals for Eaton MBP6Ki


Summary of Contents for Eaton MBP6Ki
-
Page 1: Maintenance Bypass
HotSwap MBP Maintenance Bypass MBP6Ki MBP11Ki MBP11Ki31 Installation and user manual Copyright © 2013 EATON All rights reserved. Service and support: Call your local service representative SK-90510-Y4_EN... -
Page 2: Safety Instructions
SAFETY INSTRUCTIONS SAVE THESE INSTRUCTIONS. This manual contains important instructions that should be followed during installation and maintenance of the MBP and UPS. The HotSwap MBP models that are covered in this manual are intended for installation in an environment within 0 to 40°C, free of conductive contaminant. -
Page 3: Safety Of Persons
• The admissible storage temperature range is -15ºC to +60ºC. Special precautions • The HotSwap MBP is designed to work with approved EATON UPS (contact your Eaton reseller for more information) • All repairs and service should be performed by AUTHORIZED SERVICE PERSONNEL ONLY. -
Page 4: Table Of Contents
3.5 Installation requirements ....................10 4. Power cables connection ..............11 4.1 MBP6Ki ..........................11 4.2 MBP11Ki / MBP11ki31 – with common Normal and Bypass AC source ......12 4.3 MBP11Ki / MBP11Ki31 – with separate Normal and Bypass AC source ......13 5. -
Page 5: Introduction
Before installing your HotSwap MBP with your UPS, please read first the safety instructions. Then follow the indications in this manual, which completes the UPS Installation and User Manual. To discover the entire range of EATON products, we invite you to visit our web site at www.eaton.com/ powerquality or contact your EATON representative. -
Page 6: Presentation
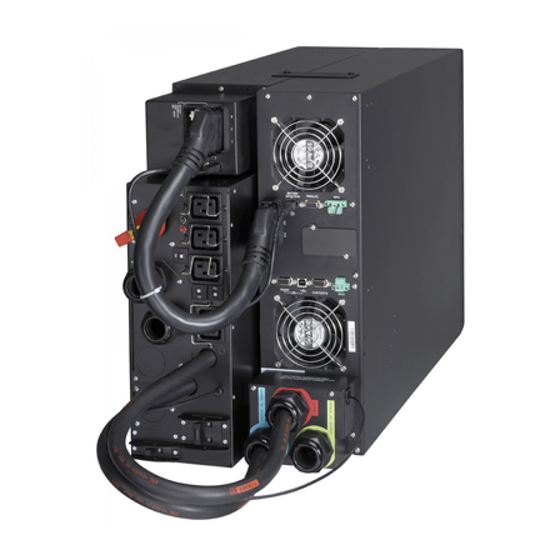
2. Presentation The Eaton® HotSwap MBP module makes it possible to service or even replace the UPS without affecting the connected loads (HotSwap function). You can safely eliminate the effects of UPS maintenance and guard the integrity of your equipment. - Page 7 Description Weight Dimensions (inch/mm) (lb/kg) D x W x H MBP6Ki 5.5 / 2.5 4.3 x 7.0 x 5.1 / 110 x 177 x 130 MBP11Ki 12.1 / 5.5 5.2 x 13.2 x 5.1 / 132 x 336 x 130 MBP11Ki31 12.1 / 5.5...
-
Page 8: Description / Panels
MBP status, and the indication on UPS display panel of both following status: • MBP connection to UPS • Bypass switch position Check the UPS user manual to check the compatibility of this feature, or contact Eaton reseller for more information MBP6Ki... -
Page 9: Installation
Recycling symbols are printed on the packing materials to facilitate sorting. 3.3 Checking the accessory kit • Verify that the following additional items are included with the MBP: MBP6Ki (1) Input/Output UPS cord Set (2) Rack kit for 19-inch enclosures... -
Page 10: Mechanical Mounting
Phase Neutral 0.5-10 mm 6 mm (10 AWG) 105°C 1 Nm N (L2) MBP6ki (Phase) (20-8 AWG) 10 mm (8 AWG) 75°C (10 lb in) Ground Phase Neutral 4-25 mm 10 mm (8 AWG) 105°C... -
Page 11: Power Cables Connection
2. Connect the MBP detection cable from the I/O cord Set (1) to the specific UPS connector (MBP detect, refer to UPS User Manual). Only with compatible EATON UPS, contact your Eaton reseller for more information. 3. Slide the MBP I/O cover (2) after removing the 4 screws, to access to MBP terminal blocks. -
Page 12: Mbp11Ki / Mbp11Ki31 - With Common Normal And Bypass Ac Source
2. Connect the MBP detection cable (2) to the specific UPS connector (MBP detect, refer to the UPS User Manual) Only with compatible EATON UPS, contact your Eaton reseller for more information. 3. Slide the MBP I/O cover (3) after removing the 5 screws, to access to MBP terminal blocks 4. Insert the Normal AC source cable through the cable gland 5. -
Page 13: Mbp11Ki / Mbp11Ki31 - With Separate Normal And Bypass Ac Source
8. Connect the MBP detection cable (2) to the specific UPS connector (MBP detect, refer to the UPS User Manual) Only with compatible EATON UPS, contact your Eaton reseller for more information. 9. Slide the MBP I/O cover (3) after removing the 5 screws, to access to MBP terminal blocks 10. Remove the Input Bypass AC jumper (4) 11. - Page 14 4. Power cables connection 12. Insert the Normal AC source cable through the cable gland 13. Connect the wires to the Normal AC source (Input) terminal blocks 14. Insert the Bypass AC source cable through the cable gland 15. Connect the wires to the Bypass AC source (Input BP) terminal blocks 16.
-
Page 15: Operations
5. Operations 5.1 UPS start-up with HotSwap MBP Verify that the total equipment ratings do not exceed the UPS capacity to prevent an overload alarm. 1. Check that the UPS is correctly connected to the HotSwap MBP (see previous chapter 4) If the UPS if equipped with outlets, those outlets can no longer be used (loads can only be connected to the MBP outlets or the MBP Output terminal blocks). -
Page 16: Ups Replacement With Hotswap Mbp
5.2 UPS replacement with HotSwap MBP UPS Removing (please follow the MANDATORY step below): MBP6Ki: 1. Put the UPS in "internal Bypass mode" (refer to the UPS user manual) 2. Verify that the UPS is on Bypass mode by checking UPS display panel (refer to the UPS user manual) BYPASS 3. - Page 17 5. Operations MBP11Ki / MBP11Ki31: 1. Put the UPS in "internal Bypass mode" (refer to the UPS user manual) BYPASS 2. Verify that the UPS is on Bypass mode by checking UPS display panel (refer to the UPS user manual) 3.
-
Page 18: Ups Maintenance With Hotswap Mbp
Return to normal operation: 1. Check that the new UPS is correctly connected to the MBP , as described below: MBP6Ki: • After opening the UPS I/O terminal blocks cover, connect to UPS the 2 power cables, and the MBP detection cable (following UPS versions), of the MBP I/O cord Set (1)–... -
Page 19: Specifications
6. Specifications MBP6Ki MBP11Ki MBP11Ki31 Input Terminal blocks Input Bypass Terminal Blocks Terminal Blocks Output 2 IEC 16A + 3IEC 10A + 4 IEC 16A + Terminal blocks 4 IEC 16A + Terminal blocks Terminal blocks Overall dimensions D x W x H (inch / mm) 5.6 x 7.0 x 5.1 /... - Page 20 Page 20 SK-90510-Y4_EN...
Need help?
Do you have a question about the MBP6Ki and is the answer not in the manual?
Questions and answers