Table of Contents
Advertisement
Quick Links
Advertisement
Table of Contents

Subscribe to Our Youtube Channel
Related Manuals for Compass 7hv


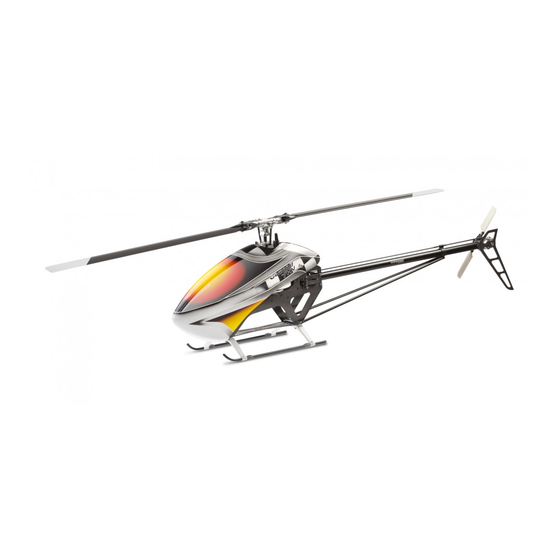
Summary of Contents for Compass 7hv
-
Page 3: Ama Information
Model Ltd. assumes no liability for damage that could occur from the assembly and/or use/misuse of this product. Although the Atom 7HV is powered by a quiet, smooth-running electric motor, it should be assembled and operated with the same care as glow engine helicopters. When operating your Atom 7HV, please exercise caution and safety. -
Page 4: Guidelines For Safe R/C Helicopter Flight
Great care has been taken in filling the bags with the correct quantity of parts and hardware for each section. However, occasional mistakes happen. In the event that you find a parts shortage or are in need of technical assistance, please contact your local Compass Model parts dealer. - Page 5 In The Box This model is packed according to assembling steps. Do not open all the bags at one time. Open only one bag for each step of assemply when building. Frame Set Step 1 Step 2 Step 3 Tail Set Step 4 Motor Set Rotor Set...
-
Page 6: Swashplate Servo Installation
Servo Description M2.5x10 Socket Head Bolt M2.5x12 Socket Head Bolt M2x8 Socket Head Bolt Stainless Ball M2 Nut Servo Bolt Servo Spacer M2.5x20 Socket Head Bolt Servo Nut 2.5mm Washer Use medium threadlock on all screws going into metal parts Swashplate Servo Installation The Servo installation is done without... -
Page 7: Tail Servo Installation
: Do not over tighten the four servo screws as it may damage the plastic parts. Tail Servo Installation Landing Gear Description M3x20 Socket Head Bolt 3mm Washer : Do not over tighten the four 3 x 5mm 3x5mm Set Screw set screws as it can damage the landing Skid Caps struts. - Page 8 Slide the tail case completely onto the boom, align it to the Compass writing and fix it with the clamp on the rear side. The two locking bolts ( 8 )must be screwed completely into the case to pierce the boom. After this...
- Page 9 Boom & Tail Rotor : Slide the tail boom clamp over the boom. Unscrew one of the ball links on the tail control rod. Screw it back on the control rod after installing it. : Just install the screw, struts and nut temporary without tightening them to much.
- Page 10 Use medium threadlock on all screws going into metal parts The boom support collar (7) has one beveled side. This must face outside. Be careful when fixing the tail boom braces and arrange the collars to them. Beveled Side : Clip on the ball link on the tail control arm.
- Page 11 Main Gear Description Use medium threadlock on all Main Shaft Clamp screws going into metal parts M2.5x10 Socket Head Bolt Main Shaft M3X30 Socket Head Bolt M3 Nylon Nut M4x10 Socket Head Bolt After installing the main Do not over gear, mount the main tighten the screw 11mm...
- Page 12 Motor And Drive Tips Use medium threadlock on all screws going into metal parts Gear backlash adjustment: For smooth operation and performance, it is necessary to adjust the gear backlash properly. Excess gear backlash can cause premature gear wear and damage. Insufficient gear backlash can cause vibration, as well as overheating of the Motor and speed controller.
- Page 13 Use blue threadlock on all screws going into metal parts. swing range : If the rubber gets older, you can increase the tension by opening the two screws in the holder and sliding it to the rear in the long holes. Adjusting the belt tensioner is pretty easy.
- Page 14 Rotor,Washout & Swashplate Description The Jesusbolt (6) just Be careful not to M4x25 Socket Head Bolt carries the torque. overtighten the two Tighten it firm but do clamping screws (7) in M4x30 Socket Head Bolt not use to much force. the main rotor hub.
- Page 15 Suggested Equipment Position Take some time for the wiring. Good fixing of the components and wires is important for a safe operation of your rc-equipment. Read the following wiring tips carefully. Aileron Brushless Motor Elevator Pitch Rudder 12S Battery Receiver FBL Unit Please read the manual of your FBL-Unit, transmitter and...
- Page 16 Linkage Length & Setup Compass Model ball links are build up on Do not apply plier to resize Ball Links. Pliers could the tight side. This allows you to adjust them cause hidden damage to Ball Links and result in to your personal needs.
- Page 17 Travel A Travel B Stock Plastic 17mm 16.5mm KBDD 104mm 17mm 16.5mm Compass 115mm 3.5mm 16mm 16mm Most CF 105mm 17mm 16.5mm Adjusting the gyro direction: To adjust the gyro direction, read the manual of your fbl unit. Look at the heli from behind.
-
Page 18: Wiring Tips
Wiring Tips Never use RC-components with damaged Carbon fibre and metal parts are wires. Check all wires for damaged isolation conductive . Open wires, contacts and and breakage. Control all servo connectors for open gaps between two contacts a tight fit and be sure no wire is loose in the touching the frame can cause a short connector. - Page 19 FBL Setup Tips Please read the manual for the current software version of your FBL-Unit carefully Tip: For easy measurement of the pitch angles and follow all instructions. We can't give during the setup, please use something long you any specific tips because most brands and straight (like a flybar or CF-Tube) and put it of FBL-Units change their software from on the upper servo mount behind the servorods.
- Page 20 FBL Setup Tips 2 Double check the gyro directions of your fbl unit! Incorrect gyro directions will cause a crash! Checking the swasplate and tail gyro directions is a part of the preflight check! Look at the helicopter from the side to test elevator gyro direction.
- Page 21 Control Check The picuture below shows how the swashplate has to move in mode 1 or mode 2. Swashplate Reaction Mode 2 Mode 1 Tilt Right Tilt Left Aileron Check Tilt Backward Tilt For ward Elevator Check Ascent Swash Plate Descent Pitch Check Tail Pitch Plate...
- Page 22 Canopy Use AB Glue Place the canopy onto the frames and mark the right position of the canopy insert. Mark the positions of the holes in the anopy on the Insert for drilling. Use a 2mm drill and drill straight through the insert.
- Page 23 Rotor Direction & Blades When the main rotor spins clockwise the tail blades should turn clockwise as well watching the tail rotor from the tail fin side. If not, the belt is twisted and has to be corrected. Be sure that the main rotor and tail rotor blades are installed in the right direction.
- Page 24 COMPASS MODEL (HK) LIMITED www.compassmodel.com...
-
Page 25: Parts List
Parts List 7 HV Version 3.0/2012 Copyright @Compass Model 2012 As we continue to improve our products, this part list may not reflect all recent product amendments. For more information, please refer to www.compassmodel.com... - Page 26 79-0512 80-5285 05-0117 82-5131 05-0119 60-8165 09-0109 09-7067S 91-0004 82-821003 63-8165 05-0102S 80-0312 91-0005 09-7068S 80-0304 80-0325 80-0312 82-4264 09-7101 80-0421 09-7069S 82-4264 09-7025S 80-0430 81-0328 61-4083 02-0709S 09-7067S 09-7069S 09-7025S 09-7068S 05-0102S...
-
Page 27: Part Description
Part No. Part Description Qty, 02-0709S Ball Links 10 pcs/bag 05-0102S Metal Main Grips 7Hv 1 pcs/bag 05-0117 Spindle 2 pcs/bag 05-0119 Spindle Washer (90) 2 pcs/bag 09-0109 7Hv Dampner 2 pcs/bag 09-7025S 7Hv Fbl Drive Tube 1 pcs/bag 09-7067S... - Page 28 91-0003 90-0201 02-5264 60-3092 82-3402 91-0003 63-4094 02-0264AB 80-0314 60-4094 80-0208 80-0208S 02-8205 02-0209 81-0305 60-7113 02-0701 02-0205 60-7113 02-1211 06-0222 05-0229S 98-2040B 02-0213 80-0338 61-5134 02-0225 09-7048 02-0214 82-327408 84-0214 80 0310 91-0003 09-7079 09-7007 09-7023 06-0223 06-0223 82-3201 80-0310 80-0310 09-7075...
- Page 29 Tail Pulley 1 set/bag 09-7079 7hv Tail Hinge 1pcs/bag 7Hvtail Pitch Lever Set 09-8023 1 set/bag 09-8051 7Hv Metal Gear Box 1 set/bag 02-8205 Tail Pitch Control unit 1 set/bag 02-5264 Tail rotor hub assembly (plastic) 1 set/bag 60-3092 Ball Bearings 3X9X2.5...
- Page 30 80-0332 09-7102 09-7058 05-8401 60-6155 09-7053 02-0701S 02-0701 80-0225 07-4312(12T) 07-4313 05-0606S 07-4314(14T) 09-7056 81-0404 80-0310 80-0410 (for optional motors) 09-7103 80-0308 60-17265 09-7059 62-162216 08-4928 05-0602Z 05-4602 60-15245 60-8196 08-4926 80-0308 60-8196 80-2508 09-7026 08-4927 91-0004 C-4926 09-7070 80-0512SS 80-0430 81-0404...
- Page 31 Cap Head Bolts M4x10 10 pcs/bag 80-0430 Cap Head Bolts M4X30 10 pcs/bag 80-2508 Cap Head Bolts M2.5X8 10 pcs/bag 81-0404 Set Screws M4X4 10 pcs/bag 91-0004 Nylon Lock Nuts M4 10 pcs/bag SZ4926 12S Motor for 7hv kv510 1 pcs/bag...
- Page 32 a:78-0310 80-2520 80-0375 b:80-0308 09-7073 c:80-2506 09 7024 d:82-3201 09-7011 e:91-0003 02-0918 09-7001Ra 09-7005 09-7042Z 60-10195 09-7018 85-0001 09-7060 79-0310 09-7001L 09-7004 80-0306 09-7092 09-7045S 80-0322 80-0330 09-7109 09-7078S 79-0308 82-3504 61-3062 09-7009 82-3507 82-3507 60-3095 02-0820 09-7064 09-7002a 09-7061 09-7055 09-7062 09-7071A...
- Page 33 2 pcs/bag 09-7061 Battery Tray Stand Off 2 pcs/bag 09-7062 Belt Tension Collar 2 pcs/bag 09-7064 Guide Wheel Collar 4pcs/bag 7Hv Belt Guide Wheel(new) 09-7071A 2 set/bag 09-7073 Canopy Stand Off 2 pcs/bag 09-7078S Belt Tension Mount 1 set/bag 09-7081...
- Page 34 09-7022 02 0853 80-2510 09-7200P 80-0308 (Painted) 02 0810SG(Gold) 09-7041 09-7200W 02 0810B(Blue) (Unpainted) 09-7003 80-0308 80-0308 82-3504 82-3504 06 0851 85-0002 80-0308 09 7021 80-0208S 91-0004 E-LG-09 02-0701 90-0201 02-0709S 80-2510 80-0325 09-7047 09-7080 09 BC 02 0709 09-7006 09-7012 09 7072 05-0833...
- Page 35 Spacer Frame 1pcs/bag 09-7006 Bottom Board 1pcs/bag 09-7010 Canopy Board 1pcs/bag 09-7012S Tail Link Rod 1set/bag 09-7021 7Hv Tail Link Support 1pcs/bag 09-7022 7Hv Swashplate Guide 1pcs/bag 09-7041 Upper Servo Mount 1pcs/bag 09-7047 Strute Mount 1pcs/bag 7Hv Tail Boom 09-7072...
- Page 36 COMPASS MODEL (HK) LIMITED www.compassmodel.com...
Need help?
Do you have a question about the 7hv and is the answer not in the manual?
Questions and answers