Pioneer PD-D6-J Service Manual

Pioneer PD-D6-J Service Manual

Super audio

Advertisement

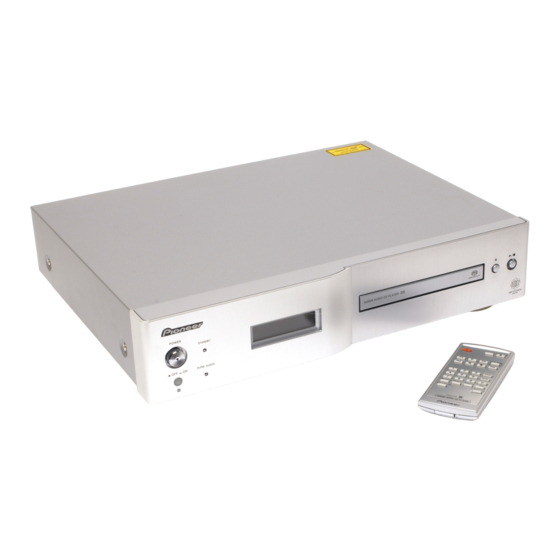
Super Audio CD Player
PD-D6-J
PD-D6-S
THIS MANUAL IS APPLICABLE TO THE FOLLOWING MODEL(S) AND TYPE(S).
Model
Type
PD-D6-J
KUXJ/CA
PD-D6-J
MYXJ5
PD-D6-S
RLFPWXJ
For details, refer to "Important Check Points for Good Servicing".
PIONEER CORPORATION
PIONEER ELECTRONICS (USA) INC. P.O. Box 1760, Long Beach, CA 90801-1760, U.S.A.
PIONEER EUROPE NV Haven 1087, Keetberglaan 1, 9120 Melsele, Belgium
PIONEER ELECTRONICS ASIACENTRE PTE. LTD. 253 Alexandra Road, #04-01, Singapore 159936
PIONEER CORPORATION 2006
Power Requirement
AC 120V
AC 220 V to 230 V
AC 110 V / 220 V to 240 V
4-1, Meguro 1-chome, Meguro-ku, Tokyo 153-8654, Japan
PD-D6-J
The voltage can be converted by
the following method
with the voltage selector
T-ZZV NOV. 2006 printed in Japan
ORDER NO.
RRV3531

Advertisement

Table of Contents
loading

Summary of Contents for Pioneer PD-D6-J

  • Page 1 PIONEER CORPORATION 4-1, Meguro 1-chome, Meguro-ku, Tokyo 153-8654, Japan PIONEER ELECTRONICS (USA) INC. P.O. Box 1760, Long Beach, CA 90801-1760, U.S.A. PIONEER EUROPE NV Haven 1087, Keetberglaan 1, 9120 Melsele, Belgium PIONEER ELECTRONICS ASIACENTRE PTE. LTD. 253 Alexandra Road, #04-01, Singapore 159936 PIONEER CORPORATION 2006 T-ZZV NOV.
  • Page 2: Safety Information

    PIONEER Service Manual. A subscription to, or additional copies Also test with plug reversed of, PIONEER Ser vice Manual may be obtained at a (Using AC adapter Earth nominal charge from PIONEER. plug as required)
  • Page 3 The interlock mechanism mentioned above becomes invalid in this mode. 2. When the cover is open, close viewing through the objective lens with the naked eye will cause exposure to the laser beam. ∗ : Refer to page 58. PD-D6-J...
  • Page 4 To protect products from damages or failures during transit, the shipping mode should be set or the shipping screws should be installed before shipment. Please be sure to follow this method especially if it is specified in this manual. PD-D6-J...
  • Page 5: Table Of Contents

    7.1.1 TEST MODE............................62 7.1.2 METHOD FOR DIAGNOSING DEGRADATION OF THE LDS ON THE PICKUP ASSY ....63 7.1.3 TROUBLE SHOOTING........................64 7.1.4 SEQUENCE AFTER POWER ON/OFF .....................68 7.1.5 DISASSEMBLY ..........................72 7.1.6 PANEL ADJUSTING...........................80 7.2 PARTS ..............................81 7.2.1 IC................................81 8. PANEL FACILITIES ............................94 PD-D6-J...
  • Page 6: Specifications

    The specifications and design of this product are subject (XDE3047) to change without notice, due to improvement. • Remote Control (PWW1175 : Except RLFPWXJ) (PWW1176 : RLFPWXJ type) • SR control cable (XDE3063) • Lithium Battery (CR2025) > (Attached inside the remote control) PD-D6-J...
  • Page 7 PD-D6-J...
  • Page 8: Exploded Views And Parts List

    For the applying amount of lubricants or glue, follow the instructions in this manual. (In the case of no amount instructions, apply as you think it appropriate.) 2.1 PACKING PD-D6-J/MYXJ5 Only PD-D6-S/RLFPWXJ PD-D6-J/KUXJ/CA...
  • Page 9 (EL) NSP 12 Warranty Card See Contrast table (2) Operating Instructions See Contrast table (2) (2) CONTRAST TABLE PD-D6-J/KUXJ/CA, PD-D6-J/MYXJ5 and PD-D6-S/RLFPWXJ are constructed the same except for the following : PD-D6-J/ PD-D6-J/ PD-D6-S/ Mark No. Symbol and Description KUXJ/CA...
  • Page 10: Exterior Section

    2.2 EXTERIOR SECTION PD-D6-S/RLFPWXJ Only PD-D6-S/RLFPWXJ Only PD-D6-J/KUXJ/CA PD-D6-S/RLFPWXJ PD-D6-S/ Only RLFPWXJ Only Refer to "2.4 05 LOADER ASSY". PD-D6-S /RLFPWXJ Only Refer to "2.3 FRONT PANEL SECTION". PD-D6-J...
  • Page 11 Washer See Contrast table (2) Washer See Contrast table (2) NSP 26 Chassis PNA2602 (2) CONTRAST TABLE PD-D6-J/KUXJ/CA, PD-D6-J/MYXJ5 and PD-D6-S/RLFPWXJ are constructed the same except for the following : PD-D6-J/ PD-D6-J/ PD-D6-S/ Mark No. Symbol and Description KUXJ/CA MYXJ5...
  • Page 12: Front Panel Section

    2.3 FRONT PANEL SECTION Refer to "2.2 EXTERIOR SECTION. " Refer to "2.2 EXTERIOR SECTION. " Refer to "2.2 EXTERIOR SECTION. " 12: 1/2 12: 2/2 PD-D6-J...
  • Page 13 Screw BPZ30P080FTC Himelon Sheet PEB1321 Earth Plate PNB1662 Earth Plate C PNB1664 (2) CONTRAST TABLE PD-D6-J/KUXJ/CA, PD-D6-J/MYXJ5 and PD-D6-S/RLFPWXJ are constructed the same except for the following : PD-D6-J/ PD-D6-J/ PD-D6-S/ Mark No. Symbol and Description KUXJ/CA MYXJ5 RLFPWXJ 6 AL Panel L...
  • Page 14: Loader Assy

    JGZ17P028FTC Flexible Cable (24P) ADD7546 Screw VBA1094 Connector Assy 2P VKP2253 Tray VNL1920 Floating Rubber VEB1351 Clamp Magnet VMG1029 Belt VEB1358 Stabilizer VNE2253 Loading Base VNL1917 Float Base 04 VNL1968 Drive Cam VNL1919 Gear Pulley VNL1921 Loading Gear VNL1922 PD-D6-J...
  • Page 15 Rear View Daifree Daifree No. 23 No. 23 GEM1036 GEM1036 Tray Tray Concave of unevenness Concave of unevenness Inner side of a ditch Daifree GEM1036 Top View Bottom View Side of the rib Concave of unevenness Daifree Daifree GEM1036 GEM1036 PD-D6-J...
  • Page 16: Traverse Mechanism Assy-S

    Note : Spindle screw (DBA1252) of No.13 is the screw which applied special bond. Therefore the adhesion becomes ineffective when takes it off once. Spindle screw is the part which cannot recycle. When part #2 is replaced, part #13 also need to be replaced at the same time. PD-D6-J...
  • Page 17 DNK4272 NSP 6 Joint Spring VK1 DBK1235 Stepping Motor VK1 DXM1201 NSP 8 Mechanism Frame VK1 DNK4160 Precision Screw VK1 DBA1209 Skew Screw VK1 DBA1211 Skew Spring VK1 DBH1516 NSP 12 Stepping Screw DBA1205 Spindle Screw VK1(for Service) DBA1252 PD-D6-J...
  • Page 18: Block Diagram And Schematic Diagram

    41 42 MOTOR X202 ASS7075 CN103 (27MHz) Clock OSC IC101 CN102 BD7995EFS IC205 SERVO TC7SH08FUS1 CN901 DRIVER ASPDIF DOUT CN104 SPDIF RQ LOADING MOTOR KEY ASSY LCD ASSY J2104A J2104 S2301,S2302 IC2101 PDC148A SYSTEM CONTROL 2401 GP1UM28XK0VF LCD Display PD-D6-J...
  • Page 19 CN1502 JA1752 SRIN SRIN SR-IN SROUT SROUT SYSPOW SYSPOW J2102 10.8V 8.3V 6.5V POWER PRIMARY ASSY SUPPLY 5.8V CN2503 CN2501 3.3V CN1503 CN1801 MNSW ASSY CN2502 CN13 AC IN J2601 TRANS ASSY PLED ASSY SW11 Voltage Selector PD-D6-S ONLY PD-D6-J...
  • Page 20: Loab Assy And Overall Wiring Connection Diagram

    PD-D6-S ONLY AC INLET W129 AUDIO2 ONLY PKP1014 DIGITAL1 DIGITAL2 MECHA1 MECHA2 CN1502 CKS3382 PKP1015 RY11 B2P3-VH PD-D6-J ONLY B3P5-VH 1 2 3 CN13 PD-D6-S ONLY PKP1016 PKP1018 PD-D6-J ONLY AUDIO CT TRANS ASSY AUDIO1 AKN7031 RKN1045 AUDIO2 (PD-D6-J:AWX8802) CN102...
  • Page 21 ÷ The > mark found on some component parts indicates the importance of the safety factor of the part. Therefore, when replacing, be sure to use parts of identical designation. ÷ : The power supply is shown with the marked box. PD-D6-J...
  • Page 22: Dvdm Assy (1/2)

    ICE MODE (RF) : RF SIGNAL ROUTE GNDD : FOCUS SERVO LOOP LINE : TRACKING SERVO LOOP LINE AWY7119 : STEPPING SERVO LOOP LINE V+3D : DIGITAL SIGNAL ROUTE R284 (AD) : AUDIO DATA SIGNAL ROUTE R285 GNDD PD-D6-J...
  • Page 23 STBY APLLCAP RD12 DQ13 APLLVSS RD13 V+5V 3.3v 3.3v 1.8v 1.8v GNDD GNDD Chip Size DIODE 1SS355 V+3DR RESISTOR R909 :2125 Size 6.8k RS1/10S***J GNDD CN204 :1608 Size (F):RS1/16S****F OTHERS:RS1/16S***J DOWNLOAD CAPACITOR :2125 Size CKSQ**~ :1608 Size CH:CCSRCH~ OTHERS:CKSRYB~ PD-D6-J...
  • Page 24: Dvdm Assy (2/2)

    DAC_XCS0 R938 CTF1389 XCS0 (L939) DAC_XCS1 R939 CTF1389 XCS1 GNDD R940 ASDAT2 DATA2 GNDD Chip Size from PAGE 1/2 VIDEO DIODE 1SS355 RESISTOR Size RS1/10S***J :1608 Size (F):RS1/16S****F OTHERS:RS1/16S***J CAPACITOR :2125Size CKSQ**~ :1608 Size CH:CCSRCH~ OTHERS:CKSRYB~ ***:parts not mounted PD-D6-J...
  • Page 25 C466 BIAS B out DAC 2ch CN905 GND1 YSAG C455 GNDA GNDD GNDD GNDA R_CR C1001 GNDA GNDA GNDD GNDA GNDD STBY (C1011) R1001 : DIGITAL SIGNAL ROUTE CKSQYB104K16 (AD) R1002 : AUDIO DATA SIGNAL ROUTE R1003 GNDD2 GNDD PD-D6-J...
  • Page 26: Ajkb Assy (1/2)

    C1308 GNDD PMCKO VCOM1 47/16 F1901 GNDA1 R1905 VCH1249 XDACDT IOUTR+ XDACCK IOUTR- R1901 R1906 VNF1084-T XDACCS1 MUTE/DSD_RS KN1901 KN1902 KN1903 KN1905 KN1904 C1902 R1902 C1309 C1901 C1903 470p CH R1304 GNDD GNDD GNDS GNDD GNDA GNDD GNDD R1305 PD-D6-J...
  • Page 27 IC1101 (1/2) NJM5532MD 47/50 R1115 VCH1255 330(D) PCN1041 C1105 C1112 V-12A R1104 R1107 GNDA 1500p 1.2k(D) 1.8k(D) GNDA 470p R1102 R1108 1.2k(D) IC1101 (2/2) NJM5532MD : AUDIO SIGNAL ROUTE(Lch) : DIGITAL SIGNAL ROUTE (AD) : AUDIO DATA SIGNAL ROUTE PD-D6-J...
  • Page 28: Ajkb Assy (2/2)

    BA 00B C0WC P - V 5 SO T-323 TY P E SO T-346 TY P E (UMD3,U MT3) (SMD 3,S MT 3) SO T-363 TY P E : DIGITAL SIGNAL ROUTE (UMT6) DISCRETE TYPE DIODE SO D-323 TY P E (UMD 2) DISCRETE TYPE PD-D6-J...
  • Page 29 PD-D6-J...
  • Page 30: Lcd, Pled, Mnsw, Key, Connector, Primary And Trans Assys

    GNDD CN2502 CN2503 PLED ASSY J2102 J2601 Q2106 S2B-PH-K-S B4B-PH-K-S V+5U PF02PG-C07 PF04PG-C12 RT1N431M (AWX8795) GNDD Q2501 RT1N241M GNDD PD-D6-J PD-D6-S RLFWP PRIMARY ASSY AWX8800 AWX8799 AWX8801 Q2401 TRANS ASSY AWX8802 AWX8797 2401 W136 220~230 110/220~240 GP1UM28XK0VF CN13 B2P3-VH B3P5-VH...
  • Page 31 110V > DIGITAL1 XTF3004 DIGITAL J12-2 DIGITAL2 RD1/4MUF4R7J PKP1014 J13 -1 J51-2 MECHA1 NEUTRAL > MECHA W124 MECHA2 CN13 PD-D6-J ONLY J51-3 W129 B2P3-VH PKP1018 > RY11 PD-D6-J ASR7013 PKP1017 ONLY J13-2 > PKP1015 1SS355 1SS355 RT1N241M RD1/4MUF4R7J AKR7001 AKR7001 W130 >...
  • Page 32: Waveforms

    [DMSO] Tray : PLAY opening Pless OPEN key Pless PLAY key Braking a turn of disc CN102-pin 2, 3, 4 (IC101-pin 30, 33, 35) IC201-pin225 [ASPDIF AUDIO DIGITAL SIGNAL] [SPINDLE (WVU)] V: 2V/div. H: 500nsec/div. V: 2V/div. H: 2msec/div. PD-D6-J...
  • Page 33 V: 1V/div. H: 500ns/div. [BCK] [DSD_L] [BCK] H: 500ns/div. [LEGATO:ON] Ch1: IC1501-pin 22 Ch3: IC1501-pin 24 Ch1: IC1101-pin 1 Ch3: IC1101-pin 7 [LRCK] [DATA] V: 1V/div. [LOUT1] [LOUT2] Ch2: IC1501-pin 21 V: 1V/div. H: 2us/div. [BCK] [LEGATO:OFF] H: 500us/div. PD-D6-J...
  • Page 34 Ch1: IC2101-pin 28 Ch2: IC2101-pin 26 V: 2V/div. [LCDCLK] [LCDDATA] H: 5us/div. [ANY FUNCTION] Ch1: IC2101-pin 51 Ch2: IC2101-pin 49 Ch1: IC2101-pin 51 Ch2: IC2101-pin 50 [SCLK] [SDATA] [SCLK] [MDATA] V: 2V/div. V: 2V/div. H: 10us/div. H: 10us/div. [DVD] [DVD] PD-D6-J...
  • Page 35: Pcb Connection Diagram

    Resistor array 3-terminal regulator 4.1 LOAB ASSY SIDE A SIDE B LOAB ASSY LOAB ASSY VNP1836-C LOAB PNE-1B1 S101 LOAD+ VWG2279- CN602 C102 LOAD- CN602 VWG2346- C101 CN601 (VNP1836-C) (VNP1836-C) CN601 CN602 CN601 CN601 CN602 CN104 LOADING MOTOR ASSY PD-D6-J...
  • Page 36: Dvdm Assy

    4.2 DVDM ASSY SIDE A SIDE A DVDM ASSY To STEPPING To SPINDLE Motor Motor CN2701 To Pickup Assy CN101 CN901 CN102 CN101 (ANP7583-A) PD-D6-J...
  • Page 37 SIDE B SIDE B DVDM ASSY (ANP7583-A) PD-D6-J...
  • Page 38: Ajkb Assy

    4.3 AJKB ASSY SIDE A SIDE A AJKB ASSY J2105 CN1502 CN1503 CN1081 Q1101 Q1201 CN1851 (PNP1489-A) CN2702 PD-D6-J...
  • Page 39 SIDE B SIDE B AJKB ASSY CN1081 CN1503 CN1502 CN1851 (PNP1489-A) PD-D6-J...
  • Page 40: Lcd Assy

    V+5U W179 V+5U W155 W180 W156 W157 W158 W182 V+5B W183 GNDD W140 W141 W142 W163 V+5U W146 W164 W165 V+5U W166 W167 W147 W190 V+5U W168 GNDD CN2106 J2104 W169 1.KEY1 2.VE+5 3.GNDU UPPER SIDE CN2106 (PNP1488-A) CN2703 PD-D6-J...
  • Page 41 5.XDFCLK C2111 6.XDFDT R2136 7.XDFCS 8.XDFRST 9.XSYSMUTE D2204 10.V+56ST 12.V+58U R2138 15.AC L2105 16.SYSPOW R2112 17.XDCRST 3,4,11, R2143 13,14.GNDD C2205 V+5U D2103 C2209 R2113 L2102 V+5U Q2102 R2114 Q2103 R2103 V+5U F2201 GNDD 1.KEY1 2.VE+5 3.GNDU R2176 CN2106 (PNP1488-A) PD-D6-J...
  • Page 42: Pled, Key And Primary Assys

    S2301 S2302 (PNP1488-A) PRIMARY ASSY WHITE YELLOW J51-3 J51-2 [[ G ]] PNE-1B1 NEUTRAL PRIMARY TRANS ASS'Y SECONDARY AWX8797 W316 AWX8802 W312 W313 PTT1367- (JJ) PTT1369- (KU) PTT1368- (WY) PTT1370- (RLF) (PNP1488-A) CN1802 E G J E G J PD-D6-J...
  • Page 43 SIDE B SIDE B KEY ASSY PLED ASSY (PNP1488-A) PNE-1B1 STOP/PLAY OPEN/CLOSE 1.KEY1 2.VE+5 3.GNDU (PNP1488-A) PRIMARY ASSY NEUTRAL PRIMARY PNE-1B1 SECONDARY (PNP1488-A) E G J E G J PD-D6-J...
  • Page 44: Connector And Mnsw Assys

    6.GNDD SCLK 5.DVDMUTE W102 W103 SDATA 4.GNDD AWX8796 XDVDRST GNDD GNDD 3.DOUT XREADY 2.GNDD DVDPOWER CONNECTOR ASS'Y 1.GNDD CN2704 15.GNDD (PNP1488-A) MNSW ASSY W314 8794 [[ G ]] W315 S2501 CN2502 2.PLED 1.V+5U PRIMARY CN2503 MNSW ASS'Y PNE-1B1 (PNP1488-A) PD-D6-J...
  • Page 45 CN2701 C2704 R2701 PNE-1B1 C2703 GNDD C2702 C2701 C2705 15.V+12A 14.V+9D TRIN 13.V+9D 12.GNDD SPDIF_RQ 11.GNDD DOUT 10.V+6R5V 9.V+6R5V 8.GNDM 7.GNDM GNDD GNDD 3.DOUT 6.GNDD 2.GNDD 5.DVDMUTE 1.GNDD 4.GNDD (PNP1488-A) MNSW ASSY C2502 Q2501 2.PLED 1.V+5U PNE-1B1 PRIMARY (PNP1488-A) PD-D6-J...
  • Page 46: Primary Assy

    AWX 8799 W309 AWX 8800 PNE-1B1 W310 8801 W311 WHITE YELLOW J12-2 PRIMARY SECONDARY RISK OF FIRE REPLACE FUSE AS MARKED. 4.GNDU 3.V+5.6ST W118 2.AC 1.SYSPOW W120 W119 W115 W117 W116 HIGH RY11 [[ G ]] (PNP1488-A) AC IN PD-D6-J...
  • Page 47 SIDE B SIDE B PRIMARY ASSY PRIMARY SECONDARY 4.GNDU 3.V+5.6ST 2.]AC 1.SYSPOW PNE-1B1 (PNP1488-A) PD-D6-J...
  • Page 48: Pcb Parts List

    Example) IC 301 is on the point (face A, 91 of x-axis, and 111 of y-axis) of the corresponding PC board. IC 301 (A, 91, 111) IC NJM2068V LIST OF WHOLE PCB ASSEMBLIES PD-D6-J/ PD-D6-J/ PD-D6-S/ Mark Symbol and Description...
  • Page 49 R 152 (A,59,121) RS1/10S1R8J R 279 (A,63,25) RS1/16S5600F R 153 (A,57,117) RS1/10S1R0J R 281 (B,19,33) RS1/10S0R0J R 154 (A,57,121) RS1/10S1R8J R 284 (A,34,61) RS1/16S103J R 200 (A,25,56) RS1/10S0R0J R 301 (B,89,136) RS1/10S0R0J R 201 (A,49,67) RS1/16S152J R 302 (B,86,136) RS1/10S0R0J PD-D6-J...
  • Page 50 C 237 (A,65,16) CHIP ELECT.CAPACITOR CEVW221M4 R 915 (A,57,128) RS1/16S682J C 239 (B,60,34) CKSRYB104K25 R 916 (B,47,128) RS1/16S223J C 240 (B,59,39) CKSRYB104K25 R 917 (B,44,125) RS1/16S223J C 241 (B,61,43) CKSRYB104K25 R 920 (B,52,135) RS1/16S332J C 243 (A,61,25) CKSRYB105K10 R 932 (A,104,97) RS1/16S0R0J PD-D6-J...
  • Page 51 CEVW101M16 C 735 (A,20,95) CHIP CERAMIC C. DCH1165 L 1702(A,191,94) COIL PTL1017 F 1301(A,152,20) INDUCTOR CTF1661 C 736 (A,25,89) CKSRYB104K25 F 1302(A,130,50) INDUCTOR CTF1661 C 737 (A,28,82) CCSRCH121J50 F 1401(A,181,20) INDUCTOR CTF1661 C 738 (A,24,78) CHIP CERAMIC C. DCH1165 PD-D6-J...
  • Page 52 R 1810(B,32,90) RS1/10S0R0J R 1501(A,104,44) RS1/10S4R7J R 1811(B,34,90) RS1/10S0R0J R 1502(A,89,24) RS1/16S220J R 1835(A,73,51) RS1/16S102J R 1503(A,101,31) RS1/16S220J R 1836(A,67,51) RS1/16S3302F R 1504(A,98,31) RS1/16S220J R 1837(A,69,52) RS1/16S1203F R 1505(A,102,28) RS1/16S220J R 1839(B,46,33) RS1/16S102J R 1507(B,90,36) RS1/16S680J R 1840(B,42,20) RS1/16S3902F PD-D6-J...
  • Page 53 D 2402(B,44,197) DIODE 1SS355 C 1605(A,120,43) CEAT470M35 L 2101(B,115,226) INDUCTOR LCYA220J2520 C 1652(A,190,68) CKSRYB104K16 L 2102(B,175,207) INDUCTOR CTF1389 C 1704(A,193,80) CKSRYB104K16 C 1705(A,190,80) ELECT. CAPACITOR VCH1248 L 2103(B,154,202) INDUCTOR CTF1389 C 1706(B,178,105) CKSRYF105Z10 L 2104(B,154,200) INDUCTOR CTF1389 L 2105(B,149,201) INDUCTOR CTF1389 PD-D6-J...
  • Page 54 R 2137(B,118,231) RS1/16S473J R 2138(B,124,233) RS1/16S473J MISCELLANEOUS R 2140(B,123,194) RS1/16S221J D 2601(A,27,217) LED(BLUE) SLR343BC4T R 2141(B,149,217) RS1/16S221J R 2142(B,152,216) RS1/16S221J RESISTORS R 2143(B,157,207) RS1/16S221J R 2601(B,32,221) RS1/16S271J R 2146(B,159,204) RS1/16S103J R 2147(B,163,204) RS1/16S103J R 2148(B,139,198) RS1/16S221J CAPACITORS C 2602(A,22,223) CEJQ470M16 PD-D6-J...
  • Page 55 >RY11 (A,65,71) JOE LOWPOWER RELAY ASR7013 >T 11 (A,65,110) POWER TRANSFORMER ATT7079 >CN13 (A,70,165) CONNECTOR B2P3-VH 13 (A,118,109) PCB BINDER VEF1040 11 (A,15,148) PCB BINDER VEF1040 12 (A,30,168) PCB BINDER VEF1040 RESISTORS R 12 (A,32,88) CARBON FILM RESISTOR RD1/4MUF220J R 14 (B,29,85) RS1/16S332J PD-D6-J...
  • Page 56: Adjustment

    Tangential Radial adjustment adjustment [Electrical Part] screw screw Electrical adjustments are not required. 6.2 JIGS AND MEASURING INSTRUMENTS Test mode remote control Screwdriver (large) Screwdriver (medium) unit (GGF1381) Screw tight (GYL1001) DVD test disc Precise screwdriver Soldering iron (GGV1025) PD-D6-J...
  • Page 57: Necessary Adjustment Points

    Exchange the Traverse Mechanism point Assy-S Electric point ∗ After adjustment, screw locks Mechanical Ÿ Exchange the Spindle Motor point with the Screw tight. Electric point Exchange PCB Assy Mechanical Exchange PC Board point LOAB and DVDM ASSYS Electric point PD-D6-J...
  • Page 58: Test Mode

    • The SKIP key and the SCAN key are effective during the test mode. Note: Even if you intend to continuously use the unit after displaying the error rate, be sure to turn the power off then TEST MODE: OFF back on POWER GGF1381 Test mode remote control unit PD-D6-J...
  • Page 59 Service Test mode connecting point LCD ASSY SIDE A JP2101 Short W163 V+5U W146 W164 W165 V+5U W166 W167 W147 W190 V+5U W168 GNDD CN2106 J2104 W169 1.KEY1 2.VE+5 3.GNDU UPPER SIDE PD-D6-J...
  • Page 60: Mechanism Adjustment

    (Refer to "6.1 ADJUSTMENT ITEMS AND LOCATION".) Joint 7.5mm Mechanism base • Attach the Traverse Mechanism Assy-S to the 05 LOADER Assy. • Turn it over and attach the joint and the joint spring. • Arrange the flexible cables. (Refer to "7.1.5 DISASSEMBLY".) PD-D6-J...
  • Page 61 90 degrees step till ERROR RATE block error rate becomes around "1E-3" again . • Record the number of rotation (N1). • Fasten the tangential adjustment screw till the number of rotation becomes Service mode end harf of N1. Best tangential point PD-D6-J...
  • Page 62: General Information

    Canceling version display The version display will automatically disappear after a while. LCD ASSY JP2101 SIDE A Short W163 V+5U W146 W164 W165 V+5U W166 W167 W147 W190 V+5U W168 GNDD CN2106 J2104 W169 1.KEY1 2.VE+5 3.GNDU UPPER SIDE PD-D6-J...
  • Page 63: Method For Diagnosing Degradation Of The Lds On The Pickup Assy

    No playback of a DVD (Test Mode), No playback of a SACD : Measure the voltage between the both ends of R322 or R325 on the DVDM Assy. If the voltage is 0.4 V or higher, the 650-nm LD is degraded. 05SD PICKUP ASSY CN101 DVDM ASSY Front side SIDE A PD-D6-J...
  • Page 64: Trouble Shooting

    • Check the connection between the AJKB and CONNECTOR Assys (15-pin FFC). • Check the connection between the CONNECTOR and DVDM Assys (29-pin FFC). Check that the voltage Are the pins bridged at IC101? at V+6R5V is +6.5 V. PD-D6-J...
  • Page 65 Normal operation Replace D1808 and Q1804, Only in that order. optical or COAX audio signals are output. Check if the pins are short-circuited at IC1101, IC1201, or IC1102. • Check the input and output signals to/from IC1701. • Check V+3D. PD-D6-J...
  • Page 66 Pin 1: Approx. 0V during opening tray approx. 6V during closing tray. Are wires of CN104 and CN103 on the DVDM Assy disconnected or Connector / cable damaged ? Does the voltage of CN102-pin 1 on the DVDM Assy change to 0V by Inside switch pressing the Inside switch. PD-D6-J...
  • Page 67 0.4 V or more, the 780-nm LD is definitely deteriorated. impossible) DVDM Assy Is there abnormality in FG waveform ? (IC201-pin 47) FG output : FTS Driver IC (IC101) Are there scratches or dirt on the disc ? Disc PD-D6-J...
  • Page 68: Sequence After Power On/Off

    Note 1: In this step, the unit wait for the DVD module to turn the power off. If the DVD module takes a longer time to turn itself off, the elapsed time will become longer, by just that much. PD-D6-J...
  • Page 69 • Muting of the power system is canceled. • Other than in an emergency power-off, the unit awaits for a while. • SYSTEM POWER2 OFF (Pin 92: H) Display-only POWER OFF completed + 240 msec 5240 msec • SYSTEM POWER1 OFF (Pin 91: H) PD-D6-J...
  • Page 70 PD-D6-J...
  • Page 71 PD-D6-J...
  • Page 72: Disassembly

    Press the 0 OPEN/CLOSE button to close the Tray. (Test Disc is clamped.) Press the STANDBY/ON button to turn off the power. Pull out the Power cord. Test disc Screwdriver (small) Projection Tray Tray Panel Drive cam 05 LOADER ASSY Bottom view PD-D6-J...
  • Page 73 Grounding wires Chassis Top View Raise the 05 LOADER ASSY. Slightly lift the 05 LOADER ASSY and displace it slightly backward. 05 LOADER ASSY Diagnosis Note: Service cable 5P (GGD1425) is required when diagnosing the DVDM ASSY side B. PD-D6-J...
  • Page 74 PLED ASSY LCD ASSY MNSW ASSY TRANS ASSY KEY ASSY PRIMARY ASSY CONECTOR ASSY DVDM ASSY AJKB ASSY PD-D6-J...
  • Page 75 Bridge 04 Note when reinserting the tray When reinserting the tray, first align the triangle printed on the loading base and the pin of the drive cam, then insert the tray. Drive cam Tray Front side Loading base Triangle PD-D6-J...
  • Page 76 Flexible cable Dislodge the two flexible cables from their factory for the spindle motor placement. Front Side Flexible cable for the pickup Bottom view Unhook the four hooks. Traverse Mechanism Assy-S Remove the Traverse Mechanism Assy-S × 2 × 2 PD-D6-J...
  • Page 77 Adjustment screw Adjustment screw Remove the 05SD Pickup Assy. (skew screw VK1) (skew screw VK1) 05SD Pickup Assy-S Note: Be careful not to lose the adjustment spring (skew spring VK1). Adjustment screw (skew screw VK1) Adjustment spring (skew spring VK1) PD-D6-J...
  • Page 78 Note: The screw is secured with the silicone adhesive. Make sure to apply the silicone adhesive after reattaching the screw. Joint VK1B Joint spring VK1 Silicone Adhesive GEM1037 Arrangement of the flexible cable for the spindle motor : Conductive surface Hook Front Side Hook Bottom view PD-D6-J...
  • Page 79 Attach the flexible cable for the pickup to the connector. Fold the flexible cable along the hook. Pass the flexible cable through the hook. Hook Backing Front Side Bottom View Hook Pass the flexible cable through the hook. Hook Hook Make sure that the cable is loose PD-D6-J...
  • Page 80: Panel Adjusting

    Set the top and bottom edges of the AL Panel L even with R and tighten the screws. Adjust this gap to zero (0). AL Panel L AL Panel R Screw for securing the AL Panel L (Tighten the screw while adjusting the gap.) Rear face of the Panel ASSY PD-D6-J...
  • Page 81: Parts

    Clock for LCD driver AQE reset P16 / T1PWML XDFRST Chip select for system bus(MTK XREADY) P17 / T1PWMH/BUZ XREADY PCM/DSD data select XPCM/DSD XDACRST DAC reset XSYSMUTE Control mute of system − VSS4 VSS4 VSS4 − VDD4 VDD4 VDD4 PD-D6-J...
  • Page 82 VDD2 − VSS2 VSS2 VSS2 P20/INT4/T1IN P21/INT4/T1IN P22/INT4/T1IN DVDACK Ackknowlegement from DVD MODULE(Interruption) P23/INT4/T1IN P24/INT5/T1IN P25/INT5/T1IN P26/INT5/T1IN P27/INT5/T1IN TRIN LOADING SW2 INPUT TROUT LOADING SW1 INPUT LOADGAIN Loading gain select PB7/D7 DVDM ON/OFF Control power supply for DVD module PD-D6-J...
  • Page 83 PC4/A4 MSDCT Mechanical power SW detect PC3/A3 DIMMER Dimmer control PC2/A2 BLON LCD Backlight ON PC1/A1 LED3 Standby indicator PC0/A0 − PA0/CS2# FLASHE/D for FLASH writing − PA1/CS1# FLASHDO for FLASH writing − 100 PA2/CS0# FLASHCLK for FLASH writing PD-D6-J...
  • Page 84 RA10 TDI / V_ADIN4 TMS / V_ADIN5 DVSS TCK / V_ADIN6 TDO / V_ADIN7 RCS# DVDD18 DVDD3 IOA2 RAS# IOA3 CAS# IOA4 RWE# IOA5 DQM1 IOA6 DQS1 IOA7 HIGHA0 DVSS IOA18 IOA19 RD10 DVSS RD11 APLLCAP RD12 APLLVSS RD13 PD-D6-J...
  • Page 85 Port Module Servo I/O Servo Motor Processor Drive Spindle Control MPEG-1/2 Flash ROM MPEG-4 Audio JPEG Memory Video Decoder Controller SACD DRAM Processor PCM / DSD Audio System Controller Parser Audio Output CPPM/CPRM SPDIF System GPIO 30-bit RISC IR/VFD PD-D6-J...
  • Page 86 Analog Inout SACD- TOP Reference 243 S_VREFN Analog Inout SACD- Bottom Reference Reference Voltage (3) Name Alt. Function 28 V2REFO Analog output Reference voltage 2.8V 29 V20 Analog output Reference voltage 2.0V 30 VREFO Analog output Reference voltage 1.4V PD-D6-J...
  • Page 87 Tracking servo output. PDM output of tracking servo compensator. 42 FOO Analog Output Focus servo output. PDM output of focus servo compensator LVTTL 3.3V Input, Schmitt Input, 47 FG (Digital pin) V_ADIN8 pull-up , with Motor Hall sensor input analog input path for V_ADIN8 PD-D6-J...
  • Page 88 60 IOA18 Inout, 2-16MA, SR, SMT Flash address 18 / IO 61 IOA19 Inout, 2-16MA, SR, SMT Flash address 19 / IO 76 IOA20 Inout, 2-16MA, SR, SMT Flash address 20 / IO Inout, 2-16MA, 89 IOA21 V_ADIN0 SR, SMT PD-D6-J...
  • Page 89 C clock pin Microcontroller port 3-5 107 UP3_5 Inout, 4MA, SR, PU, SMT Hardwired RD232 TXD C data pin 111 IR Input, SMT IR control signal input Inout, 2-16MA, 112 INT0# Microcontroller external interrupt 0, active low SR, PU, SMT PD-D6-J...
  • Page 90 SR : ON/OFF MISC (8) Name Alt. Function 110 PRST# Input PU, SMT Power on reset input, active low 109 ICE Input PD, SMT Microcontroller ICE mode enable 228 XTALO Output 27M crystal out 229 XTALI Input 27M crystal in PD-D6-J...
  • Page 91 Digital Video output Y bit 0 GPIO DRAM data 25 While using 16-bits wide DRAM: SDO1 Inout Serial interface port 1 data-out 176 RD25 MS_SDIO Non-pull MS Card SDIO pin part II SMPTE_Y[1] Digital Video output Y bit 1 GPIO PD-D6-J...
  • Page 92 DRAM address 3 150 RA2 Inout DRAM address 2 149 RA1 Inout DRAM address 1 147 RA0 Inout DRAM address 0 146 RA10 Inout DRAM address 10 145 BA1 Inout DRAM bank address 1 143 BA0 Inout DRAM bank address 0 PD-D6-J...
  • Page 93 113 DQM0 Inout Data mask 0 Other Interface (4) Name Alt. Function SDO3 GPIO 48 TDI V_ADIN4 Inout SD_DAT SDIN3 GPIO 49 TMS V_ADIN5 Inout SD_CMD SCLK3 GPIO 50 TCK V_ADIN6 Inout SDCLK SDCS3 GPIO 51 TDO V_ADIN7 Inout MSCLK PD-D6-J...
  • Page 94: Panel Facilities

    8. PANEL FACILITIES Front panel POWER STANDBY indicator Display Disc tray Remote sensor PURE AUDIO indicator PD-D6-J...
  • Page 95: Remote Control

    LEGATO - Lights when Legato Link Pro is switched on. PURE AUDIO (ALL) REPEAT / RANDOM / PGM - Light to CLEAR indicate the playback mode. 10 ENTER Character display 11 TIME TOTAL / REMAIN - Indicate the disc/track 12 LEGATO LINK information currently displayed. PD-D6-J...
  • Page 96: Jigs/Lubricants/Glues List

    "6.5 MECHANISM ADJUSTMENT" CLEANING Before shipping out the product, be sure to clean the following positions by using the prescribed cleaning tools: Position to be cleaned Cleaning tools Pickup leneses Cleaning liquid : GEM1004 Cleaning paper : GED-008 PD-D6-J...

This manual is also suitable for:

Pd-d6-s

Table of Contents