Epson TM-P80 Technical Reference Manual
Hide thumbs
Also See for TM-P80:
- User manual ,
- Technical reference manual (112 pages) ,
- Setup manual (2 pages)
Table of Contents
Advertisement
Quick Links
Technical Reference Guide
Product Overview
Describes features of the product.
Setup
Describes setup and installation of the product.
Application Development Information
Describes how to control the printer and necessary information
when you develop applications.
Handling
Describes how to handle the product.
Appendix
Describes general specifications, initial software settings, and
character code tables.
M00067303
Rev. C
Advertisement
Table of Contents

Subscribe to Our Youtube Channel
Related Manuals for Epson TM-P80


Summary of Contents for Epson TM-P80
- Page 1 Technical Reference Guide Product Overview Describes features of the product. Setup Describes setup and installation of the product. Application Development Information Describes how to control the printer and necessary information when you develop applications. Handling Describes how to handle the product. Appendix Describes general specifications, initial software settings, and character code tables.
- Page 2 • Neither is any liability assumed for damages resulting from the use of the information contained herein. • Neither Seiko Epson Corporation nor its affiliates shall be liable to the purchaser of this product or third parties for damages, losses, costs, or expenses incurred by the purchaser or third parties as a result of: accident, misuse, or abuse of this product or unauthorized modifications, repairs, or alterations to this product, or (excluding the U.S.) failure to strictly...
-
Page 3: For Safety
For Safety Key to Symbols The symbols in this manual are identified by their level of importance, as defined below. Read the following carefully before handling the product. You must follow warnings carefully to avoid serious bodily injury. WARNING Provides information that must be observed to prevent damage to the equipment or loss of data. -
Page 4: Warnings
Continued use may lead to fire. Immediately turn the power off, disconnect the battery pack, and then contact your dealer or a Seiko Epson service center for advice. Never attempt to repair this product yourself. Improper repair work can be dangerous. -
Page 5: Cautions
Cautions Do not connect cables in ways other than those mentioned in this manual. Different connections may cause equipment damage or fire. Be sure to set this equipment on a firm, stable, horizontal surface. CAUTION The product may break or cause injury if it falls. ... -
Page 6: Restriction Of Use
• Never disassemble or modify this product or the installed Radio Frequency module. • Seiko Epson Corporation shall not be liable for interference to radio/TV resulting from changes or modifications to this product or the installed Radio Frequency module not... -
Page 7: About This Manual
About this Manual Aim of the Manual This manual was created to provide information on the development, design, and installation of POS systems and the development and design of printer applications for developers. Manual Content The manual is made up of the following sections: Chapter 1 Product Overview Chapter 2... -
Page 8: Table Of Contents
Contents ■ For Safety ..........................3 Key to Symbols............................3 Warnings ..............................4 Cautions ..............................5 ■ Restriction of Use ........................6 ■ Note about interference...................... 6 ■ About this Manual ........................ 7 Aim of the Manual ..........................7 Manual Content .............................7 ■ Contents..........................8 Product Overview ................13 ■... - Page 9 Setup .....................29 ■ Flow of Setup ........................29 ■ Installing the Printer ......................30 Notes on Using the Wi-Fi Models ......................30 ■ Installing the Battery......................31 ■ Installing or Replacing the Roll Paper................33 When Installing the Printer Horizontally ..................... 33 When Installing the Printer Vertically....................34 ■...
- Page 10 Handling ..................83 ■ Charging Battery........................ 83 Using the optional AC adapter (PS-11) .....................83 Battery’s charging status ........................84 Battery malfunction ..........................85 When using the optional battery charger (OT-CH60II) ..............86 ■ Cleaning the Printer ......................88 Cleaning the Printer Case ........................88 Cleaning the Platen Roller/Paper Sensor ..................89 Cleaning the Thermal Head .......................90 Appendix ..................91 ■...
- Page 11 ■ Character Code Tables....................110 Common to All Pages ........................110 Page 0 [PC437: USA, Standard Europe] ..................111 Page 1 (Katakana) ..........................112 Page 2 (PC850: Multilingual) ......................113 Page 3 (PC860: Portuguese)......................114 Page 4 (PC863: Canadian-French) ....................115 Page 5 (PC865: Nordic) ........................
-
Page 13: Product Overview
Chapter 1 Product Overview Product Overview This chapter describes features and specifications of the TM-P80, a portable receipt printer. Features Printing Maximum printing speed of 100 mm/s is possible. Printer handling • Easy drop-in paper loading. • Long battery life. - Page 14 Interfaces • Has Wi-Fi (IEEE802.11 a/b/g/n) or Bluetooth (Ver. 2.1 + EDR) interface. • The Wi-Fi model supports 2.4 GHz and 5 GHz. WPA2-Enterprise is also available as a security option. • USB interface is standard equipment. Environment Has a paper-saving function.
-
Page 15: Product Configurations
Chapter 1 Product Overview Product Configurations Interfaces • Wi-Fi model (IEEE802.11 + USB) • Bluetooth model (Bluetooth + USB) Accessories Included • Thermal roll paper (for operation check) • Battery pack (OT-BY60II) • Belt clip (attached to the printer) • USB cable •... -
Page 16: Part Names And Functions
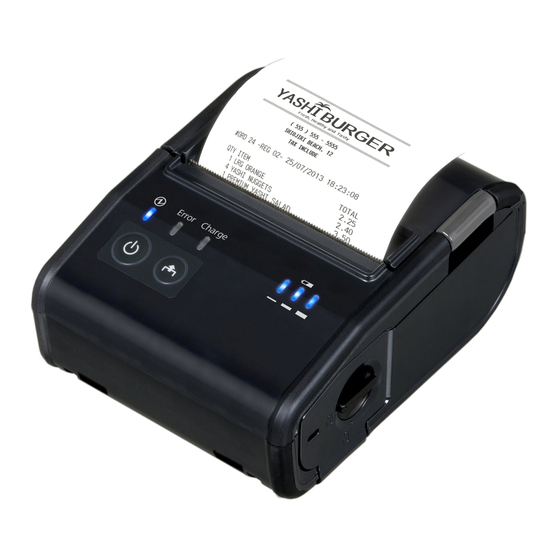
Part Names and Functions Roll paper cover Open button Control panel "Control Panel" on page Connector for the AC adapter Connector for the USB Lever Battery cover Belt clip Roll Paper Cover Open this cover to install or remove the roll paper. Open Button Push this button to open the roll paper cover. -
Page 17: Control Panel
Chapter 1 Product Overview Battery Cover Open this cover to install or remove the battery. Belt clip Use this clip to hang the printer on your belt. Control Panel Power LED Error LED Charge LED Battery LED Power button Feed button Buttons Power Button Press this button to turn the printer on. - Page 18 Feed button • When Paper Type Setting is set to Receipt paper (without black mark), pressing this button once feeds paper by one line. Holding this button down feeds paper continuously. • When Paper Type Setting is set to Receipt paper (with black mark), pressing this button feeds paper to the print starting position on the next black mark.
-
Page 19: Offline
Chapter 1 Product Overview Offline The printer automatically goes offline and stops printing under the following conditions. Once all of the following conditions are cleared, the printer becomes online and ready to print. • During power on until the printer is ready •... -
Page 20: Power Functions
Power Functions You can customize the printer using the power functions, the auto-power off function and battery charge mode function to save the battery power or minimize the battery deterioration. Auto-Power Off The printer automatically turns off once the specified time has elapsed in the idle state. However, when the printer is in the following status, it is not considered as idle state, and the auto-power off function is not applied. -
Page 21: Operation Mode When Battery Is Low
Chapter 1 Product Overview Operation Mode When Battery is Low There are two operation modes for the printer when the battery is low. Change the mode depending on the usage status. Mode 1 (initial setting): Continues printing until the remaining battery becomes approximately 0%. This is appropriate if you want to maximize the battery operation time. -
Page 22: Mode 2
Mode 1 : On : Flash : Off Remaining Battery LED Error LED Printing Communication battery charge Approx. 60 100% Level H Possible Possible Approx. 20 60% Level M Possible Possible Approx. 10 20% Level L Possible Possible Level S Approx. - Page 23 Chapter 1 Product Overview Mode 2 : On : Flash : Off Remaining Battery LED Error LED Printing Communication battery charge Approx. 60 100% Level H Possible Possible Approx. 40 60% Level M Possible Possible Approx. 20 40% Level L Possible Possible...
-
Page 24: Column Emulation Mode
If you have replaced a printer that can print at the dot density of 180 dpi on the paper that is 80 mm wide with TM-P80 (Dot density: 203 dpi), when you set the Column emulation mode to 42 column mode, the print results will be similar. -
Page 25: Error Status
Chapter 1 Product Overview Error Status When an error occurs, the printer stops printing, goes offline, and the Error LED flashes. There are three error types: automatically recoverable errors, recoverable errors, and unrecoverable errors. Automatically Recoverable Errors Printing is temporarily suspended when automatically recoverable errors occur. They can recover automatically, as described below. -
Page 26: Unrecoverable Errors
Printing is no longer possible when unrecoverable errors occur. If the same error occurs again even after turning the power back on, contact your dealer or a Epson service center. Immediately turn off the power and remove the battery when unrecoverable errors occur. -
Page 27: Nv Memory (Non-Volatile Memory)
Graphics, such as shop logos to be printed on receipts, can be stored. Even if communication speed is low, high speed graphic printing is possible. Use the TM-P80 Utility to register graphics. You can also print and confirm the registered graphics in the TM-P80 Utility or NV graphics print mode. -
Page 28: User-Defined Page
NV memory. You can read or reset the information with TM-P80 Utility, the Status API of the APD, or OPOS ADK to use it for periodical checks or part replacement. -
Page 29: Setup
Chapter 2 Setup Setup This chapter describes setup and installation of the product. Flow of Setup This chapter consists of the following sections, along with the setup flow of the product. The TM- P80 has dual interfaces: a built-in USB interface and another interface selected by the customer, wireless LAN or Bluetooth interface. -
Page 30: Installing The Printer
Installing the Printer You can install the printer horizontally or vertically. You can also carry it using the belt clip on the back of the printer to hang the printer on your belt. When you install the printer vertically, only the orientation shown below is available. Do not install the printer upside down. -
Page 31: Installing The Battery
Chapter 2 Setup Installing the Battery The printer does not operate without a charged battery installed. Follow the steps below to install the battery. Be sure to use the battery OT-BY60II. Using a battery other than the one specified may cause fire, explosion, leakage, overheating or other damage. - Page 32 Install the battery, and close the battery cover. To charge the battery, see "Charging Battery" on page...
-
Page 33: Installing Or Replacing The Roll Paper
Chapter 2 Setup Installing or Replacing the Roll Paper Follow the steps below to install or replace the roll paper. If you hang the printer vertically on a belt using a belt clip on the back of the printer, see "When Installing the Printer Vertically"... -
Page 34: When Installing The Printer Vertically
Pull out some paper, close the cover, and tear off the paper. When Installing the Printer Vertically Press the open button to open the roll paper cover. - Page 35 Chapter 2 Setup Remove the used roll paper core, if there is one. Set the new roll paper in the correct direction. Pull the leading edge of the roll paper.
- Page 36 Pull out some paper, close the cover, and tear off the paper.
-
Page 37: Connecting The Printer
When communicating with a host PC via the USB cable, connect the USB cable to the printer, turn on the PC, and then turn on the printer. For Windows, you can change the printer settings with the TM-P80 Utility. For details on the TM-P80 Utility, see "Software Settings" on page Do not place any weight or stress on the cable when using. -
Page 38: Wireless Lan Interface
Wireless LAN Interface When using the wireless LAN interface, it is recommended to connect the printer to a host PC via the USB cable first and use EpsonNet Config to set wireless LAN settings. When you set up the access point at the same time, set the access point in advance and check that it operates correctly. - Page 39 Note that the wireless LAN connection with the access point may be unstable depending on the environment. In that case, turning off this function may improve the connection. Needs • TM printer: TM-P80 • Computer for setting: Windows 8/Windows 7/Windows Vista/Windows XP/Windows 2000 • Utility for setting: EpsonNet Config •...
- Page 40 Acquisition of the setting information Acquire the following information from the network administrator. • Network mode • SSID: This is set for each network of the SSID wireless LAN. Set the same setting as the access point. • WEP, WPA, WPA-Personal/Enterprise: This is a security setting and a cipher key. Set the same setting as the access point.
-
Page 41: Confirming The Operation
Chapter 2 Setup Configure the [Network] settings and the [TCP/IP] settings. Disconnect the USB cable, turn off the printer, and then turn it back on. To start wireless LAN communication, be sure to disconnect the USB cable, turn off the printer, and then turn it back on. -
Page 42: Bluetooth Interface
Use a tool, such as a built-in Bluetooth connection tool of your device to establish the connection with the printer. If your device is a Windows computer, use EPSON TM Bluetooth Connector, which is a utility to easily pair a terminal and the printer. - Page 43 Chapter 2 Setup Select [Search all printers around this computer], and then click [Search]. Select the printer to be paired ( Not been paired yet), and then click [Connect].
- Page 44 [OK]. Select the port to be used from the pull-down list, and then click [OK]. Printing method Port name APD print queue ESDPRTxxx (TM-P80: Queue name) UPOS ESDPRTxxx (UPOS for TM-P80) ESC/POS command Displayed virtual COM port (e.g. COM4) The “Connection complete” window appears. Click [Test Buzzer] or [Test Printing] to check operation.
- Page 45 Chapter 2 Setup If “Error” is displayed when you click the [Search] on the TM Bluetooth Connector, check whether: The Bluetooth adapter is installed to the computer. Bluetooth is ON in the Windows settings. If the device is not displayed on the TM Bluetooth Connector or the TM Bluetooth Connector Status shows “...
-
Page 46: Software Settings
With the customized values and memory switches, which are software settings for this printer, you can set the various functions. For an outline of those functions, see the following section. Use TM-P80 Utility, Software setting mode, or ESC/POS commands (“GS ( E“), to set the customized values and memory switches. -
Page 47: Print Density
Chapter 2 Setup User NV memory capacity • 1 KB (initial setting) • 64 KB • 128 KB • 192 KB NV graphics memory capacity • None • 64 KB • 128 KB • 192 KB • 256 KB • 320 KB •... -
Page 48: Print Speed
Selectable from: automatic selection, fixed to wireless LAN/Bluetooth interface, or fixed to built- in USB. The TM-P80 has dual interfaces: a built-in USB interface and another interface selected by the customer, wireless LAN or Bluetooth. The tables below describe the modes you can set for the printer to control the dual interfaces. - Page 49 Chapter 2 Setup Column emulation mode • 48 column mode (initial setting) • 42 column mode For detailed information, see "Printing Specifications" on page 91 "Character Specifications" on page Command execution during offline When this function is enabled, you can execute commands that are not related to mechanical operation while the printer is off-line.
- Page 50 Paper reduction is not performed for space dot lines of graphics printing data. When reducing barcode height, be sure to check reading a barcode with your barcode reader in advance. Automatic power off time Selectable from 0, 1 to 60 minutes. (initial setting: disabled) When using the USB interface, the automatic power off function is disabled even if the time is set.
- Page 51 Chapter 2 Setup Buzzer settings • Buzzer sounds for low battery warning •Disabled •Enabled (initial setting) • Buzzer sounds for roll paper end warning •Disabled •Enabled (initial setting) • Buzzer sounds for error occurrence warnings •Disabled •Enabled (initial setting) Error signal output •...
- Page 52 Bluetooth interface • Passkey (initial setting: 0000) • Device name (initial setting: TM-P80_xxxxxx) The device name is initially set to TM-P80_xxxxxx. (xxxxxx refers to the last 6 digits of the serial number labeled on the back of your printer.) Acceptable Characters Item Number of characters Acceptable Characters...
-
Page 53: Paper Layout Setting
Chapter 2 Setup Paper Layout Setting You can make settings for paper type and size in Paper layout setting. Paper type is set to Receipt paper (without black mark) as default. In case of using the Receipt paper (with black mark), you must select the Receipt paper (with black mark) for paper type. -
Page 55: Application Development Information
Chapter 3 Application Development Information Application Development Information This chapter describes how to control the printer and gives information useful for printer application development. Controlling the Printer Use a driver, ESC/POS commands, or ePOS-Print to control the printer. ePOS-Print is available only with the Wi-Fi models. -
Page 56: Esc/Pos Commands
ESC/POS Commands ESC/POS is the Epson original printer command system. With ESC/POS commands, you can directly control all the TM printer functions, but detailed knowledge of printer specifications or combination of commands is required. The ESC/POS command functions are listed below. For detailed information about ESC/POS commands, see the ESC/POS Command Reference. - Page 57 Chapter 3 Application Development Information Print Commands Print and line feed Print and return to standard mode (in page mode) Print data in page mode Print and feed n lines Character Commands Cancel print data in page mode Set right-side character spacing Select print mode(s) Turn underline mode on/off Turn emphasized mode on/off...
- Page 58 Printing Paper Commands Select label and black mark control function(s) Paper layout setting Paper layout information transmission Transmit the positioning information Feed paper to the cutting position Feed paper to the print starting position Paper layout error special margin setting Status Commands Transmit real-time status Enable/disable Automatic Status Back (ASB)
- Page 59 Chapter 3 Application Development Information Set the customized setting values Transmit the customized setting values Set the configuration item for the Bluetooth interface Transmit the configuration item for the Bluetooth interface Set the configuration item for the USB interface Transmit the configuration item for the USB interface Bit-image Commands Select bit-image mode Define downloaded bit image...
- Page 60 Two Dimensions Code Commands Set up and print the symbol Barcode Commands Select print position of HRI characters Select font for HRI characters Set barcode height Set barcode width Print barcode Macro Function Commands Start/end macro definition Execute macro Miscellaneous Commands Send real-time request to printer Execute power-off sequence Transmit specified status in real-time...
-
Page 61: Epos-Print
Chapter 3 Application Development Information Set horizontal and vertical motion units Initialize maintenance counter Transmit maintenance counter Kanji Commands (only for Traditional Chinese model) Select print mode(s) for Kanji characters Select Kanji character mode Turn underline mode on / off for Kanji characters Cancel Kanji character mode Define user-defined Kanji characters Set Kanji character spacing... -
Page 62: Software And Manuals
APD Printer Specification paper cut, a cash drawer, or customer display. The Devmode API/PRINTERINFO Manual Status API (Epson original DLL) that monitors printer Status API Manual status and sends ESC/POS commands is also Sample Program Guide attached to this driver. - Page 63 It is not a driver to be used for printing from commercial applications. *2 This guide describes general information on how to control printers using the OPOS ADK (in the chap- ter “POS Printer” and “Appendix A”). It does not describe Epson’s specific functions.
-
Page 64: Utilities
Use for wireless LAN setting. For Windows and Mac. Monitoring Tool: Monitoring Tool User’s Manual Use to check a list of status for the Epson printers connected to the network. You can also update certificates for multiple printers used for WPA- Enterprise in a batch. -
Page 65: Epsonnet Config (Web Version)
Chapter 3 Application Development Information EpsonNet Config (Web Version) EpsonNet Config (Web version) is a utility to configure the network and other settings on a web browser. Starting EpsonNet Config (Web Version) Follow the steps below to start up EpsonNet Config (web version). Start up a PC connected to the network. - Page 66 In the initial setting, the user name and password will be required on the authentication screen when you access EpsonNet Config (web version) from a browser. Enter “epson” for both user name and password. You can change the password in [Password] in the Optional configuration menu.
-
Page 67: Settings
Chapter 3 Application Development Information Settings Select from the menu list on the left to check or configure the settings. Enable the time server when using a certificate. Otherwise, the printer's Stored Date/Time may not be set correctly and the wireless LAN may be unavailable. If this happens, enable the time server, or initialize the Stored Date/Time from one of the following: ... -
Page 68: Configuration Menu
Configuration menu You can configure the settings as shown in the table below. Menu Settings Wireless Settings (Communication Standard, Network Mode, SSID, Channel, Encryption Type) WPA Pre-Shared Key, Default WEP Key, WEP Key 1/2/3/4, Authentication Algorithm Power Save Wireless Note: Characters you can use for the User ID/Password when using WPA-Enterprise are as follows: - Character code: ASCII character (20H to 7EH) - Page 69 Chapter 3 Application Development Information You can also select the following functions from the optional configuration menu. Administrator Information: Use to register administrator name and the printer location. Reset: Use to reset the interface card or restore the default settings. ...
-
Page 70: Setting/Checking Modes
Setting/Checking Modes Besides the ordinary print mode, the printer has the following modes to set or check settings of the printer. • Self-test mode: page 71 • Hexadecimal dumping mode: page 72 • NV graphics print mode: page 73 • Software setting mode: page 74 •... -
Page 71: Self-Test Mode
Chapter 3 Application Development Information Self-test Mode In the self-test mode, the printer prints the current status of the printer and resident characters as a test print). You can confirm the following information with the status print. • ROM version •... -
Page 72: Hexadecimal Dumping Mode
Hexadecimal Dumping Mode In the hexadecimal dumping mode, the printer prints the data transmitted from a host computer in hexadecimal numbers and their corresponding characters. Starting the hexadecimal dumping mode Follow the steps below to run this mode. If there is no character corresponding to print data, “.” is printed. ... -
Page 73: Nv Graphics Print Mode
Chapter 3 Application Development Information NV Graphics Print Mode You can confirm the following information by running NV graphics print mode: Capacity of the NV graphics Used amount of the NV graphics Unused capacity of the NV graphics ... -
Page 74: Software Setting Mode
Software Setting Mode In the software setting mode, you can set the following customized values and memory switches which are software switches of this printer. Print density Automatic paper reduction Interface mode USB class Print speed ... - Page 75 Chapter 3 Application Development Information Setting the memory switch Follow the steps below to run this mode. Enter the memory switch setting mode. 1. Check that the roll paper is set and that the printer is turned off. 2. While pressing the Feed button, turn on the printer. Keep pressing the Feed button until the printer starts printing.
- Page 76 Setting conditions • Print Density Number of times to press the Feed button Settings No change Monochrome • Automatic Paper Reduction Number of times to press the Feed button Settings No change Upper Margin Lower Margin Blank Line Spacing Blank Space Barcode Height •...
- Page 77 Chapter 3 Application Development Information • Printing Speed Number of times to press the Feed button Settings No change Level 1 (Slow) Level 2 Level 3 Level 4 Level 5 Level 6 Level 7 Level 8 Level 9 Level 10 (Fast) •...
- Page 78 • Buzzer sounds Number of times to press the Feed button Settings No change Low battery warning Roll paper end warning Error occurrence warning • Auto power off Number of times to press the Feed button Settings No change Enable Disable •...
-
Page 79: Wireless Communication Setting Initializing Mode
Chapter 3 Application Development Information Wireless Communication Setting Initializing Mode You can initialize the wireless communication settings by running this mode. When you run this mode with a Wi-Fi model connecting with the wireless LAN interface, the wireless LAN setting will be initialized. When you run this mode with a Bluetooth model connecting with the Bluetooth interface, the Bluetooth setting will be initialized. -
Page 80: Radio Field Intensity Check Mode (Only For Wi-Fi Models)
Radio Field Intensity Check Mode (Only For Wi-Fi Models) In the radio field intensity check mode, the printer prints information about the wireless LAN intensity. Starting the field intensity check mode Follow the steps below to run this mode. Install the roll paper. Close the roll paper cover. -
Page 81: Dynamic Status Sheet Print Mode (Only For Wi-Fi Models)
Chapter 3 Application Development Information Dynamic Status Sheet Print Mode (Only for Wi-Fi Models) In the dynamic status sheet print mode, the printer prints the dynamic status sheet indicating the wireless LAN settings. Starting the dynamic status sheet print mode Follow the steps below to run this mode. -
Page 83: Handling
Chapter 4 Handling Handling This chapter describes basic handling of the printer. Charging Battery Follow the steps below to charge the battery. You can charge the battery using the printer itself with the optional AC adapter (PS-11) or using the optional multi-charger (OT-CH60II). Be sure to use the battery OT-BY60II. -
Page 84: Battery's Charging Status
Battery’s charging status Make sure you charge the battery in an environment with a temperature of 0 to 40°C. Battery charging stops if it is charged in an environment outside the temperature range allowed for charging. The charging status of the battery is notified by the combination of three LED lights on the Control Panel. -
Page 85: Battery Malfunction
Chapter 4 Handling Battery malfunction If the battery has been charged for about five hours but cannot be fully charged, it is considered as a malfunction, and Charge LED flashes. If this happens, you cannot use the same battery pack again. -
Page 86: When Using The Optional Battery Charger (Ot-Ch60Ii)
When using the optional battery charger (OT-CH60II) Firmly insert the battery pack into the battery holder. Securely insert the AC cable in to AC adapter's inlet. Make sure you use the AC adapter and cable that came with OT-CH60II. Securely insert the DC cable into the power connector of the charger. - Page 87 Chapter 4 Handling Insert the power plug into the outlet and turn the power ON. (Power) LED (green) is lit. In a few seconds, Charge LED (orange) is lit, and charging starts. Once charging is complete, Charge LED (orange) turns off. ...
-
Page 88: Cleaning The Printer
Cleaning the Printer Cleaning the Printer Case Be sure to unplug the AC cable from the wall socket, remove the battery, and turn off the printer before cleaning. Wipe the dirt off the printer case with a dry cloth or a damp cloth. Never clean the product with alcohol, benzine, thinner, or other such solvents. -
Page 89: Cleaning The Platen Roller/Paper Sensor
Chapter 4 Handling Cleaning the Platen Roller/Paper Sensor When paper dust accumulates on the platen rollers or the paper sensor, follow the steps below to clean them. To maintain good functional capabilities, clean them regularly (every 6 months). Do not use an alcohol-based solvent. Use of an alcohol-based solvent might cause the adhesive agent to partially dissolve making its removal even more difficult. -
Page 90: Cleaning The Thermal Head
Cleaning the Thermal Head Epson recommends cleaning the thermal head periodically (generally every 3 months) to maintain print quality. After printing, the thermal head can be very hot. Be careful not to touch it and to let it cool before you clean it. Do not damage the thermal head by touching it with your fingers or any hard object. -
Page 91: Appendix
Appendix Appendix Product Specifications Printing Specifications Printing method Thermal line printing Dot density 203 × 203 dpi Printing direction Unidirectional with friction feed Maximum print speed* 100 mm/s {3.94"/s} Printing 48 column mode 72 mm {2.83"}, 576 dots width (initial setting) 42 column mode 68.3 mm {2.69"}, 546 dots Characters... - Page 92 *1 The printing speed listed above are the values when using a new battery fully charged, the print density is 100%, and at normal temperature. The printing speed changes automatically depending on the remaining battery, the head temperature, and the number of print dots. *2 Only for Traditional Chinese Model.
-
Page 93: Character Specifications
Appendix Character Specifications Number of characters Alphanumeric characters: 95 Extended graphics: 128 × 43 pages (including user-defined page) International characters: 18 sets Traditional Chinese : Big5 13,535 Character 48 column mode Font A 12 × 24 structure (initial setting) Font B 9 ×... -
Page 94: Paper Specifications
Paper Specifications Type Thermal paper: Receipt paper (without black mark) Receipt paper (with black mark) Form Roll paper Size Width 79.5 ± 0.5 mm {3.13 ± 0.02"} Outside diameter 51.0 mm {2.01"} maximum Roll width when 80.0 + 0.5/- 1.0 mm {3.15 + 0.02/- 0.04"} taken up Roll paper core Outside diameter: 18.0 mm {0.71"} or more... - Page 95 Appendix Requirement for black mark printing Paper feed direction Preprintable area 30 to 300 15 or more 3 to 5 Back(non-printing side) Units:mm The allowable relation between the reflecting rate in the black mark portion (1) and the non black mark portion (2) must be as shown in the below: Black mark portion (1): 16% or less...
-
Page 96: Printable Area
Printable Area Printing is automatically performed in one to four-part energization depending on the printing conditions. During printing with two to four-part energization, a maximum misalignment (horizontal ruled line shift) of 1/4 to 1/2 dot might occur in the paper feeding direction due to segmented printing. -
Page 97: Printing And Cutting Positions
Appendix Printing and Cutting Positions Manual-cutter position Approx. 7.5 mm Center of the print dotline Paper feed direction... -
Page 98: Electrical Characteristics
Electrical Characteristics Be sure to install the battery in the printer. The printer does not operate with the optional AC adapter only. Be sure to use the optional PS-11 as the power supply unit. Dedicated battery Model: D141A Rated voltage: DC 7.4 V (OT-BY60II) Capacity: 2000 mAh... -
Page 99: Reliability
Appendix Reliability Life* Printer mechanism 10 million lines printing (3.75 mm {0.15"} for one line) Thermal head 100 million pulses (for each element), 50 km MTBF (Mean Time Between 120,000 hours Failure)* MCBF (Mean Cycle Between 16 million lines Failure)* *1 End of life is defined as the point at which the printer reaches the beginning of the wear out period. -
Page 100: Acoustic Noise
Acoustic noise During operation Approximately 53 dB (bystander position) Note: Acoustic noise differs depending on the paper used, printing contents, and the setting values, such as print speed or print density. Drop impact resistance Height 120 cm (4 feet) * This is an experimental value based on our company's drop test standard; this is not a guaranteed value. Dust/splash proof function Vertical placement IP54 equivalent... -
Page 101: External Dimensions And Mass
• Depth: Approximately 140 mm {5.51"} • Height: Approximately 64 mm {2.52"} (the belt clip excluded) • Mass: Wi-Fi model: Approximately 506 g {1.11 lb} Bluetooth model: Approximately 500 g {1.10 lb} (Battery included; belt clip and roll paper excluded) Colors EBCK (Epson Black) -
Page 102: Specifications Of Interfaces And Connectors
Specifications of Interfaces and Connectors USB (Universal Serial Bus) Interface USB interface connector Has a USB upstream port connector (mini USB type-B connector) USB transmission specifications USB function Overall specifications According to USB 2.0 specifications Transmission speed USB Full-Speed (12 Mbps) Transmission method USB bulk transmission method Power supply specifications... -
Page 103: Ieee802.11A/B/G/N Wireless Lan Interface
Using W53 (CH52 - CH64) outdoors in Australia or Hong Kong is prohibited. Using W58 (CH149 - CH165) is either prohibited or unavailable. Using the TM-P80 outdoors in France is prohibited. In Italy, if used outside of own premises, general authorization is required. - Page 104 Specification • IEEE802.11a/b/g/n (2.4 GHz band or 5 GHz band) compliant wireless LAN communication compatible • Infrastructure mode and 802.11 Ad-hoc mode are supported • Support the IP address automatic acquisition function (DHCP, APIPA). Communication speed • IEEE802.11a (5 GHz): Automatic change •...
-
Page 105: Printing Communication Protocol
Appendix Printing communication protocol • LP, LPR: Transfers printing data • TCP Socket Port: Transfers printing data and printer status via bidirectional direct socket communication. LP , LPR • Max. simultaneous connections: • Number of connections for which printing is 1 (Other users need to wait until printing available: is completed.) -
Page 106: Bluetooth Wireless Interface
Notes on use • When you initialize or change the printer settings, the printer is reset to reflect the settings. It may take about 1 minute depending on the network settings or environment. Also, your application may indicate power off during the time waiting for reset. In that case, wait for about 1 minute, and then reconnect to the printer. -
Page 107: Notes On Use
• When communicating with Android 2.3.3 or later versions, communicate through an insecure connection. Communication with the printer is not available for secure connection. To establish insecure connection, you need to use Android OS's API for communication that supports insecure connection. Note that Epson's ePOS-Print SDK supports insecure connection. -
Page 108: The Initial Software Settings
The Initial Software Settings To set the customized values and memory switches, see "Software Settings" on page Settings Initial Setting User NV memory capacity 1 KB NV graphics memory capacity 384 KB Print density Level 7 Print speed Level 10 Interface mode Automatic selection Column emulation mode... - Page 109 Appendix Settings Initial Setting USB class Vendor Class Passkey 0000 Bluetooth interface Device name TM-P80_xxxxxx * The device name is initially set to TM-P80_xxxxxx. (xxxxxx refers to the last 6 digits of the serial num- ber labeled on the back of your printer.)
-
Page 110: Character Code Tables
Character Code Tables The character code tables show only character configurations. They do not show the actual print pattern. “SP” in the table shows a space. Common to All Pages When the international character set (See "International Character Sets" on page 154.) is USA:... -
Page 111: Pc437: Usa, Standard Europe]
Appendix Page 0 [PC437: USA, Standard Europe]... -
Page 112: Katakana)
Page 1 (Katakana) -
Page 113: Pc850: Multilingual)
Appendix Page 2 (PC850: Multilingual) -
Page 114: Pc860: Portuguese)
Page 3 (PC860: Portuguese) -
Page 115: Pc863: Canadian-French)
Appendix Page 4 (PC863: Canadian-French) -
Page 116: Pc865: Nordic)
Page 5 (PC865: Nordic) -
Page 117: Pc851: Greek)
Appendix Page 11 (PC851: Greek) -
Page 118: Pc853: Turkish)
Page 12 (PC853: Turkish) -
Page 119: Pc857: Turkish)
Appendix Page 13 (PC857: Turkish) -
Page 120: Pc737: Greek)
Page 14 (PC737: Greek) -
Page 121: Iso8859-7: Greek)
Appendix Page 15 (ISO8859-7: Greek) -
Page 122: Wpc1252)
Page 16 (WPC1252) -
Page 123: Pc866: Cyrillic #2)
Appendix Page 17 (PC866: Cyrillic #2) -
Page 124: Pc852: Latin 2)
Page 18 (PC852: Latin 2) -
Page 125: Pc858: Euro)
Appendix Page 19 (PC858: Euro) -
Page 126: Thai Code 42)
Page 20 (Thai Code 42) -
Page 127: Thai Code 11)
Appendix Page 21 (Thai Code 11) -
Page 128: Thai Code 18)
Page 26 (Thai Code 18) -
Page 129: Tcvn-3: Vietnamese)
Appendix Page 30 (TCVN-3: Vietnamese) -
Page 130: Tcvn-3: Vietnamese)
Page 31 (TCVN-3: Vietnamese) -
Page 131: Pc720: Arabic)
Appendix Page 32 (PC720: Arabic) -
Page 132: Wpc775: Baltic Rim)
Page 33 (WPC775: Baltic Rim) -
Page 133: Pc855: Cyrillic)
Appendix Page 34 (PC855: Cyrillic) -
Page 134: Pc861: Icelandic)
Page 35 (PC861: Icelandic) -
Page 135: Pc862: Hebrew)
Appendix Page 36 (PC862: Hebrew) -
Page 136: Pc864: Arabic)
Page 37 (PC864: Arabic) -
Page 137: Pc869: Greek)
Appendix Page 38 (PC869: Greek) -
Page 138: Iso8859-2: Latin 2)
Page 39 (ISO8859-2: Latin 2) -
Page 139: Iso8859-15: Latin 9)
Appendix Page 40 (ISO8859-15: Latin 9) -
Page 140: Pc1098: Farsi)
Page 41 (PC1098: Farsi) -
Page 141: Pc1118: Lithuanian)
Appendix Page 42 (PC1118: Lithuanian) -
Page 142: Pc1119: Lithuanian)
Page 43 (PC1119: Lithuanian) -
Page 143: Pc1125: Ukrainian)
Appendix Page 44 (PC1125: Ukrainian) -
Page 144: Wpc1250: Latin 2)
Page 45 (WPC1250: Latin 2) -
Page 145: Wpc1251: Cyrillic)
Appendix Page 46 (WPC1251: Cyrillic) -
Page 146: Wpc1253: Greek)
Page 47 (WPC1253: Greek) -
Page 147: Wpc1254: Turkish)
Appendix Page 48 (WPC1254: Turkish) -
Page 148: Wpc1255: Hebrew)
Page 49 (WPC1255: Hebrew) -
Page 149: Wpc1256: Arabic)
Appendix Page 50 (WPC1256: Arabic) -
Page 150: Wpc1257: Baltic Rim)
Page 51 (WPC1257: Baltic Rim) -
Page 151: Wpc1258: Vietnamese)
Appendix Page 52 (WPC1258: Vietnamese) -
Page 152: Kz1048: Kazakhstan)
Page 53 (KZ1048: Kazakhstan) -
Page 153: User-Defined Page)
Appendix Page 255 (User-Defined Page) -
Page 154: International Character Sets
International Character Sets ASCII code (Hex) Country France Germany U.K. Denmark I Sweden Italy Spain I Japan Norway Denmark II Spain II Latin America Korea Slovenia/ Croatia China Vietnam Arabia...
Need help?
Do you have a question about the TM-P80 and is the answer not in the manual?
Questions and answers