Beurer BM 58 Instructions For Use Manual
Hide thumbs
Also See for BM 58:
- User manual ,
- Instruction manual (68 pages) ,
- Instructions for use manual (20 pages)
Table of Contents
Advertisement
Available languages
Available languages
Quick Links
BEURER GmbH
Tel.: +49 (0) 731 / 39 89-144
www.beurer.de
Mail: kd@beurer.de
•
Söflinger Str. 218
•
•
Fax: +49 (0) 731 / 39 89-255
•
BM 58
Gebrauchsanleitung
D
Blutdruckmessgerät .......................................................(2 – 13)
Instruction for Use
G
Blood pressure monitor .............................................. (14 – 23)
F
Mode d´emploi
Tensiométre .................................................................(24 – 34)
Instrucciones para el uso
E
Tensiómetro .................................................................(35 – 46)
Instruzioni per l´uso
I
Misuratore di pressione ..............................................(47 – 57)
Kullanma Talimatı
T
Bilgisayarli tansiyon ölçer ..........................................(58– 67)
r
Инструкция по применению
Прибор для измерения артериального
давления на предплечье ........................................ (68 – 79)
Q
Instrukcja obsługi
Ciśnieniomierz .............................................................(80 – 90)
89077 Ulm (Germany)
Advertisement
Table of Contents

Subscribe to Our Youtube Channel
Related Manuals for Beurer BM 58


Summary of Contents for Beurer BM 58
- Page 1 BM 58 Gebrauchsanleitung Blutdruckmessgerät ............(2 – 13) Instruction for Use Blood pressure monitor ..........(14 – 23) Mode d´emploi Tensiométre ..............(24 – 34) Instrucciones para el uso Tensiómetro ..............(35 – 46) Instruzioni per l´uso Misuratore di pressione ..........(47 – 57) Kullanma Talimatı...
-
Page 2: Wichtige Hinweise
• Messen Sie Ihren Blutdruck immer zu gleichen Tageszeiten, Mit freundlicher Empfehlung um eine Vergleichbarkeit der Werte zu gewährleisten. Ihr Beurer-Team • Ruhen Sie sich vor jeder Messung ca. 5 Minuten aus! • Zwischen zwei Messungen sollten Sie 5 Minuten warten! 1. - Page 3 • Verwenden Sie das Gerät nur bei Personen mit dem für – Verwenden Sie nur die mitgelieferte oder originale das Gerät angegebenen Umfangbereich des Oberarmes. Ersatz-Manschetten. Ansonsten werden falsche • Sie können das Blutdruckmessgerät mit Batterien oder Messwerte ermittelt. mit einem Netzgerät betreiben. Beachten Sie, dass eine •...
- Page 4 • Das Gerät darf nicht selbst repariert oder justiert werden. Eine einwandfreie Funktion ist in diesem Fall nicht mehr gewährleistet. • Reparaturen dürfen nur vom Beurer Kundenservice oder autorisierten Händlern durchgeführt werden. Prüfen Sie jedoch vor jeder Reklamation zuerst die Batterien und tauschen Sie diese gegebenenfalls aus.
-
Page 5: Messung Vorbereiten
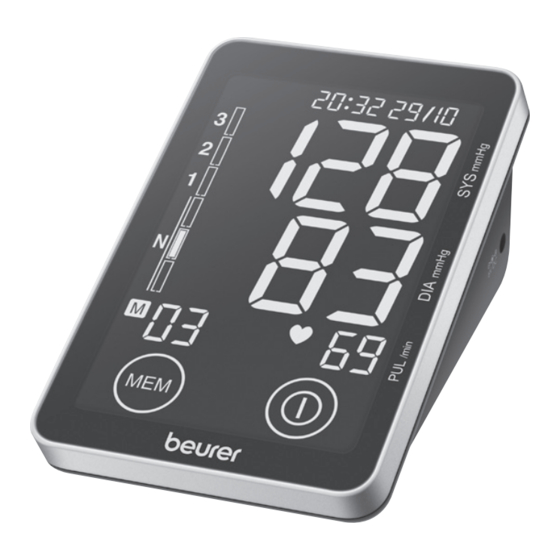
Touch Screen Aktivierungsschalter 6. Speicheranzeige Durchschnittswert ( ) , Morgens ( Abends ( ) Nummer des Speicherplatzes Das Gerät verfügt über ein Touch Screen Display. Um eine 7. WHO-Indikator unbeabsichtigte Aktivierung des Bildschirms zu vermeiden, 8. Symbol Batteriewechsel behalten Sie den Touch Screen Aktivierungsschalter in der 9. - Page 6 • Schließen Sie den Batteriefachdeckel wieder sorgfältig. • Drücken Sie gleichzeitig „START/STOP“ und „MEM“ Ta- sten. Das Jahr beginnt zu blinken. Stellen Sie mit der Ta- Wenn die Batteriewechselanzeige „ “ dauerhaft er- ste „MEM“ das Jahr ein und bestätigen Sie mit „START/ scheint, ist keine Messung mehr möglich und Sie müssen STOP“.
-
Page 7: Blutdruck Messen
5. Blutdruck messen Stecken Sie nun den Manschettenschlauch in den An- schluss für den Manschettenstecker. Bitte bringen Sie das Gerät vor der Messung auf Raumtem- peratur. Achtung: Das Gerät darf nur mit der Original-Manschette betrieben werden. Die Manschette ist für einen Armumfang Manschette anlegen von 22 bis 30 cm geeignet. -
Page 8: Ergebnisse Beurteilen
Blutdruckmessung durchführen • Sie können die Messung jederzeit durch das Drücken der Taste „START/STOP“ abbrechen oder indem Sie den • Bringen Sie den Touch Screen Aktivierungsschalter in die Touch Screen Aktivierungsschalter auf die Position „OFF“ Position „ON“. schieben. • Legen Sie, wie zuvor beschrieben, die Manschette an •... - Page 9 ert, anormal ist. Die Symptome (ausgelassene oder vorzeitige bewegen. Sollte das Symbol oft erscheinen, wenden Herzschläge, langsamer oder zu schneller Puls) können u.a. Sie sich bitte an Ihren Arzt. Selbstdiagnose und -behandlung von Herzerkrankungen, Alter, körperliche Veranlagung, Ge- aufgrund der Messergebnisse können gefährlich sein. Befol- nussmittel im Übermaß, Stress oder Mangel an Schlaf her- gen Sie unbedingt die Anweisungen Ihres Arztes.
-
Page 10: Messwerte Speichern, Abrufen Und Löschen
7. Messwerte speichern, abrufen und • Zum Abschalten drücken Sie erneut die Taste „MEM“ oder die Taste „START/STOP“, oder bringen Sie den löschen Touch Screen Aktivierungsschalter in die Position „OFF“. • Die Ergebnisse jeder erfolgreichen Messung werden zu- • Sollten Sie vergessen das Gerät abzuschalten, schaltet sammen mit Datum und Uhrzeit abgespeichert. -
Page 11: Gerät Reinigen Und Aufbewahren
Luftfeuchte abgeknickt werden. Stromversorgung 4 x 1,5 V AA-Batterien (Alkaline Type LR6) 10. Technische Angaben Batterie- Für ca. 500 Messungen, je nach Modell-Nr. BM 58 Lebensdauer Höhe des Blutdrucks bzw. Messmethode Oszillometrisch, nicht invasive Aufpumpdruck Blutdruckmessung am Oberarm Zubehör Aufbewahrungstasche, Messbereich Druck 0 –... - Page 12 Bitte beachten Sie dabei, dass tragbare und mobile Ausgang 6 V DC, 600 mA, nur in Verbindung HF-Kommunikationseinrichtungen dieses Gerät beein- mit Beurer Blutdruckmessgeräten flussen können. Genauere Angaben können Sie unter der Hersteller Friwo Gerätebau GmbH angegebenen Kundenservice-Adresse anfordern.
-
Page 13: Garantie
Kunden der Nachweis des Kaufes zu führen. Die Garantie ist innerhalb eines Zeitraumes von 3 Jahren ab Kaufdatum gegenüber der Beurer GmbH, Söflinger Straße 218, 89077 Ulm, Germany geltend zu machen. Der Kunde hat im Ga- rantiefall das Recht zur Reparatur der Ware bei unseren... -
Page 14: Getting To Know Your Instrument
• The readings that you take may only be used for informa- Best regards, tion purposes – they are not a substitute for a medical Your Beurer Team examination! Discuss your results with the doctor. Never use them to make medical decisions independently (e.g. 1. Getting to know your instrument regarding medication and dosage thereof). - Page 15 • Never attempt to repair the instrument or adjust it yourself. will be recorded. We can no longer guarantee perfect functioning if you do. • Do not press any buttons until the cuff is in position. • Repairs may only be performed by Beurer Customer • If the instrument is not used for any length of time, we Service or authorized dealers. However, always check the recommend removing the batteries. batteries and replace them if necessary prior to making any complaint.
-
Page 16: Unit Description
3. Unit description Touch screen activation switch The device features a touch screen display. To prevent the screen from being activated accidentally, keep the touch screen activation switch set to "OFF" when the device is not in use. To operate the device, move the touch screen activation switch to "ON". - Page 17 8. „Change battery“ icon the batteries. Once batteries have been removed from the 9. Arrhythmia recognition device, the time must be reset. Used batteries do not belong in the household waste. You PC kit are legally obliged to dispose of the batteries. Dispose of With the additionally available accessory set 655.17, them via your specialist electrical supplier or local collec ting point for recyclable waste.
-
Page 18: Measuring Blood Pressure
• Pressing the "START/STOP" button again will switch the elbow and above the artery. The display off. tube should be in line with the centre of the palm. Mains operation Now place the free end of the cuff snugly, but not too tightly, around You can also operate this device with a mains adapter. No the arm, and fix it with the Velcro batteries should be in the battery compartment for this. -
Page 19: Evaluating Results
• Rest for approx. 5 minutes before each measurement. increased further. As soon as a heart rate is detected, the Otherwise there may be divergences. heart rate symbol is displayed. • You can perform the measurement either sitting or lying • Heart rate, systolic and diastolic blood pressure are dis- down. Always make sure that the cuff is on a level with played. your heart. • You can cancel the measurement at any time by pres- • In order not to distort the result, it is important to keep sing the "START/STOP"... - Page 20 slow or excessively fast heart rate) may be caused, among treatment based on the test results may be dangerous. It is other things, by heart disease, age, physical predisposi- vital to follow your doctor‘s instructions. tion, excessive use of stimulants, stress or lack of sleep. Arrhythmia can only be ascertained through examination by WHO classification: your doctor.
-
Page 21: Saving, Retrieving And Deleting Results
sion range and diastolic pressure in the normal range), the • To switch off the device, press the "MEM" button again WHO classification on the unit always indicates the higher or the "START/STOP" button or push the touch screen range (grade hypertension in the example described). activation switch to "OFF". • If you forget to switch off the device, it will switch off auto- 7. -
Page 22: Cleaning And Storing The Instrument
10. Specifications level or inflation pressure Accessories With storage pouch, instruction Model No. BM 58 manu al, 4 pcs “AA” battery Method of Measurement Oscillometric, non-invasive Classification Application part Type B blood pressure measurement on... - Page 23 Directive 93/42/EC, the German medical products act Output 6 V DC, 600mA, only in connection and European standards EN1060-1 (non-invasive blood with beurer blood pressure monitor pressure monitors, Part 1: general requirements) and EN1060-3 (non-invasive blood pressure monitors, Part Supplier Friwo Gerätebau GmbH...
-
Page 24: Premières Expériences
• Avant chaque mesure, reposez-vous pendant env. 5 mi- nutes! Avec nos sentiments dévoués • Patientez 5 minutes entre deux mesures! Beurer et son équipe • Les valeurs mesurées par vos soins sont purement infor- matives. Elles ne sauraient remplacer une consultation 1. Premières expériences médicale! Discutez des valeurs mesurées avec votre mé- decin. Ne prenez aucune décision médicale individuelle à... - Page 25 • L’appareil ne doit être utilisé que sur des personnes pré- – Utilisez uniquement les brassards de rechange fournis sentant un tour de bras adapté. ou d’origine. Dans le cas contraire, vous obtiendrez des • Le lecteur de tension artérielle peut être utilisé sur piles valeurs mesurées erronées. ou sur secteur. Notez que l’enregistrement des données • N’appuyez pas sur les touches tant que vous n’avez pas n’est possible que si votre lecteur de tension artérielle est mis le brassard.
-
Page 26: Description De L'appareil
• Vous ne devez en aucun cas réparer ou ajuster l‘appareil vous-même. Le cas contraire, aucun fonctionnement irréprochable n‘est garanti. • Les réparations doivent être effectuées uniquement par le service après-vente de Beurer ou des revendeurs agréés. Cependant avant de faire une réclamation, contrôlez d‘abord les piles et changez-les, le cas échéant. • Pour éliminer l‘appareil, conformez-vous à la direc- 1. Flexible du brassard tive sur les appareils électriques et électroniques... -
Page 27: Préparation À La Mesure
Interrupteur d’activation de l’écran tactile 7. Classe OMS 8. Symbole changement de piles L’appareil dispose d’un affichage à écran tactile. Pour éviter 9. Reconnaissance de l’arythmie une activation accidentelle de l’écran, gardez l’interrupteur d’activation de l’écran tactile en position « OFF » quand Kit PC l’appareil n’est pas utilisé. -
Page 28: Mesure De La Tension Artérielle
• Réglez ensuite le mois, le jour, l'heure et les minutes et Quand l'icône „ “ du témoin de changement de piles confirmez à chaque fois avec « START/STOP ». reste allumé, il n'est plus possible d'effectuer une mesure ; •... - Page 29 par des vêtements trop serrés ou Adoption d’une posture correcte toute autre chose. Placez le brassard de telle sorte que son bord inférieur se situe 2 à 3 cm au-dessus du coude et au-dessus de l’artère. Le cordon doit être orienté en direction du • Avant chaque mesure, reposez-vous pendant env. 5 mi- milieu de la paume de la main.
-
Page 30: Evaluation Des Résultats
avec la touche « START/STOP ». Sans activation, la der- Attendez au moins 5 minutes avant de faire une nouvelle nière mémoire utilisateur utilisée est utilisée automatique- mesure. ment après 5 secondes. 6. evaluation des résultats • Le dernier résultat mesuré enregistré s’affiche briève ment Arythmies cardiaques: avant la mesure. Si la mémoire ne contient aucune me- sure, l’appareil affiche «... -
Page 31: Enregistrement, Appel Et Suppression Des Valeurs Mesurées
Classe OMS : sanguine à hauts et faibles risques. Cette norme, cepen- L'Organisation Mondiale de la Santé (OMS) et le Comité dant, n'est qu'un guide général, car la pression sanguine national de coordination du programme d'éducation sur individuelle varie selon les personnes, les différents groupes l'hypertension artérielle ont mis au point une norme sur d'âge, etc. -
Page 32: Message D'erreur/Suppression Des Erreurs
• Mettez l’interrupteur d’activation de l’écran tactile en Des messages d’erreur peuvent s’afficher si : position « ON ». • les valeurs de tension artérielle sont anormalement éle- • Avec la touche « MEM » puis avec la touche « START/ vées ou basses (Er1 ou Er2 s’affiche à l’écran), STOP », sélectionnez la mémoire utilisateur souhaitée. • le brassard est trop serré ou trop lâche (Er3 ou Er4 En appuyant encore sur la touche «... -
Page 33: Fiche Technique
Alimentation électrique 4 piles 1,5 V AA (alcalines LR6) Durée de service des piles Pour 500 mesures environ, selon N° de modèle BM 58 la tension arérielle, à savoir la Méthode de mesure Mesure de la pression artérielle pression de gonflage oscillométrique, invasive au bras... - Page 34 Fabricant Friwo Gerätebau GmbH reils de mesure non invasive de la tension artérielle partie 1: exigences générales) et EN1060-3 (appareils de mesu- Protection L’appareil dispose d’une isolation re non invasive de la tension artérielle partie 3: exigences double et d’un protecteur thermique complémentaires pour systèmes électro mécaniques de primaire mettant l’appareil hors mesure de la tension artérielle).
-
Page 35: Conocer El Aparato
• Repose unos 5 minutos antes de iniciar la medición. Les saluda cordialmente • Es recomendable esperar 5 minutos entre dos mediciones. Su equipo Beurer • Los valores medidos por Vd. sirven solamente para su información; ellos no sustituyen los exámenes médicos. Nunca tome Vd. propias decisiones médicas basadas en 1. Conocer el aparato los valores medidos (por ejemplo, medicamentos a tomar y sus dosificaciones);... - Page 36 • Aplicar el aparato solamente en personas cuyo tamaño • No presionar los botones mientras el brazalete no esté del brazo se encuentre dentro de la gama de circunferen- colocado. cias especificada para el aparato. • Si usted no necesita usar el aparato durante un período • Vd. puede utilizar el tonómetro con pilas o bien con mayor de tiempo, recomendamos sacar las pilas. la fuente de alimentación para la red. Observe que el Indicaciones sobre las pilas almacenamiento de datos es posible solamente, si su tonómetro recibe corriente.
-
Page 37: Descripción Del Aparato
De lo contrario no se podrá garantizar el correcto funcionamiento del aparato. • Las reparaciones deben ser llevadas a cabo exclusiva- mente por el servicio postventa de Beurer o bien por sus agentes autorizados. Antes de gestionar cualquier recla- mación, controle en primer lugar las pilas y cámbielas en caso dado. -
Page 38: Preparar La Medición
Interruptor de encendido de la pantalla táctil 8. Símbolo de cambio de pilas 9. Detección de arritmia El aparato dispone de pantalla táctil; para evitar que esta se encienda por error, mantenga el interruptor de encendido Kit para PC de la pantalla táctil en la posición “OFF” mientras no esté usando el aparato. -
Page 39: Medir La Presión Sanguínea
año con la tecla “MEM” y confirme con la tecla “START/ Cuando el „ “ de cambio de pilas permanece encendido STOP”. permanentemente, significa que es imposible llevar a cabo • A continuación, ajuste el mes, el día, la hora y el minuto y más mediciones y que debe cambiarse todas las pilas confirme cada uno de ellos con la tecla “START/STOP”. - Page 40 Colocar el brazalete Bajo el número de pedido 162.796 puede adquirirse en las tiendas especializadas o bien en la dirección de servicio un Coloque el brazalete en el brazo brazalete de tamaño mayor para brazos con perímetros de izquierdo desnudo. 30 hasta 42 cm. El manguito se debe colocar de tal manera, que el margen inferior Colocar el cuerpo en la posición correcta quede a unos 2 ó...
-
Page 41: Evaluar Los Resultados
• Coloque usted el brazalete tal como se ha descrito ante- Observar el capítulo „Avisos de fallas/Eliminación de riormente y tome la posición en que desea llevar a cabo fallas“ en las presentes instrucciones de uso y repetir la la medición. medición. • Ponga en marcha el tonómetro presionando el botón ini- • El resultado de la medición se almacena automáticamente. cio/parada . Tras mostrar la pantalla completa aparecerá • Para apagar el aparato sólo tiene que pulsar la tecla el último registro de usuario almacenado ( ). - Page 42 Clasificación WHO: Repita la medición, si en la pantalla aparece el símbolo La Organización Mundial de la Salud (WHO) y la Comisión después de la medición. Sírvase observar que Vd. debe Coordinadora Nacional del Programa de Educación sobre descansar previamente 5 minutos y que no debe hablar ni Alta Presión Sanguínea ha desarrollado un estándar de moverse durante la medición.
-
Page 43: Almacenar, Activar Y Borrar Valores De Medición
7. Almacenar, activar y borrar valores de • Para apagar el aparato sólo tiene que pulsar de nuevo las teclas “MEM” o “START/STOP”, o poner el interruptor de medición encendido de la pantalla táctil en la posición “OFF”. • Los resultados de todas las mediciones correctas se •... -
Page 44: Limpiar Y Guardar El Aparato
+5 °C a +40 °C; < 90 % de 10. especificaciones técnicas trabajo permitida humedad relativa Modelo No. BM 58 Temperatura de alma- -20 °C a +55 °C; < 95 % de Método de medición Medición oscilométrica, no cenamiento permitida humedad relativa invasiva, de la presión presión... - Page 45 6 V DC, 600 mA, solamente en • Este aparato cumple con la norma europea EN60601-1-2 combinación con los tensiómetros y está sometido a medidas de precaución especiales Beurer respecto a la compatibilidad electromagnética. Para Fabricante Friwo Gerätebau GmbH este efecto sírvase considerar que los equipos de co- Protección...
- Page 46 • Si Vd. utiliza el aparato para fines profesionales o econó- micos, deberá Vd. llevar a cabo controles periódicos de la técnica de medición, según lo estipula la “Prescripción para Usuarios Profesionales de Productos Médicos”. Recomendamos a Vd. someter el aparato también a controles de técnica de la medición cada dos años, si el aparato se usa en el sector privado.
-
Page 47: Note Introduttive
• Misurare la pressione sanguigna sempre alle stesse ore del giorno per ottenere dati attendibili per la comparazione. Cordiali saluti • Riposare per circa 5 minuti prima di ogni misurazione! Il Suo team Beurer • Mantenere un intervallo di circa 5 minuti fra due misura- zioni! • I valori misurati dall’utente possono servire solo a titolo 1. Note introduttive informativo – essi non sostituiscono le visite mediche! - Page 48 • Utilizzare lo sfigmomanometro solo su persone che • Non premere pulsanti finché il bracciale non è ben allac- possiedono una circonferenza del braccio compresa nel ciato al polso. campo indicato per l’apparecchio. • Si consiglia di rimuovere le batterie quando l’apparecchio • Lo sfigmomanometro può essere utilizzato a batteria o non viene usato per un lungo periodo. con un alimentatore di rete. Tener presente che il salva- taggio dei dati è possibile solo se lo sfigmomanometro ri- Indicazioni sulle batterie ceve corrente.
-
Page 49: Descrizione Dell'apparecchio
3. Spina del bracciale caso non è più garantito un funzionamento corretto. 4. Pulsante di attivazione touch • Le riparazioni devono essere eseguite esclusivamente dal screen servizio assistenza di Beurer o da ri-venditori autorizzati. 5. Interfaccia USB Prima di ogni reclamo verificare in primo luogo lo stato 6. Supporto manicotto delle batterie e sosti-tuirle, se necessario. - Page 50 4. Preparazione della misurazione Supporto del manicotto È possibile stipare comodamente il manicotto tramite il rela- Inserimento delle batterie tivo supporto posizionato sul lato inferiore dell'apparecchio. • Far scivolare verso l'alto A tale scopo sfilare con i pollici il supporto del manicotto il supporto del manicotto fino al suo arresto (vedere anche il capitolo "Inserimento posizionato sul retro delle batterie").
-
Page 51: Misurazione Della Pressione Sanguigna
Nota: Sulle batterie contenenti sostante nocive batterie nel vano batterie. L'alimentatore di rete può e ssere sono riportate le sigle seguenti: Pb = la batte- acquistato nei negozi specializzati indicando il numero di ria contiene piombo, Cd = la batteria contiene ordinazione 071.19 oppure contattando l'indirizzo del servi- cadmio, Hg = la batteria contiene mercurio. - Page 52 bile dovrà essere rivolto verso il • Riposare per circa 5 minuti prima di ogni misurazione! In centro del palmo della mano. caso contrario l’apparecchio può fornire misure inesatte. Applicare quindi l’estremità libera • La misurazione può essere eseguita da seduti o sdrai- del bracciale intorno al braccio, ati. Ad ogni modo controllare che il bracciale si trovi in maniera ben aderente ma non all'altezza del cuore.
- Page 53 • Prima della misurazione, viene visualizzato brevemente Attendere almeno 5 minuti prima di eseguire un’altra l’ultimo valore memorizzato. Se la memoria non contiene misurazione. valori misurati, il display visualizza ogni volta il valore „0“. 6. Valutare i risultati • Il bracciale viene gonfiato a 190 mm Hg. L’aria compressa Aritmie cardiache: nel bracciale viene scaricata lentamente.
-
Page 54: Salvataggio, Richiamo E Cancellazione Dei Valori Misurati
Classificazione dell’OMS: per il riconoscimento dei valori della pressione sanguigna L'Organizzazione Mondiale della Sanità (OMS) e il National con un rischio elevato e ridotto. Tali valori standard fungono High Blood Pressure Education Program Coordinating tuttavia solo da direttiva generale poiché la pressione san- Committee (Comitato di coordinamento dei programmi guigna individuale tende a differire da individuo a individuo nazionali per l'educazione sull'alta pressione sanguigna) -
Page 55: Messaggi Di Errore/Eliminazione Dei Guasti
• Portare il pulsante del touch screen in posizione "ON". • i valori della pressione sanguigna sono eccezionalmente • Premendo il pulsante "MEM" e quindi il pulsante "START/ alti o bassi (il display visualizza Er1 o Er2), STOP", selezionare la memoria utilizzatore desiderata. •... -
Page 56: Dati Tecnici
10. Dati tecnici Temperatura di conser- da -20 °C a +55 °C, < 95 % vazione ammissibile umidità relativa dell’aria Modello N° BM 58 Alimentazione Batterie 4 x 1,5 V AA (alcaline tipo Metodo di misurazione Misurazione oscillometrica, non LR6) - Page 57 Protezione L’apparecchio dispone di un doppio norme EN1060-1 (sfigmomanometri non invasivi, parte isolamento di protezione ed è 1: Requisiti generali) e EN1060-3 (sfigmomanometri non equipaggiato di un fusibile termico sul invasivi, parte 3: Requisiti complementari per sistemi elet- lato primario che, in caso di guasto, tromeccanici di misurazione della pressione sanguigna).
-
Page 58: Önemli Bilgiler
• Tansiyonunuzu daima günün aynı saatinde ölçerek, ölçü- len değerlerin birbiriyle kıyaslanabilir olmasını sağlayınız. Dostane tavsiyelerimizle • Her ölçümden önce yakl. 5 dakika dinleniniz! Beurer Müessesesi • İki ölçüm arasında 5 dakika beklemeniz gerekir! • Kendi ölçtüğünüz değerler sadece sizin bilgi edinme- 1. Tanıtım nize yarar; bir doktor kontrolünün yerini tutmaz! Ölçüm Kolun üst kısmı üzerinden tansiyon ölçme cihazı, yetişkin değerlerinizi doktorunuzla gözden geçiriniz, bu değerlere... - Page 59 akımı ile beslenmesi durumunda mümkün olacağına dikkat Piller ile ilgili bilgiler ediniz. Pillerin şarjı biter bitmez veya güç kaynağı elektrik prizinden çekilip çıkarılınca, tansiyon aletinin tarih, saat • Pillerin yutulması halinde, ölüm tehlikesi söz konu- değerleri kaybolur. su olabilir. Bu nedenle, pilleri ve ürünleri çocukların • Otomatik kapatma fonksiyonu, cihazın herhangi bir tuşuna ulaşamayacakları...
-
Page 60: Cihazın Tarifi
• Onarımlar sadece Beurer yetkili servisi veya yetkili satıcılar 5. USB bağlantı noktası tarafından yapılmalıdır. Fakat her reklamasyondan önce, 6. Bileklik yine de ilk olarak pilleri kontrol ediniz ve gerekirse bunları 7. Manset fisi için baglanti değiştiriniz. (sol taraf) • Cihazı lütfen 2002/96/EC – WEEE (Waste Electrical 8. Belleğe kayıt tuşu MEM and Elektronik Equipment – Elektrikli ve elektronik 9. - Page 61 ekrandaki görüntüler: Bunu yaparken, pillerin + ve - kutuplarının doğru yerleştirilmiş olmasına dikkat ediniz. Tekrar şarj edilebilir 1. Manşet hortumu aküler kesinlikte kullanılmamalıdır. 2. Manşet • Pil yuvasının kapağını tekrar dikkatlice kapatınız. 3. Manşet fişi 4. Tespit edilen nabız değeri Pil Değiştirme Göstergesi „ “ sürekli yanıyorsa, herhangi 5.
-
Page 62: Tansiyonun Ölçülmesi
• Aynı anda “START/STOP” ve “MEM” düğmesine basın. Manşetin takılması Yıl yanıp sönmeye başlar. “MEM” düğmesiyle yılı ayarlayın Manşeti, açık olan sol üst kola ve “START/STOP” ile onaylayın. sarınız. Kolunuzdaki kan dolaşımı, • Daha sonra ayı, günü, saati ve dakikayı ayarlayın ve her dar elbise ve benzeri sebeple defasında “START/STOP” ile onaylayın. etkilenmemelidir. Manşeti üst • “START/STOP” düğmesine yeniden basıldığında ekran kolunuza öyle takınız ki, alt kesimi kapanır. - Page 63 Doğru konuma geçilmesi Onaylanmadığında 5 saniye sonra otomatik olarak en son kullanılan kullanıcı hafızası kullanılır. • Ölçme işleminden önce, belleğe son kaydedilmiş ölçüm sonucu kısaca gösterilir. Bellekte herhangi bir ölçme so- nucu yoksa, cihaz bu durumda „0“ değerini gösterir. • Manşet, 190 mmHg basınç değerine kadar pompalanır. Manşetin içindeki hava basıncı...
-
Page 64: Sonuçların Değerlendirilmesi
6. Sonuçların değerlendirilmesi önce 5 dakika dinlenmeye ve ölçme işlemi esnasında konuşmamaya veya hareket etmemeye lütfen dikkat ediniz. Kalpte ritmik çalışma bozuklukları: Bu sembol sık sık görünürse, lütfen doktorunuza Bu cihaz, ölçüm esnasında kalpteki muhtemel ritmik çalışma başvurunuz. Ölçüm sonuçlarına göre kendi kendinizi diya- bozukluklarını... - Page 65 Doktorunuza, düzenli aralıklarla danışmanız önemlidir. sabah yapılan ölçümlerin son 7 gündeki ortalama değeri Doktorunuz, normal bir kan basıncı için sizin birey- görüntülenir. (Sabah: saat 5.00 – 9.00, gösterge “ ”). sel değerlerinizi ve de kan basıncının tehlikeli olarak “MEM” düğmesine basılmaya devam edildiğinde akşam değerlendirilecek yükseklikten itibaren olan değerleri size yapılan ölçümlerin son 7 gündeki ortalama değeri gö- bildirir.
-
Page 66: Teknik Bilgiler
İzinli muhafaza ısısı -20 °C den +55 °C kadar, % < 95 10. Teknik bilgiler nispi hava nemi Model numarası BM 58 Akımla beslenmesi 4 x 1,5 V AA-Piller (Alkaline Tipi LR6) Ölçme metodu Üst kol üzerinden, osilometrik,vücut Pil çalışma süresi Kan basıncının ve pompalama... - Page 67 Giriş 100–240 V, 50–60 Hz ve EN1060-1 Avupa standartlarına (vücudun dışından uy- Çıkış 6 V DC, 600 mA, sadece Beurer tansiyon gulanan tansiyon ölçme cihazları bölüm 1: Genel talepler) ölçme cihazı ile birlikte kullanılır ve EN1060-3 Avrupa standartlarına (vücudun dışından Üretici...
-
Page 68: Важные Указания
• Всегда измеряйте кровяное давление в одно и то же приведенным в ней указаниям. время суток, чтобы обеспечить сравнимость результатов. • Перед каждым измерением расслабляйтесь в течение С дружескими пожеланиями сотрудники компании Beurer около 5 минут! • Между двумя измерениями рекомендуется подождать 1. Ознакомление... - Page 69 артериальном давлении, нарушениях кровообращения и – Используйте только входящие в объем поставки или сердечного ритма и других предболезнях. оригинальные запасные манжеты. В противном случае • Использовать аппарат только для людей, у которых получаются неверные результаты измерений. • Не нажимать на кнопки, пока не надета манжета. объем...
-
Page 70: Описание Прибора
• Запрещается самостоятельно ремонтировать или регулировать прибор. В этом случае больше не гарантируется безупречность работы. • Ремонт разрешается выполнять только сервисной службе фирмы Beurer или авторизированным сервисным организациям. Но перед любыми рекламациями вначале 1. Шланг манжеты проверьте батарейки и, при необходимости,замените их. -
Page 71: Подготовка К Измерению
Выключатель сенсорного дисплея 6. Индикация содержимого памяти Среднее значение ( ) , утром ( ), вечером ( ) номер ячейки памяти На приборе имеется сенсорный дисплей. Чтобы избежать 7. Классификация ВОЗ случайного включения сенсорного дисплея, держите его 8. Пиктограмма замены батареек выключатель... - Page 72 • Аккуратно закройте крышку батарейного отсека. Для настройки даты и времени действуйте следующим образом: Если постоянно светится индикация замены батареек • Переведите выключатель сенсорного дисплея в позицию „ “ проведение измерений больше невозможно, и Вы „ON“ . должны заменить все батарейки. После удаления батареек •...
-
Page 73: Измерение Кровяного Давления
5. Измерение кровяного давления Наденьте теперь соединительную трубку манжеты на штуцер манжеты. Пожалуйста, перед измерением храните прибор при комнатной температуре. Внимание! Эксплуатация прибора допускается только с оригинальной манжетой. Данная манжета пригодна Наложить манжету для руки с окружностью от 22 до 30 см. Под номером Наденьте... -
Page 74: Оценка Результатов
Выполнить измерение кровяного давления • Вы можете в любой момент прервать измерение нажатием. • Переведите выключатель сенсорного дисплея в позицию • Пиктограмма «Er» появляется, если измерение не „ON“ . может быть выполнено должным образом. Прочтите • Наденьте манжету, как было описано выше, и примите главу... - Page 75 заболеваниями сердца, возрастом, физиологической можно классифицировать и оценить, как указано в предрасположенностью, чрезмерным употреблением нижеследующей таблице. тонизирующих и возбуждающих продуктов, стрессом или недосыпанием. Аритмия может быть обнаружена только при классификация ВОЗ: обследовании врачом. Всемирная организация здравоохранения (ВОЗ) Повторите измерение, если пиктограмма и...
-
Page 76: Сохранение, Вызов И Удаление Результатов Измерения
Важно регулярно консультироваться со своим врачом. значение из всех результатов утренних измерений за Ваш врач сообщит Ваши индивидуальные значения последние 7 дней. (Утро: 5.00 - 9.00, индикация „ “). Если нормального кровяного давления, а также тот уровень, нажать кнопку „MEM“ еще раз, отобразится среднее значение начиная... -
Page 77: Технические Данные
10. Технические данные • манжета наложена слишком сильно или слишком слабо (на дисплее появляется Er3 или Er4), Модель № BM 58 • давление накачивания превышает 300 мм рт. ст. (на Методы измерения Осцилло метрическое дисплее появляется Er5), измерение неинвазивное • накачивание длится более 3 минут (на дисплее... - Page 78 Размер манжеты 22 до 30 см предосторожности в отношении электромагнитной совместимости. При этом учитывайте, что переносные и Допустимая рабочая от +5 °C до +40 °C, < 90 % температура относительная влажность мобильные средства ВЧ-связи могут влиять на данный прибор. Точную информацию Вы можете получить в Допустимая...
- Page 79 11. Г арантия Мы предоставляем гарантию на дефекты материалов и изготовления этого прибора на срок 36 месяцев со дня продажи через розничную сеть. Г арантия не распространяется: - на случаи ущерба, вызванного неправильным использованием - на быстроизнашивающиеся части ( батарейки, манжета ) - на...
-
Page 80: Ważne Wskazówki
• Przed każdym pomiarem odpocząć ok. 5 minut! Z poważaniem, • Pomiędzy pomiarami odczekać 5 minut! Zespół firmy Beurer • Uzyskane wartości służą wyłącznie do własnej informacji – w żadnym wypadku nie zastępują badania lekarskiego! Wyniki należy omówić z lekarzem, nie uzasadniać nimi w 1. Zapoznanie żadnym wypadku własnych decyzji w leczeniu (np.: leków Naramienny aparat do mierzenia ciśnienia krwi służy do... - Page 81 możliwa jest tylko w przypadku, gdy urządzenie ma prąd. Jeśli więc baterie są wyczerpane, urządzenie straci Wskazówki do baterii możliwość pamiętania daty oraz czasu zegarowego. • Baterie mogą być przy połknięciu niebezpieczne dla • Automatyka wyłączania wyłącza urządzenie w celu życia. Przechowywać z tego powodu baterie i produkt oszczędności baterii, jeśli w ciągu minuty nie zostanie w miejscach niedostępnych dla małych dzieci.
-
Page 82: Opis Urządzenia
• Naprawy mogą być przeprowadzane jedynie przez ser- 6. Uchwyt mankietu wis firmy Beurer lub autoryzowany serwis dystrybutora 7. Gniazdo dla wtyczki opaski sprzętu. Przed złożeniem reklamacji sprawdzić najpierw (lewa strona) baterie i w razie potrzeby wymienić je na nowe. 8. Przycisk pamięci MEM • Urządzenie utylizować zgodnie z zaleceniem 9. -
Page 83: Przygotowanie Pomiaru
4. Przygotowanie pomiaru Wskazania na wyświetlaczu: 1. Czas i data Zakładanie baterii 2. Ciśnienie skurczowe • Przesuń uchwyt mankietu 3. Ciśnienie rozkurczowe znajdujący się z tyłu 4. Zmierzona wartość pulsu urządzenia do góry, aby 5. Pompowanie, wypuszczanie się zablokował. powietrza (strzałka) • Otwórz pokrywę baterii 6. -
Page 84: Pomiar Ciśnienia Krwi
Wskazówka: Takie oznaczenia znajdują się na • Wciśnij równocześnie przycisk „START/STOP” oraz bateriach zawierających szkodliwe substancje: „MEM”. Rok zacznie migać. Ustaw rok za pomocą przy- Pb = bateria zawiera ołów, Cd = bateria zawiera cisku „MEM” i potwierdź wciskając przycisk „START/ kadm, Hg = bateria zawiera rtęć. - Page 85 było wsunąć pod niego dwa • Aby nie zafałszować wyniku pomiaru jest ważne, aby palce. podczas pomiaru zachowywac się spokojnie i nie mówić. Wężyk mankietu należy wetknąć do przyłącza dla wtyczki man- Przeprowadzanie pomiaru kietu. • Ustaw włącznik wyświetlacza w pozycji „ON”. • Założyć mankiet w wyżej opisany sposób i przyjąć Uwaga: Urządzenie może być postawę, w której chce się przeprowadzić pomiar. użytkowane tylko z oryginalną...
-
Page 86: Ocena Wyników
• Pomiar można przerwać w każdej chwili wciskając przy- Powtórzyć pomiar, kiedy po jego wykonaniu na cisk „START/STOP“ lub przesuwając włącznik wyświetla- wyświetlaczu pojawi się symbol . Należy pamiętać, cza po pozycji „OFF“. aby odpocząć 5 minut i w czasie pomiaru nie mówić i nie • Jeżeli pomiar nie został prawidłowo przeprowadzony, poruszać się. Jeśli symbol pojawia się... -
Page 87: Zapis Wartości Pomiarowych Do Pamięci, Edycja I Kasowanie
Zakres wartości ciśnienia krwi Ciśnienie skurczowe Ciśnienie rozkurczowe Postępowanie (w mmHg) (w mmHg) Stopień 3: silne nadciśnienie > = 180 > = 110 Skontaktuj się z lekarzem Stopień 2: umiarkowane nadciśnienie 160 – 179 100 – 109 Skontaktuj się z lekarzem Stopień... -
Page 88: Komunikaty O Błędach/Usuwanie Błędów
(na wyświetlaczu pojawia się komunikat 10. Dane techniczne Er1 lub Er2), • mankiet jest założono za ciasno lub za luźno (na Nr modelu BM 58 wyświetlaczu pojawia się komunikat Er3 lub Er4), Metoda pomiaru Oscylometryczny, nieinwazyjny • ciśnienie napompowywania jest wyższe niż 300 mmHg pomiar ciśnienia krwi na przedra-... - Page 89 Wyjście 6 V DC, 600 mA tylko w połączeniu z Zasilanie elektryczne 4 baterie 1,5 V AA (alkaliczne ciśnieniomierzami firmy Beurer typu LR6) Producent Friwo Gerätebau GmbH Żywotność baterii Na ok. 500 pomiarów, w zależ- Ochrona Urządzenie posiada podwójną...
- Page 90 Obudowa i Obudowa adaptera chroni przed kontak producenta kontrole techniczno-pomiarowe w odstępach 2 – letnich. pokrywa rtem z częściami, które przewodzą ochronna wzgl. mogłyby przewodzić prąd (palce, igły, hak testowy). Użytkownikowi nie wolno jednocześnie dotykać pacjenta i wtyczki wyjściowej adaptera AC. • To urządzenie jest zgodne z normą...
Need help?
Do you have a question about the BM 58 and is the answer not in the manual?
Questions and answers