Indesit PIM 640 S Operating Instructions Manual
Hide thumbs
Also See for PIM 640 S:
- Operating instructions manual (56 pages) ,
- Operating instructions manual (15 pages)
Table of Contents
Advertisement
Available languages
Available languages
Quick Links
PIM 640 S
PIM 640 AS
PIM 640 AS EX
Italiano
Istruzioni per l'uso
PIANO
Sommario
Istruzioni per l'uso,1
English
Operating Instructions
HOB
Contents
Operating Instructions,1
Warnings,3
Assistance,8
Description of the appliance,10
Installation,21
Français
Mode d'emploi
TABLE DE CUISSON
Sommaire
Mode d'emploi,1
Assistance,8
Installation,28
Español
Manual de instrucciones
ENCIMERA
Sumario
Manual de instrucciones,1
Advertencias,4
Asistencia,8
Descripción del aparato,11
Instalación,37
Portuges
Instruções para a utilização
PLANO
Índice
Instruções para a utilização,1
Advertências,5
Assistência,9
Descrição do aparelho,12
Instalação,44
Advertisement
Table of Contents

Related Manuals for Indesit PIM 640 S


Summary of Contents for Indesit PIM 640 S
-
Page 1: Table Of Contents
PIM 640 S PIM 640 AS PIM 640 AS EX Français Mode d’emploi TABLE DE CUISSON Sommaire Mode d’emploi,1 Avertissements,4 Assistance,8 Description de l’appareil,11 Installation,28 Mise en marche et utilisation,34 Précautions et conseils,34 Nettoyage et entretien,35 Anomalies et remèdes,36 Italiano Español... - Page 2 Deutsch Bedienungsanleitung KOCHMULDE Inhaltsverzeichnis Bedienungsanleitung,2 Hinweise,5 Kundendienst,9 Beschreibung Ihres Gerätes,12 Installation,51 Inbetriebsetzung und Gebrauch,56 Vorsichtsmaßregeln und Hinweise,57 Reinigung und Pflege,57 Störungen und Abhilfe,58 Nederlands Gebruiksaanwijzing KOOKPLAAT Inhoud Gebruiksaanwijzing,2 Belangrijk,6 Service,9 Beschrijving van het apparaat,13 Het installeren,59 Starten en gebruik,65 Voorzorgsmaatregelen en advies,66 Onderhoud en verzorging,66 Storingen en oplossingen,67 ليغشتلا...
-
Page 3: Avvertenze
L’apparecchio non è destinato a essere messo in funzione per mezzo di un temporizzatore esterno oppure di un Avvertenze sistema di comando a distanza separato. ATTENZIONE: Questo apparecchio e le ATTENZIONE: l’uso di protezioni del sue parti accessibili diventano molto caldi piano inappropriate può... -
Page 4: Avertissements
The appliance is not intended to be Ne jamais nettoyer l’appareil avec des operated by means of an external timer nettoyeurs vapeur ou haute pression. or separate remote control system. Essuyer tout liquide pouvant se trouver CAUTION: the use of inappropriate hob sur le couvercle avant de l’ouvrir. -
Page 5: Hinweise,5
la llama, por ejemplo, con una tapa o con ATENÇÃO: Deixar um fogão com una manta ignífuga. gordura e óleo sem vigilância pode ser perigoso e provocar um incêndio. ATENCIÓN: Riesgo de incendio: no deje NUNCA tente apagar as chamas com objetos sobre las superficies de cocción. - Page 6 vorausgesetzt sie werden ausreichend überwacht oder sie wurden in den sicheren Gebrauch des Geräts eingewiesen und Belangrijk haben eine ausreichende Wahrnehmung der mit dem Gebrauch des Geräts PAS OP: Dit apparaat en zijn bereikbare verbundenen Gefahren. Erlauben Sie onderdelen worden tijdens gebruik zeer Kindern nicht, mit dem Gerät zu spielen.
- Page 7 Het apparaat is niet geschikt om te worden ingeschakeld m.b.v. een externe timer of door een gescheiden afstandsbedieningssysteem. PAS OP: het gebruik van ongeschikte kookplaatbeschermingen kan ongelukken veroorzaken. تحذيرات انتبه: يصبح هذا الجهاز وجميع أجزاءه الملموسة ساخنة .ج د ً ا أثناء االستخدام .يجب...
-
Page 8: Assistenza
08:00 e i giorni festivi, per chi chiama dal telefono fisso. Per chi chiama da radiomobile le tariffe sono legate al piano tariffario dell’operatore telefonico utilizzato. Le suddette tariffe potrebbero essere soggette a variazione da parte dell’operatore telefonico; per maggiori informazioni consultare il sito www.indesit.com. -
Page 9: Kundendienst,9
Assistência Comunique: • o modelo da máquina (Mod.) • o número de série (S/N) Estas últimas informações encontram-se na placa de identificação situada no aparelho e/ou na embalagem. Kundendienst Geben Sie bitte Folgendes an: • das Gerätemodell (Mod.) • die Modellnummer (S/N). Letztere Informationen finden Sie auf dem Typenschild, das sich auf dem Gerät und/oder der Verpackung befindet. -
Page 10: Descrizione Dell'apparecchio
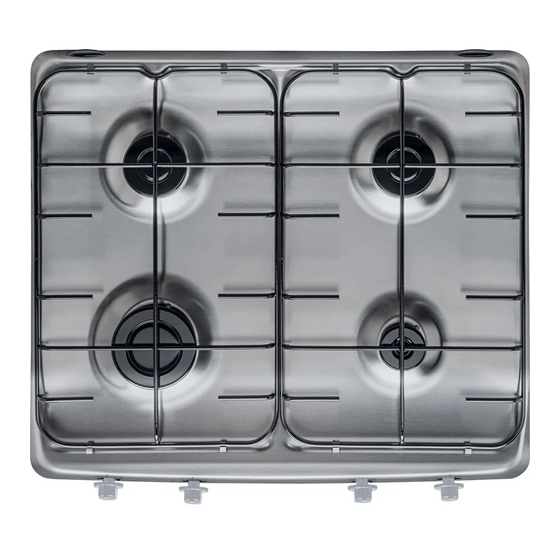
Descrizione dell’apparecchio Description of the Vista d’insieme appliance 1 Griglie di appoggio per RECIPIENTI DI COTTURA Overall view 2 BRUCIATORI GAS 3 PIASTRA ELETTRICA* 1 Support Grid for COOKWARE 4 Spia FUNZIONAMENTO PIASTRA ELETTRICA* 2 GAS BURNERS 5 Manopole di comando dei BRUCIATORI GAS 3 ELECTRIC HOTPLATE* 6 Manopole di comando della PIASTRA ELETTRICA* 4 Electric HOTPLATE INDICATOR LIGHT*... -
Page 11: Description De L'appareil
Only available on certain models. N’existe que sur certains modèles. Description de l’appareil Descripción del aparato Vue d’ensemble Vista en conjunto 1 Grilles support de CASSEROLES 1 Parrillas de apoyo para RECIPIENTES DE COCCIÓN 2 BRÛLEURS À GAZ 2 QUEMADORES A GAS 3 PLAQUE ÉLECTRIQUE* 3 PLACA ELÉCTRICA* 4 Voyant FONCTIONNEMENT PLAQUE ÉLECTRIQUE*... -
Page 12: Beschreibung Ihres Gerätes,12
Presente sólo en algunos modelos. Há somente em alguns modelos. Descrição do aparelho Beschreibung Ihres Gerätes Vista de conjunto Geräteansicht 1 Grades de suporte para RECIPIENTES DE COZEDURA 1 KOCHMULDENROSTE 2 QUEIMADORES A GÁS 2 GASBRENNER 3 CHAPA ELÉCTRICA* 3 ELEKTROPLATTE* 4 Indicador luminoso DAS CHAPAS ELÉCTRICAS* 4 Kontrollleuchte ELEKTROPLATTE* 5 Selectores de comando dos QUEIMADORES A GÁS... - Page 13 Nur bei einigen Modellen. زاهجلا فصو Beschrijving van het apparaat نظرة عامة Algemeen aanzicht 1 يدعم شبكة أواني الطهي 2 محارق الغاز 1 Roosters voor PANNEN *3 لوح التسخين الكهربائي 2 GASBRANDERS *4 مؤشر لوح التسخين الكهربائي 3 ELEKTRISCHE KOOKPLAAT* 5 مقابض...
-
Page 14: Installazione
Installazione • I gas di petrolio liquefatti, più pesanti dell’aria, ristagnano verso il basso. Quindi i locali contenenti bidoni di GPL debbono prevedere delle aperture verso l’esterno così ! È importante conservare questo libretto per poterlo da permettere l’evacuazione dal basso delle eventuali consultare in ogni momento. -
Page 15: Collegamento Elettrico
Collegamento elettrico Schema di fissaggio dei ganci I piani dotati di cavo di alimentazione tripolare, sono predisposti per il funzionamento con corrente alternata alla tensione e frequenza di alimentazione indicate sulla targhetta caratteristiche (posta sulla parte inferiore del piano). Il conduttore di terra del cavo è contraddistinto dai colori giallo-verde. - Page 16 ! Per un sicuro funzionamento, per un adeguato uso • Regolazione minimi dell’energia e maggiore durata dell’apparecchiatura, assicurarsi che la pressione di alimentazione rispetti i valori 1. Portare il rubinetto sulla posizione di minimo; indicati nella tabella 1 “Caratteristiche dei bruciatori ed ugelli”. 2.
- Page 17 PIM 631 AS PI 640 S PI 640 AS R PIM 640 AS PIM 640 S PIM 640 AS EX PIM 640 A ! E’ possibile installare il piano PI 640 AST/PIM 640 AST solo sopra forni incasso dotati di ventilazione di...
-
Page 18: Avvio E Utilizzo
Avvio e utilizzo • utilizzare sempre recipienti a fondo piatto e con coperchio. ! Su ciascuna manopola è indicata la posizione del • al momento dell’ebollizione ruotare la manopola fino alla bruciatore gas o della piastra elettrica* corrispondente. posizione di minimo. Bruciatori gas Bruciatore Ø... -
Page 19: Manutenzione E Cura
Manutenzione e cura • L’apparecchio non va installato all’aperto, nemmeno se lo spazio è riparato, perché è molto pericoloso lasciarlo esposto a pioggia e temporali. Escludere la corrente elettrica • Non toccare la macchina a piedi nudi o con le mani o i Prima di ogni operazione isolare l’apparecchio dalla rete di piedi bagnati o umidi. - Page 20 Il bruciatore non si accende o la fiamma non è uniforme. Avete controllato se: • Sono ostruiti i fori di uscita del gas del bruciatore. • Sono montate correttamente tutte le parti mobili che compongono il bruciatore. • Ci sono correnti d’aria nelle vicinanze del piano. La fiamma non rimane accesa nelle versioni con sicurezza.
-
Page 21: Installation
Installation • Liquid petroleum gas sinks to the floor as it is heavier than air. Therefore, rooms containing LPG cylinders must also be equipped with vents to allow gas to escape in ! Before operating your new appliance please read this the event of a leak. -
Page 22: Gas Connection
Front Connecting the supply cable to the mains Install a standardised plug corresponding to the load indicated on the data plate. The appliance must be directly connected to the mains using an omnipolar circuit-breaker with a minimum contact opening of 3 mm installed between the appliance and the mains. - Page 23 leaks. The seal must always be replaced after rotating the 4. Some appliances have a safety device (thermocouple) pipe fitting (seal provided with appliance). The gas supply fitted. If the device fails to work when the burners are set pipe fitting is a threaded 1/2 gas cylindrical male attachment. to the low flame setting, increase this low flame setting using the adjusting screw.
-
Page 24: Burner And Nozzle Specifications
PI 640 S PI 640 AS R PIM 640 AS PIM 640 S PIM 640 AS EX PIM 640 A ! The PI 640 AST/PIM 640 AST hob can only be installed above built-in ovens with a cooling ventilation system. -
Page 25: Start-Up And Use
Start-up and use • When the contents of the pan reach boiling point, turn the knob to minimum. ! The position of the corresponding gas burner or electric Burner Ø Cookware Diameter (cm) hotplate* is shown on every knob. Fast (R) 24 - 26 Gas burners Semi Fast (S) -
Page 26: Maintenance And Care
Maintenance and care • Do not touch the appliance with bare feet or with wet or damp hands and feet. • The appliance must be used by adults only for the Switching the appliance off preparation of food, in accordance with the instructions Disconnect your appliance from the electricity supply before outlined in this booklet. - Page 27 The flame dies in models with a safety device. Check to make sure that: • You pressed the knob all the way in. • You keep the knob pressed in long enough to activate the safety device. • The gas holes are not blocked in the area corresponding to the safety device.
-
Page 28: Installation
Installation • La pièce doit prévoir un système qui consent un apport d’air nécessaire à une régulière combustion. Le flux d’air nécessaire à la combustion ne doit pas être inférieur à 2 ! Conservez ce mode d’emploi pour pouvoir le consulter /h par kW de puissance installée. - Page 29 • Les éléments hauts jouxtant la hotte doivent être placés à Aération au moins 420 mm de distance du plan de travail (voir figure). Pour garantir une bonne aération, la cavité d’encastrement doit être dépourvue de paroi arrière. Il est conseillé En cas d’installation de la table d’installer le four de manière à...
-
Page 30: Raccordement Gaz
• la prise est bien apte à supporter la puissance maximale En amont de l’appareil il faut installer un robinet d’arrêt du de l’appareil, indiquée sur la plaquette signalétique; gaz (pour la Belgique marqué A.G.B); il devra être installé de manière à pouvoir facilement le manoeuvrer. Pour le •... - Page 31 Les brûleurs ne nécessitent d’aucun réglage de l’air primaire. • Réglage minimum (pour la France e la Belgique) 1. Placez le robinet sur la position de minima; 2. Déposez la manette et tournez la vis de réglage positionnée à l’intérieur ou sur le côté de la tige du robinet jusqu’à...
- Page 32 Caractéristiques des brûleurs et des injecteurs Tableau 1 (Pour la France et la Belgique) Gaz Liquides Gaz Naturels Brûleur Diamètre Puissance By-pass Injecteur Débit* Injecteur Débit* (mm) thermique 1/100 1/100 1/100 kW (p.c.s.*) (mm) (mm) Butane Propane (mm) Nom. Red. Rapide 3.00 0.70...
- Page 33 PIM 631 AS PI 640 S PI 640 AS R PIM 640 AS PIM 640 S PIM 640 AS EX PIM 640 A ! La table PI 640 AST/PIM 640 AST ne peut être installée qu’au-dessus de fours encastrés équipés de ventilation...
-
Page 34: Mise En Marche Et Utilisation
Mise en marche et utilisation • de toujours utiliser des casseroles à fond plat et avec couvercle. ! La position du brûleur gaz ou de la plaque électrique* • de tourner la manette dans la position minimum au correspondante est indiquée sur chaque manette. moment de l’ébullition. -
Page 35: Nettoyage Et Entretien
et sur la plaquette d’immatriculation. ‘‘poubelle barrée’’ est apposée sur tous les produits • Cet appareil a été conçu pour un usage familial, de pour rappeler les obligations de collecte séparée. Les type non professionnel. consommateurs devront contacter les autorités locales •... -
Page 36: Anomalies Et Remèdes
Entretien robinets gaz Il peut arriver qu’au bout d’un certain temps, un robinet se bloque ou tourne difficilement. Il faut alors le remplacer. ! Cette opération doit être effectuée par un technicien agréé par le fabricant. Anomalies et remèdes Il peut arriver que l’appareil ne fonctionne pas ou ne fonctionne pas très bien. -
Page 37: Instalación
Instalación • Los gases de petróleo licuados, más pesados que el aire, se depositan en las partes más bajas. Por lo tanto, los ambientes que contienen botellas de GPL deben tener ! Es importante conservar este manual para poder aberturas hacia el exterior para permitir la evacuación consultarlo en todo momento. - Page 38 Conexión eléctrica Esquema de fijación de los ganchos Las encimeras que poseen cable de alimentación tripolar, se fabrican para funcionar con corriente alterna, a la tensión y frecuencia de alimentación indicadas en la placa de características (ubicada en la parte inferior de la encimera). El conductor de puesta a tierra del cable se distingue por los colores amarillo-verde.
- Page 39 En el caso de alimentación con gas líquido, desde botella, • Regulación de aire principal de los quemadores utilice reguladores de presión conformes con las Normas Los quemadores no necesitan de ninguna regulación de Nacionales vigentes. aire principal. ! Para un funcionamiento seguro, un adecuado uso de la •...
- Page 40 PIM 631 AS PI 640 S PI 640 AS R PIM 640 AS PIM 640 S PIM 640 AS EX PIM 640 A ! Es posible instalar la encimera PI 640 AST/PIM 640 AST sólo sobre hornos empotrados dotados de ventilación.
-
Page 41: Puesta En Funcionamiento Y Uso
Puesta en funcionamiento y Consejos prácticos para el uso de los quemadores Si desea obtener el máximo rendimiento, es útil recordar lo siguiente: ! En cada mando está indicada la posición del quemador a • utilice recipientes adecuados para cada quemador (ver gas o de la placa eléctrica* correspondiente. -
Page 42: Precauciones Y Consejos
Precauciones y consejos través de un temporizador externo o de un sistema de mando a distancia. ! El aparato ha sido proyectado y fabricado en conformidad Eliminación con las normas internacionales de seguridad. • Eliminación del material de embalaje: respete las normas Estas advertencias se suministran por razones de seguridad locales, de esta manera los embalajes podrán ser y deben ser leídas atentamente. -
Page 43: Anomalías Y Soluciones
Mantenimiento de las llaves de gas Con el tiempo puede suceder que una llave se bloquee o presente dificultad para girar, en esos casos será necesario proceder a la sustitución de dicha llave. ! Esta operación la debe efectuar un técnico autorizado por el fabricante. -
Page 44: Instalação
Instalação • Os gases de liquefeitos de petróleo, mais pesados do que o ar, estagnam-se embaixo. Portanto, as salas que contiverem cilindros de GLP devem possuir aberturas ! É importante guardar este folheto para poder consultá-lo a para fora, de maneira que possibilitem o escoamento qualquer momento. - Page 45 ! É possível instalar o plano PI 640 AST/PIM 640 AST Esquema para prender os ganchos somente sobre fornos de encaixe equipados com ventilação de arrefecimento. Ligação eléctrica Os planos equipados com cabo de alimentação de três pólos são predispostos para o funcionamento com uma corrente alternada na tensão e a frequência de alimentação Posição do gancho Posição do gancho...
- Page 46 Em caso contrário, efectuar as operações indicadas no • Regulação do ar primário dos queimadores parágrafo “Adaptação a diferentes tipos de gás”. Em caso de alimentação com gás líquido de botija, utilizar Os queimadores não necessitam de qualquer regulação reguladores de pressão em conformidade com as Normas de ar primário.
- Page 47 PIM 631 AS PI 640 S PI 640 AS R PIM 640 AS PIM 640 S PIM 640 AS EX PIM 640 A ! É possível instalar o plano PI 640 AST/PIM 640 AST somente sobre fornos de encaixe equipados com ventilação...
-
Page 48: Início E Utilização
Início e utilização Conselhos práticos para utilização dos queimadores Para obter a máxima performance é bom lembrar-se do ! Em cada selector está indicada a posição do queimador seguinte: de gás ou da chapa eléctrica* correspondente. • utilize recipientes adequados para cada um dos Queimadores a gás queimadores (veja a tabela) com o objectivo de evitar O queimador escolhido pode ser regulado mediante o... -
Page 49: Precauções E Conselhos
Precauções e conselhos • Não permita que as crianças brinquem com o aparelho. • O aparelho não é destinado a ser colocado em funcionamento por meio de um temporizador externo ! Este aparelho foi projectado e fabricado em conformidade ou por um sistema de comando à distância separado. com as normas internacionais de segurança. -
Page 50: Anomalias E Soluções
aconselhado enxaguar com água abundante e enxugar depois da limpeza. Para mais é bom enxugar eventuais vazamentos de água. Manutenção das torneiras do gás Com o tempo pode ocorrer o caso de uma torneira que se bloqueie ou apresente dificuldades na rotação, portanto será necessário substituir a torneira mesma. -
Page 51: Installation
Installation Oder auf indirekte Weise durch Angrenzender Zu belüftender angrenzende Räume, die mit Raum Raum ! Bewahren Sie diese Bedienungsanleitung bitte sorgfältig e i n e m i n s F r e i e f ü h r e n d e n auf, damit Sie sie jederzeit zu Rate ziehen können. - Page 52 Die Kochmulde wird mit Hilfe von Haken auf der zwischen Bei Installation über einem Einbaubackofen ohne 20 und 40 mm starken Arbeitsplatte befestigt. Um eine K ü h l s y s t e m - Z w a n g s b e l ü f t u n g m ü s s e n A b - u n d optimale Befestigung der Kochmulde zu gewährleisten, Zuluftöffnungen vorgesehen werden, um eine geeignete sollten sämtliche zur Verfügung stehenden Haken...
- Page 53 ! Netzkabel und Steckdose müssen bei installiertem Gerät 2000 mm nicht überschreiten. Stellen Sie nach erfolgtem leicht zugänglich sein. Anschluss bitte sicher, dass der Inox-Schlauch nicht mit beweglichen Teilen in Berührung kommt oder an irgendeiner ! Das Netzkabel darf nicht gebogen oder eingeklemmt Stelle eingedrückt wird.
- Page 54 5. Nach erfolgter Neuregelung sind die auf den Bypass- Linien angebrachten Siegel mit Siegellack oder ähnlichem Material zu erneuern. ! Bei Flüssiggasen muss die Einstellschraube ganz angezogen werden. ! Ersetzen Sie anschließend das Etikett der alten Eichung mit einem der neuen Gasart entsprechenden Etikett (in unseren Kundendienstzentren erhältlich).
- Page 55 PIM 631 AS PI 640 S PI 640 AS R PIM 640 AS PIM 640 S PIM 640 AS EX PIM 640 A ! Die Kochmulde PI 640 AST/PIM 640 AST darf nur dann über Einbaubacköfen installiert werden, wenn diese...
-
Page 56: Inbetriebsetzung Und Gebrauch
Inbetriebsetzung und Gebrauch Praktische Hinweise zum Gebrauch der Brenner Um optimale Leistungen zu gewährleisten, ist Folgendes ! Auf jedem Reglerknopf ist gekennzeichnet, welcher zu beachten: Gasflamme oder Elektroplatte* er entspricht. • Verwenden Sie die für den jeweiligen Brenner geeignete Gasbrenner Topfgröße (siehe Tabelle) um zu vermeiden, dass die Der gewählte Brenner kann mittels des entsprechenden Flammen über den Topfboden herausschlagen. -
Page 57: Vorsichtsmaßregeln Und Hinweise
Vorsichtsmaßregeln und Hinweise • Das Gerät ist nicht zur Verwendung durch Personen (einschließlich Kinder) mit eingeschränkten körperlichen, geistigen oder Wahrnehmungsfähigkeiten oder aber ! Das Gerät wurde entsprechend den strengsten ohne ausreichende Erfahrung und Produktkenntnis internationalen Sicherheitsvorschriften entworfen geeignet, sofern sie nicht durch eine für ihre Sicherheit und gebaut. -
Page 58: Störungen Und Abhilfe
wobei zu kontrollieren ist, dass die Löcher der Das Kochgeschirr steht nicht sicher. Flammenkränze nicht verstopft sind. Bitte kontrollieren Sie, ob: • Reinigen Sie die Elektroplatten mit einem feuchten • der Topfboden auch vollständig eben ist; Tuch und reiben Sie sie mit etwas Öl ein, wenn sie noch •... -
Page 59: Het Installeren
Het installeren Dit systeem kan worden uitgevoerd door lucht direct van buiten te ! Bewaar dit boekje zorgvuldig voor eventuele verdere onttrekken door middel van een raadpleging. Wanneer u het product weggeeft, verkoopt, buis met een doorsnede van of wanneer u verhuist, dient u dit boekje bij het apparaat minstens 100 cm en die zodanig te bewaren zodat alle nodige informatie voorhanden blijft. - Page 60 De bevestigingsklemmen maken een bevestiging Als de kookplaat wordt geïnstalleerd boven een inbouwoven mogelijk van de kookplaat aan een keukenblad van die niet beschikt over een afkoelmechanisme met ventilator, tussen de 20 en 40 mm dik. Voor een goede bevestiging moet de nodige ventilatie binnen het meubel worden bereikt raden wij u aan alle bijgeleverde haken te gebruiken.
- Page 61 ! Wanneer het apparaat geïnstalleerd is moeten het snoer plaatsgevonden moet u controleren dat de flexibele metalen en het stopcontact gemakkelijk te bereiken zijn. buis niet in contact komt met de beweegbare delen of dat hij vastgekneld raakt. ! De kabel mag niet worden gebogen of samengedrukt. ! Gebruik uitsluitend buizen en afdichtingen die voldoen ! De kabel moet van tijd tot tijd worden gecontroleerd en aan de geldende landelijke normen.
- Page 62 5. Als de regeling voltooid is moet u de zegels op de bypass schroefjes weer op hun plaats brengen met zegellak of dergelijk materiaal. ! Bij vloeibaar gas moet het regelschroefje geheel dicht worden geschroefd. ! Aan het einde van deze handelingen moet u het oude etiket van de gasinstelling vervangen met het etiket dat correspondeert met het nieuwe gas, verkrijgbaar bij onze Technische Service Centers.
- Page 63 Merkmale der Brenner und Düsen Tabel 1 (Voor Belgie) Vloeibaar gas Natuurlijk gas Branders Doorsenee Thermisch By-pass Straal. Bereik* Straal. Bereik* (mm) vermogen 1/100 1/100 1/100 kW (p.c.s.*) (mm) Nom. Ger. (mm) (mm) Snel (Groot) (R) 3.00 0.70 Half snel (Medium) (S) 1.90 0.40 Hulp (Klein) (A)
- Page 64 PIM 631 AS PI 640 S PI 640 AS R PIM 640 AS PIM 640 S PIM 640 AS EX PIM 640 A ! De kookplaat PI 640 AST/PIM 640 AST kan worden geïnstalleerd boven een ingebouwde oven op voorwaarde...
-
Page 65: Starten En Gebruik
Starten en gebruik Praktisch advies voor het gebruik van de branders ! Op iedere knop staat aangegeven waar de gasbrander of Voor een optimaal rendement dient u het volgende te de elektrische plaat* zich precies bevindt. onthouden: Gasbranders • gebruik voor iedere brander de pan die erop past (zie De gekozen brander kan met de betreffende knop als volgt tabel) om te vermijden dat de vlammen er onderuit worden geregeld:... -
Page 66: Voorzorgsmaatregelen En Advies,66
Voorzorgsmaatregelen en • Dit apparaat mag niet worden gebruikt door personen (kinderen inbegrepen) met een beperkt lichamelijk, sensorieel of geestelijk vermogen of personen die niet de advies nodige ervaring of kennis hebben met het apparaat, tenzij onder toezicht van een persoon die verantwoordelijk is voor hun veiligheid of nadat hun is uitgelegd hoe het Dit apparaat is ontworpen en vervaardigd volgens de apparaat werkt. -
Page 67: Storingen En Oplossingen
• De elektrische kookplaten moeten worden schoongemaakt met een vochtige doek en met een beetje olie worden ingesmeerd als ze nog lauw zijn. • Roestvrij staal kan vlekken gaan vertonen als er voor langere tijd kalkhoudend water of agressieve schoonmaakmiddelen (fosforhoudend) op hebben gelegen. - Page 68 .المحرق ال يشتعل أو أن اللهب ليس موحدا حول المحرق :افحص فيما إذا .• ثقوب الغاز على المحرق مسدودة .• كل األجزاء القابلة لإلزالة التي يتألف منها المحرق، مركبة كما يجب .• توجد ريح قوية بجانب الجهاز .اللهب ينطفئ في الطرازات المزودة بجهاز أمان :تأكد...
- Page 69 يتوجب على المستهلكين االتصال بسلطتهم المحلية أو بتاجر التجزءة فيما • عند إزالة أو تغيير موضع الجهاز، استخدم دائما المسكات المزودة على .يتعلق بالمعلومات المتعلقة بالطريقة الصحيحة للتخلص من جهازهم القديم .جانبي الفرن الصيانة والعناية .• ال تالمس الجهاز وأنت حافي القدمين أو بيدين ورجلين مبللتين أو رطبتين •...
- Page 70 بدء التشغيل واالستخدام ( قطر أواني الطهي )سمØ المحرق .! الوضع المالئم لمحرق الغاز أو صفيحة التسخين الكهربائية* يظهر على كل مفتاح 24 - 26 (R) سريع 16 - 20 (S) نصف سريع محارق الغاز 10 - 14 (A) إضافي :يمكن...
- Page 71 PIM 631 AS PI 640 S PI 640 AS R PIM 640 AS PIM 640 S PIM 640 AS EX PIM 640 A . إال فوق موقد مدمج مجهز بنظام تبريد للتهويةPI 640 AST/PIM 640 AST ! ال يمكن تركيب رف التسخين...
- Page 72 ! إذا كان الجهاز متصل بالغاز السائل، فإنه يجب إحكام مسمار الضبط بقدر توصيل أنابيب الفوالذ المقاوم للصلب المرنة الممتدة بوصلة .اإلمكان .1/2 تركيب أنبوب تزويد الغاز هو وصلة ذكرية أسطوانية ! بمجرد االنتهاء من هذا اإلجراء، استبدل ملصق القيم القديم بآخر يشير للنوع يجب...
- Page 73 توصيل كبل تزويد الكهرباء بالشبكة الكهربائية الرئيسية ر ك ّ ب شمعة إشعال مطابقة للمواصفات بما يتالءم مع الجهد المشار إليه على أمامي .لوحة البيانات يجب أن يتصل الجهاز بالشبكة الكهربائية الرئيسية مباشرة باستخدام قاطع دائرة أحادي القطب مع فتحة تماس من 3 ملم على األقل بين الجهاز والشبكة الكهربائية الرئيسية.
- Page 74 التركيب تسرب. ونتيجة لذلك، فإن أسطوانات الغازات البترولية السائلة، سواء كانت ممتلئة تمام ا ً أو جزئي ا ً ، يجب أال يتم تركيبها أو تخزينها في الغرف أو مناطق التخزين التي تقع أسفل المستوى األرضي )البدروم وغيره(. ي ُوصى باالحتفاظ ! قبل...
- Page 76 195113922.00 04/2013 - XEROX FABRIANO...
Need help?
Do you have a question about the PIM 640 S and is the answer not in the manual?
Questions and answers