Advertisement
Quick Links
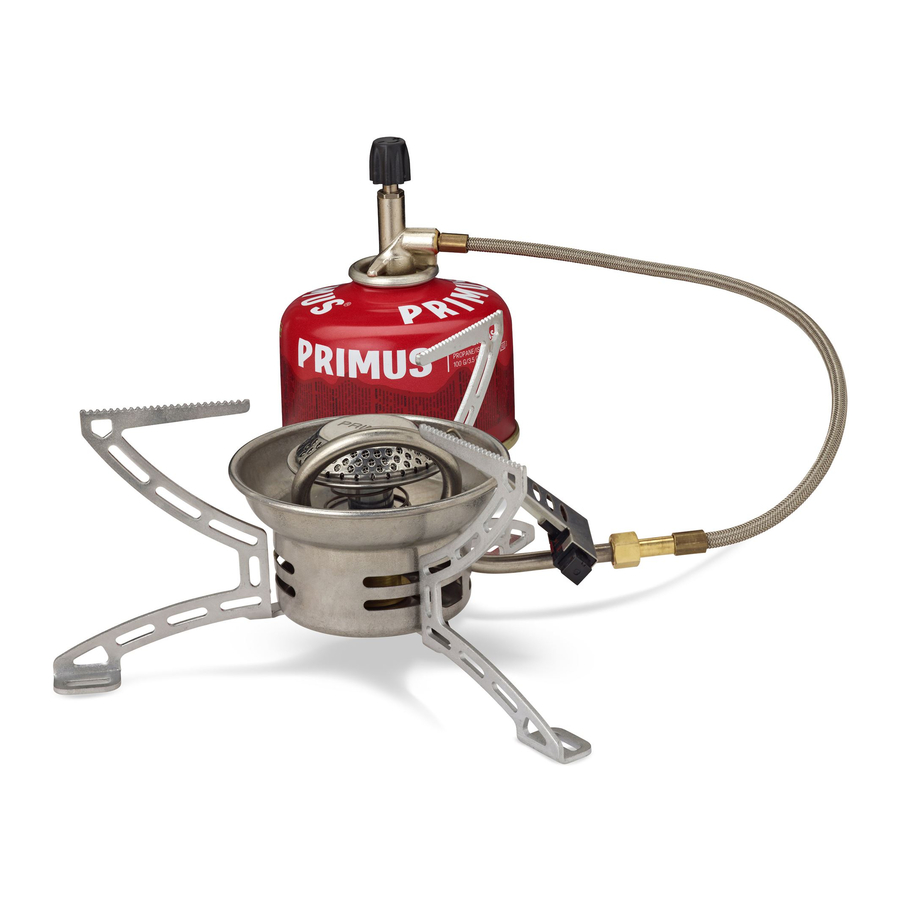
5. UTILIZAÇÂO DO APARELHO (Figura 2)
DK
5.1
Coloque a protecção do chão fornecida (5) sobre uma
superfície o mais plana possível por baixo do fogão.
Certifique-se de que a mangueira está completamente
retirada em direcção à botija de gás. Mantenha a botija
de gás afastada de fontes de calor que irradiem do fogão
VIGTIGT: Læs denne brugsanvisning omhyggeligt igennem,
durante a sua utilização.
inden gasapparatet tilsluttes gasflasken, og læs derefter
5.2
Rode o botão da válvula (2) para a esquerda, e acenda
regelmæssigt brugsanvisningen, så kendskabet til hvordan
o fogão, premindo o eléctrodo de ignição (9). É possível
gasapparatet fungerer holdes ved lige. Opbevar denne
regular a chama rodando o botão da válvula (2).
brugsanvisning til fremtidig brug: Følges denne anvisning
5.3
Quando o fogão estiver ligado deve ser mantido o mais
ikke, kan det medføre alvorlige personskader og døden!
nivelado possível e não deve ser deslocado. A deslocação
do fogão durante a sua utilização pode incendiar o mesmo.
ADVARSEL: Dette apparat forbruger syre og producerer
5.4
Certifique-se de que o fogão se encontra completamente
desligado após cada utilização rodando o botão da válvula
kultilte. Dette apparat må IKKE anvendes og tændes i rum
totalmente para a direita. Existirá algum atraso entre o
uden ventilation, indendørs, i et telt, køretøj eller andet lukket
momento em que desliga a válvula e o bico de gás se
rum, så man undgår, at liv bringes i fare.
apaga.
5.5
A distância a manter de materiais inflamáveis no tecto e
KUN TIL UDENDØRS BRUG!
nas paredes é de 500 mm, CASO CONTRÁRIO podem
incendiar-se.
Tildæk ALDRIG apparatet og gasflasken med en
afskærmning, sten eller lignende, som kan forårsage
CONSELHO! A utilização de gás com o tempo frio é
overophedning og skader på apparatet og gasflasken. Det
activada por vários factores que podem ser resolvidos com
algumas medidas.
er livsfarligt at overophede gasflasker på denne måde. Benyt
den afskærmning, der følger med apparatet.
Factores que afectam a insuficientcia do fogão:
- A mistura de gás na garrafa (propano/isobutano/butano)
1. INDLEDNING
- A quantidade de gás na garrafa
1.1
Dette apparat er beregnet til PRIMUS PowerGas
- A temperatura circundante
(blanding af propan/Isobutan/butan) 2202, 2206 og
- A temperatura da botija de gás
2207.
1.2
Brug Primus gasflasker. Det kan være farligt at tilslutte
Medidas que melhoram o funcionamento durante o tempo
dette apparat til gasflasker af andre mærker.
frio:
1.3
Gasforbruget er 175 g/t / 9000 BTU/t / ca. 2,5 kW
- Aqueça a botija de gás com as suas mão ou peças de
roupa.
med et gastryk på 1 bar.
1.4
Mundstykkets størrelse: 0,40 mm, 732000.
6. SUBSTITUIR A BOTIJA DE GÁS
1.5
Apparatet opfylder kravene i henhold til EN 521 og
6.1
Feche a válvula na botija de gás rodando completamente
ANSI Z21.72b-2002/CSA11.2b-2002.
o botão (2) para a direita. Certifique-se de que o fogão se
1.6
Undgå at udsætte slangen for slitage. Pas på at
apague e de que nas proximidades, não existem quaisquer
SLANGEN IKKE BLIVER SNOET.
chamas nuas ou fontes de ignição. Desloque o fogão para o
exterior e desaparafuse a válvula da botija de gás. Substitua
2. RÅD VEDRØRENDE SIKKER BRUG (Fig. 1)
a junta circular da válvula caso esteja gasta ou danificada.
2.1
Se efter at apparatets pakninger (1) sidder korrekt og
Ligue a válvula de acordo com os itens 4.3 e 4.4.
er i god stand, inden tilslutningen foretages.
7. MANUTENÇÃO
2.2
Dette apparat er kun beregnet til udendørsbrug. Dette
7.1
Se o fogão não tiver chama ou a chama for muito pequena
apparat må IKKE anvendes og tændes i rum uden
apesar da botija ter gás, o bico pode estar entupido.
ventilation, indendørs, i et telt, køretøj eller andet lukket
7.2
Limpar o jacto
rum, så man undgår, at liv bringes i fare.
Feche a valvula de retenção (2) e desenrosque o reservatório
2.3
Sørg for at ingen brændbare genstande findes i
(botija) de gás (3).
nærheden, som beskrevet under punkt 5.5.
7.3
Desenrosque o combustor (4).
2.4
Når der skal tilsluttes og skiftes gasflaske, skal det ske
7.4
Desenrosque a embocadura (10) com uma chave em U de 6
på et sikkert sted, udendørs, og ikke i nærheden af
mm.
tænkelige antændelseskilder som åben ild, forbrænder
7.5
Limpe a embocadura soprando através do orifício frontal. Não
use agulhas nem objectos similares para limpar a embocadura,
eller kakkelovn. Undgå at skifte eller tilslutte gasflasker
pois podem danificar o orifício, tornando perigosa a utilização
i større menneskemængder.
do aparelho.
2.5
Såfremt apparatet lækker (lugt af gas), placeres det
7.6
Volte a colocar a embocadura enroscando-a cuidadosamente,
straks på et godt ventileret sted udendørs, ikke i
de forma a vedar a junção por completo. Ligue de novo o
nærheden af antændingskilder, så lækagen kan blive
reservatório de gás, segundo a descrição no ponto 4. Para
undersøgt og standset. Lækager må kun kontrolleres
maior segurança, verifique a junção através de água quente
udendørs. Man må aldrig kontrollere en lækage, mens
com sabão. A junção não está suficientemente vedada se se
ilden er tændt. Brug sæbevand eller lignende.
formarem bolas de sabão.
2.6
Benyt aldrig et apparat med skadede eller utætte
7.7
Enrosque os combustores de novo, com firmeza.
pakninger og heller ikke et, der lækker, er beskadiget
8. VERIFICAÇÃO E MANUTENÇÃO
eller fungerer dårligt.
8.1
Certifique-se sempre de que as juntas de vedação estejam
2.7
Efterlad aldrig et tændt apparat uden opsyn.
colocadas nos locais correctos e que se encontram em
2.8
Sørg for at kasseroller ikke koger tørre.
boas condições. Isto deve ser verificado sempre que o
aparelho for montado. Substitua as juntas de vedação
3. APPARATETS HÅNDTERING
caso as mesmas estejam danificadas ou gastas. É possível
3.1
Berør ikke de ophedede dele på apparatet, mens det
adquirir juntas de vedação novas no seu retalhista Primus
er i brug eller lige efter.
mais próximo.
3.2
Opbevaring: Skru altid gasflasken af apparatet, når
det ikke anvendes. Opbevar flasken på et tørt, sikkert
9. MANUTENÇÃO E REPARAÇÃO
sted, hvor der ikke er nogen varmekilder. Undgå
9.1
Se não for possível corrigir uma falha através destas
instruções, o aparelho deve ser devolvido ao seu retalhista
direkte sollys.
Primus mais próximo.
3.3
Misbrug ikke apparatet og anvend det heller ikke til
9.2
Nunca tentes efectuar qualquer outro tipo de trabalho de
andre formål end det tilsigtede.
manutenção ou reparação que não seja aqui descrito.
3.4
Apparatet skal håndteres forsigtigt. Tab til ikke på
9.3
Nunca efectue alterações ao aparelho, pois a sua utilização
jorden.
pode tornar-se perigosa.
9.4
O fogão foi aprovado com uma mangueira montada na
4. APPARATETS MONTERING (Fig. 2)
fábrica, e esta NÃO deve ser substituída por qualquer outra
4.1
Kontrollér at ventilen (2) er helt lukket (drejet længst om
mangueira que não seja a mangueira original 732910.
med uret).
4.2
Hold gasflasken (3) i opret stilling, når den tilsluttes
10. PEÇAS SOBRESSELENTES E ACESSÓRIOS
10.1
Utilize apenas peças sobresselentes e acessórios
ventilen.
originais da Primus. Tenha cuidado ao montar as peças
4.3
Tilslut forsigtigt ventilen til gasflasken. Undgå at skrue
sobresselentes e os acessórios e evite tocar nas partes
gevindet skråt ind. Træk sammen, indtil ventilens O-
quentes.
ring støder mod gasflasken. Træk kun sammen med
10.2
Utilize apenas botijas de gás PRIMUS PowerGas 2202,
håndkraft.
2206 e 2207 (Mistura de Propano/Isobutano/Butano) para
4.4
Kontrollér at koblingen er helt gastæt. En eventuel
este aparelho.
lækage skal kontrolleres udendørs. Brug sæbevand
10.3
Peças sobresselentes
eller lignende. Brug aldrig åben ild til at kontrollere
732000
Jacto 0,40 mm
en lækage. Med sæbevand ses lækagen som små
732440
Junta circular
732910
Mangueira incluindo válvula
bobler på det sted, der lækker. Tænd aldrig for
10.4
Se tiver dificuldade em obter peças sobresselentes ou
apparatet, hvis der er tvivl, eller gassen kan høres eller
acessórios, contacte o seu distribuidor local Primus. Visite
lugtes. Skru gasflasken af og ret henvendelse til den
www.primus.se
lokale Primus forhandler.
4.5
Drej benene (karrets støtteben) (12) i rette position i
vindskærmen (11).
4.6
Apparatet er nu klar til brug.
3277 PRIMUS EasyFuel II EF, kogeapparat
5. SÅDAN ANVENDES APPARATET (Fig. 2)
5.1
Placér den medfølgende jordbeskyttelse (5) under
BRUGSVEJLEDNING
apparatet på en flade, der er så plan som muligt.
Sørg for, at slangen er helt udstrakt mod gasflasken.
Hold gasflasken borte fra varmen, som stråler ud fra
apparatet, når det er i brug.
5.2
Drej ventilens rat (2) mod uret og tænd for apparatet
ved at trykke på piezotænderen (9). Flammen kan
finjusteres ved at dreje på ventilens rat (2).
5.3
Mens apparatet brænder, skal det stå så plant
som muligt, og det må ikke flyttes omkring. Flyttes
apparatet, mens det er i drift, giver det flammer.
5.4
Sørg for at apparatet slukkes helt efter brug ved at
dreje ventilens rat længst muligt med uret. Der kan
være lidt forsinkelse fra det øjeblik, hvor ventilen drejes,
indtil brænderen slukkes.
5.5
Afstanden til brændbart materiale i tag og vægge skal
være mindst 500 mm, ELLERS kan der opstå brand.
TIPS! Flere faktorer påvirker brug af gas i koldt vejrlig,
men de kan afhjælpes med en række forholdsregler.
Faktorer som påvirker apparatets effekt:
- Gasflaskens blanding af gas (propan/isobutan/butan)
- Mængden af gas i flasken.
- Omgivelsernes temperatur
- Gasflaskens temperatur
Forholdsregler som forbedrer funktionen i koldt vejr:
- Opvarm gasflasken med hænderne eller under
påklædningen.
6. GASFLASKES UDSKIFTNING
6.1
Luk ventilen på gasflasken ved at dreje rattet (2)
længst om med uret. Sørg for at apparatet slukkes,
og at der ikke er anden åben ild eller antændingskilde
i nærheden. Flyt apparatet udendørs og skru ventilen
af gasflasken. Udskift ventilens O-ring, hvis den er slidt
eller skadet. Tilslut ventilen ifølge punkt 4.3 og 4.4.
7. VEDLIGEHOLDELSE
7.1
Sker det, at apparatet ikke brænder eller brænder med
lav effekt, selv om der er brændstof i gasflasken, så
kan mundstykket være tilstoppet.
7.2
Mundstykkets rengøring
Drej skrueventilen (2) helt til og skru patronen (3) fra.
7.3
Skru brænderen (4) af.
7.4
Skru dysen (10) af med en 6 mm skruenøgle.
7.5
Rens dysen ved at puste gennem det lille hul foran.
Brug ikke enforkert størrelse stikinstrument eller nål eller
lignende for at fjerne tilstopningen: hullet kan beskadiges
og gøre apparatet farligt at bruge.
7.6
Sæt dysen i igen og skru den tæt til for at sikre
gastætning. Sæt patronen til igen ved at følge instruktio-
nen i afsnit 4. Kontrollér for en sikkerheds skyld samlin-
gerne med varmt sæbevand. Hvis der
opstår bobler, er samlingen ikke tilstrækkeligt tæt.
7.7
Skru brænderen tæt til.
8. KONTROL OG VEDLIGEHOLDELSE
8.1
Sørg altid for, at pakningerne er korrekt placerede
og i god stand. Dette skal kontrolleres hver gang,
apparatet monteres. Udskift pakningerne, hvis de er
skadede eller slidte. Der kan købes nye pakninger hos
den nærmeste forhandler af Primus.
9. SERVICE OG REPARATION
9.1
Såfremt eventuelle fejl ikke kan løses ved at følge disse
instrukser, skal apparatet sendes retur til nærmeste
forhandler af Primus.
9.2
Gør aldrig forsøg på at udføre andre former for
vedligeholdelses- eller reparationsarbejde end de
foreskrevne.
9.3
Lav aldrig nogen ændringer af apparatet, da det
derved kan blive farligt at bruge.
9.4
Gasapparatet er blevet godkendt med fabriksmonteret
slange, og den må IKKE ombyttes med nogen anden
type end originalslangen 732910.
10. RESERVEDELE OG TILBEHØR
10.1 Der må kun anvendes Primus originale reservedele
og tilbehør. Vær forsigtig, når reservedele og tilbehør
monteres, og pas på ikke gribe fat i ophedede dele.
10.2 Anvend kun PRIMUS PowerGas gasflasker 2202,
2206 og 2207( blanding af propan/isobutan/butan) til
dette apparat.
10.3 Reservedele
732000
732000
732440
732910
10.4 Ret henvendelse til den lokale Primus distributør, hvis
der opstår vanskeligheder med at få fat på reservedele
eller tilbehør. Besøg www.primus.se
Design and Quality Primus AB Sweden
Tel: +46 8 564 842 30
www.primus.se
-0845-09
Fig 1
1
Fig 2
3
Fig 3
Fig 4
Mundstykke 0,40 mm
Mundstykke 0,40 mm
O-ring
Slange inkl. ventil
3277
3277 PRIMUS EasyFuel II EF, stove
ENG
INSTRUCTIONS FOR USE
PRIMUS
EasyFuel™ II EF
IMPORTANT: Read these instructions carefully before
connecting the gas appliance to the LP gas cartridge, and
then study the instructions regularly in order to remember
the way the gas appliance works. Keep these instructions
for future use: Failure to follow these instructions can result
in serious personal injury and death!
WARNING: This appliance consumes oxygen and produces
carbon dioxide. To avoid extreme danger, do NOT use or
ID:048AS-0099
ignite this appliance in unventilated space, indoors, in a
tent, in a vehicle or other enclosed space.
USE OUTDOORS ONLY!
NEVER cover the stove and LP gas cartridge with wind screen,
stones or similar, that can cause overheating and damage
to the stove and to the LP gas cartridge. Overheating the
LP gas cartridge in this way is extremely dangerous. Use
the wind screen that accompanies the stove.
1. INTRODUCTION
1.1
This appliance is intended for PRIMUS PowerGas
(Propane/Isobutane/Butane mix) 2202, 2206 and 2207.
1.2
Use Primus LP gas cartridges. Connecting this appliance
to other types of LP gas cartridges can involve risk.
1.3
Gas consumption 175 g/h / 9000 BTU/h / approx. 2.5 kW
at 1 bar gas pressure.
1.4
Size of jet: 0.40 mm, 732000.
1.5
The appliance fulfils requirements in accordance with EN
521 and ANSI Z21.72b-2002/CSA11.2b-2002.
1.6
Avoid subjecting the hose to wear. Make sure that the
HOSE DOES NOT GET TWISTED.
2. ADVICE FOR SAFE USE (Fig 1)
2.1
Ensure that the sealing joints of the appliance (1) are in
correct position and are in good condition before being
connected.
2
2.2
This appliance is only intended for outdoor use. To avoid
This appliance is only intended for outdoor use. To avoid
extreme danger, Do NOT use or ignite the appliance in
unventilated place, indoors, in a tent, in a vehicle or other
enclosed space.
2.3
Make sure that no inflammable objects are in the vicinity,
as described under Item 5.5.
2.4
When connecting and replacing the LP gas cartridge,
this must be carried out in a safe place, outdoors, not in
the vicinity of any conceivable source of ignition such as
naked flame, pilot flame or electric heater. Avoid replacing
or connecting up the LP gas cartridge where there are
numbers of people.
2.5
If the appliance leaks (smell of gas) immediately put it in
a well-ventilated place outdoors, not in the vicinity of a
source of ignition, where the leak can be inspected and
stopped. Checking for leaks may only be carried out
outdoors. Checking for leaks must never be carried out
using a naked flame. Use soapy water or similar.
2.6
Never use an appliance with damaged or worn sealing
12
joints, or a leaking, damaged or badly functioning
appliance.
2.7
Never leave a lit appliance out of sight.
2.8
Make sure that saucepans do not boil dry.
3. HANDLING THE APPLIANCE
3.1
Do not touch the hot parts of the appliance during or
directly after use.
3.2
Storage: Always unscrew the LP gas cartridge from the
appliance when it is not being used. Keep the cartridge
in a dry, safe place, where there are no sources of heat.
Avoid solar radiation.
3.3
Do not misuse the appliance or use it for other purposes
than those for which it is intended.
3.4
Handle the appliance carefully. Do not drop it.
4. ASSEMBLING THE APPLIANCE (Fig 2).
4.1
Ensure that the control knob (2) is turned off (turned fully
clockwise).
4
4.2
Keep the cartridge (3) upright when fitting it to the valve.
4.3
Place the valve squarely on top of the cartridge (as shown in
fig .2).
4.4
Gently screw the cartridge into the valve until it meets the O-
10
ring of the valve.
Be careful not to fit the cartridge cross threaded. Screw
hand tight only. Do not overtighten or you will
damage the cartridge valve.
4.5
Ensure that a complete gas seal has been made. If you have
to check the gas soundness of the appliance, do this out-
11
doors. Do not check for leaks with a naked flame. Use warm
soapy water only, applied to the joints and connections of
the appliance. Any leakage will show up as bubbles around
the leakage area. If you are in doubt or you can hear or smell
9
gas, do not attempt to light the appliance. Unscrew the car-
tridge and contact your local dealer.
4.6
Rotate the legs (pot supports) (12) into their correct operating
positions into the wind shield (11).
4.7
Make sure the burner is screwed down tightly. The stove is
now ready for use.
52272 / 1
5. USE OF THE APPLIANCE (Fig 2)
5.1
Put the accompanying ground protection (5) on as
level a surface as possible under the stove. Ensure
that the hose is fully pulled out towards the LP gas
cartridge. Keep the LP gas cartridge away from heat
that radiates from the stove when in use.
5.2
Turn the valve knob (2) anticlockwise, and light the
stove by pressing the piezo ignitor (9). The flame can
be fine-tuned by turning the valve knob (2).
5.3
When the stove is burning it should be kept as level
as possible and must not be moved around. Moving
the stove while in use can cause it to flare up.
5.4
Ensure that the stove is turned off completely after
use by turning the valve knob clockwise as far as it
will go. There will be some delay between turning the
valve off and the burner going out.
5.5
The distance to inflammable material in ceiling and
walls must be at least 500 mm, OTHERWISE they
can catch fire.
ADVICE! The use of LP gas in cold weather is
affected by a number of factors which can be
remedied with a number of measures.
Factors that affect the efficiency of the stove:
- The mixture of gas in the LP gas cartridge (propane/
isobutane/butane)
- The quantity of LP gas in the cartridge
- The surrounding temperature
- The temperature of the LP gas cartridge
Measures which improve function during cold
weather:
- Warm the LP gas cartridge with your hands or
under clothing.
6. CHANGING THE CARTRIDGE
6.1
Shut the valve fully. Be sure the flame is extinguished and
no other flame is nearby. Take the unit outdoors away
from other people. Unscrew the cartridge from the valve
and replace the appliance sealing O-ring if it is cracked or
worn. Avoid cross threading by putting the valve onto the
cartridge screw thread squarely and screw on hand tight
only, as described in section 4.
7. MAINTENANCE
7.1
If gas pressure drops or the gas will not light, check if
there is gas left in the cartridge (3). If so, the jet nipple (10)
might be blocked.
Cleaning the jet nipple
7.2
Fully turn off the control knob (2) and unscrew the car-
tridge (3).
7.3
Unscrew the burner (4).
7.4
Unscrew the jet nipple (10) using a 6 mm spanner.
7.5
Clean out the jet nipple by blowing through the tiny hole at
the front. Do not use an incorrect size picker or any type
of pin etc. to clean the blockage or you may damage the
hole and make the appliance unsafe.
7.6
Re-fit the jet nipple and screw it tightly to ensure a gas
seal. Re-fit the cartridge by following the description in
section 4. For extra safety, check the joint with warm
soapy water. If bubbles appear, the joint is not tight
enough.
7.7
Rescrew the burner tightly.
8. CHECKING AND MAINTENANCE
8.1
Always make sure that the sealing joints are located
in the correct places and are in good condition.
This should be checked every time the appliance is
assembled. Replace sealing joints if they are damaged
or worn. New sealing joints can be purchased from you
nearest Primus retailer.
9. SERVICE AND REPAIR
9.1
If it is not possible to rectify a fault by following these
instructions, the appliance should be returned to your
nearest Primus retailer.
9.2
Never try to carry out any other maintenance or repair
work than that which is described here.
9.3
Never make any alterations to the appliance, as it may
then be dangerous to use.
9.4
The stove has been approved with a factory-mounted
hose, and this must NOT be replaced with any other
hose than the genuine hose 732910.
10. SPARE PARTS AND ACCESSORIES
10.1 Only use genuine Primus spare parts and accessories.
Only use genuine Primus spare parts and accessories.
Take care when assembling spare parts and
accessories, and avoid touching hot parts.
10.2 Only use PRIMUS PowerGas LP gas cartridges 2202,
Only use PRIMUS PowerGas LP gas cartridges 2202,
2206 and 2207 (Propane/Isobutane/Butane mix) for this
appliance.
10.3 Spare parts
Spare parts
732000
Jet 0.42mm
732440
O-ring
732910
Hose including valve
10.4 If you have difficulty in obtaining spare parts or
If you have difficulty in obtaining spare parts or
accessories, contact your local Primus distributor. Visit
www.primus.se
Advertisement

Related Manuals for Primus 3277 EasyFuel II EF


Summary of Contents for Primus 3277 EasyFuel II EF
- Page 1 Forholdsregler som forbedrer funktionen i koldt vejr: - The temperature of the LP gas cartridge Brug Primus gasflasker. Det kan være farligt at tilslutte Gas consumption 175 g/h / 9000 BTU/h / approx. 2.5 kW Medidas que melhoram o funcionamento durante o tempo - Opvarm gasflasken med hænderne eller under...
- Page 2 2206 e 2207. - La temperatura ambiente isobutano/butano) 2202, 2206 y 2207. 1. GÉNÉRALITÉS Utilize botijas de gás Primus. A ligação deste aparelho a ventilation occur. 6. REMPLACEMENT DE LA CARTOUCHE DE GAZ - La temperatura del cartucho de gas Utilice cartuchos de gas Primus.
- Page 3 Anbringen von Ersatzteilen vorsichtig åtskruvning kan skador uppstå på gasbehållaren. Handkraft anziehen. Accertarsi che il collegamento sia perfettamente di PRIMUS 2202, 2206 e 2207 (miscela di Propano/ 10.3 Reserveonderdelen und vermeiden Sie es, erhitzte Teile anzufassen. Se till att fullständig tätning för gasen uppnåtts. Kontroll av Stellen Sie sicher, dass die Verbindung gasdicht ist.
- Page 4 Åtgärder som förbättrar funktionen vid kall väderlek: 2207. - Ympäristön lämpötila Gebruik gasflessen van Primus. Als u dit apparaat op Käytä Primus-kaasusäiliötä. Tämän laitteen - Värm gasbehållaren med händerna eller under kläderna. Bruk Primus-gassbeholdere. Tilkopling til andre typer - Kaasusäiliön lämpötila...
Need help?
Do you have a question about the 3277 EasyFuel II EF and is the answer not in the manual?
Questions and answers