Table of Contents
Advertisement
Quick Links
Advertisement
Chapters
Table of Contents

Related Manuals for Bosch TCA6001


Summary of Contents for Bosch TCA6001
- Page 1 TCA 60.. de Gebrauchsanleitung en Operating instructions fr Notice d’utilisation Istruzioni per l’uso nl Gebruiksaanwijzing es Instrucciones de uso tr Kullanma talimatž pl Instrukcja obs³ugi ru Ÿc¹pº®ýåø ÿo õ®cÿæya¹aýåå Internet: http://www.bosch-hausgeraete.de...
-
Page 4: Table Of Contents
Inhaltsverzeichnis Auf einen Blick ........Was Sie unbedingt beachten müssen . -
Page 5: Auf Einen Blick
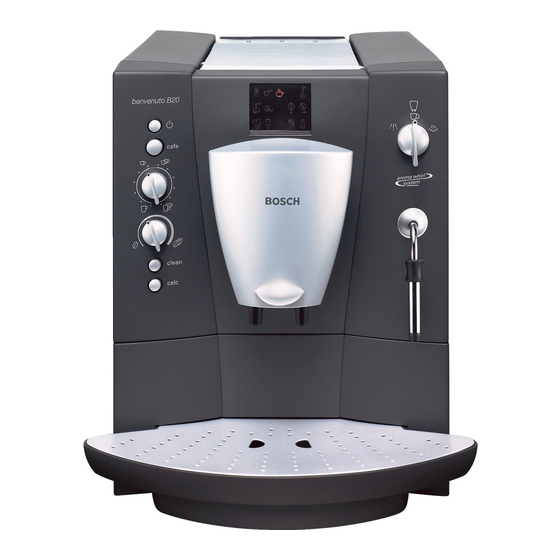
Auf einen Blick Was Sie unbedingt beachten müssen 1 Netzschalter 2 Funktionswähler (Kaffee, Dampf, Gebrauchsanleitung sorgfältig durchlesen und Heißwasser) im Schriftguthalter 10 aufbewahren! 3 Display (Anzeige mit Symbolen) Dieses Gerät ist für den Haushalt und die 4 Taste Verarbeitung haushaltsüblicher Mengen und 5 Bezugstaste 2 nicht für den gewerblichen Gebrauch bestimmt. -
Page 6: Vor Dem Ersten Gebrauch
Vor dem ersten Bedienelemente Gebrauch Netzschalter 1 Allgemeines Der Netzschalter 1 auf der Rückseite des Gerätes schaltet die Stromzufuhr ein oder Nur reines Wasser und vorzugsweise aus. Espresso oder Vollautomaten Bohnen Nach Einschalten des Netzschalters 1 leuchtet mischungen in die entsprechenden Behälter der Leuchtring der Taste 4 grün auf. - Page 7 Nach Betätigung der Taste 4 heizt das Drehknopf zum Einstellen der Füllmenge 6 Gerät auf, der Leuchtring Taste 4 und das Symbol im Display 3 blinken. Mit dem Drehknopf Anschließend spült das Gerät, der Leuchtring wird die Flüssigkeitsmenge eingestellt. der Taste 4 blinkt und im Display 3 leuchtet auf.
-
Page 8: Zubereitung
Drehknopf zum Einstellen der Kaffeestärke Tipp: Bei Bezug von 2 Tassen gleichzeitig den Drehknopf 7 auf einstellen. Mit dem Drehknopf 7 wird die Durch erneutes Drücken der Bezugs Menge gemahlenen Kaffees von sehr mild ( taste 2 5 oder der Taste 4 kann der bis extra stark ( ) ausgewählt. -
Page 9: Dampf Zum Milch Aufschäumen
Dampf zum Getränke Achtung erwärmen Keine ganzen Bohnen oder löslichen Kaffee einfüllen! Maximal zwei gestrichene Meßlöffel q Hülse a an Düse 13 nach oben schieben. Kaffee einfüllen. q Düse 13 tief in die zu erwärmende Flüssig q Deckel am Schacht für Kaffeepul keit tauchen. -
Page 10: Wasser Härte Einstellen
Wasser Härte einstellen Die richtige Einstellung der Wasser Härte ist Bei externen Wasserenthärtern in der wichtig für das Entkalkungsprogramm. Hausanlage oder Verwendung von bereits gefiltertem Wasser ist die Wasser Härte 1 einzustellen. Wasser Wasser Wasser Wasser Filter Härte 1 Härte 2 Härte 3 Härte 4 Einstellung... -
Page 11: System Meldungen
System Meldungen Das Gerät zeigt Meldungen im Display 3 an. Bedeutung Abhilfe Wasser fehlt. Frisches, kaltes Wasser in den Wasser tank 22 einfüllen. leuchtet Hinweis: Eine kleine Restmenge Wasser bleibt immer im Wassertank 22. Wassertank 22 fehlt oder nicht Wassertank 22 einsetzen. richtig eingesetzt. -
Page 12: Reinigen
Bedeutung Abhilfe Tür zur Brüheinheit 17 ist nicht Tür zur Brüheinheit 17 schließen. geschlossen. leuchtet Kaffeebezug nicht möglich. Funktionswähler 2 auf stellen leuchtet Störung Siehe unter Kapitel Kleine Störungen selbst beheben". blinken Hinweis: Während die Symbole im Display 3 leuchten oder im Display 3 blinken, kann kein Kaffee bezogen werden. -
Page 13: Düse Reinigen
Reinigungsprogramm starten q Funktionswähler 2 auf stellen. q Düse 13 nach Abkühlen außen abwischen. q Wassertank 22 ganz füllen. q Die Düse 13 zum gründlichen Reinigen q Reinigungstaste + 8 minde zerlegen. Teil 13/b mit Geldstück ab stens 3 Sekunden gedrückt halten. Falls schrauben (siehe Bild auf Ausklappseite) nun in seltenen Fällen im Display 3... -
Page 14: Kleine Störungen Selbst Beheben
Entkalkungsprogramm Starten q Wassertank 22 ausspülen, mit frischem Wasser bis max füllen und wieder einset q Entkalkungstaste 4 9 mindestens zen. 3 Sekunden gedrückt halten. Falls nun q Auffanggefäß ausleeren und wieder unter in seltenen Fällen im Display 3 die Düse 13 stellen. blinkt siehe unter Kleine Störungen selbst beheben". - Page 15 Kaffee läuft nur tropfenweise. Mahlgrad zu fein. Mahlgrad gröber einstellen. Pulverkaffee zu fein. Gröberes Kaffeepulver verwenden. Kaffee hat keine Crema Ungeeignete Kaffeesorte. Kaffeesorte wechseln. (Schaumschicht) (Schaumschicht). Bohnen nicht mehr röstfrisch. Frische Bohnen verwenden. Mahlgrad nicht auf Kaffeeboh Mahlgrad optimieren. nen abgestimmt. Mahlwerk mahlt keine Kaffee Bohnen fallen nicht ins Mahl Leicht an den Bohnenbehälter...
-
Page 16: Français
Contents Overview ........Important information . -
Page 17: Overview
Overview Important information 1 Mains switch 2 Function selector Please read these operating instructions (coffee, steam, hot water) carefully and keep in the document holder 10! 3 Display (with symbols) This appliance is designed for domestic use button and for processing normal quantities of food 5 2 button and not for industrial use. -
Page 18: Before Using Your Appliance For The First Time
Before using your Controls appliance for the Mains switch 1 first time The mains switch 1 on the rear of the ap pliance switches the power supply on or off. General When the mains switch 1 has been switched Fill the respective containers with pure water on, the illuminated ring on button 4 is lit and preferably espresso or coffee beans for... - Page 19 Button Small Button 4 switches on the appliance espresso or switches it to stand by" mode. Espresso When button 4 is pressed, the appliance heats up, the illuminated ring on button 4 and the symbol on display 3 flash. Small coffee Then the appliance is rinsed and the illuminated ring on button 4 flashes and...
-
Page 20: Preparation
Warning Adjust the degree of grinding only while the Preparation grinding unit is running! Otherwise the ap pliance may be damaged. General q Open the right cover of the appliance 18. q Press the 2 button 5. This fully automatic espresso/coffee machine q While the grinding unit is running, turn the grinds fresh coffee for each brewing process. -
Page 21: Steam For Frothing Milk
Steam for frothing milk Risk of scalding! When the function selector is set to =, the q Push down sleeve a on nozzle 13. nozzle may spurt slightly. Escaping steam q Fill the cup approx. full of milk. is very hot. q Immerse nozzle 13 approx. -
Page 22: Selecting The Water Hardness
Selecting the water hardness It is important for the descaling programme If external water softeners are used in the that the water hardness is set correctly. domestic water system or if filtered water is used, select water hardness 1. Water Water Water Water... -
Page 23: System Messages
System messages The appliance indicates messages on display 3. Meaning Remedial action No water. Pour fresh, cold water into the water tank is lit Note: There is always a small amount of water left in the water tank 22. Water tank 22 is missing or Insert water tank 22. -
Page 24: Cleaning The Appliance
Meaning Remedial action Door for brewing unit 17 is not Close door for brewing unit 17. closed. is lit Coffee cannot be brewed. Set function selector 2 to is lit Fault. See chapter Eliminating minor faults yourself". flash Note: Coffee cannot be brewed while the symbols are lit on display 3 or flash on display 3. -
Page 25: Cleaning The Nozzle
Warning q Press the 2 button 5. Note:The appliance is automatically cleaned, Never interrupt the cleaning programme! lights up on display 3. Wait for the next Do not drink liquid! Never use descaling ta symbol on display 3 blets or other descaling agents. (approx. -
Page 26: Descaling The Appliance
Descaling the appliance If the illuminated ring on the descaling button q Set function selector 2 to 0. 4 9 is lit red and is indicated Note: The appliance is automatically on display 3 when the appliance is switched descaled, 3 lights up on display. -
Page 27: Guarantee
Guarantee The guarantee conditions for this appliance are as defined by our representative in the country in which it is sold. Details regarding these conditions can be obtained from the dealer from whom the appliance was purchased. The bill of sale or receipt must be produced when making any claim under the terms of this guarantee. - Page 28 Grinding unit is making loud Foreign objects in the grinding Contact Hotline. noise. unit (e.g. grit which also Note: Preground coffee can occurs in superior types still be prepared. of coffee). Wait until the appliance Illuminated ring on the has warmed up to room button 4 flashes.
-
Page 29: Deutsch
Table des matières Vue d'ensemble ........Consignes impératives à respecter . -
Page 30: Vue D'ensemble
Vue d'ensemble Consignes impératives 1 Interrupteur principal à respecter 2 Sélecteur de fonctions (café, vapeur, eau chaude) Veuillez lire la présente notice d'instructions 3 Écran (affichage des symboles) attentivement puis la ranger dans le support 4 Touche de rangement à cet effet 10! 5 Touche de prélèvement 2 Cet appareil est destiné... -
Page 31: Conseils Pour La Mise Au Rebut
Conseils pour la mise au rebut L'appareil est prêt à fonctionner 4 une fois que les anneaux lumineux de la tou Pour connaître les circuits actuels mise 4 2 5 et de la touche au rebut, veuillez consulter votre revendeur de prélèvement s'allument en vert et que ou les services administratifs de votre mairie. - Page 32 Ecran 3 Touche de prélèvement 2 5 L'écran 3 renseigne, par des symboles, sur Le fait d'appuyer sur la touche de prélèvement les réglages, les opérations en cours et les 2 5 vous permet de prélever un expresso messages de l'appareil. ou du café.
-
Page 33: Préparation Du Café
Utilisation de grains pour Pour vous permettre de prélever 2 tasses, la sortie 12 a été équipée de deux buses de expresso / pour café sortie. q Réglez le sélecteur de fonctions 2 sur Bouton rotatif servant à régler la con q A l'aide du bouton rotatif centration du café... -
Page 34: Utilisation D'expresso En Poudre / Café En Poudre
Utilisation d'expresso Vapeur servant à faire mousser en poudre / café en poudre le lait q Par le bouton rotatif q Déplacez la douille a de la buse 13 vers 6, réglez la quantité de rem le bas. plissage voulue. q Remplissez une tasse env. -
Page 35: Vapeur Servant À Chauffer Des Boissons
Vapeur servant à chauffer des Préparation d'eau chaude boissons q Placez la tasse voulue sous la buse 13. q Déplacez la douille a de la buse 13 vers q Déplacez la douille ade la buse 13 vers le haut. le bas. q Plongez la buse 13 dans le liquide q Réglez le sélecteur de fonctions 2 sur à... -
Page 36: Réglage De La Dureté De L'eau
Réglage de la dureté de l'eau En présence d'adoucisseurs d'eau externes, installés dans le réseau d'eau domestique, Le bon réglage de la dureté de l'eau joue ou si vous utilisez de l'eau déjà filtrée, vous un rôle important pour le programme devrez régler la cafetière sur la dureté... -
Page 37: Messages Du Système
Attention: Nous proposons un filtre 21 comme accessoire en option (n° de réf. 461732) Maintenant, l'appareil s'enclenche destiné au réservoir d'eau 22. Respectez automatiquement. L'appareil est de nouveau les instructions accompagnant le filtre 21. prêt à faire du café dès que les anneaux lumineux des touches 4 et 2 5 q Commencez par mettre le filtre 21... - Page 38 Signification Remède Le bac 24 et le bac à marc de café Mettez le bac 24 et le bac à marc 23 manquent. de café 23 en place. clignote L'anneau lumineux de la touche Exécutez le programme de nettoyage. de nettoyage + 8 est allumé Voir page 38.
-
Page 39: Nettoyage
Programme de nettoyage Si d'une part l'anneau lumineux de la touche Nettoyage de nettoyage + 8 s'allume en rouge et si d'autre part le symbole s'affiche sur l'écran 3 vous devrez nettoyer l'appareil Nettoyage quotidien le plus rapidement possible. Risque d'électrocution Pour le nettoyer, utilisez la pastille de nettoyage ci jointe. -
Page 40: Nettoyage De La Buse
Lancement du programme de nettoyage Remarque : l'appareil se nettoie automatiquement, le symbole s'allume q Remplissez complètement le réservoir sur l'écran 3. Attendez (10 minutes env.) que d'eau 22. le symbole suivant s'affiche sur l'écran 3. q Maintenez la touche de nettoyage q Videz le bac 24 et le bac à... -
Page 41: Détartrage
Détartrage Si, appareil sous tension, l'anneau lumineux Lancer le programme de détartrage de la touche de détartrage 49 s'allume q Maintenez la touche de détartrage en rouge et si le symbole s'affiche sur 4 9 appuyée pendant 3 secondes l'écran 3, vous devrez détartrer l'appareil sans minimum. -
Page 42: Garantie
Remarque : l'appareil se détartre q Nettoyez les contacts 26 puis séchez les. automatiquement. Le symbole s'allume q Remettez le bac 24 et le bacà marc sur l'écran 3. La solution détartrante coule de café 23 en place. périodiquement dans le bac 24. Attendez Remarque : l'appareil se rince automatique (10 minutes env.) que le symbole suivant ment. - Page 43 Le café ne coule que par Degré de mouture trop fin. Réglez le sur une mouture gouttes. plus grossière. Café en poudre trop fin. Utilisez un café en poudre plus grossier. Le café n'a pas de couche Variété de café inadéquate. Changez de variété...
-
Page 44: Deutsch
Indice Guida rapida ........Osservare assolutamente . -
Page 45: Guida Rapida
Guida rapida Osservare assolutamente 1 Interruttore principale 2 Selettore funzioni Leggere interamente con attenzione (caffè, vapore, acqua bollente) le istruzioni per l'uso e conservarle nel 3 Display (indicazione con simboli) contenitore stampati 10. 4 Pulsante 5 Pulsante erogazione 2 Questo apparecchio è destinato all'uso 6 Manopola per regolazione quantità... -
Page 46: Al Primo Uso
Al primo uso Elementi di comando Generali Introdurre nei relativi contenitori solo acqua Interruttore principale 1 potabile e preferibilmente miscele di caffè L'interruttore principale 1 sul lato posteriore in grani per macchine da caffè espresso dell'apparecchio inserisce o disinserisce l'ali o macchine automatiche. - Page 47 Pulsante Manopola per la regolazione della quantità Con il pulsante 4 si accende l'apparecchio oppure lo si rimette in condizione Con la manopola di «Stand by». si regola la quantità di liquido. Dopo l'azionamento del pulsante caffè piccolo l'apparecchio si riscalda, l'anello luminoso del pulsante 4 ed il simbolo nel display 3...
-
Page 48: Preparazione
Usare grani per espresso / Manopola per la regolazione della densità del caffè per caffè Con la manopola 7 si seleziona q Il selettore funzioni 2 deve essere disposto la quantità di caffè macinato da molto blando ) ad extra forte ( q Con la manopola Pulsante lavaggio + 8 6, regolare la quantità... -
Page 49: Usare Polvere Per Espresso/Caffè
Usare polvere per Vapore per schiumare il latte espresso/caffè q Spingere verso il basso 13 il manicotto a del getto. q Regolare con la manopola 6 la quantità desiderata. q Riempire la tazza con circa di latte. q Mettere la/le tazza/e sotto l'uscita 12. q Immergere il getto 13 ca. -
Page 50: Vapore Per Riscaldare Bevande
Vapore per riscaldare bevande Preparare l'acqua calda q Spingere verso l'alto il manicotto a del q Disporre una tazza adeguata sotto getto 13. il getto 13. q Immergere a fondo il getto 13 nel liquido q Spingere verso il basso il manicotto a del da riscaldare. -
Page 51: Impostare La Durezza Dell'acqua
Impostare la durezza dell'acqua La corretta impostazione della durezza In caso di estreme durezze dell'acqua dell'acqua è importante per il programma nell'impianto domestico o di uso di acqua già di decalcificazione. filtrata, regolare la acqua durezza 1. Acqua Acqua Acqua Acqua Filtro durezza 1... -
Page 52: Messaggi Del Sistema
Messaggi del sistema L'apparecchio visualizza i messaggi nel display 3. Significato Rimedio Manca acqua. Introdurre acqua potabile fredda nel serbatoio dell'acqua 22. è visualizzato Avvertenza: nel serbatoio 22 rimane sempre una piccola quantità residua di acqua. Il serbatoio 22 manca o non Inserire il serbatoio dell'acqua 22. -
Page 53: Pulizia
Significato Rimedio L'effetto del filtro 21 è esaurito Sostituire il filtro 21 (Codice N° 46 1732) dopo 400 erogazioni o dopo o continuare con il funzionamento senza ca. 2 mesi. filtro 21. Se non si sostituisce il filtro, è visualizzato regolare la durezza dell'acqua vedi a pagina 50. -
Page 54: Programma Di Pulizia
Programma di pulizia Nota: l'apparecchio esegue il lavaggio automaticamente, nel display 3 appare Quando ad apparecchio inserito l'anello il simbolo . Attendere (circa 1 minuto) luminoso del pulsante pulizia + 8 finché nel display 3 non appaiono i simboli è acceso a luce rossa e nel display 3 appare seguenti il simbolo . -
Page 55: Decalcificazione
Avviare il programma di decalcificazione q Premere per 9 almeno 3 secondi Decalcificazione il pulsante decalcificazione 4. Se ora in casi molto rari nel display 3 lampeggia il simbolo , vedi il capitolo «Eliminare Quando con l'apparecchio acceso l'anello da soli piccoli guasti». luminoso del pulsante q Vuotare il piattello 24 ed il piattello per di decalcificazione 4 9 si accende a luce... -
Page 56: Eliminare Da Soli Piccoli Guasti
Nota: l'apparecchio esegue il risciacquo q Vuotare il piattello 24 ed il piattello per automaticamente, nel display 3 appare fondi di caffè 23. il simbolo . L'acqua scorre ad intervalli nel q Pulire ed asciugare i contatti 26. recipiente di raccolta. q Inserire di nuovo il piattello 24 ed il piattello Attendere (circa 4 minuti) finché... -
Page 57: Garanzia
Il programma Filtro attivo. Togliere il filtro e regolare di decalcificazione non inizia. la durezza dell'acqua. Non decalcificare mai con il filtro inserito. Forte rumore del macinacaffè. Corpi estranei nel sistema Chiamare il numero verde. di macina (per es. pietruzze, Nota: si può... -
Page 58: Nederlands
Inhoudsopgave In één oogopslag ....... . . Waar u beslist op moet letten . -
Page 59: In Één Oogopslag
In één oogopslag Waar u beslist op moet letten 1 Netschakelaar 2 Functiekeuzeknop De gebruiksaanwijzing zorgvuldig lezen (koffie, stoom, heet water) en goed bewaren in de documenthouder 10! 3 Display (weergave met symbolen) Dit apparaat is geschikt voor het huishouden 4 Toets en voor het verwerken van hoeveelheden die 5 Afgiftetoets 2... -
Page 60: Voor Het Eerste Gebruik
Voor het eerste Bedienings gebruik elementen Algemeen Netschakelaar 1 Uitsluitend schoon water en bij voorkeur Met netschakelaar 1 op de achterzijde van het espressomelanges of bonenmelanges voor apparaat kunt u de stroomtoevoer in en uits de volautomatische koffiemachine chakelen. in de desbetreffende reservoirs doen. Geen Nadat de netschakelaar 1is ingeschakeld, koffiebonen met een glazuur of karamellaagje wordt de verlichtingsring van toets... - Page 61 Toets kleine Met toets 4 wordt het apparaat espresso ingeschakeld of op stand by" gezet. espresso Nadat toets 4 is ingedrukt, wordt het apparaat opgewarmd, de verlichtingsring kleine van toets 4 en het symbool koffie op display 3 knipperen. Daarna spoelt het apparaat, koffie de verlichtingsring van toets 4 knippert...
-
Page 62: Bereiding
Maalwerk instellen q Met de draaiknop koffiemaalgraad 14 Bereiding de gewenste fijnheid van het koffiepoeder instellen. Algemeen Attentie Deze volautomatische espresso /koffiema De maalgraad uitsluitend wijzigen bij lopend chine maalt voor elke percolatie verse koffie. maalwerk! Anders kan het apparaat bescha Bij voorkeur espressomelanges of digd raken. -
Page 63: Stoom Voor Het Opschuimen Van Melk
Stoom voor het opschuimen Stoom voor het verwarmen van van melk dranken q Huls a van pijpje 13 naar onderen schui q Huls a van pijpje 13 naar boven schuiven. ven. q Pijpje 13 diep in de te verwarmen vloeistof q Kopje ongeveer met melk vullen. -
Page 64: Waterhardheid Instellen
Waterhardheid instellen De juiste waterhardheid is van belang voor het Stel waterhardheid 1 in indien de waterleiding ontkalkingsprogramma. van het huis al ontkalkingsmiddelen bevat of indien u gefilterd water gebruikt. Waterhardheid Waterhardheid Waterhardheid Waterhardheid Filterinstelling q De waterhardheid vaststellen met behulp Attentie: van het bijgevoegde teststrookje. -
Page 65: Systeemmeldingen
Systeemmeldingen Het apparaat geeft meldingen weer op display Betekenis Oplossing Geen water. Schoon, koud water in waterreservoir 22 doen. brandt N.B.: Er blijft altijd een kleine hoeveelheid restwater achter in waterreservoir Waterreservoir 22 ontbreekt Waterreservoir 22 aanbrengen. of is niet correct aangebracht. Bonenhouder 15 is leeg. -
Page 66: Reinigen
Betekenis Oplossing Na 400 kopjes Filter 21 vervangen (bestelnr. 46 1732) of ca. 2 maanden is filter 21 of zonder filter 21 werken. Als er geen versleten. nieuw filter wordt aangebracht, moet brandt de waterhardheid worden ingesteld zie pag. 63. Deur van de percolatie Deur van de percolatie eenheid 17 eenheid 17 is niet dicht. -
Page 67: Pijpje Reinigen
Pijpje reinigen Attentie Het reinigingsprogramma nooit onderbreken! Attentie De vloeistoffen niet drinken! Het pijpje 13 na elk gebruik reinigen. In geen geval ontkalkingstabletten of andere q Passend opvangbakje onder het pijpje ontkalkingsmiddelen in het apparaat doen. 13 zetten. Tijdens het reinigingsprogramma (duur q Functiekeuzeknop 2 korte tijd op0 ca. - Page 68 q Schaal 24 en het koffiedikreservoir Bij het apparaat is een ontkalkingsmiddel 23 leegmaken en weer aanbrengen. geleverd. Speciaal ontwikkelde en ge schikte middelen zijn verkrijgbaar bij q Waterreservoir 22 uitspoelen, met schoon water vullen tot max. en weer de klantenservice (bestelnr. 31 0451). aanbrengen.
-
Page 69: Kleine Storingen Zelf Verhelpen
Kleine storingen zelf verhelpen Storing Oorzaak Oplossing Geen afgifte van heet water Pijpje 13 is verstopt. Pijpje 13 grondig reinigen. of stoom mogelijk. Te weinig schuim of te dunne Huls a op pijpje 13 niet Huls a op pijpje 13 naar schuim. -
Page 70: Garantie
Maalwerk maakt lawaai. Ongewenste voorwerpen Klantenservice bellen. in maalwerk (bijv. steentjes, N.B.: Poederkoffie kan men die ook voorkomen gewoon blijven zetten. in uitgelezen koffiesoorten). Wachten tot het apparaat Verlichtingsring van toets is opgewarmd tot knippert. brandt kamertemperatuur. Apparaat te koud. ijkl knipperen Het apparaat minstens... -
Page 71: Español
Índice De un vistazo ........Puntos a tener en cuenta . -
Page 72: De Un Vistazo
De un vistazo Puntos a tener en cuenta 1 Interruptor de red 2 Mando selector de funciones Lea detenidamente las instrucciones de uso (café, vapor, agua caliente) del aparato y guárdelas en el portadocu 3 Pantalla de visualización (con símbolos) mentos 10 para cualquier consulta posterior. -
Page 73: Eliminación De Embalajes Y Desguace Del Aparato Usado
Puesta en funcionamiento ¡Peligro de quemadura! del aparato ¡Tocar la boquilla 13 sólo en la pieza de plástico! ¡No orientar nunca la boquilla 13 q Extraer el cable de conexión del aparato contra personas! Al principio de la extracción del compartimento correspondiente. de agua caliente o vapor, la boquilla 13 puede Introducir el enchufe en la toma salpicar. -
Page 74: Elementos De Mando
Enjuague Café en polvo Elementos Café listo Vapor de mando Llenar depósito de agua Vaciar / Fallo en bandejas Interruptor de red 1 Abrir café El interruptor de red 1 situado en la parte Abrir agua posterior del aparato conecta o desconecta la Grupo de escaldado alimentación de corriente del mismo. -
Page 75: Preparación Del Café
Tecla de extracción 2 5 Para preparar dos tazas de café, la salida 12 dispone de dos boquillas. Pulsando la tecla de extracción 2 5 se puede tomar café expreso (café fuerte) Mando giratorio para dosificar la cantidad o café normal. El anillo luminoso verde de café... -
Page 76: Utilizar Café En Grano Para Café Expreso / Para Café Normal
Utilizar café en grano para café Utilizar café expreso en expreso / para café normal polvo/café normal en polvo q Colocar el mando selector de funciones 2 q Ajustar con el mando giratorio en la posición 6 el tamaño de la taza. q Ajustar con el mando giratorio q Colocar la taza debajo de la salida 12. -
Page 77: Vapor Para Preparar Espuma De Leche
Vapor para preparar Vapor para calentar líquidos espuma de leche q Desplazar el manguito a de la boquilla 13 hacia arriba. q Desplazar el manguito a de la boquilla 13 hacia abajo. q Sumergir la boquilla 13 profundamente en el recipiente con el líquido que se q Llenar aprox. -
Page 78: Ajustar El Grado De Dureza Del Agua
Ajustar el grado de dureza del agua La comprobación del grado de dureza En caso de disponer de una instalación descal correcto del agua es importante cificadora externa o utilizar agua filtrada, deberá para el programa de descalcificación. ajustarse el grado de dureza del agua 1. Dureza Dureza Dureza... -
Page 79: Indicaciones Del Sistema
Indicaciones del sistema El aparato muestra indicaciones en la pantalla de visualización 3. Significado Manera de subsanar Falta agua. Llenar agua limpia, fría en el depósito de agua 22. se ilumina Advertencia: En el deposito de agua 22 siempre queda una mínima cantidad de agua residual. -
Page 80: Limpiar El Aparato
Significado Manera de subsanar La capacidad del filtro 21 Sustituir el filtro 21 (Nº de pedido 46 está agotada tras realizar 1732) o proseguir el funcionamiento 400 tomas o haber de la máquina sin el filtro 21. En caso se ilumina transcurrido aprox. -
Page 81: Programa De Limpieza
Programa de limpieza Arrancar el programa de limpieza q Llenar completamente el depósito Si estando conectado el aparato se ilumina de agua 22. el anillo luminoso rojo de la tecla de limpieza q Pulsar la tecla de limpieza + 8 + 8 y aparece en la pantalla como mínimo durante 3 segundos. -
Page 82: Limpiar La Boquilla
Limpiar la boquilla ¡No interrumpir nunca el programa de descalcificación! ¡Atención! ¡No ingerir los líquidos producidos La boquilla 13 deberá limpiarse durante la descalcificación! inmediatamente después de concluir su uso. La máquina se suministra con un agente q Colocar un recipiente de tamaño de descalcificación. - Page 83 Advertencia: El aparato ejecuta Advertencia: El aparato ejecuta automáticamente el ciclo de descalcificación. automáticamente un ciclo de enjuague. En la pantalla de visualización 3 se En la pantalla de visualización 3 se ilumina ilumina el símbolo . La solución el símbolo .
-
Page 84: Pequeñas Averías De Fácil Solución
Pequeñas averías de fácil solución Avería Posible causa Forma de subsanarla No es posible tomar agua La boquilla 13 está obstruida. Limpiar a fondo la boquilla 13. caliente o vapor. La espuma generada es El manguito a de la boquilla13 Desplazar el manguito a insuficiente o sale líquida. - Page 85 Funcionamiento ruidoso Han accedido al molinillo Llamar a la Línea de atención del molinillo. cuerpos extraños (por ejemplo al usuario. piedrecillas, que también Advertencia: Se puede pueden encontrarse en las continuar preparando café clases selectas de café). en polvo. El anillo luminoso de la tecla Aguardar a que el aparato alcance la temperatura 4 destella.
-
Page 86: Garantía
BOSCH, se compromete a reparar o reponer imprescindible acreditar por parte del usuario de forma gratuita durante el período de doce y ante el Servicio Autorizado de BOSCH, la meses, a partir de la fecha de compra por el fecha de adquisición mediante la correspon... -
Page 87: Türkçe
Žçindekiler Genel bakžå ........Kesinlikle dikkat etmeniz gerekenler . -
Page 88: Genel BakžÅ
Genel bakžå Kesinlikle dikkat etmeniz 1 Açma kapatma åalteri gerekenler 2 Fonksiyon seçme dümesi (kahve, buhar, sžcak su) 3 Gösterge (sembollü gösterge) Kullanma kžlavuzunu itinayla okuyunuz tuåu ve doküman tutturma düzeninde 10 muhafaza ediniz! 5 2 kahve alma tuåu Bu cihaz sadece evde kullanžlmak ve evde 6 Dolum miktaržnž... -
Page 89: X8E;Lk KullanžMdan Önce
Cihazžn devreye sokulmasž q Elektrik fiåini kablo gözünden çekip Žlk kullanžmdan çžkaržnžz ve elektrik prizine takžnžz. önce q Su tankžna 22 souk temiz su doldurunuz. "max" su doldurma seviyesi iåaretine dikkat ediniz. Genel bilgiler q Kahve çekirdei kabžna 15 kahve Sadece temiz ve saf su ve ilgili kablara çekirdei doldurunuz. -
Page 90: Kumanda Üniteleri
tuåu 4 tuåu 4 ile cihaz açžlžr veya "stand by" Kumanda üniteleri moduna alžnžr. tuåuna 4 basžldžktan sonra, cihaz žsžnmaya baålar, tuåuna 4 ait žåžklž Açma kapatma åalteri 1 halka ve göstergedeki 3 sembolü yanžp söner. Ardžndan cihazžn durulama Cihazžn arka yüzündeki açma kapatma fonksiyonu dereye girer, tuåuna 4 ait åalteri 1, cihazžn elektrik beslemesini... -
Page 91: Kahve HazžRlanmasž
2 küçük Kahve espresso 2 espresso hazžrlanmasž 2 küçük kahve Genel bilgi 2 kahve Bu tam otomatik espresso / kahve makinesi her kahve piåirildiinde taze kahve öütür. 2 büyük kahve Öncelikle espresso veya tam otomatik 2 XXL kahve kahve çekirdei karžåžmlarž kullanžnžz. Çekirdekleri serin, hava almayacak åekilde ve kapalž... -
Page 92: ÖÜtme Düzeninin Ayarlanmasž
Öütme düzeninin Dikkat ayarlanmasž Bütün kahve çekirdei veya piåirilmeden suda çözülen (neskafe) doldurmayžnžz! q Kahve öütme derecesi için döner Azami silme dolu iki ölçek öütülmüå düme 14 ile, kahve tozunun incelik toz kahve doldurunuz. derecesi ayarlanžr. q Kahve tozu gözünün kapaž 16 Dikkat ve sa... -
Page 93: X8E;Çecek žSžTmak Için Buhar
Žçecek žsžtmak için buhar Sžcak su hazžrlanmasž q Memedeki 13 kovan a yukarž itilmelidir. q Uygun bir fincan memenin 13 altžna yerleåtirilmelidir. q Meme 13 žsžtžlacak sžvžnžn içine iyice sokulmalždžr. q Memedeki 13 kovan a aåaž itilmelidir. q Fonksiyon seçme dümesi 2 yavaåça q Fonksiyon seçme dümesi 2 = konumuna çevrilmelidir. -
Page 94: Su Sertlik Derecesinin Ayarlanmasž
Su sertlik derecesinin Evin harici kireçten aržndžrma sistemi varsa veya cihazda önceden filtrelenmiå ayarlanmasž su kullanžlžyorsa, su sertlik derecesi 1 Su sertlik derecesinin doru ayarlanmasž, ayarlanmalždžr. kireçten aržndžrma programž için önemlidir. Su sertlik Su sertlik Su sertlik Su sertlik Filtre ayarž derecesi 1 derecesi 2 derecesi 3... -
Page 95: Sistem Mesajlarž
Sistem mesajlarž Cihaz göstergede 3 mesajlar bildirir. Anlamž Yardžm Su yok veya eksik. Su tankžna 22 temiz, souk su doldurulmalždžr. yanžyor Bilgi: Az miktarda bakiye su daima su tankžnda 22 kalžr. Su tankž 22 yok veya yerine Su tankž 22 doru takžlmalždžr. doru takžlmamžå. -
Page 96: CihazžN Temizlenmesi
Anlamž Yardžm Kahve piåirme ünitesinin Kahve piåirme ünitesinin kapaž 17 kapaž 17 kapalž deil. kapatžlmalždžr. yanžyor Kahve almak mümkün deil. Fonksiyon seçme dümesi 2 konumuna ayarlanmalždžr. yanžyor Aržza "Basit aržzalarž kendiniz giderebilirsiniz" bölümüne bakžnžz. yanžp sönüyor Bilgi: sembolleri göstergede 3 yanarken veya sembolleri göstergede 3 yanžp sönerken, cihazdan kahve alžnmasž... -
Page 97: Temizleme Programž
Temizleme programž q Sa cihaz kapažnž 18 ve öütülmüå kahve tozu gözünün kapažnž 16 açžnžz. Cihaz açžkken + temizlik tuåuna 8 ait q Žlgili göze 16 bir temizlik tableti atžnžz. žåžklž halka kžrmžzž yanarsa ve göstergede 3 q Öütülmüå kahve tozu gözünün sembolü... -
Page 98: CihazžN Kireçten AržNdžRžLmasž
q Su tankžna 22 su doldurunuz ve içine kireçten aržndžrma maddesi ilave ediniz; Cihazžn kireçten toplam sžvž miktarž 0,5 litredir. Veya aržndžržlmasž q Hazžr kireçten aržndžrma maddesi karžåžmžnž su tankžna 22 doldurunuz Cihaz açžkken calc kireçten aržndžrma (toplam sžvž miktarž 0,5 litredir). tuåuna 9 ait žåžklž... -
Page 99: Küçük AržZalarž Kendiniz Giderebilirsiniz
q Fonksiyon seçme dümesini 2 q 24 numaralž kabž ve kahve tortu kabžnž sembolüne ayarlayžnžz. 23 tekrar yerine takžnžz. Bilgi: Cihaz otomatik olarak durulama iålemi Bilgi: Cihaz otomatik olarak durulama iålemi yapar. Göstergede 3 sembolü yanar. yapar. Su belli aralžklar ile ilgili kabžn 24 içine akar. q Meme 13 ve cihaz üzerine sžçrayan Göstergede 3 daha sonraki sembolün... -
Page 100: Garanti
Kireçten aržndžrma Sistem çok sžcak. Fonksiyon seçme programž veya temizleme dümesini 2 0 konumuna programž çalžåmaya ayarlayžnžz ve yaklaåžk bir baålamžyor. Göstergede 3 fincan sžcak su alžnžz. sembolü 5x yanžp sönüyor. Kireçten aržndžrma programž Filtre aktif. Filtreyi çžkaržnžz ve su sertlik çalžåmaya baålamžyor. -
Page 101: Polski
Spis treœci Opis urz¹dzenia ........Na co nale¿y koniecznie zwróciæ... -
Page 102: Opis Urz¹Dzenia
Opis urz¹dzenia Na co nale¿y koniecznie 1 Wy³¹cznik sieciowy zwróciæ uwagê 2 Programator (kawa, para, gor¹ca woda) 3 Wyœwietlacz (wskaŸnik z symbolami) 4 Przycisk Instrukcjê u¿ytkowania i obs³ugi nale¿y 5 Przycisk 2 dok³adnie przeczytaæ i starannie 6 Pokrêt³o do nastawiania wielkoœci przechowywaæ... -
Page 103: Wskazówki Dotycz¹Ce Usuwania Opakowania I Zu¿Ytego Urz¹Dzenia
Wskazówki dotycz¹ce Urz¹dzenie jest gotowe do pracy, je¿eli usuwania opakowania pierœcienie œwietlne przycisku i zu¿ytego urz¹dzenia 4 i przycisku poboru 2 5 œwiec¹ siê na zielono, a na wyœwietlaczu 3 Aktualne informacje o sposobie usuniêcia pojawi siê symbol opakowania i zu¿ytego urz¹dzenia mo¿na Wskazówka: W czasie pierwszego u¿ycia otrzymaæ... - Page 104 Wyœwietlacz 3 Przycisk poboru 2 5 Wyœwietlacz 3 za pomoc¹ wyœwietlanych Poprzez naciœniêcie przycisku 2 5 symboli ukazuj¹ siê aktualne nastawienia mo¿na pobraæ kawê espresso lub zwyk³¹. i meldunki urz¹dzenia. W czasie nalewania kawy zielony pierœcieñ œwietlny miga. P³ukanie Ponowne naciœniêcie przycisku 2 5 Kawa mielona przerywa wyp³yw kawy przed czasem.
-
Page 105: Przygotowanie
Zastosowanie kawy ziarnistej Pokrêt³o do nastawiania mocy parzonej kawy do automatów i kawy ziarnistej typu espresso Pokrêt³em 7 wybiera siê iloœæ mielonej kawy od bardzo s³abej ( q Programator 2 nastawiæ na do bardzo mocnej ( q Pokrêt³em Przycisk programu czyszczenia + 8 nastawiæ... -
Page 106: Zastosowanie Kawy Mielonej Do Automatów I Kawy Mielonej Typu Espresso
Zastosowanie kawy mielonej Przygotowanie pary do automatów i kawy mielonej do spieniania mleka typu espresso q Tulejkê a na dyszy 13 przesun¹æ na dó³. q Fili¿ankê nape³niæ mlekiem prawie do q Pokrêt³em wysokoœci. nastawiæ odpowiedni¹ wielkoœæ nalewanej porcji kawy i iloœæ fili¿anek. q Dyszê... -
Page 107: Przygotowanie Pary Do Podgrzewania Napojów
Przygotowanie pary Przygotowanie gor¹cej wody do podgrzewania napojów q Odpowiedni¹ fili¿ankê podstawiæ pod dyszê 13. q Tulejkê a na dyszy 13 przesun¹æ do góry. q Tulejkê a na dyszy 13 przesun¹æ na dó³. q Dyszê 13 zanurzyæ g³êboko w p³ynie q Programator 2 przekrêciæ... -
Page 108: Nastawianie Stopnia TwardoœCi Wody
Nastawianie stopnia twardoœci wody Prawid³owe nastawienie stopnia twardoœci Je¿eli w domowej sieci wodoci¹gowej wody jest bardzo wa¿ne dla programu zainstalowane jest urz¹dzenie zmiêkczaj¹ce usuwania kamienia. wodê lub zastosujemy wodê przefiltrowan¹, nastawiæ stopieñ twardoœci 1. Stopieñ Stopieñ Stopieñ Stopieñ Nastawie-n twardoœci 1 twardoœci 2 twardoœci 3 twardoœci 4... -
Page 109: Meldunki Systemowe
Meldunki systemowe Meldunki urz¹dzenia pokazuj¹ siê na wyœwietlaczu 3. Znaczenie Usuniêcie Brak wody. Zbiornik wody 22 nape³niæ œwie¿¹, czyst¹ wod¹. œwieci siê Wskazówka: W zbiorniku wody 22 pozostaje zawsze resztka wody. Zbiornik wody 22 nie jest w³o¿ony, Zbiornik wody 22 w³o¿yæ albo jest w³o¿ony nieprawid³owo. -
Page 110: Czyszczenie
Znaczenie Usuniêcie Filtr 21 jest zu¿yty po Wymieniæ filtr 21 pobraniu 400 fili¿anek kawy lub (nr katalogowy 46 1732) albo po up³ywie ok. 2 miesiêcy. wyj¹æ filtr 21 i eksploatowaæ œwieci siê dalej urz¹dzenie. Je¿eli nie w³o¿ymy nowego filtra, nale¿y nastawiæ... -
Page 111: Program Czyszczenia
Program czyszczenia q Otworzyæ praw¹ pokrywê urz¹dzenia 18 i pokrywê zbiornika kawy mielonej 16. Je¿eli przy w³¹czonym urz¹dzeniu pierœcieñ q Do zbiornika 16 wrzuciæ tabletkê œrodka œwietlny przycisku programu czyszczenia czyszcz¹cego. + 8 zaœwieci siê na czerwono, a na q Zamkn¹æ pokrywê zbiornika 16 i praw¹ wyœwietlaczu 3 pojawi siê... -
Page 112: Usuwanie Kamienia
W³¹czanie programu usuwania kamienia q Nacisn¹æ przycisk programu usuwania Usuwanie kamienia 4 9 i przytrzymaæ co najmniej 3 sekundy. Je¿eli kamienia nawyœwietlaczu 3 miga symbol , co zdarza siê rzadko patrz „Sami usuwamy drobne usterki". Je¿eli przy w³¹czonym urz¹dzeniu pierœcieñ œwietlny przycisku programu usuwania q Zbiornik 24 i zbiornik fusów 23 opró¿niæ... -
Page 113: Gwarancja
q Zbiornik wody 22 wyp³ukaæ, nape³niæ Wskazówka: Urz¹dzenie p³ucze siê œwie¿¹ wod¹ do oznaczenia max automatyczni. i ponownie w³o¿yæ. q Wytrzeæ rozbryzgi na dyszy 13 q Naczynie wyj¹æ spod dyszy 13, opró¿niæ i na urz¹dzeniu. i ponownie podstawiæ. Proces usuwania kamienia jest q Programator 2 nastawiæ... - Page 114 Kawa sp³ywa tylko Kawa mielona jest zbyt drobno. Nastawiæ mniejszy stopieñ kroplami. rozdrobnienia (mieliæ grubo). Mielona kawa jest zbyt mia³ka. U¿yæ kawê grubiej zmielon¹. Zaparzona kawa nie ma Nieodpowiedni gatunek kawy. Zmieniæ gatunek kawy. warstwy pianki ( crema") warstwy pianki („crema"). Kawa ziarnista jest nieœwie¿a.
-
Page 115: Pºcc®Å¼
Coªep²a¸åe Ko¯ÿæe®¹¸¾¼ o¢µop ......a ñ¹o cæeªºe¹ o¢pa¹å¹¿ oco¢oe ¸å¯a¸åe ........š®aµa¸åø... -
Page 116: Ko¯ÿæe®¹¸¾¼ O¢Μop
Ko¯ÿæe®¹¸¾¼ a ñ¹o cæeªºe¹ o¢µop o¢pa¹å¹¿ oco¢oe ¸å¯a¸åe 1 ¾®æ÷ña¹eæ¿ 2 ¥epe®æ÷ña¹eæ¿ ¾¢opa íº¸®ýå¼ ¥poñ¹å¹e ¸å¯a¹e濸o å¸c¹pº®ýå÷ (®oíe, ÿap, ¨opøñaø oªa) ÿo õ®cÿæºa¹aýåå å ÿoæo²å¹e ee ¸a xpa¸e¸åe 3 ©åcÿæe¼ (帪å®aýåø c ÿo¯oó¿÷ ªep²a¹eæ¿ 10! Õ¹a ®oíeap®a cå¯oæo) ¸e ÿpeª¸aµ¸añe¸a ªæø ÿpo¯¾òæe¸¸o¨o 4 K¸oÿ®a åcÿo濵oa¸åø. -
Page 117: X9A;®Aµa¸åø Ÿo º¹Åæåµaýåå
š®aµa¸åø ÿo º¹åæåµaýåå Koíeap®a ¨o¹oa ® õ®cÿæºa¹aýåå, ecæå ®oæ¿ýa o®pº¨ ®¸oÿ®å 4 å ®¸oÿ®å o¹¢opa Ÿíop¯aýå÷ o ÿpaå濸o¼ º¹åæåµaýåå ®oíe 2 5 ce¹ø¹cø µeæe¸¾¯ ce¹o¯, ªo¯aò¸åx õæe®¹poÿpå¢opo ¾ ¯o²e¹e å ¸a ªåcÿæee 3 µa¨opae¹cø cå¯oæ ÿoæºñ广 ¹op¨oo¼ op¨a¸åµaýåå åæå ... - Page 118 ©åcÿæe¼ 3 K¸oÿ®a o¹¢opa ®oíe 2 5 ©åcÿæe¼ 3 ÿo®aµ¾ae¹ c ÿo¯oó¿÷ cå¯oæo ¥º¹e¯ ¸a²a¹åø ¸a ®¸oÿ®º 2 5 ¯o²¸o paµæåñ¸¾e ºc¹a¸o®å å coo¢óe¸åø ÿpooªå¹¿ o¹¢op ®oíe «õcÿpecco» åæå o coc¹oø¸åå ®oíeap®å. o¢¾ñ¸o¨o ®oíe. o pe¯ø o¹¢opa ®oíe ce¹øóeecø µeæe¸¾¯ ce¹o¯ ®oæ¿ýo o®pº¨ ¥po¯¾®a ®¸oÿ®å...
-
Page 119: På¨o¹Oæe¸åe ®Oíe
Pºñ®a pe¨ºæåpo®å ®peÿoc¹å ®oíe q C ÿo¯oó¿÷ pºñ®å 7 ¾¢epå¹e ÿpeªÿoñå¹ae¯º÷ a¯å ®peÿoc¹¿ ®oíe. q ¥oc¹a¿¹e ñaò®º(å) ÿoª ÿpåcÿoco¢æe¸åe C ÿo¯oó¿÷ pºñ®å 7 ¾¢åpae¹cø ªæø o¹¢opa ®oíe 12. ¥på ¸eo¢xoªå¯oc¹å ®oæåñec¹o ¯oæo¹o¨o ®oíe, ¸eo¢xoªå¯o¨o ªæø o¹pe¨ºæåpº¼¹e ÿpåcÿoco¢æe¸åe 12 ÿpå¨o¹oæe¸åø ¸aÿå¹®a, ¸añå¸aø c oñe¸¿ ÿo ¾co¹e. -
Page 120: På¨o¹Oæe¸åe ®Oíe ŵ ¯Oæo¹O¨o ®Oíe «Õcÿpecco» / O¢¾Ñ¸o¨o ¯Oæo¹O¨o ®Oíe
¥på¨o¹oæe¸åe ®oíe ¥ap ªæø cÿe¸åa¸åø ¯oæo®a åµ ¯oæo¹o¨o ®oíe q ¥epeªå¸¿¹e ¹ºæ®º a ¸åµ ÿo ¸acaª®e 13. «õcÿpecco» / o¢¾ñ¸o¨o aÿoæ¸å¹e ñaò®º ¯oæo®o¯ ÿpå¯ep¸o ¸a ¯oæo¹o¨o ®oíe ¥o¨pºµå¹e ¸acaª®º 13 ¯oæo®o q C ÿo¯oó¿÷ pºñ®å ¸a ¨æº¢å¸º o®. 1 c¯. ºc¹a¸oå¹e ¸eo¢xoªå¯oe a¯... -
Page 121: Ap ªæø Ÿoªo¨pea ¸Aÿå¹®O
¥ap ªæø ÿoªo¨pea ¸aÿå¹®o q ¥epeªå¸¿¹e ¹ºæ®º a epx ÿo ¸acaª®e 13. q ¥o¨pºµå¹e ¸acaª®º 13 ¨æº¢o®o ÿoªo¨peae¯º÷ ²åª®oc¹¿. q eªæe¸¸o ÿepeeªå¹e ÿepe®æ÷ña¹eæ¿ ¾¢opa íº¸®ýå¼ 2 ¸a cå¯oæ =. O®oæo 20 ce®º¸ª ®oíeap®a ¸a¨peae¹cø. a ªåcÿæee 3 ¯å¨ae¹ cå¯oæ . -
Page 122: X9A;C¹A¸o®A ²Ec¹®Oc¹Å Oª¾
šc¹a¸o®a ²ec¹®oc¹å oª¾ ©æø ¾ÿoæ¸e¸åø ÿpo¨pa¯¯¾ ºªaæe¸åø ¸a®åÿå Ecæå ªo¯aò¸e¯ oªoÿpooªe å¯e÷¹cø oñe¸¿ a²¸o, ñ¹o¢¾ ¢¾æo ÿpaå濸o c¹poe¸¸¾e º¯ø¨ñå¹eæå oª¾ åæå ¾ ºc¹a¸oæe¸o µ¸añe¸åe ²ec¹®oc¹å oª¾. åcÿo濵ºe¹e º²e o¹íå濹poa¸¸º÷ oªº, ¹o cæeªºe¹ ºc¹a¸aæåa¹¿ µ¸añe¸åe ²ec¹®oc¹å oª¾ 1. ±ec¹®oc¹¿ ±ec¹®oc¹¿ ±ec¹®oc¹¿... -
Page 123: Cåc¹E¯¸¾E Coo¢Óe¸åø
Cåc¹e¯¸¾e coo¢óe¸åø Coo¢óe¸åø o coc¹oø¸åå ®oíeap®å ¾oªø¹cø ¸a ªåcÿæe¼ 3. ³¸añe¸åe ¥o¯oó¿ ÿpå ºc¹pa¸e¸åå e¹ oª¾. ³aæe¼¹e peµepºap 22 ce²º÷, xoæoª¸º÷ oªº. Ce¹å¹cø š®aµa¸åe: ¸e¢oæ¿òoe ®oæåñec¹o oª¾ ce¨ªa oc¹ae¹cø peµepºape 22. Peµepºap ªæø oª¾ 22 šc¹a¸oå¹e ¸a ¯ec¹o peµepºap ªæø o¹cº¹c¹ºe¹... -
Page 124: Ñåc¹®A
³¸añe¸åe ¥o¯oó¿ ÿpå ºc¹pa¸e¸åå Íå濹pº÷óåe co¼c¹a ³a¯e¸å¹e íå濹p 21 (¸o¯ep ªæø íå濹pa 21 ocæa¢ea÷¹ ÿocæe µa®aµa: 461 732) åæå ÿpoªoæ²a¼¹e 400 µaapo® åæå ÿpå¯ep¸o õ®cÿæºa¹aýå÷ ®oíeap®å ¢eµ íå濹pa Ce¹å¹cø ñepeµ 2 ¯ecøýa. 21. Ka® 嵯e¸å¹¿ ºc¹a¸o®º cæºñae, ecæå íå濹p ¢oæ¿òe ¸e ¢ºªe¹ åcÿo濵oa¹¿cø, oÿåca¸o ¸a c¹pa¸åýe 121. -
Page 125: Po¨pa¯¯a Ñåc¹®Å
¥po¨pa¯¯a ñåc¹®å ®æ÷ñe¸åe ÿpo¨pa¯¯¾ ñåc¹®å q aÿoæ¸å¹e ªo ®pae peµepºap 22. Ecæå ÿpå ®æ÷ñe¸¸o¼ ®oíeap®e µa¨opae¹cø q a²¯å¹e ¸a ®¸oÿ®º + 8 å ¸e ®pac¸¾¯ ce¹o¯ ®oæ¿ýo o®pº¨ ®¸oÿ®å + o¹ÿºc®a¼¹e ee ¹eñe¸åe 8 å ¸a ªåcÿæee 3 ÿoøæøe¹cø cå¯oæ ¯å¸å¯º¯... -
Page 126: Ñåc¹®A ¸Acaª®Å
Ñåc¹®a ¸acaª®å Cpeªc¹o ªæø ºªaæe¸åø ¸a®åÿå å¯ee¹cø ®o¯ÿæe®¹e ÿoc¹a®å. Cpeªc¹a, paµpa- ¸å¯a¸åe ¢o¹a¸¸¾e cÿeýåa濸o ªæø oñåc¹®å ªa¸¸o¼ acaª®º cæeªºe¹ 13 ñåc¹å¹¿ ÿocæe ®a²ªo¨o ®oíeap®å, ¯o²¸o ÿoæºñ广 ñepeµ C溲¢º åcÿo濵oa¸åø. cepåca (¸o¯ep ªæø µa®aµa: 31 0451). q 13 ÿoªxoªøóº÷ e¯®oc¹¿. a ÿpo¹ø²e¸åå... -
Page 127: Ka® ºc¹Pa¸å¹¿ Ca¯oc¹Oø¹E濸O ¯Eæ®Åe ¸Eåcÿpa¸oc¹Å
š®aµa¸åe: oñåc¹®a ®oíeap®å o¹ ¸a®åÿå š®aµa¸åe: ÿpo¯¾®a ®oíeap®å ¾ÿoæ¸øe¹cø ¾ÿoæ¸øe¹cø a¹o¯a¹åñec®å, ¸a ªåcÿæee 3 a¹o¯a¹åñec®å, ¸a ªåcÿæee 3 ÿoøæøe¹cø ÿoøæøe¹cø cå¯oæ . Pac¹op cpeªc¹a cå¯oæ . oªa cæåae¹cø ÿpåe¯¸º÷ cæåae¹cø ÿpåe¯¸º÷ e¯®oc¹¿ ñepeµ e¯®oc¹¿ ñepeµ oÿpeªeæe¸¸¾e 帹epaæ¾. oÿpeªeæe¸¸¾e 帹epaæ¾. ¥oªo²ªå¹e, ÿo®a ¥oªo²ªå¹e, ÿo®a ¸a ªåcÿæee 3 ¸e ÿoøå¹cø... - Page 128 Koíe ¢eµ ¹o¸®o¨o cæoø eÿoªxoªøóå¼ cop¹ ®oíe. oµ¿¯å¹e ®oíe ªpº¨o¨o cop¹a. ÿe¸¾ ÿe¸¾ Koíe¼¸¾e µep¸a ¢¾æå cæåò®o¯ oµ¿¯å¹e ce²eÿoª²ape¸¸¾e ªa¸o o¢²ape¸¾. µep¸a. šc¹a¸oæe¸¸aø c¹eÿe¸¿ ÿo¯oæa ¥oª¢epå¹e ÿpaå濸o ¹o¸®oc¹¿ ¸e ÿoªxoªå¹ ® åcÿo濵ºe¯¾¯ ÿo¯oæa ®oíe. ®oíe¼¸¾¯ µep¸a¯. Koíe¯oæ®a ³ep¸a ¸e ÿoÿaªa÷¹ ®oíe¯o殺 Cæe¨®a ÿoc¹ºñå¹e ÿo e¯®oc¹å...
- Page 130 Landesvertretung anfordern. Beachten Sie unser weiteres Kundendienst Angebot: Auch nach Ablauf der Garantie stehen Ihnen unser Werkskundendienst und unsere Servicepartner zur Verfügung. Robert Bosch Hausgeräte GmbH 584132 Carl Wery Str. 34 / 81739 München // Germany de, en, fr, it, nl, es, tr, pl, ru // 8407...
Need help?
Do you have a question about the TCA6001 and is the answer not in the manual?
Questions and answers