Advertisement
Quick Links
900
SITdefault
Saab 9-3 CV M04-
Parking assistance (SPA)
Accessories Part No.
12 832 509
MONTERINGSANVISNING · INSTALLATION INSTRUCTIONS
MONTAGEANLEITUNG · INSTRUCTIONS DE MONTAGE
Group
9:40-04
SCdefault
Installation instructions
Date
Instruction Part No.
Apr 03
12 832 519
Saab 9-3 CV M04-
Replaces
F930A194
Advertisement

Subscribe to Our Youtube Channel
Related Manuals for Saab 12 832 509

Summary of Contents for Saab 12 832 509
- Page 1 Installation instructions SCdefault MONTERINGSANVISNING · INSTALLATION INSTRUCTIONS MONTAGEANLEITUNG · INSTRUCTIONS DE MONTAGE SITdefault Saab 9-3 CV M04- Parking assistance (SPA) Accessories Part No. Group Date Instruction Part No. Replaces 12 832 509 9:40-04 Apr 03 12 832 519 F930A194 Saab 9-3 CV M04-...
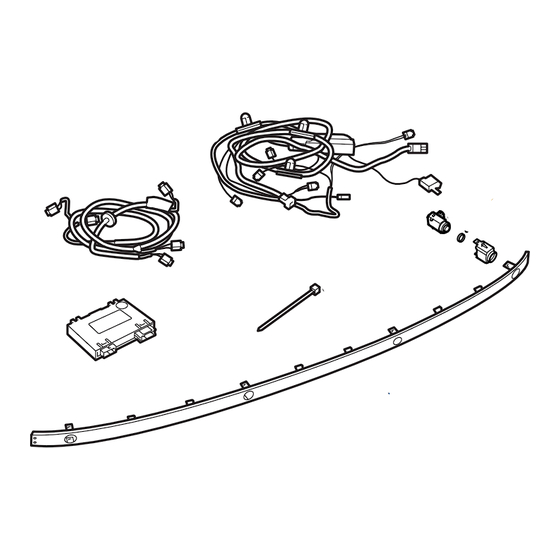
- Page 2 2 12 832 519 F930A195 1 SPA control module 2 Holder (x4) 3 Seal (x4) 4 Distance sensor (x4) 5 Decor strip, bumper 6 Wiring harness, distance sensor 7 SPA wiring harness 8 Cable tie (x2) Saab 9-3 CV M04-...
- Page 3 3 Remove the two nuts that hold the rear bumper air shield to the body and the bolts that hold the bumper shell to the wheel housings. 4 Lower the vehicle and remove the rear bumper decor strip. Saab 9-3 CV M04-...
- Page 4 Remove the side trim. 8 Remove the clips for the right-hand side trim and fold the trim aside. Unhook the strap on the rear side of the side trim and remove the side trim. Saab 9-3 CV M04-...
- Page 5 10 Remove the bumper shell bolts that are located below the rear lamp clusters. 11 Remove the bumper shell by pulling the sides outwards and then pulling the bumper shell rear- wards. Important Place the bumper on a soft, clean surface. Saab 9-3 CV M04-...
- Page 6 20 mm between your eyes and the light source may cause eye injury. 14 Remove the rearmost connector (blue) from the rear fuse box. Make a note of how the rear wir- ing harness is connected and then remove it. Saab 9-3 CV M04-...
- Page 7 Secure the parts of the wiring harness using cable ties. 16 Connect the control module and fit it onto the mounting point on the rear fuse box. 17 Remove the support from the bumper shell. Saab 9-3 CV M04-...
- Page 8 The connector sockets for the distance sensors should point towards the right-hand side of the car. 22 Fit the wiring harness for the sensors into the slots in the bumper shell. 23 Fit the support to the bumper shell. Saab 9-3 CV M04-...
- Page 9 27 Fit the bumper shell bolts that are located below the rear lamp clusters. 28 Fit and connect the rear lamp clusters. Check the fit against the boot lid moulding. Saab 9-3 CV M04-...
- Page 10 31 Fit the right-hand side trim, and hook the strap on. Fit the clips. 32 Fit the side scuff plates. 33 Fit the scuff plate and fit the carpet on the lug- gage compartment floor. Saab 9-3 CV M04-...
- Page 11 “All”, select “Add/Remove”, select the accessory and then “Add”. Note The diagnostic tool will on some occasions need to retrieve a security code in TIS. Information on what to do will be displayed on the diagnostic tool display. Saab 9-3 CV M04-...
Need help?
Do you have a question about the 12 832 509 and is the answer not in the manual?
Questions and answers