Table of Contents
Advertisement
Quick Links
Advertisement
Table of Contents

Subscribe to Our Youtube Channel
Related Manuals for Aquos IS13SH


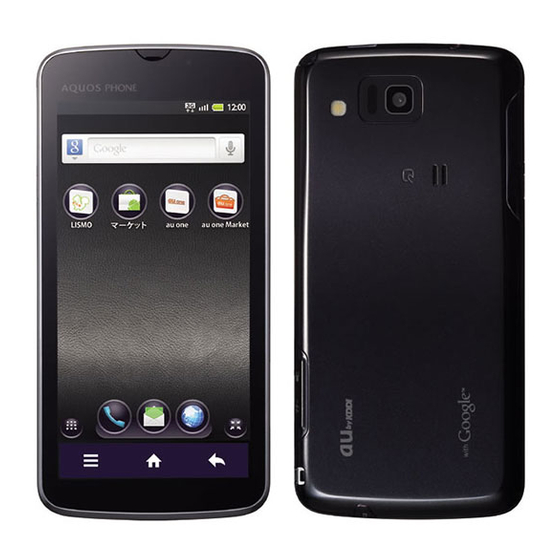
Summary of Contents for Aquos IS13SH
-
Page 2: Preface
You can download the Basic Manual (this manual) and the Instruction Thank you for purchasing the IS13SH. Manual (Accessory) (Japanese) or full Instruction Manual (Japanese) Before using your IS13SH, be sure to read the Basic Manual (this PDF in PDF format from the au homepage. manual) to ensure correct usage. -
Page 3: Before Using An Au Phone
• For a child’s use, read the Basic Manual and give your child instructions on proper use. • The IS13SH is a cell phone compatible with the international roaming service. Each network service which is described in the Basic Manual varies depending on the area or service. For details,... -
Page 4: Cell Phone Etiquette
* This is inserted in the Do not make calls in theaters, museums, libraries, and other similar IS13SH at the time of purchase. places. Turn power off or turn on Manner mode so as not to disturb ●... -
Page 5: Illustrations And Descriptions In This Manual
• Explanations of this manual are based on the case when the color of the IS13SH is “Airy Pink” as an example. • Explanations of this manual are based on the case when the IS13SH is held vertically. If you hold it horizontally, menu items/icons/on-screen keys etc. -
Page 6: Water Resistance
・ More specifically, water resistance enables you; Water Resistance To use the IS13SH by holding it with wet hands in rains (with a The IS13SH complies with IPX5 and IPX7 water protection standards precipitation of 20 mm an hour or smaller) without an umbrella. -
Page 7: Security Code And Pin Code
PiPit or the Customer Service Center. ● PIN Code • When the PIN code is locked, the IS13SH may be restarted for the security Usage Preventing unauthorized use of the au IC-Card by a third party reasons. - Page 8 IS13SH by yourself or are received/downloaded to the IS13SH from external devices. The memory contents of the IS13SH may be deleted or changed because of unexpected elements such as static electricity and malfunction or modifications, improper operations, etc.
-
Page 9: Table Of Contents
Adding an Address Book Entry ......42 Learning the Basics Preface............ii Using an Address Book ........43 For Learning Operations of the IS13SH..ii Operating the Touch Panel ........20 Viewing the Address Book Details Screen ... 43 Using Phone Number ........... 44 Operating the Touch Keys........21... - Page 10 Anshin Security Pack ..........71 Using 3LM Security..........72 Using Remote Support..........72 Using VirusBuster Mobile for au ......72 Managing Applications ..........72 Settings of IS13SH Checking Your Profile ...........73 Changing the Incoming Ring Tone......73 Changing the Wallpaper........73 Initializing microSD Memory Card ......74 Global Function Using Global Passport CDMA .......75...
-
Page 11: Names And Functions Of Parts
A Earpiece (Receiver) F External connection jack Emits voice of other party during a call, messages in Answering Use it to connect the IS13SH to the common AC adapter 03 (sold memo, etc. separately), the microUSB cable 01 (sold separately), the 18 B Light sensor pin-microUSB conversion adapter 01 (sold separately), etc. - Page 12 N Battery pack cover ■ Back O Mouthpiece (Microphone) Transmits your voice to the other party during a call. It is also used for recording sounds. Take care not to cover the microphone with your fingers etc. P Earphone jack Q Internal antennas Do not cover the internal antennas area with your hand when you ®...
-
Page 13: Removing/Attaching The Battery Pack
■ Back (Inside the Battery Pack Cover) Removing/Attaching the Battery Pack Removing the Battery Pack When removing the battery pack, turn off the IS13SH. Remove the battery pack cover on the back of the IS13SH. Hook a fingertip (nail) on the concave portion with the center of the battery pack cover pressed (A), and then remove the battery pack cover by pulling up in the direction of the arrow (B). -
Page 14: Attaching The Battery Pack
Attaching the Battery Pack result in damage to the battery pack or the battery pack cover. Use the specified battery pack for the IS13SH and attach it properly. Using au IC-Card After making sure that the PULL tab is closely... -
Page 15: Inserting Au Ic-Card
Insert the au IC-Card according to the orientation of its cutout. • Inserting the tray not deeply enough may prevent the IS13SH from functioning properly. • When the tray comes off, insert the tray straightly. -
Page 16: Using Microsd Memory Card
Customer Service Center. ■ Handling Precautions • Do not remove the battery pack and do not turn off the IS13SH and other equipments while reading, writing, playing, saving or moving/ copying data. It may result in damage to data in the IS13SH or microSD memory card or data loss. -
Page 17: Removing Microsd Memory Card
IS13SH. • Do not remove the microSD memory card forcefully. It may result in damage to the microSD memory card or the IS13SH or data loss. • Application installed to microSD memory card cannot be used once you removed microSD memory card. -
Page 18: Charging The Battery Pack
Approx. 570 min • A cell phone is set not to enable the sleep mode because of an * These times are based on the case when the IS13SH is used in Japan. application etc. • Applications which remain activated in the background are used. - Page 19 Unplug the common AC adapter 03 (sold separately) power plug from the power outlet/Unplug the common DC adapter 03 (sold separately) plug from the cigarette lighter socket. • Although you can charge the IS13SH while the power is turned on, charging time lengthens.
-
Page 20: Turning The Power On/Off
• If you use the microUSB cable to charge the IS13SH, it may take the IS13SH Turning the Power Off longer to be fully charged than if you use the specified AC adapter (sold separately). -
Page 21: Switching The Display Language To English
If you have already had a Google account, tap Sign in, enter the user name and password and tap Sign in. After you purchase the IS13SH, the initial setup screen is displayed If you have not had a Google account, tap Create and follow the automatically when turning on the power or inserting another’s au... -
Page 22: Operating The Touch Panel
Operating the Touch Panel Gently touch a screen and then trace it to the desired direction. The display (main area) of the IS13SH is a touch panel. You can • Scroll screen or switch pages. In addition, operate gauge and bar operate the IS13SH by directly touching the screen. -
Page 23: Operating The Touch Keys
■ Pinch Operating the Touch Keys Touch a screen with two of your fingers and then move them apart or While the display (main area) illuminates (except for when the unlock closer together. screen is displayed), the following icons appear on the display (sub •... -
Page 24: Using The Home Screen
■ Switching Desktops Using the Home Screen You can switch desktops by sliding or flicking the home screen to the left or right. Viewing the Home Screen The home screen consists of multiple desktops, and you can add shortcuts, widgets and folders on each desktop screen. 《Switching desktop screens》... -
Page 25: Moving/Removing Shortcuts/Widgets/Folders
Folder New folder Moving/Removing Shortcuts/Widgets/Folders Add folders which can store shortcuts. On the home screen, long-touch a shortcut/widget/ Bluetooth received Add folders which display data received folder to move/remove. ® via Bluetooth Receive by IC transmission ■ When moving the shortcut/widget/folder Add folders which display data received via IC communication. -
Page 26: Using The Launcher
Settings Check settings or information. Google Search Search for information in the IS13SH or on web sites. Voice Search Enter a keyword for Google search with your voice. Compass Display the compass and your current location on the Google Maps. - Page 27 Search for information in the and manage them. built-in dictionary of the IS13SH or dictionaries on the Internet. Delete data in the IS13SH and microSD memory card or lock its Calendar Save and manage schedules. operations in case of loss of your...
- Page 28 Icon Name of icon Description Icon Name of icon Description LISMO Player Enjoy playing music such as Disaster Message Register your safety information music downloaded via LISMO Board in the au server when a disaster and data imported from music occurs.
- Page 29 Icon Name of icon Description Icon Name of icon Description 動画on! (DOGA NHK G-Media動画on! (NHK Disneyカレン This is a calendar application on!) G-Media DOGA on!) enables ダー (Disney with cute Disney characters. you to watch latest news and calendar) Additional calendar various categories of NHK backgrounds and more apps are movies such as report, sports,...
-
Page 30: Using The Status Bar
: Waiting to upload data status bar, while the status indicators to show the status of the IS13SH • The Uploading data indicator and Sending file are on the right side. - Page 31 ■ Examples of status indicator Indicator Description ® Wi-Fi signal strength Indicator Description : Level 4 : Level 3 : Level 2 Time : Level 1 : Level 0 Alarm set ® Bluetooth in use Battery level : Waiting : Connecting : Battery level display : No battery GPS in use...
-
Page 32: Using Notification/Status Panel
Answering memo is recorded》 B Notification area A Information/notification indicator display area You can check the status of the IS13SH and contents of B Status indicator display area notifications. You can tap to activate a corresponding application depending on the information. -
Page 33: Switching Orientation
《Portrait display》 superimposed. The charge indicator other than is displayed as an animation. • Operate the IS13SH in the upright position. The screen display may not be changed if the IS13SH is laid in parallel to the ground. Answering memo set... -
Page 34: Displaying Available Menu
■ Context Menu Displaying Available Menu The context menu is displayed by long-touching an item or a display ■ Option Menu where the menu is available. The option menu is displayed by tapping e on the screen where the Example: In the character entry screen (Notepad) menu is available. -
Page 35: Character Input
Tap the character entry field to display software keyboard and enter Keep Flick left characters by tapping keys on the screen. touching The following software keyboards are available for the IS13SH. 12Key You can enter a character, changing characters by repeatedly tapping the character entry key. QWERTY... - Page 36 A Character entry area : Half-width Katakana B Prediction candidates list/Relational prediction candidates list/ : Full-width alphabet : Full-width numeric Normal conversion candidates list : Full-width Katakana If the word prediction function is enabled, the prediction : Character code candidates list is displayed when characters are entered. If the H Delete key relational prediction function is enabled, the relational prediction Deletes the selected character or the character on the left of the...
-
Page 37: Switching Character Entry Modes
: Uppercase character entry Entering Emoji/D-Emoji/Symbol/Facemark : Uppercase character entry lock On the character entry screen, You can switch the symbols to enter by tapping the key in numeric Tap when there is no conversion target on the character entry screen. entry. -
Page 38: Switching Input Software
E Character entry mode switch key : Displays Emoji converted automatically when sent to a cell phone of other carrier. : Displays normal Emoji. : Displays full-width symbols. : Displays half-width symbols. F Delete key Deletes the selected character or the character on the left of the cursor. -
Page 39: Making A Call
F Delete key Making a Call Deletes a single-digit on the left side of the cursor. If you [Phone. On the home screen, long-touch it, all the numbers on the left side of the cursor are deleted and all the numbers are deleted when there is no number on the left side of the cursor. -
Page 40: Making An International Call (Au International Call Service)
• Even if you cannot use the service by exceeding the limit fee, you can use * The numbers are emergency call numbers. The IS13SH notifies your present location to from the first day of the next month. Also, you can use the domestic call as the emergency call destination with a signal from a base station when you call to the usual while the service is stopped. -
Page 41: Answering A Call
Answering a Call Returning a Call (Outgoing History/ Incoming History) Answering an Incoming Call [Phone [Outgoing History/ On the home screen, Slide to the right during an incoming call. Incoming History. When you get an incoming call while the backlight illuminates (except for when the unlock screen is displayed), tap Answer. -
Page 42: Turning On Manner Mode
[Settings [Call settings • The IS13SH can store up to 100 entries in each of the outgoing and On the home screen, incoming histories. If the history exceeds 100 entries, Exceeded entries are [Call/Ans Memo [Answering memo setting. -
Page 43: Playing A Message In Answering Memo
Speaker on/ The Answering memo can be heard on the Playing a Message in Answering Memo Speaker off speaker/earpiece. [ Settings [Call settings On the home screen, [Call/Ans Memo [Answering Memo List. • When multiple Answering memos are recorded, tap while playing a message to play the previous/next Answering memo. -
Page 44: Adding An Address Book Entry
Ring Set Set the sound and the vibration when an Adding an Address Book Entry incoming call and a mail message is [Address Book [e On the home screen, received. [Add new entry [Select the account. Save [Yes. (Face) Register the image of the face. •... -
Page 45: Using An Address Book
E Action icons Using an Address Book Tap to retrieve the following functions. : Call to the selected phone number. Viewing the Address Book Details Screen : Create a C-mail message using the selected phone [Address Book On the home screen, number as an address. -
Page 46: Using Phone Number
Using Phone Number Using Mail Address [Address Book [Address Book On the home screen, On the home screen, [Select a contact information. [Select a contact information. ■ When calling/sending to a phone number ■ When sending a mail message to a mail address Select the phone number. -
Page 47: Using E-Mail/C-Mail
Using E-mail/C-mail Sending E-mail Messages [Mail [Create. E-mail (XXX@ezweb.ne.jp) is a service that you can exchange e-mail On the home screen, with other cell phones and with PCs that support e-mail. In addition to text messages, you can also send data such as photos and movies by e-mail. -
Page 48: Sending C-Mail Messages
Tap the subject entry field [Enter a subject. transmission is reserved and will be sent to the other party whenever the IS13SH enters within the service area or at the specified time. Up to 50 full-width/100 half-width characters can be entered in the •... - Page 49 • If you enter the name in the destination entry field, the destination candidates are searched for automatically from the send/receive history or You can also enter a phone number as the destination directly by the address book and displayed. Select one of them to set as the tapping the destination entry field.
-
Page 50: Receiving E-Mail/C-Mail Messages
■ Receiving Mail Message by Inquiring C-mail is stored, all the C-mails stored in the C-mail center will be sent after the user ends a call with the IS13SH. If you set the cell phone not to receive mail messages automatically... - Page 51 Folder. Example: In the inbox screen 《Folder list screen》 《Inbox screen》 A Mail box name A Mail box name B Folder B Folder name C All mails C Mail messages/Templates list Appears when a folder is created. All mail messages saved in Mail messages/Templates saved in the selected folder are the inbox/outbox are displayed.
- Page 52 : Received mail message which are replied Example: In the received mail contents display screen : Received mail message which are forwarded : Mail message with attached files : Protected mail message : Mail message with Auto resend/Sending reservation set : Failed sending mail message D Indicator Appears when there are multiple folders and it indicates the...
-
Page 53: Setting Mail Filters
1.「携帯」 「 PHS」 「 PC」 メールを受信 カンタン設定 • If mail messages are sent while the outbox is full, sent mail messages will be (Simple Settings) (1. Receive Mail Messages from Cell deleted from the oldest ones which are unprotected. Phone, PHS or PC) Reject spoofing or auto-forwarded mail Setting Mail Filters messages, and receive mail messages... - Page 54 指定受信リスト設定 Issue a one time password to set the mail 詳細設定 PC設定用ワンタ (Advanced (Allowed Address List Setting) filter on your PC. イムパスワード Settings) Prioritize reception of mail messages from 発行 certain e-mail addresses, domains or parts (Issue One Time of addresses to the left of “@” that are Password for PC contained in the specified address list.
-
Page 55: Rejecting Spam C-Mail Messages
• 指定受信リスト設定 (なりすまし ・ 転送メール許可) (Allowed Address List Rejecting Spam C-mail Messages Setting (Spoofing or Forwarded Mail Messages)) is a function to prevent auto-forwarded e-mail messages from being rejected because of the setting You can register the phone numbers to reject C-mail messages. You of なりすまし規制... -
Page 56: Setting Account For Pc-Mail
Select an account type. Setting Account for PC-mail When setting by POP3 server, the PC-mail saved in the IS13SH You can use PC-mail by setting an account of au one mail etc. terminal may be deleted depending on the provider you use. -
Page 57: Sending Pc-Mail Messages
Inbox checking Set the interval to confirm to the Sending PC-mail Messages frequency server whether a new PC-mail is [PC-mail [e received. On the home screen, Send email from this Set to the priority account when [Compose. account by default. composing a PC-mail if multiple mail accounts are set. -
Page 58: Receiving Pc-Mail Messages
[Settings [Accounts & sync to • On the home screen, tap E Attached file icon synchronize Gmail saved in the server with one saved in the IS13SH. Displayed on a mail message with files attached. • For using Gmail, refer to Google homepage. -
Page 59: Sending Gmail
Sending Gmail [Gmail [e [Compose. On the home screen, Tap the destination entry field [Enter the destination. Tap the subject entry field [Enter the subject. Tap the message entry field [Enter the message. Receiving Gmail Gmail is received. When Gmail is received, appears on the status bar, and the mail ring tone sounds. -
Page 60: Viewing Sites With Browser
Viewing Sites with Browser Using Bookmarks/History [Browser. On the home screen, Displaying a Site from Bookmarks/History The browser screen is displayed. [Browser [ On the home screen, [au one to connect to the au one portal On the home screen, tap site. -
Page 61: Bookmarking A Web Page
Bookmarking a Web Page Bookmark the displayed site. [Browser [ [Add. On the home screen, [Browser [ [Long-touch a bookmark • On the home screen, tap [Delete bookmark to delete the bookmark. Likewise, on the home screen, [Browser [ [Most visited/History [Long-touch a most visited site/history [Delete from bookmarks to delete the bookmark. -
Page 62: Using The Camera
In such case, reactivate • Make sure that your fingers, hair, the straps of the IS13SH, etc. do the camera. not obscure the camera lens when shooting images. If the straps •... -
Page 63: Taking Photos
• When shooting images in a dark place, noises may increase and shot photos may become rough etc. • Note that if the self-timer shooting is set and the IS13SH is left on an unstable place, it may fall due to the vibration etc. - Page 64 A Shake reducing icon J Picture size switching key [Camera [ [Shake On the home screen, tap Set the picture size. Reducing [ON. After that, the icon is displayed. K Scene setting key B Automatic current location adding icon Set the scene setting. L Remaining number of images for shooting Appears when the current location is set to be added in a M Brightness adjusting bar...
-
Page 65: Recording Movies
E Various setting key [Camera [ [Chase Focus [ON. After • On the home screen, tap Change the various settings. that, the AF mark chases the subject even if the subject is moving. [Camera [ [Infinity Fixed. After that, F Mobile light ON/OFF •... -
Page 66: Using Gallery
• When you get an incoming call while recording, the recording is stopped Using Contents Manager and saved, and then the incoming call screen is displayed. If Auto Save is set to OFF, the recording is stopped, and then the incoming call screen is You can categorize and list, display/play, check, and manage data on displayed. -
Page 67: Using Menu In The Contents Screen
TV/SD-Video: Displays recorded data of 1Seg or recorded Delete Delete data. selected data such as data cooperated with recorders. List Players Display types of applications related to file Doc.: Displays Office and text data. format. Others: Displays other data. • If you long-touch a file format, you can D Searching icon change the application related to the file Set the search criteria. -
Page 68: Cautions For Using 1Seg
Also, you cannot watch BS and 110 degree CS digital broadcasting. • The IS13SH may be warm while watching 1Seg. Be careful of touching for a long time which may result in a low temperature burn. -
Page 69: Watching 1Seg
: Displays the channel list. Watching 1Seg : Displays the data broadcast operation panel. [One Seg [One Seg TV. On the home screen, : Switches channels or searches for a channel by long-touch. : Displays the program guide. : Moves the cursor. : Selects an item. - Page 70 ■ Operations while displaying Channel List Select the broadcast station name: Switches to the selected broadcast station. Long-touch the broadcast station [Channel overwrite registration [Yes: Assigns the broadcast station being watched to the selected remote control number. Long-touch the broadcast station [Delete channel [Yes: Deletes the broadcast station from the selected remote control number.
-
Page 71: Using Earthquake Early Warning
• For details on earthquake early warnings provided by the Japan Using Earthquake Early Warning Meteorological Agency, refer to the Japan Meteorological Agency homepage. Checking Earthquake Early Warning http://www.jma.go.jp/ • Earthquake early warnings cannot be received during a call. Also, they may Earthquake Early Warning is a service to collectively deliver not be received during communication such as while sending and receiving earthquake early warnings provided by the Japan Meteorological... -
Page 72: Deleting/Setting Earthquake Early Warning
Deleting/Setting Earthquake Early Warning Using Android Market On the home screen, 緊急地震速報アプリ You can download and install various applications such as useful tools or games from Android Market offered by Google. (Earthquake Early Warning Application). • Google account is required to use Android Market. For details on Google account, refer to the “Setting Up a Google Account”. -
Page 73: Using Gree Market
■ 3LM Security Using GREE Market • If the IS13SH is stolen or lost, you can delete data on the IS13SH. You can search for games and contents provided by au one GREE. Contact the Customer Service Center to delete the data. -
Page 74: Using 3Lm Security
Using 3LM Security Using VirusBuster Mobile for au [3LM [For Consumer. On the home screen, On the home screen, When you activate 3LM Security for the first time, the terms of service ウイルスバスター (VirusBuster). for 3LM Security are displayed, so tap I Accept [Activate after When you activate VirusBuster for the first time, the license agreement confirming the contents. -
Page 75: Checking Your Profile
• If au IC-Card is not inserted or different au IC-Card is inserted, auIC Checking Your Profile Card(UIM) error. Please insert card appears for checking your profile. Tap OK [Settings [Profile. On the home screen, to display the profile screen. However, information such as Own phone number, Own mail address or ICCID is not displayed. -
Page 76: Initializing Microsd Memory Card
Initializing microSD Memory Card When initializing a microSD memory card, all data (including applications) saved on the microSD memory card is deleted. [Settings On the home screen, [microSD & phone storage [Unmount microSD [OK. Erase microSD. Erase microSD [Enter Lock No. [OK [Erase everything. -
Page 77: Using Global Passport Cdma
[Roaming settings [PRL settings the responsibility of the customer. • If the au IC-Card inserted into the IS13SH is stolen or lost, the card [Update PRL version. may be inserted into another mobile phone (including GSM mobile The PRL is obtained. -
Page 78: Making A Call At Your Travel Destination
■ Setting the Area Making a Call at Your Travel Destination You can set the area where you use the IS13SH. ■ Making a Call to Another Country (Including Japan) [Settings On the home screen, from Your Travel Destination [Wireless & networks [Mobile networks You can make a call to Japan or another country from your travel [Roaming settings [Area settings. -
Page 79: Receiving A Call At Your Travel Destination
■ Making a Call within the Same Country While Receiving a Call at Your Travel Destination Overseas You can receive calls with the same method as when receiving calls in You can call to general fixed-line phones or mobile phones with the Japan. -
Page 80: 1Seg Troubleshooting
• Did you set the correct setting in Area settings? its service life. (zP.76) • Make sure the IS13SH is not left in the place for a • Is the IS13SH within the service area or in a location Cannot receive calls. - Page 81 Cannot operate the camera. (zP.16) • Confirm for using the camera. (zP.60) • Proximity sensor is not mounted on the IS13SH, so The screen is not turned off while you the screen is not turned off when your face gets are dialing/calling.
-
Page 82: Index
C-mail Double-tap ........20 Index C-mail.......... 45 Drag..........21 Cmail........... 46 Compose au one Market....... 70 Gmail........... 57 Numeric PC-mail messages...... 55 Earphone jack .......10 3LM ..........72 Contents Manager ......64 Earpiece...........9 Context menu ....... 32 Earthquake Early Warning Battery pack ......... 11 Create .......... - Page 83 Gmail ..........56 Moving folders ......23 Pinch..........21 Google account ......19 Moving shortcuts ......23 Playing data ........64 GPS ..........42 Moving widgets ......23 POP3 server ........54 Japan ..........76 GREE_MARKET......71 Port ..........54 Group setting........ 42 Postal..........
- Page 84 Removing widgets......23 Slideshow ........65 User name ........54 Reply..........57 Slideshow settings ...... 65 Reply all......... 57 SMTP server ......... 54 Require sign-in......54 Sort..........65 Ring Set ......... 42 Speaker ......... 10 Video Camera ....... 63 Roaming ........
- Page 85 October 2011 Edition...
Need help?
Do you have a question about the IS13SH and is the answer not in the manual?
Questions and answers