Table of Contents
Advertisement
Quick Links
SHV42
Basic Manual
Using "Online Manual" (Japanese)
You can check "Online Manual"(Japanese) that describes detailed of various
functions by operating the product as follows.
On the home screen → "App list screen"→ [サポー ト] (Support) → [取扱説
明書] (Online Manual) (Japanese).
Also, you can check "Online Manual"(Japanese) on the au homepage.
https://www.au.com/online-manual/shv42/
Descriptions in this manual are based on Android™ version 8.0.
The company names and product names appearing in this manual are
trademarks or registered trademarks of their respective holders.
For exemptions, refer to "Notes on Usage" available on the au homepage.
For inquiries, call:
Customer Service Center
For general information, charges, and operation assistance
Business hours: 9:00 to 20:00 (7 days a week)
From fixed-line phones:
on your au cellphone.
In case above numbers are not available, call toll-free:
0120-977-033
0120-977-699
For service cancelation procedure in case of loss or theft
Business hours: 24 hours (7 days a week)
From fixed-line phones:
In case above numbers are not available, call toll-free:
0120-925-314
Repair and Delivery Service Center
For loss, theft or damage
Business hours: 9:00 to 20:00 (7 days a week)
From fixed-line phones/au cell phones:
0120-925-919
June 2018, 1st Edition
Sold by: KDDI CORPORATION,
OKINAWA CELLULAR TELEPHONE COMPANY
Manufactured by: SHARP CORPORATION
From au cell phones:
area code not required
(except Okinawa)
(Okinawa)
From au cell phones:
area code not required
(toll free)
Cell phone and PHS operators collect and recycle unused
telephones, batteries and battery chargers at stores bearing
the
logo regardless of brand and manufacturer to protect
the environment and reuse valuable resources.
(toll free)
(toll free)
濡れた状 態での充電は、
異 常 な発 熱・焼 損 などの
原因となり大変危険です。
Advertisement
Table of Contents

Related Manuals for Aquos R2 SHV42


Summary of Contents for Aquos R2 SHV42
- Page 1 SHV42 Basic Manual Using “Online Manual” (Japanese) You can check “Online Manual”(Japanese) that describes detailed of various functions by operating the product as follows. On the home screen → “App list screen”→ [サポー ト] (Support) → [取扱説 明書] (Online Manual) (Japanese). Also, you can check “Online Manual”(Japanese) on the au homepage.
-
Page 2: List Of Packaged Items
Preface Thank you for buying the “AQUOS R2 SHV42” (simply called the “SHV42” or the “product” from here on). Before using the product, be sure to read the “Basic Manual” (this manual) and “Notes on Usage”/“Setting Guide” available on the au homepage to ensure correct use. -
Page 3: Illustrations And Descriptions In This Manual
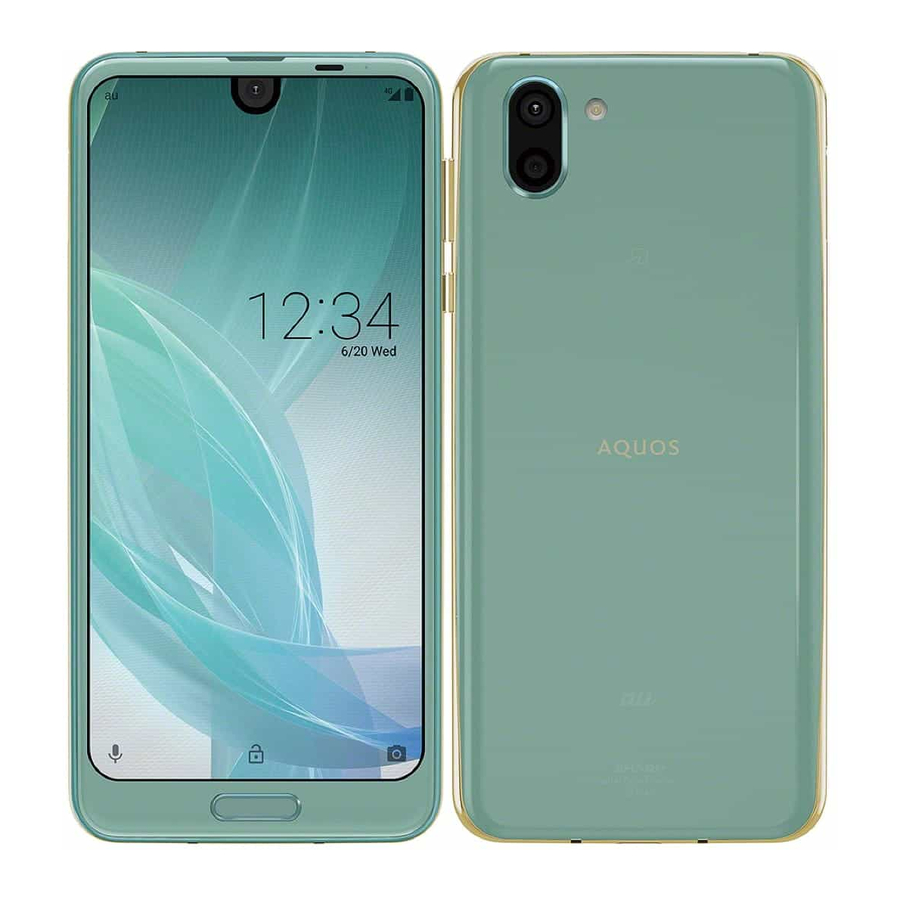
◎ Explanations of this manual are based on the case when the color of the main unit is “Aqua Marine” as an example. ◎ Descriptions in this manual are based on operation in AQUOS Home. Operations may be different if home applications have been changed (by using “Home applications”, etc.). -
Page 4: Cell Phone Etiquette
◎ The company names and product names appearing in this manual are trademarks or registered trademarks of their respective holders. Also, ™ and ® marks are sometimes omitted. Cell Phone Etiquette ■ Use of cell phones is not allowed in the following places! •... -
Page 5: Names And Functions Of Parts
Names and Functions of Parts ■ Front/Left Side/Right Side A au IC Card/microSD memory card tray B In camera lens C Earpiece (Receiver) D Proximity sensor/Light sensor Proximity sensor prevents inadvertent operations of the touch panel during a call. Light sensor detects the ambient brightness and adjusts the brightness of display. - Page 6 ■ Back/Top and Bottom ® ® J Wi-Fi /Bluetooth antennas K Standard out camera lens L Mobile light M & mark ® Hold it over a reader/writer when using Osaifu-Keitai /NFC. N Internal antenna O Video out camera lens (Dramatic wide camera) P GPS/Internal antennas ®...
- Page 7 Pulling out the IMEI plate A Turn the display side up and pull out the au IC Card/microSD memory card tray. (For details on pulling out the au IC Card/microSD memory card tray, refer to the step of “Attaching the au IC Card” (zP. 8).) B Turn the display side down and hook the convexity part of the included SIM eject tool (sample) into the hole of the IMEI plate to pull it out.
- Page 8 Attaching/Removing a Clear Case (Sample) Attaching/Removing a Clear Case (Sample) When attaching/removing a clear case (sample), make sure to hold the product with your hand so as not to scratch the display etc. Also, take care not to press f power key and u d volume up/down key by your finger or hand.
-
Page 9: Attaching/Removing The Au Ic Card
Attaching/Removing the au IC Card Attaching the au IC Card Before attaching the au IC Card, turn the product off. Also, attach it with the display side turned up. Insert the tip of SIM eject tool (sample) into the au IC Card/ microSD memory card tray eject hole. -
Page 10: Using A Microsd Memory Card
◎ When pulling out the card tray from the product, pull it slowly and horizontally with the display side turned up. • Pulling out the card tray forcefully or obliquely may cause damage. • When pulling out the card tray with the display side turned down or the product stood upright, the au IC Card or microSD memory card being attached to the card tray may be off and cause loss. -
Page 11: Removing The Microsd Memory Card
◎ Make sure that the top/bottom and front/rear of the microSD memory card are facing correctly. Attaching it forcibly may cause damage etc. ◎ Do not touch the terminal part of a microSD memory card. Removing the microSD Memory Card Before removing a microSD memory, make sure to turn the product off. -
Page 12: Turning The Power On/Off
(hold down for at least 3 seconds) while the product is turned off. ◎ The initial setting of the touch panel will be executed until “AQUOS” disappears from the screen after the power is turned on. Do not touch the screen, otherwise touch panel operations may not be performed properly. -
Page 13: Turning The Screen On/Off
3 seconds) to turn it on, and then holding down d until the lock screen is displayed after the AQUOS logo appears. ◎ It is recommended that you back up your data on the product before booting in safe mode. -
Page 14: Lock Screen
Lock Screen The lock screen is displayed if you turn the screen on. If you register your fingerprint, you can unlock the screen just by touching the fingerprint sensor. 《Lock screen》 A Wallpaper B Notifications area Notifications for missed calls/new mails/SMSs, etc. appear as a pop-up. Double-tap notification for corresponding screen. -
Page 15: How To Use The Touch Panel
• Zoomed in/out on the web page, etc. Using the AQUOS Home AQUOS Home is a home app that consists of the home screen (Desktop Sheet/Favorite Tray) and App list screen. On the Desktop Sheet of the home screen, you can register shortcuts for applications/functions and widgets, while on the Favorite Tray of the home screen, you can register shortcuts for applications/functions. - Page 16 C App D Page Indicator When switching pages on the Desktop Sheet, indicates the present display position. E Favorite Tray You can register a shortcut for the favorite applications and functions to start quickly. F Navigation Bar G Search Use quick search box. H Folder Tap a folder →...
- Page 17 Using the Notification/Status Panel In the notification/status panel, you can check the details on notification icons and status icons or activate an application corresponding to the icon. You can also set the manner mode, Airplane mode, etc. ■ Displaying the notification panel Slide the status bar down.
-
Page 18: Setting The Manner Mode
◎ When the display is on, the charging/incoming indicator which notifies you of new notification such as a missed call does not flash. Check notification icons on the notification/status panel. ◎ While connecting a specified charger (sold separately) to the product even after charging is complete (battery level is 100%), it keeps illuminating in green. -
Page 19: Character Entry
◎ The explanation screen for permissions may be displayed depending on the applications/functions. Also, multiple confirmation screens may be displayed or the displayed contents may differ. Check the displayed contents carefully and follow the on-screen instructions. ◎ In this manual, some description of the confirmation screens may be omitted. -
Page 20: Receiving Calls
Making Calls Using History On the home screen → [ ] → [ The history list screen is displayed. Using Contact Lists On the home screen → [ ] → [ You can make a call by selecting a contact and tapping the phone number field. -
Page 21: Troubleshooting
• If the software update fails, it may become impossible to operate the product. If this happens, bring it to an au shop or PiPit (not accepted by some shops). • Charge the battery sufficiently before starting update. If the battery level is insufficient or the battery runs out during the update, the software update will fail. -
Page 22: Peripheral Devices
3. In the following cases, you are charged a repair fee even during the warranty period. (Or repairs may not be possible.) A When you have not properly operated following instruction manuals. B When malfunctions or damages have caused by unwarranted repairs or modifications. -
Page 23: Main Specifications
Main Specifications ■ Main unit (SHV42) Display Approx. 6.0 inches, approx. 16.77 million colors, IGZO, 3,040×1,440 (WQHD+) Approx. 181 g (including the internal battery) Weight Size (W×H×D) Approx. 74 mm×156 mm×9.0 mm (thickest point: Approx. 10.0 mm) Memory (built-in) RAM: Approx. 4 GB Internal Storage: Approx. -
Page 24: Specific Absorption Rate (Sar) Of Cell Phones
◎ The continuous talk time and continuous standby time may drop to less than half depending on the battery charging status, usage environment such as temperature, reception condition at the location where the product is used, and the function settings. ■... -
Page 25: Regulatory Information
Regulatory information In some countries/regions including Europe , there are restrictions on the use of 5GHz WLAN that may limit the use to indoors only. Please check the local laws and regulations beforehand. *1 The following EU and EFTA member countries: Belgium (BE), Bulgaria (BG), Czech Republic (CZ), Denmark (DK), Germany (DE), Estonia (EE), Ireland (IE), Greece (EL), Spain (ES), France (FR), Croatia (HR), Italy (IT), Cyprus (CY), Latvia (LV), Lithuania (LT), Luxembourg (LU), Hungary (HU),... -
Page 26: European Rf Exposure Information
• Maximum transmit power GSM 900 +33 dBm (Power Class4) DCS 1800 +30 dBm (Power Class1) WCDMA FDD Ⅰ +24 dBm (Power Class3) WCDMA FDD Ⅷ +24 dBm (Power Class3) LTE Band 1 +23 dBm (Power Class3) LTE Band 3 +23 dBm (Power Class3) LTE Band 8 +23 dBm (Power Class3) -
Page 27: Fcc Notice
FCC Notice ־This device complies with part 15 of the FCC Rules. Operation is subject to the following two conditions: (1) This device may not cause harmful interference, and (2) this device must accept any interference received, including interference that may cause undesired operation.
Need help?
Do you have a question about the R2 SHV42 and is the answer not in the manual?
Questions and answers