Table of Contents
Advertisement
If you smell gas:
1. Shut off gas to the appliance.
2. Extinguish any open flame.
3. If odor continues, keep away from the
appliance and immediately call your fire
department.
Failure to follow these instructions could
result in fire or explosion which could cause
property damage, personal injury or death.
1. Never operate this appliance unattended.
2. Never operate this appliance within 10 ft
(3 m) of any structure, combustible
material or other gas cylinder..
3. Never operate this appliance within 25
feet (7.5m) of any flammable liquid.
4. Do not fill cooking vessel beyond
maximum fill line.
5. Never allow oil or grease to get hotter than
400ºF or 200ºC. If the temperature exceeds
400ºF (200ºC) or if oil begins to smoke,
immediately turn the burner or gas supply
OFF.
6. Heated liquids remain at scalding
temperatures long after the cooking
process. Never touch cooking appliance
until liquids have cooled to 115ºF (45ºC) or
less.
7. If a fire should occur, keep away from the
appliance and immediately call your fire
department. Do not attempt to extinguish
an oil or grease fire with water.
Failure to follow these instructions could
result in fire, explosion or burn hazard,
which could cause property damage,
personal injury or death.
OUTDOOR USE ONLY / NEVER LEAVE UNATTENDED
DANGER
DANGER
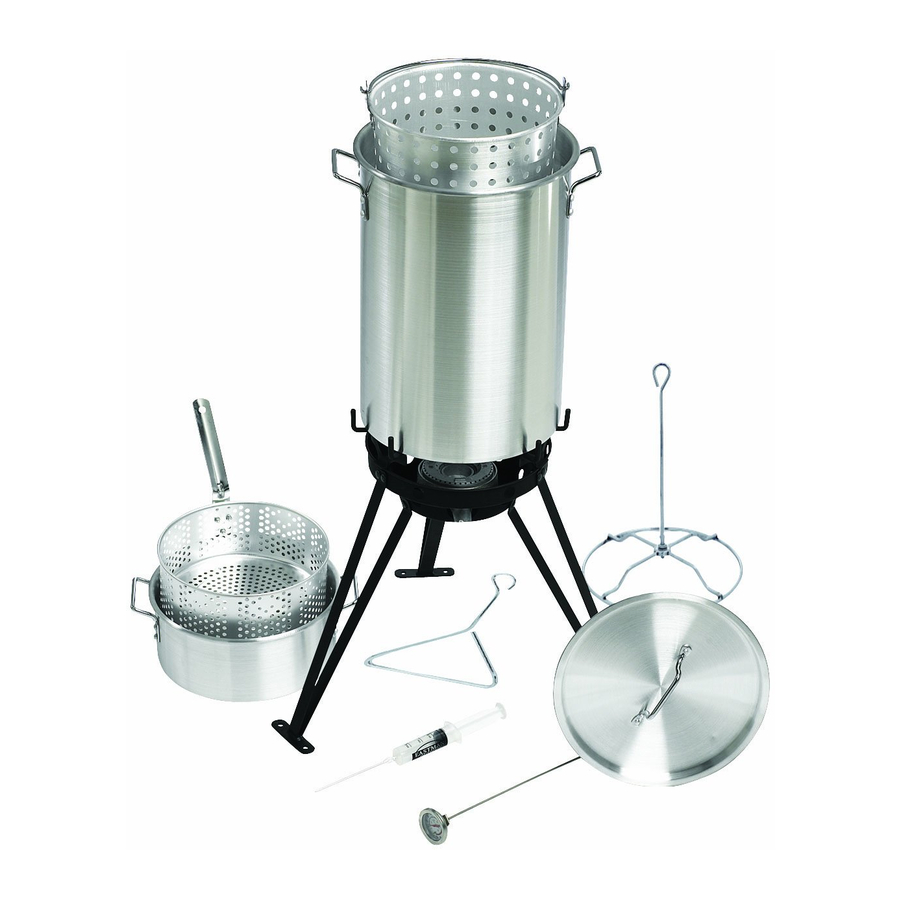
Revolution Burner™ and
Outdoor Cooking Set
Instruction and Safety Manual
WARNING AND SAFETY INFORMATION;
ASSEMBLY AND OPERATING
INSTRUCTIONS; MAINTENANCE &
COOKING INSTRUCTIONS FOR:
10 Piece Stainless Steel Outdoor
TM
Gourmet
Cooking Set Model 37068
7 Piece Stainless Steel Outdoor
TM
Gourmet
Cooking Set Model 37069
10 Piece Aluminum Outdoor Gourmet
Cooking Set Model 37059
7 Piece Aluminum Outdoor Gourmet
Cooking Set Model 38024
For a Safe Cooking Experience,
Follow All Instructions and Safety
Warnings in this Instruction
Manual
This Instruction Manual contains
important information necessary for the
prorper assembly and safe use of the
appliance.
Read and Follow all Warnings and
Instructions before assembling and
using the appliance.
Follow all warnings and instructions
when using the appliance.
KEEP THIS MANUAL FOR FUTURE
REFERENCE. The installer must leave the
instructions with the consumer.
Approximate assembly time is 14 minutes.
TM
TM
Page 1 of 19
Advertisement
Table of Contents

Summary of Contents for Eastman Outdoors Revolution 37059
- Page 1 Revolution Burner™ and Outdoor Cooking Set Instruction and Safety Manual WARNING AND SAFETY INFORMATION; ASSEMBLY AND OPERATING DANGER INSTRUCTIONS; MAINTENANCE & If you smell gas: COOKING INSTRUCTIONS FOR: 1. Shut off gas to the appliance. 2. Extinguish any open flame. 10 Piece Stainless Steel Outdoor 3.
-
Page 2: Warnings
QCC1, timer shutoff, and all LP gas connections for leaks. Do NOT use the appliance if there is a leak. Contact Eastman Outdoors at 1-800-241- 4833 on how to obtain and replace the parts. -
Page 3: Table Of Contents
Do not tamper with or attempt repairs on the burner body, frame, valves, regulator hose assembly, or LP • tank. Repair should be done by a qualified service person. Please contact Eastman Outdoors at 1-800-241- 4833 for assistance. Do NOT loosen or disconnect any gas fitting while the appliance is in use. -
Page 4: Burner Parts Diagram
Step 1 ASSEMBLY Burner Parts Diagram QTY PARTS LIST 1. Burner Body 2. Legs 3. Burner Element 4. Burner Grate 5. Burner Orifice/Regulator Hose Assembly 6. Burner Housing Bolt 7. Air Shutter 8. Shutter Spring 9. Short Square Bolts 12 10.Flat Washer 12 11. -
Page 5: Regulator Hose Assembly
The high pressure regulator hose assembly supplied must be used. • Replacement high pressure regulators assemblies must be those specified by Eastman Outdoors. One adjustable wrench is needed when attaching the hose to the appliance. Place the shutter spring (#8) onto burner... -
Page 6: Fuel Safety
Fig. 12 Fig. 13 Use supplied wrench to make sure all nuts and bolts are tight before proceeding to the next section. Step 1.3 Fuel Safety Only use LP gas with this appliance. Only use an approved 20 lb. LP gas tank with this appliance (same as those commonly used on gas grill with Acme/Type 1/QCC1 Safety Valves). -
Page 7: Leak Testing
Make sure the regulator control valve is in the off position by turning the valve counter clockwise until it is tight (figures 16). This will not allow gas to flow through the hose. Fig. 16 Make sure the valve on LP tank is clean. Attach regulator (in up position) and hose to LP tank by sliding the black portion of the QCC1 fitting overtop LP tank valve threads (figure 17). -
Page 8: Maintenance Before Every Use
Turn regulator control valve ¼ turn clockwise to open valve. If you hear gas rushing, smell gas or see growing bubbles on the timer shutoff, immediately turn LP tank off and contact Eastman Outdoors Customer Service Department at 1-800-241-4833. DO NOT USE THE BURNER. -
Page 9: Lighting
Before each use, inspect the cooking vessel for dents, cracks, or pinholes. Fill the cooking vessel with water and dry off the outside of the cooking vessel. If water appears on the outside of cooking vessel, there is a leak. Do NOT use the cooking vessel if there is a leak. Contact Eastman Outdoors at 1-800-241-4833 on how to obtain replacement parts. -
Page 10: Shut Off
1 minute mark. Fig. 26 Place a lit match (Eastman Outdoors strongly recommends using a long-stem match or lighter) under the burner up through the hole in the center of the burner element (figure 27). -
Page 11: How To Determine Fill Level
Step 3.1 How to Determine Fill Level INSTRUCTIONS FOR DETERMINING MAXIMUM FILL LEVEL OF THE COOKING VESSEL: Place the food product on the holder or in the basket. Place the food product and holder/basket into the empty vessel. Fill the vessel with water just until the food product is completely submerged. There must be a minimum of 3 inches (8cm) between the water level and top of the vessel. -
Page 12: Heat Cooking Liquid
Step 3.4 Heat Cooking Liquid Do not use the lid while heating the oil or while deep-frying • Heat the cooking liquid to the desired temperature by following the Cooking Instructions Section. IMPORTANT NOTE: The timer shutoff may have to be reset in order to reach the desired cooking temperature. -
Page 13: Clean Up
IMPORTANT NOTE: The timer shutoff may have to be reset in order to maintain cooking temperature. Always reset the timer shutoff before the timer reaches the one minute mark. If the time expires on the timer shutoff and flame is extinguished, turn the regulator control valve to the off position and relight the burner by following the lighting instructions in this manual. -
Page 14: Fish/Hot Pot Assembly Instructions
heavy-duty pipe cleaner, or screwdriver. Use compressed air or flush water through small casting holes to clean out debris from air holes. Once cleared, reassemble air shutter, spring, and hose assembly. Burner does not ignite in 3 to 5 seconds or burner ignites and has a low flame intensity? Turn regulator control valve off and turn LP tank valve off. -
Page 15: Cooking Deep-Fried Turkey
Step 9 Cooking Instructions for Deep-Fried Turkey Step 9.1 Turkey Preparation Eastman Outdoors 30-quart turkey pots and burner can be used to cook poultry weighing up to 18 pounds. Turkey or chicken must be completely thawed inside and out. Remove neck, giblets, and pop- up timer, if present. - Page 16 Thermometer to prevent overheating and to ensure proper cooking temperatures. Heat oil to 325ºF to 350ºF (163ºC to 177ºC). Do not use a lid when heating oil or deep-frying. Do not fry without a thermometer or with a faulty thermometer. Never permit oil/grease to exceed 350ºF (177ºC).
-
Page 17: Frying Fish Of Chicken Wings
Carefully remove turkey from stand. Carve, serve and enjoy! Step 10 Cooking Instructions for Deep Frying Fish or Chicken Wings Eastman Outdoors Fish-Fry/Hot pot and Eastman Outdoors Burner can fry up to 2 pounds of fish or chicken wings at one time. -
Page 18: Warranty Information
MERCHANTABILITY AND FITNESS FOR A PARTICULAR PURPOSE, SHALL APPLY TO THE PRODUCT. Eastman Outdoors shall not in any event be liable for any incidental or consequential damages, either in the breach of this warranty or any other reason, resulting from the use of this product. - Page 19 Eastman Outdoors will not be held liable for any losses due to negligent operation on the part of the user. Eastman Outdoors will not be obligated to repair or replace equipment that has been altered or used other than in accordance with the manufacturer’s operating instructions.
Need help?
Do you have a question about the Revolution 37059 and is the answer not in the manual?
Questions and answers