Table of Contents
Advertisement
Quick Links
Advertisement
Table of Contents

Related Manuals for marklin Portalkran 76500


Summary of Contents for marklin Portalkran 76500
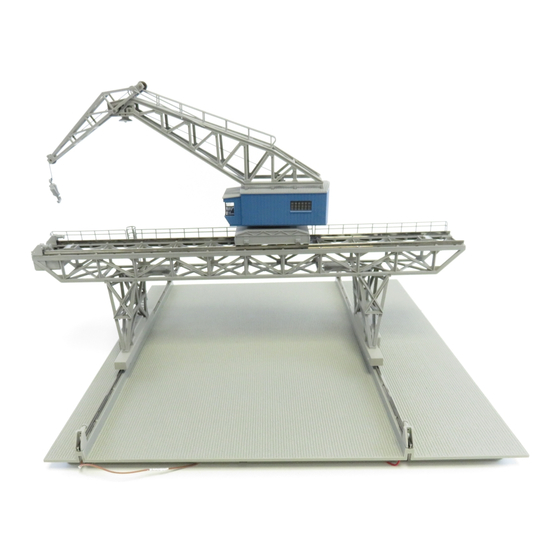
- Page 1 Portalkran 76500...
-
Page 2: Table Of Contents
Inhaltsverzeichnis Table of Contents Soommaire Inhoudsopgave Seite Page Page Blz. Funktion Function Fonction Functie Portalkran aufbauen Assembling the gantry crane Montage de la grue à portique Portaalkraan opbouwen Betriebshinweise Notes for operation Instructions de service Gebruiksaanwijzingen Inbetriebnahme Commissioning Mise en service Inbedrijfstelling Wartung Maintenance... -
Page 3: Funktion
Funktion Function H0-Modell eines Portalkrans H0 model of a gantry crane mit folgenden Funktionen: with the following functions: Motorisch betriebene Kranbrücke, die Durch die Synchronisation zwischen A motorised crane bridge that can move The synchronisation between receiver and sich auf der Grundplatte in einer Richtung Empfänger und Bedienpult können auch backwards and forwards linearly along control panel means that several gantry... -
Page 4: Fonction
Fonction Functie Modèle H0 d’une grue à portique H0-model van een portaalkraan avec les fonctions suivantes: met de volgende functies: Pont roulant à commande motorisée, Par synchronisation du récepteur et du Motorisch bestuurde kraanbrug, die op Door de synchronisatie tussen ontvanger se déplaçant sur la plaque de montage pupitre de commande, il est possible de de grondplaat in één richting voorwaarts... - Page 5 Funktion Function Fonction Functie Anschlussbelegung Empfänger Receiver connection allocation Affectation des broches Aansluitschema ontvanger du récepteur D1: Versorgungs-LED D1: Supply LED D1: DEL de l’alimentation D1: Voedings-LED D2: Betriebs-LED D2: Operating LED D2: DEL de fonctionnement D2: Bedrijfs-LED A1: Anschluss Versorgungsspannung A1: Supply voltage connection A1: Raccordement de la tension d’alimen- A1: Aansluiting voedingsspanning...
- Page 6 Funktion Function f1,f2,f3,f4 Tastaturbelegung Bedienpult Control panel button allocation Anzeige LED 1 Display LED 1 Anzeige LED 2 Display LED 2 Einschalter On-off switch Mode-Schalter Mode switch ohne Verwendung beim Portalkran Not used for gantry crane 8-Wege Richtungsknopf 8-way direction knob function K1-1: Haken senken...
- Page 7 Fonction Functie f1,f2,f3,f4 Affectation des touches Toetstoewijzing du pupitre de commande bedieningspaneel Affichage DEL 1 Signalering LED 1 Affichage DEL 2 Signalering LED 2 Commutateur marche / arrêt Inschakelaar Commutateur de mode Mode-schakelaar Pas utilisé avec la grue à portique buiten bedrijf bij portaalkraan Bouton 8 directions 8-weg-richtingsknop...
-
Page 8: Portalkran Aufbauen
Portalkran aufbauen Assembling Montage de la grue Portaalkraan the gantry crane à portique opbouwen 1. Grundplatte einsetzen 1. Installing the base plate 1. Installez la plaque de montage 1. Grondplaat aanbrengen 343 mm 360 mm 4 mm 10 mm... - Page 9 Portalkran aufbauen Assembling the gantry crane 2. Grundplatte anschließen 2. Connecting the base plate Hinweis: Versorgungstrafo gehört nicht zum Note: supply transformer not included in Lieferumfang. Folgende Transformatoren delivery scope. The following transformers sind von der Fa. Märklin als Versorgungs- have been checked and approved by trafo geprüft und damit freigegeben: Märklin for use as supply transformers:...
- Page 10 Montage de la grue Portaalkraan à portique opbouwen 2. Raccordez la plaque de montage 2. Grondplaat aansluiten Remarque: le transformateur d’alimentation N.B.: Een voedingstrafo wordt niet bijgele- ne fait pas partie de la fourniture. Les verd. De volgende transformators zijn door transformateurs suivants ont été...
- Page 11 Portalkran aufbauen Assembling Montage de la grue Portaalkraan the gantry crane à portique opbouwen 3. Zusätzliche Betriebsanzeige 3. Connecting an additional 3. Raccord du témoin de fonction- 3. Extra bedrijfsindicatie aansluiten anschließen (optional). operating indicator (optional). nement additionnel (en option). (optioneel).
- Page 12 Portalkran aufbauen Assembling Montage de la grue Portaalkraan the gantry crane à portique opbouwen 4. Kranbrücke aufsetzen 4. Erecting the crane bridge 4. Mettre le pont roulant en place 4. Kraanbrug plaatsen Endanschläge (Puffer mit Halter) entfernen. Remove the end stops (buffers with Retirer les butées de fin de course Eindaanslagen (buffers met drager) bracket).
- Page 13 Portalkran aufbauen Assembling Montage de la grue Portaalkraan the gantry crane à portique opbouwen 5. Kranhaus aufsetzen 5. Positioning the crane cab 5. Installer la cabine de grue 5. Kraanhuis opzetten Endanschläge (Puffer mit Halter) entfernen. Remove the end stops (buffers with Retirer les butées de fin de course Eindaanslagen (buffers met drager) bracket).
- Page 14 Portalkran aufbauen Assembling Montage de la grue Portaalkraan the gantry crane à portique opbouwen 6. Auf Wunsch können Sie den 6. If desired, you may connect 6. Si vous le désirez, vous pouvez 6. Desgewenst kunt u de Hebemagnet anschließen the lifting magnet.
- Page 15 Portalkran aufbauen Assembling Montage de la grue Portaalkraan the gantry crane à portique opbouwen 7. Kranausleger verstellen 7. Adjusting the crane jib 7. Réglage de la flèche de la grue 7. Kraangiek verstellen...
- Page 16 Portalkran aufbauen Assembling Montage de la grue Portaalkraan the gantry crane à portique opbouwen 8. Bedienpult: 8. Control panel: 8. Pupitre de commande: 8. Bedieningspaneel: Batterien einsetzen inserting the batteries insérez les piles Batterijen plaatsen Suitable battery type: Mignon (AA). Type de piles appropriées: mignon (AA).
-
Page 17: Betriebshinweise
Betriebshinweise Notes for operation Eine Veränderung des Adressschalters S1 Achtung! Achten Sie darauf, dass die In practice it is virtually never necessary Attention! Ensure that the cargoes (S. 6) am Empfänger ist in der Praxis verwendeten Ladegüter keine Gefahr to make changes to the address switch used present no danger to children praktisch nie notwendig. -
Page 18: Instructions De Service
Instructions de service Gebruiksaanwijzingen Dans la pratique, il n’est pas nécessaire l’électro-aimant sont, par exemple, des Wijzigen van de adresschakelaar S1 Attentie: Let erop, dat de gebruikte de modifier le commutateur d’adresse S1 petites billes de fer ou encore des petits (pag. -
Page 19: Inbetriebnahme
Inbetriebnahme Commissioning Mise en service Inbedrijfstelling Sender und Empfänger Synchronising the transmitter and Synchronisation de l’émetteur Zender en ontvanger synchro- synchronisieren receiver et du récepteur niseren Bei der ersten Inbetriebnahme (!) oder wenn The two units must be tuned to each other Lors de la première mise en service (!) ou Bij de eerste inbedrijfstelling (!), of wanneer das Bedienpult neu auf den Empfänger ab-... - Page 20 Inbetriebnahme 1. Netzstecker des Versorgungstransfor- M1 nach oben drücken: Hinweis: Bei verdeckt eingebautem (Betriebs-LED D2 am Empfänger blinkt). mators in die Netzsteckdose stecken. Die Kranbrücke bewegt sich vorwärts. Empfänger ist die Betriebsanzeige nicht In diesem Fall ist es empfehlenswert Anschließend muss die rote Versorgungs- erkennbar.
- Page 21 Commissioning 1. Plug the power supply plug of the supply Push M1 upwards: Note: If the receiver is installed in a ting LED D2 on receiver flashes on and transformer into the power supply socket. the crane bridge moves forwards. concealed location, then the operating off).
- Page 22 Mise en service 1. Branchez la fiche secteur du transforma- Poussez K2 vers la droite: Lorsque l’émetteur n’est pas actionné fonctionnement s’allume en perma- teur d’alimentation dans la prise de la cabine pivote dans le sens des pendant un certain temps, l’appareil nence en vert sur le récepteur) ou bien courant.
- Page 23 Inbedrijfstelling 1. Netstekker van de voedingstransformator M1 omhoog duwen: Blijft bediening van de zender enige manent groen), danwel of de verbin- in de netcontactdoos steken. Daarna moet De kraanbrug beweegt naar voren. achterwege, schakelt het toestel zelf- ding door het zelfstandig uitschakelen de rode voedings-LED (D1, pagina 6) standig uit.
- Page 24 Inbetriebnahme Commissioning Mise en service Inbedrijfstelling Weitere Möglichkeiten Further possibilities for operation Autres commandes du pupitre Overige mogelijkheden des Bedienpults of the control panel de commande van het bedieningspaneel Das Bedienpult besitzt eine ganze Reihe The control panel has a whole series of Le pupitre de commande dispose d’un large Het bedieningspaneel heeft een hele reeks von zusätzlichen Bedienmöglichkeiten,...
- Page 25 Inbetriebnahme Commissioning Mise en service Inbedrijfstelling Verhalten des Empfängers Behaviour of the receiver in the Comportement du récepteur en Reactie van de ontvanger bei Kurzschluss case of a short-circuit cas de court-circuit bij kortsluiting Tritt ein Kurzschluss am Portalkran auf, so If a short-circuit occurs at the gantry crane, En cas de court-circuit au niveau de la grue Treedt op de portaalkraan een kortsluiting...
- Page 26 Inbetriebnahme Commissioning Mise en service Inbedrijfstelling Anschluss des Portalkrans direkt Connecting the gantry crane Raccordement de la grue à portique Aansluiting van de portaalkraan an die Control-Unit 6021 directly to Control-Unit 6021 directement à la Control-Unit 6021 rechtstreeks op de Control-Unit 6021 Für die überwiegende Anzahl an Modellbah- For the overwhelming majority of model rail- Pour la grande majorité...
- Page 27 Inbetriebnahme Commissioning Mise en service Inbedrijfstelling Adresse einstellen Setting the address Régler l’adresse Adres instellen Im Kranhaus und in der Kranbrücke befindet The crane cab and crane bridge each con- Un décodeur numérique se trouve respective- Zowel in het kraanhuis als in de kraanbrug is sich jeweils ein Digitaldecoder.
- Page 28 Inbetriebnahme Commissioning Mise en service Inbedrijfstelling Empfänger: Schalter S1 (S. 6) Decoder im Kranhaus Decoder in der Kranbrücke Receiver: Switch S1 (p. 6) Decoder in crane cab Decoder in crane bridge Récepteur: commutateur S1 (p. 6) Décodeur dans la cabine de la grue Décodeur dans le pont roulant Ontvanger: schakelaar S1 (pag.
- Page 29 Inbetriebnahme Commissioning Mise en service Inbedrijfstelling Bedienung über die Operation using Commande au moyen de la Bediening via de Control-Unit 6021 Control-Unit 6021 oder ein Control-Unit 6021 or a Control-Unit 6021 ou de l’appareil of een Control 80 f besturings- Fahrgerät Control 80 f Control 80 f controller Control 80 f...
-
Page 30: Wartung
Wartung Maintenance Maintenance Onderhoud Haftreifen wechseln Achsen und Antrieb am Kranhaus ölen Nur sparsam ölen! Replacing the traction tyres Oil axles and drive unit on the crane cab Oil only sparingly! Remplacer les bandages Huiler les axes et l’entraînement de la cabine de la grue Antislipbanden vervangen N’appliquez qu’un peu d’huile! Assen en aandrijving op het kraanhuis oliën... - Page 31 Radio Frequency Emission Notice This equipment has been tested and found Reorient or relocate the receiving antenna. Caution: to comply with the limits for a Class B digital Changes or modifications of this product not device, pursuant to Part 15 of the FCC Rules. Increase the separation between the expressly approved by Märklin, Inc.
Need help?
Do you have a question about the Portalkran 76500 and is the answer not in the manual?
Questions and answers