
Related Manuals for Belling FS50GTCL


Summary of Contents for Belling FS50GTCL
- Page 1 BEL FS50GTCL Whi/444443998 BEL FS50GTCL Blk/444443999 BEL FS50GTCL Sta/444444000 OPERATING AND INSTALLATION INSTRUCTIONS OF FREESTANDING GAS TWIN CAVITY...
- Page 2 Dear Customer, Thank you for purchasing this Cooking Appliance. The safety precautions and recommendations in these instructions are for your own safety and the safety of others. These instructions will also allow you to make full use of all the features offered by your appliance.
- Page 3 CONTENTS: COOKER LAYOUT WARNINGS INSTALLATING YOUR COOKER USING THE PRODUCT CLEANING AND MAINTENANCE SERVICE AND TRANSPORT...
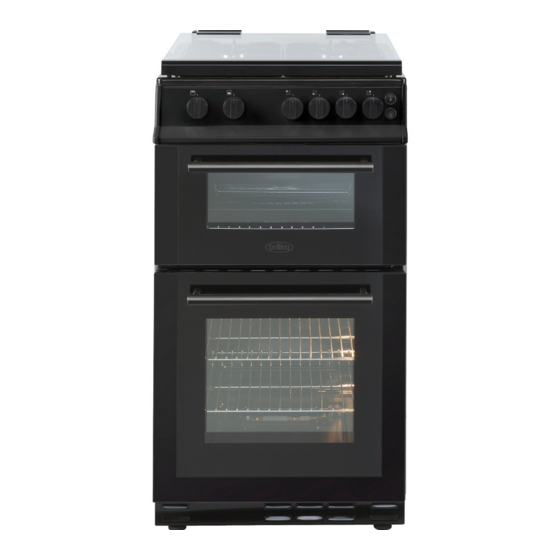
- Page 4 PART 1: COOKER LAYOUT LAYOUT: 2. Rack 1. Rack 5. Rack 4. Rack 3. Raf 3. Rack 2. Rack 1. Rack List of Components: 1- Cooktop 8- Oven Lamp 2- Control Panel 9- Semi-Rapid Burner 3- Oven Door Handle 10- Rapid Burner 4- Supply Leg 11- Auxillary Burner 5- Oven Door...
- Page 5 PART 2: WARNINGS PLEASE READ THE ENTIRE INSTRUCTION MANUAL CAREFULLY BEFORE USING YOUR APPLIANCE. MAKE SURE TO KEEP THE MANUAL SOMEWHERE SAFE IN CASE YOU NEED IT FOR FUTURE REFERENCE. THIS INSTRUCTION MANUAL HAS BEEN WRITTEN WITH OUR OTHER COOKER MODELS IN MIND, AS WELL AS YOUR MODEL, THEREFORE SOME OF THE FEATURES THAT YOU SEE EXPLAINED IN THIS MANUAL WILL NOT BE APPLICABLE TO YOUR COOKER.
- Page 6 - WARNING: Danger of fire: do not store items on the cooking surfaces. - WARNING: If the surface is cracked, switch off the appliance to avoid the possibility of electric shock. - For hobs incorporating a lid, any spillage should be removed from the lid before opening.
- Page 7 - Do not use steam cleaners for cleaning the appliance. - WARNING: Ensure that the appliance is switched off before replacing the lamp to avoid the possibility of electric shock. - CAUTION: Accessible parts may be hot when the cooking or grilling is in use. Young children should be kept away.
- Page 8 - Ensure that the supply cord is not wedged during the installation. If the supply cord is damaged, it must be replaced by the manufacturer, its service agent or similarly qualified persons in order to prevent a hazard. - While the oven door is open, do not let children climb on the door or sit on it. Installation Warnings - Do not operate the appliance before it is fully installed.
- Page 9 - CAUTION: The use of a gas cooking appliance results in the production of heat, moisture and products of combustion in the room in which it is installed. Ensure that the kitchen is well ventilated especially when the appliance is in use, keep natural ventilation holes open or install a mechanical ventilation device (mechanical extractor hood).
- Page 10 PART 3: INSTALLING YOUR COOKER Manufactured with the best quality parts and materials, this modern, functional and practical cooker aims to meet all your cooking needs. Read the manual carefully to familiarise yourself with the functions of the appliance so that you know how to use it successfully and safely.
- Page 11 This electric fan must have the capacity to change the air of the kitchen environment 4-5 times of its own volume of air per hour. Cooker hood flue Electrical ventilator Air inlet section Air inlet section min. 100cm min. 100cm Min.
- Page 12 - When choosing a place for your cooker, do not place it near a refrigerator and make sure there are no flammable or combustible materials in the surrounding area that could catch fire with a cooker nearby, such as curtains, oil, cloth etc. - Make sure there is at least a 2cm gap between the back cover of the cooker and the wall to help the air circulate.
- Page 13 - Before you assemble the connection, you must make sure the hose is not damaged with soapy water or leakage fluids. - Do not use a naked flame to check for gas leakages. - All metal items that are used during gas connection must be free from rust. Also check the expiry date of any components used for connections.
- Page 14 3.5 Electrical connection and safety measures When it comes to connecting your appliance, please follow the instructions below carefully: - The earthing cable (the green and yellow wire) must be connected to the earth terminal. Make sure the insulated cable is connected to a power source during the connection of the cable.
- Page 15 3.6 CONVERTING THE GAS Caution : The following procedures must be undertaken by authorized service personnel. You appliance can be adjusted to operate with LPG or Natural Gas. The burners can be altered to work with different types of gas by switching their injectors and adjusting the minimum flame length suitable to the gas in use.
- Page 16 Adjusting the minimum flame position: First of all, make sure that the appliance is unplugged from the electric current and the gas feed is open. The minimum flame position is adjusted with a flat screw located on the valve. For valves with a flame failure safety device, the screw is located on the side of the valve spindle and for valves without a flame failure safety device, the screw is located inside the valve spindle.
- Page 17 Changing the gas inlet: For some countries, the gas inlet type can be different for NG/LPG gases. In such a case, remove the current connection components and nuts (if any) and connect the new gas supply accordingly. In all conditions, all components used in gas connections should be approved by local and/or international authorities.
- Page 18 PART 4: USING THE PRODUCT 4.1 Using the gas burners Ignition of the burners To determine which knob controls which burner, check the position symbol above the knob. Manual ignition of the gas burners If your appliance does not come with an automatic ignition or in the event there is a power cut and the automatic ignition is not working, follow the steps below to ignite the burner: For hob burners: To ignite one of the burners, press and turn one of the knobs counter- clockwise so that the knob is in the maximum position.
- Page 19 Flame safety device: Hob Burners Hob burners that come with a flame failure safety device will give your kitchen extra security should a gas flame on the hob extinguish during use. If a flame does extinguish, the device will cut off the gas supply immediately to prevent unburned gas from leaking into the room.
- Page 20 When the burners are not in use for prolonged periods, always turn the main gas control valve off. WARNING: • Use only flat pans with a sufficiently thick base. • Ensure that the base of the pan is dry before placing it on the burners. •...
- Page 21 • The material and finish of a tray will affect how well the base of a dish browns. Enamel, dark, heavy or non-stick cookware increase base browning whereas shiny aluminium or polished steel trays will reflect the heat away and reduce base browning. •...
- Page 22 • Food should be thoroughly dried before grilling to minimize splashing. Brush lean meats and fish lightly with a little oil or melted butter to keep them moist during cooking. • Ensure that food is placed centrally on the shelf and there is sufficient room around the baking tray/dish to allow for the heat to circulate evenly around the whole dish.
- Page 23 Oven Accessories * This instruction manual has been written with our other cookers in mind, as well as your model, therefore some of the accessories of your cooker may be different to the accessories listed below. Wire grid The wire grid is used to grill or to place different containers and cookware in the oven.
- Page 24 PART 5: CLEANING AND MAINTENANCE CLEANING Before cleaning your cooker, make sure that all the control knobs are set to “0” and your oven is cool to the touch. Unplug the appliance. Before you clean, check whether the cleaning equipment and detergents you use are appropriate for the cooker, and what is recommended by the manufacturer.
- Page 25 - Do not wash them when they're still hot from cooking. - Do not use harsh/abrasive powders or cleaning materials. - Do not leave vinegar, coffee, milk, salt, water, lemon or tomato juice on the enamel for a long time. Cleaning stainless steel parts - Clean any stainless steel parts on a regular basis.
- Page 26 PART 6: SERVICE AND TRANSPORT 6.1 TROUBLESHOOTING BEFORE CONTACTING A REPAIR SERVICE If the oven is not working: 1.Make sure the cooker is plugged in and switched on. 2.Check other appliances to make sure there hasn't been a power cut. 3.If your model has a timer, make sure the timer is set properly because it may not be regulating the time.
- Page 27 INJECTOR TABLE...
- Page 28 Brand BEL FS50GTCL Whi BEL FS50GTCL Blk Model BEL FS50GTCL Sta Type of Oven Mass 42,7(+/-2) Energy Efficiency Index - conventional Energy Efficiency Index - fan forced Energy Class MJ/cycle - Energy consumption (gas) - conventional kWh/cycle MJ/cycle - Energy consumption (gas) - fan forced...
- Page 29 Brand BEL FS50GTCL Whi BEL FS50GTCL Blk Model BEL FS50GTCL Sta Type of Hob Number of Cooking Zones Heating Technology-1 Size-1 Auxiliary Energy Efficiency-1 Heating Technology-2 Size-2 Semi-Rapid Energy Efficiency-2 59,0 Heating Technology-3 Size-3 Semi-Rapid Energy Efficiency-3 59,0 Heating Technology-4...
- Page 30 The symbol on the product or on its packaging indicates that this product may not be treated as household waste. Instead it shall be handed over to the applicable collection point for the recycling of electrical and electronic equipment. By ensuring this product is disposed of correctly, you will help prevent potential negative consequences for the environment and human health, which could otherwise be caused by inappropriate waste handling of this product.
Need help?
Do you have a question about the FS50GTCL and is the answer not in the manual?
Questions and answers
Oven lights up but does not.get hotter
If the Belling FS50GTCL oven is lighting up but not getting hotter, it may be due to one of the following reasons:
1. The oven door is being opened too often, which lowers the internal temperature and affects cooking performance.
2. The door may not be closing properly, causing heat to escape. Check the latch, screws, and for any obstruction.
3. The gas flame may be unstable or going out. If the flame cuts out after ignition, hold the oven knob down longer until the flame is stable. If it goes out again, wait 90 seconds before retrying.
4. If the flame is yellow-tipped or unstable, the burner caps and crowns may not be assembled correctly or may need cleaning.
Check these areas to identify and fix the issue.
This answer is automatically generated